Best Selling Products

Genuine Adobe Illustrator account
99 USD

Upgrade genuine Capture One account
120 USD

Plugin Retouch4me
69 USD

MidJourney Account
29 USD

Genuine Cheap Canva Pro
39 USD

Upgrade Genuine Office 365
49 USD

Capcut Pro 1 Year
39 USD

Freepik Premium Account
59 USD

Adobe Photoshop Copyright - Full App
120 USD

Copyright Adobe Lightroom Account
59 USD

Windows 10 & 11 Pro Key
36 USD

Autodesk All App Account Copyright
120 USD

ChatGPT Plus Account (GPT-4)
16 USD

Upgrade Duolingo Super
29 USD

Adobe Premiere Pro Account
99 USD
Create a fabric text effect in Photoshop with SaDesign
Nội dung
Text with a fabric background effect will help make your design more vivid. You can absolutely create a fabric text effect by combining many tools in Photoshop. Join Sadesign to learn how to create fabric text effects in Photoshop through the sharing below.
Text with a fabric background effect will help make your design more vivid. You can absolutely create a fabric text effect by combining many tools in Photoshop. Join Sadesign to learn how to create fabric text effects in Photoshop through the sharing below.
The fabric text effect in Photoshop is created by a combination of many tools. Below are some steps as follows:

1. Create a background.
First we need to create a background layer with realistic fabric fibers for the fabric text effect in Photoshop.
Step 1: Create a document.
On the menu bar, select File => New… => fill in the appropriate parameters => OK.
Or press the keyboard shortcut Ctrl+N and then enter the appropriate parameters.
.png)
Step 2: Set the Foreground color to “#83b7ca” and the Background color to “#22576b”. Then press the Alt + Delete key combination to fill the Background color with the Foreground color.
.png)
Step 3: Next, we will combine some effects to make the background more beautiful. These effects will apply to both the Background and the text. On the menu bar, select Filter => Filter Gallery.
.png)
In Filter Gallery box, select Sketch => Halftone Pattern.
(1).png)
In the parameter adjustment section next to it, set Size to 1, Contrast to 0 and at Pattern Type select “Dot”. Then click OK.
.png)
This effect creates a background with lots of tiny dots.
.png)
Step 4: Continue selecting Filter => Filter Gallery => Artistic => Smudge Stick. Then adjust Stroke Length to 2, Highlight Area to 12, Intensity to 10. Then click OK.
.png)
At this point we will get a background similar to the one on jeans.
.png)
Step 5: Continue selecting Filter => Filter Gallery => Texture => Grain. Adjust Intensity to 11, Contrast to 50, Grain Type select “Regular”. Then click OK.
.png)
At this time, the background has a little noise mixed in to make the fabric background look more realistic.
.png)
Step 6: Press Ctrl+J to duplicate the Background layer. Then hide the copy layer by clicking on the eye on the left side of the layer.
.png)
Step 7: At Background layer, select Image => Adjustments => Hue/Saturation.
.png)
Change Hue to 20, Saturation to -50 and Lightness to -50. Sau đó nhấn OK.
.png)
Step 8: Select Image => Adjustments => Levels. Change the Shadows value to 35 to make the background a little darker.
.png)
2. Create the text.
Step 1: Select the Horizontal Type Tool to write the text you need to create a fabric text effect in Photoshop. For example, I use the font Grobold.
.png)
Step 2: In the Character panel (Window => Character), adjust the font size to 250pt (or up to you) and adjust the Tracking to 75 to avoid overlapping the text.
.png)
Step 3: Notice that the letter “F” is a bit close to “a”. To fix it, select the Type Tool and click between the letters “F” and “a”, then adjust the Kerning to 68 (or higher) so that the two letters are further apart.
.png)
3. Create text effects.
Step 1: Click on the eye in the Background copy layer to open this layer. Then drag that layer above the text layer. Press Ctrl + Click on the thumbnail (letter T) in the text layer to make a selection around the text.
.png)
Step 2: At the text layer, on menu bar, Select => Modify => Expand.
.png)
In the Expand Selection dialog box that appears, enter the value 6. The larger the number, the wider the selection will be. However, you need to be careful that the value is not too large because it may stick to other words.
.png)
Step 3: On the Background copy layer, press Ctrl+J. Now it will copy the selected area of the text and then cut it onto the background we created earlier.
.png)
Let's hide the Background copy layer because we won't need it anymore.
.png)
Step 4: Duplicate “Layer 1″, and set the Blend Mode to Soft Light, reducing the Opacity to 50%. This helps show some details in the background clearly.
.png)
Step 5: Double click on "Layer 1", select the Inner Shadow effect, reduce the Opacity to about 50%, set Distance to 0, Size to 2. Then click OK.
.png)
Step 6: Duplicate the text layer with Ctrl+J, use Move Tool to move it to the top of all layers.
.png)
Step 7: Right-click on the copied text layer and select Convert to Shape. The text now cannot be edited anymore because it has merged into a regular image.
.png)
Step 8: On the toolbar select Rectangle Tool. What you need to pay attention to is the Options bar of this tool at the top of the screen. Here are some features that help us create fabric text effects in Photoshop easily.
.png)
In the Fill icon, select “No Color” to remove the outline. Now we will remove the color in the block, but it will also remove the border.
hieu-ung-chu-vai-khau-trong-photoshop-28.jpg
Step 9: Therefore we need to add a border to this text. Click on the Stroke icon next to it and select “Solid Color”. Then, click on the Color Picker icon and select the color “#c0b384”.
.png)
Choose a border width of 3pt, then choose the dashed line type as shown in the image. To set up more, click More Options.
.png)
In the Stroke panel, set Align to Inside, set Caps to Butt and Corners to Miter. Adjust the value of Dash to 2.5 and Gap to 1. In which, the Dash value is the length of the dashes, and Gap is the distance between the dashes. Then click OK.
.png)
Step 10: Double click on the text layer to display the Layer Style panel. Select the following effects and set the parameters as follows:
Bevel and Emboss: Set Size to 0, the effect will increase the size of the stitch.
Change the color of Highlight Mode to “#bea85a”.
.png)
Contour: Don’t change.
.png)
Inner Shadow: Distance is 0 and Size is 1.
.png)
Gradient Overlay: Adjust Blend Mode as Multiply, Opacity as 50%. Select style Gradient as “Orange, Yellow, Orange″, Style as Reflected.
.png)
Outer Glow: Set Blend Mode as Multiply, choose color to “#444425”, set Size to 0. This step will create a shadow layer below.
.png)
Drop Shadow: Change the Blend Mode to Multiply, set the color to “#112d37”, Opacity to 80%, Distance to 0, Size to 7, and Contour to Cove Deep.
.png)
Now you have a very 3D fabric text effect in Photoshop as shown.
.png)
Step 11: Press Ctrl+click on the Thumbnail of "Faker copy" to get the selection.
.png)
Click the Create new fill or adjustment layer icon below the Layers panel and choose Hue/Saturation. This will create a layer mask to correct each layer without affecting the other layers.
.png)
In Properties box, set Hue value to 10 and Saturation to -25.
.png)
Step 12: Create a selection as you just did above again, at this time, you choose Create new fill or adjustment layer => Levels. In the dialog box appearing, set the Shadows value to 30 to darken the texture.
.png)
4. Create a ruffled fabric border for the text.
To make the fabric text effect in Photoshop more realistic, we will create a ruffled fabric effect for the text.
Step 1: Open the Brush panel (Window => Brush) and select a brush named "Dune Grass" and adjust the parameters as shown below.
Brush Tip Shape:
.png)
Shape Dynamics:
hieu-ung-chu-vai-khau-trong-photoshop-44.jpg
Scattering:
.png)
Dual Brush: Select a brush named “Chalk 36 pixels”.
.png)
Color Dynamics:
.png)
Step 2: Right-click on the original text layer and select Create Work Path.
.png)
Set the Foreground color to #597f91 and the Background color to “#081f30”. Create a new layer between the "Faker" and "Layer 1" layers and name it "Stroke".
.png)
Step 3: On the toolbar, select Direct Selection Tool, then right-click on the text border and select Stroke Path.
.png)
Select Brush from the Tool menu, and make sure you uncheck Simulate Pressure.
.png)
At this point, the fabric edge appears tasseled like real fabric but it is still a bit small. To make this part of the fabric even more tasseled, we will repeat step 3. We will get a larger and more realistic image of the tassel part of the fabric.
.png)
Press Enter to delete the line above the sewing threads.
.png)
5. Create shadow for text.
Step 1: Double click on the Stroke layer to add Drop Shadow, set the color to “#222222”, set Distance to 10, Spread to 15, and Size to 10.
.png)
Step 2: Create a new layer on top, name it "Dirt", then change the Blend Mode to Darker Color. Set the Foreground color to “#8c6239”.
.png)
Step 3: Ctrl + Click on the thumbnail of Faker to get a selection, then press Shift + Ctrl + Click on the "Stroke" thumbnail layer to add a selection for tasseled part.
.png)
Use a brush then click a few times on the text surface. The text will look quite real and more natural.
.png)
Step 4: Now that the selection is still there, create a new layer on top of the other layers and name it "Clouds". Set the Foreground and Background colors back to Black and White by pressing “D”.
.png)
On menu bar, Filter => Render => Clouds. Press Ctrl+ D to remove the selection.
.png)
Set the “Clouds” layer with Blend Mode as Overlay, Opacity set to 20%, or any other value you like. This step will add light amplitude to the texture.
.png)
Step 5: Select Create new fill or adjustment layer => Gradient Map.
.png)
Make sure it's on top of the other layers, then set the Blend Mode to Soft Light and set the Opacity to 50%, which can improve the color.
.png)
The gradient is created and uses the color “#504d44” on the left and “#aba277” on the right as shown below.
hieu-ung-chu-vai-khau-trong-photoshop-63.jpg
Step 6: Create a new layer between the "Clouds" layer and the "Dirt" layer. Let's name it “Rivets”. Double click on it to adjust the parameters:
.png)
Bevel and Emboss: Set the Gloss Contour to Half Round, set the Highlight Mode to Vivid Light and reduce the Opacity to 65%, then check the Anti-aliased box.
.png)
Contour: Select Cone, check Anti-aliased box
.png)
Drop Shadow: Set Distance to 0.
.png)
Step 7: Set the Foreground color to “#564a2e”, choose the hard round 13px brush, and add some nails to the corners of the text.
.png)
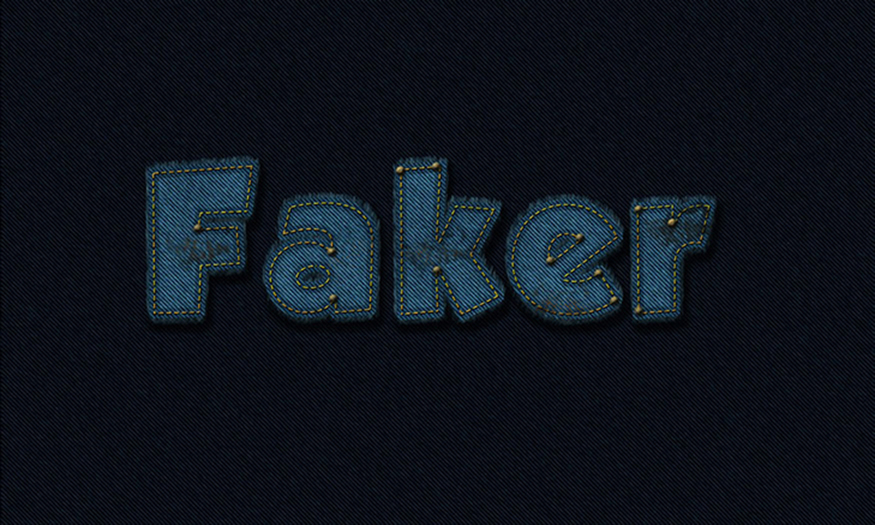
So you have finished creating the fabric text effect in Photoshop, the results will be:
.png)
Above are detailed instructions on the steps to create a fabric text effect in Photoshop. Although there are many different steps, the implementation is not too complicated. Hopefully the above sharing can help you create satisfactory photos.


VIP Products


Best Selling Products
Genuine Adobe Illustrator account
99 USD
Upgrade genuine Capture One account
120 USD
Plugin Retouch4me
69 USD
MidJourney Account
29 USD
Genuine Cheap Canva Pro
39 USD
Upgrade Genuine Office 365
49 USD
Capcut Pro 1 Year
39 USD
Freepik Premium Account
59 USD
Adobe Photoshop Copyright - Full App
120 USD
Copyright Adobe Lightroom Account
59 USD
Windows 10 & 11 Pro Key
36 USD
Autodesk All App Account Copyright
120 USD
ChatGPT Plus Account (GPT-4)
16 USD
Upgrade Duolingo Super
29 USD
Adobe Premiere Pro Account
99 USD