Best Selling Products
Glitch Text Effect in Photoshop
Nội dung
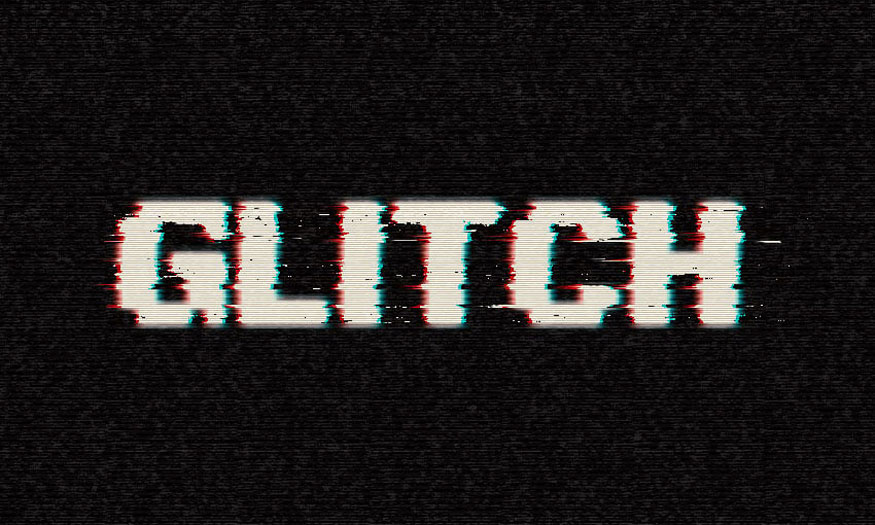
The glitch effect is to correct the type of glitch effect in digital with solid lines of noise in colors of blue and pink. The following tutorial SaDesign will show you how to use layer styles, filters and masks to create a quick and easy Glitch text effect in Photoshop for text.

1. Create background - text
To create a Glitch text effect in Photoshop, we first need to create a new document and then write the text that needs the Glitch effect.
Step 1: Create a new document in Photoshop with the size of 900 x 700 px. Then in the layer control panel, click Create new fill or adjustment layer (split circle icon), select Solid Color, the Picker color panel appears, select the color code #101010.
.jpg)
Step 2: On the toolbar, select the Horizontal Type Tool to write text. Here I write GLITCH, use the font Pixel Digivolve, and set the Size to 170 pt.
.jpg)
Step 3: Rename the text layer to Text 01, right-click on it and select Convert to Smart Object.
.jpg)
Step 4: Press Ctrl+J layer Text 1 to duplicate and rename the copy to Text 02.
.jpg)
Step 5: Hide the Text 02 layer by clicking on the eye icon next to it.
.jpg)
2. Apply Layer Style
We should continue applying Layer Styles to create a Glitch text effect in Photoshop. Double-click on the Text 01 layer to apply the following Layer Styles:
Step 1: Select Blending Options, in Advanced Blending, uncheck G and B in Channels.
.jpg)
Step 2: Select Outer Glow and set the parameters:
Opacity: 50%
Color: #ffffff
Size: 10
.jpg)
This will give the text a red color as shown.
.jpg)
Step 3: Show layer Text 02 and double-click to apply the following Layer Style:
Select Blending Options, in Advanced Blending, uncheck R in Channels.
.jpg)
Step 4: Select Outer Glow and set the following parameters:
Opacity: 50%
Color: #ffffff
Size: 10
.jpg)
This will give the text a blue color, this part won't be visible for now but we'll deal with that next.
.jpg)
3. Create a basic Glitch text effect in Photoshop
Step 1: Select the Move Tool and use the arrow keys to slightly move the Text 01 and Text 02 layers in opposite directions to reveal the red and blue outlines of the text until you get the desired result.
.jpg)
Step 2: Press Ctrl+J to duplicate the two layers Text 01 and Text 02.
.jpg)
Step 3: Create a new layer on top of all layers, name it Filters 01 and press Alt+Ctrl+Shift+E to merge all layers into a new layer.
Right-click on the Filters 01 layer and select Convert to Smart Object.
.jpg)
Step 4: Hold down the Alt key and click the Add layer mask icon at the bottom of the Layers panel to add an inverted layer mask.
.jpg)
Step 5: Press Ctrl+J to duplicate the Filters 01 layer and rename the copy to Filters 02.
.jpg)
4. Use a layer mask
Step 1: Select the Rectangular Marquee Tool, create some random horizontal selections that span the text as shown.
.jpg)
Step 2: Select Filters 01 layer mask's thumbnail, then Fill the selection with white then press Ctrl+D to deselect.
.jpg)
Step 3: Hold down the Alt key and click on the Filters 01 layer mask's thumbnail to show it.
.jpg)
Step 4: Use the Rectangular Marquee Tool again to create narrower selections between the lines you already have, but also keep some of the unselected areas.
.jpg)
Step 5: Hold down the Alt key and click again on Filters 01 layer mask's thumbnail to get the original content, select Filters 02 layer mask's thumbnail and Fill the new selection with white.
Press Ctrl+D to deselect when you're done.
.jpg)
5. Using Filters
Step 1: Select the Filters 01 layer, go to Filter => Pixelate => Mezzotint and set the Type to Short Strokes.
.jpg)
Step 2: Select the Filters 02 layer and go to Filter => Distort => Wave. This can be a tricky filter to apply, so you may need to try different values until you get the result you want.
The values used here are:
Number of Generators: 1
Wavelength:
Min. 1
Max. 106
Amplitude:
Min. 90
Max. 133
Scale:
Yellow. 6
Green. 1
Type: Sine
Undefined Areas: Repeat Edges Pixels
.jpg)
Step 3: On the menu bar, select Filter => Pixelate => Mezzotint and set Type to Long Strokes.
.jpg)
Step 4: Go to Filter => Stylize => Wind and set Method to Wind and Direction to From the Right.
.jpg)
Step 5: If you need to remove any unwanted parts, select the layer mask's thumbnail, select the Brush Tool and choose a soft round tip.
Set the Foreground Color to Black and paint over the unwanted areas to hide them.
.jpg)
6. Add Scanlines Effect
Step 1: Click Create new fill or adjustment layer in the layers palette and select Color Lookup. Then select Fuji ETERNA 250D Fuji 3510 (by Adobe).cube from the 3DLUT File menu.
.jpg)
Step 2: Create a new layer on top of all layers, Fill it with White, name it Scanlines and convert it to a Smart Object.
Make sure the Foreground and Background Color are set to Black and White.
.jpg)
Step 3: On the menu bar, select Filter => Filter Gallery => Sketch => Halftone Pattern, and set the following parameters:
Size: 1
Contrast: 5
Pattern Type: Line
.jpg)
Step 4: On the Scanlines layer, set the Blend Mode to Soft Light and the Opacity to 50%.
.jpg)
Step 5: In the layer panel, select Create new fill or adjustment layer then select Pattern, and use Pattern 1 Fill from the basic scanline patterns.
Set the Opacity of the layer to 25%.
.jpg)
7. Create a Noise Overlay
After completing the above steps, we will add a noise overlay to make the effect most realistic. You can follow these steps:
Step 1: Create a new layer on top of all layers, fill it with black, name it Noise and convert it to a Smart Object.
.jpg)
Step 2: On the menu bar, select Filter => Texture => Grain, and set the parameters:
Intensity: 40
Contrast: 50
Grain Type: Stippled
.jpg)
Step 3: Click OK, and select Filter => Texture => Grain again and set the same values as the step above.
.jpg)
Step 4: Select the New Effect layer icon in the bottom right corner. Then select Sketch => Conté Crayon, and set the parameters as follows:
Foreground Level: 7
Background Level: 7
Texture: Canvas
Scaling: 100%
Relief: 4
Light: Top
.jpg)
Step 5: Change the Noise layer's Blend Mode to Linear Dodge (Add) and its Opacity to 20%.
.jpg)
Step 6: Use the Rectangular Marquee tool to create random selections across the entire document, but try to avoid making large selections across the text.
.jpg)
Step 7: Press Ctrl+J to duplicate the selection in a new layer, rename it to Noise Lines and change the Blend Mode to Color Dodge.
.jpg)
So we have finished creating the Glitch text effect in Photoshop. We can see the GLITCH text as if it is glitched, with a very unique digital noise.
Above is a summary of the steps to create a Glitch text effect in Photoshop. To achieve this effect, we need to combine many tools and go through many different steps. Please do it carefully to get the most unique effect. Try it to create impressive designs.
Sadesign Co., Ltd. provides the world's No. 1 warehouse of cheap copyrighted software with quality: Panel Retouch, Adobe Photoshop Full App, Premiere, Illustrator, CorelDraw, Chat GPT, Capcut Pro, Canva Pro, Windows Copyright Key, Office 365 , Spotify, Duolingo, Udemy, Zoom Pro...
Contact information
SADESIGN software Company Limited


