Best Selling Products
How to create grass text effect in Photoshop with SaDesign
Nội dung
Text lines with grass effects will help your design become more unique and attractive. You can completely create grass text effects in Photoshop with just a few steps, combined with many different tools. Join Sadesign to learn how to create grass text effects right in the following share

1. Step 01 Create grass text effect in Photoshop - Create the background
To get a unique photo with a grass text effect in Photoshop, we first need a suitable background. You can create a background for the grass text effect in Photoshop through the following steps.
Step 1: First, we need to create a new working document with arbitrary size in Photoshop. To create a new file, on the menu bar, select File => New… => fill in the appropriate parameters => OK. Or you can use the shortcut key combination Ctrl + N and then fill in the appropriate parameters.
.jpg)
Step 2: We need to create a gradient background. On the toolbar, select the Gradient Tool (G). In the Options section at the top of the screen, double-click on Click to edit the Gradient. In the window that appears, set the color on the left to light yellow (#adbf41) and on the right to medium green (#328a26) and then click OK. On the Options bar, select Radial gradient.
.jpg)
Then we place the mouse in the middle of the background and drag it to one side of the background. Now we get a light blue background with a yellow transition in the middle as shown.
.jpg)
Once you have finished creating the background, we will move on to the step of creating text with the grass text effect in Photoshop.
2. Grass Text Effect in Photoshop - Create Grass Text
To create text effects, follow these steps:
Step 1: First, we need a beautiful grass photo so that we can create a grass text effect in Photoshop later. Download a beautiful grass photo to your computer. Then drag it into the background you just created. Adjust the size to fit the text you intend to write.
.
.jpg)
Now click on the eye icon to the left of the layer to temporarily hide this layer.
.jpg)
Step 2: Next, we need to create the text for the grass text effect in Photoshop. So, choose a font you want, customize the size accordingly. Use the Horizontal Type Tool to write the appropriate text..
.jpg)
Then set Opacity to 50%.
.jpg)
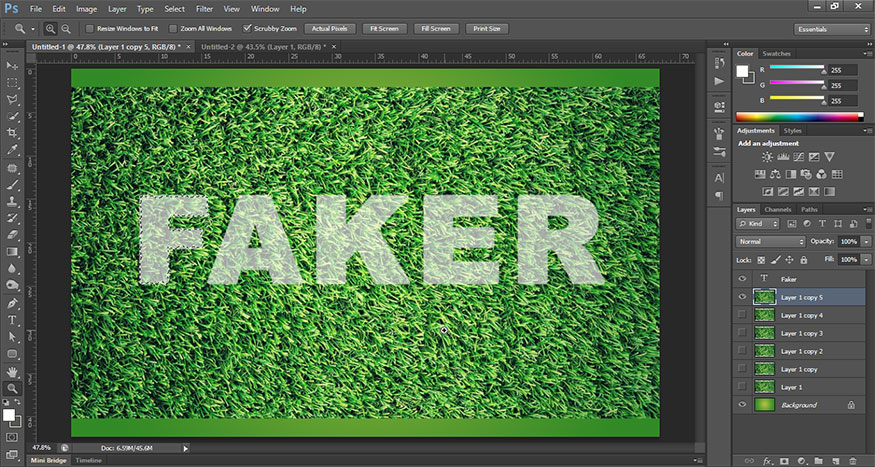
Step 3: We can see that the word FAKER has 5 characters, so select the grass layer and press Ctrl+J 5 times to create 5 copied grass layers.
Step 4: On the toolbar, select the Pen Tool. Then trace along the letters to create a selection. You should do each letter one by one, here I will do the letter F first. You can zoom in to make it easier to select the area. You should create curves so that the grass text effect in Photoshop is most realistic.
.jpg)
Once you have connected the points, right-click on the path you just created and select Make Selection.
.jpg)
In the Make Selection dialog box that appears, set Feather Radius to 0 and click OK.
.jpg)
Now we will get the result that the letter F is selected as shown.
.jpg)
Step 5: Select a grass layer, then invert the selection by pressing Ctrl+Shift+I. The document will now look like the image. We can see that the selection will be inverted to the grass and background areas.
.jpg)
Press Delete to delete the grass background. Then press Ctrl+D to remove the selection. Now we will get the result as shown.
.jpg)
Let's temporarily hide the FAKER layer, now we will see the letter F has grass.
.jpg)
Step 6: Add some effects to make the grass text effect in Photoshop more vivid. Double-click on the F letter layer, the layer Style dialog box appears, fill in the parameters as shown in the picture.
.jpg)
.jpg)
.jpg)
Step 6: We will create a 3D effect for this letter F. Create a new layer below the letter F layer. Press Ctrl and click on the F thumbnail layer to create a selection of the letter F. Then select the new layer below the newly created area, use the Gradient Tool to fill it with black. Now the new layer below has a black letter F. Use the Move Tool to move this black letter F to the right and down a bit to create a 3D shadow as shown.
.jpg)
Step 7: On the menu bar, select Filter => select Blur => select Motion Blur.
.jpg)
In the Motion Blur dialog box, set the parameters as shown. Or set the appropriate parameters depending on your image.
.jpg)
Step 8: Set the Opacity of the shadow to 30%
.jpg)
Step 9: Now I duplicate the bottom shadow layer to make the shadow a little darker. Then I press Ctrl+E so that the shadow gets darker as it gets closer to the text. Set this layer to Multiply and Opacity to 60%.
.jpg)
Step 10: Duplicate the main grass letter layer, move it below the first grass letter layer and turn off the effects. Use the Move Tool to move it a little to the right and down. Finally, select all the layers related to the letter F and press Ctrl+E to merge them.
.jpg)
Step 11: Turn on the FAKER text layer and perform the above steps with the remaining words. The result will be the word FAKER with the grass text effect in Photoshop.
.jpg)
Above is a guide on how to create a grass text effect in Photoshop. The implementation is not complicated, so you should try it right away. Hopefully, the above sharing of Sadesign can help you have unique designs.


