Best Selling Products

Upgrade Duolingo Super
29 USD

Upgrade Genuine Office 365
49 USD

ChatGPT Plus Account (GPT-4)
16 USD

Genuine Cheap Canva Pro
39 USD

Freepik Premium Account
59 USD

Adobe Premiere Pro Account
99 USD

Autodesk All App Account Copyright
120 USD

Windows 10 & 11 Pro Key
36 USD

Plugin Retouch4me
69 USD

Genuine Adobe Illustrator account
99 USD

Adobe Photoshop Copyright - Full App
120 USD

Copyright Adobe Lightroom Account
59 USD

Capcut Pro 1 Year
39 USD

MidJourney Account
29 USD

Upgrade genuine Capture One account
120 USD
How to Blur the Background Using Photoshop
Nội dung
- 1. Introduction to Photoshop software
- 2. The best tool for blurring the background in Photoshop
- 3. Step-by-step guide on blurring the background in Photoshop using Depth Blur
- 3.1. Step 1: Open the image and access Neural Filters
- 3.2. Step 2: Activate Depth Blur and select the area to focus on.
- 3.3. Step 3: Fine-tune Blur Strength and Focal Range settings
- 3.4. Step 4: Complete and export the image
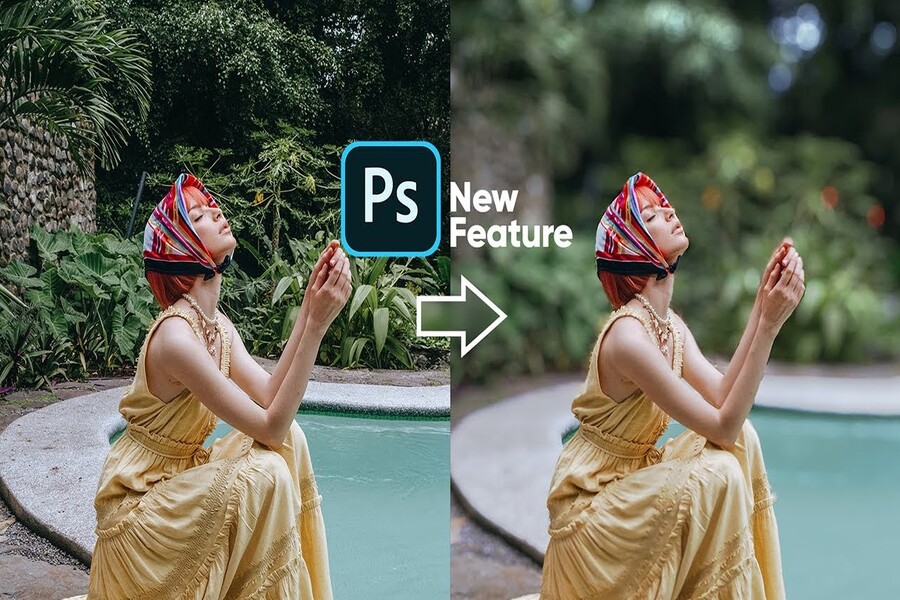
This detailed guide explains the technique of blurring the background to make the subject stand out clearly. It's suitable for Photoshop beginners but still ensures a natural-looking bokeh effect. It works well for portraits, product photos, and promotional materials.
Previously, removing the background in Photoshop required complex manual operations such as using the Pen Tool to separate the background, creating detailed masks, and then applying blurring filters. These steps demanded high skill, were time-consuming, and easily discouraged beginners. However, with the development of artificial intelligence, Photoshop has been equipped with smarter tools, significantly simplifying the editing process.
Among them, Depth Blur, a feature within Neural Filters, is considered the optimal solution for quickly, naturally, and effectively blurring the background. This tool allows Photoshop to automatically analyze the depth of the image, identify the subject and background, thereby creating a bokeh effect similar to that achieved with a large aperture lens.
1. Introduction to Photoshop software
Photoshop is one of the most popular and influential image editing software programs in the graphic design industry today. Developed by Adobe, Photoshop is not only a tool for professional designers but is also widely used by photographers, marketers, content creators, and even general users. Through numerous upgrades, Photoshop has become a comprehensive image editing ecosystem, meeting everything from basic needs to complex, high-level image processing requirements.
Photoshop's greatest strength lies in its ability to deeply manipulate every detail of an image. Users can edit colors, lighting, layout, retouch skin, crop and paste, create visual effects, and build graphic products for various purposes such as advertising, printing, digital media, or social media. Because of this versatility, Photoshop is considered a fundamental skill for anyone pursuing a career in design and image creation.
In recent years, Photoshop has undergone a significant transformation by integrating artificial intelligence through Adobe Sensei. Features such as Neural Filters, Select Subject, Generative Fill, and Depth Blur significantly reduce processing time while improving output quality. Instead of performing many complex manual operations, users can focus more on creative ideas and aesthetic direction.
In particular, for common tasks like blurring the background, Photoshop is no longer just for highly skilled users. Thanks to its intelligent tools, even beginners can create natural and professional-looking bokeh effects if they follow the right process. This is why Photoshop remains the leading photo editing software and continues to be a preferred choice in 2026.
2. The best tool for blurring the background in Photoshop
To quickly and effectively blur the background of an image in Photoshop, we will use the Depth Blur tool built into the Neural Filters feature. This is a powerful tool supported by artificial intelligence, allowing Photoshop to "understand" the image structure instead of simply applying a blurring effect.
Depth Blur works on the principle of analyzing depth of field. Instead of requiring the user to precisely select the subject and background, this tool automatically determines which parts should be kept in focus and which should be blurred. This is especially useful for photos with complex details such as hair, layered backgrounds, or uneven lighting.
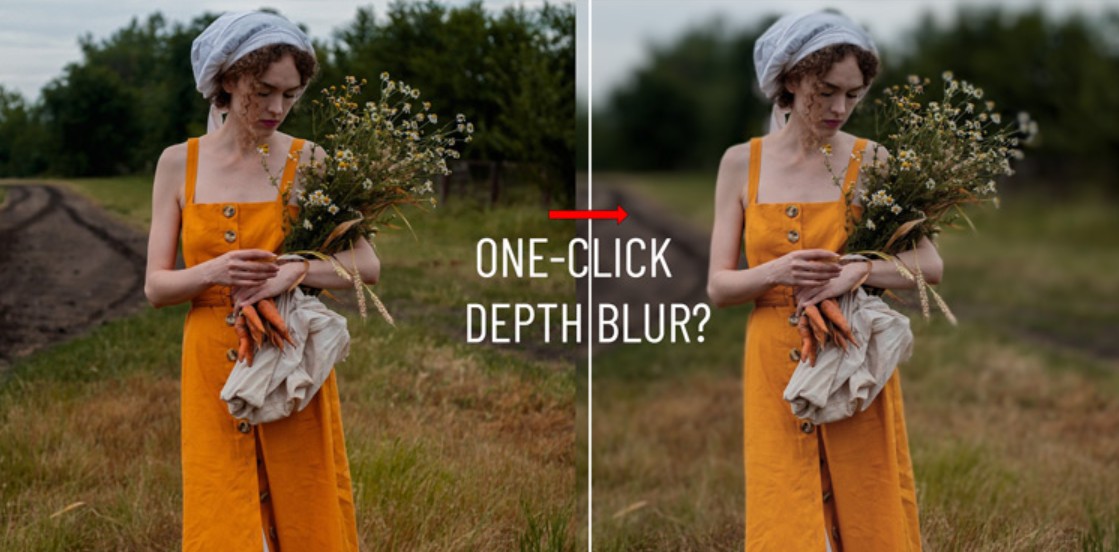
A major advantage of Depth Blur is its ability to create a blurring effect with depth, meaning the degree of blur changes depending on the relative distance between objects in the image. As a result, the background isn't "rigidly blurred" like with traditional filters, but rather has a smooth transition, similar to the bokeh effect in professional photography.
Furthermore, Depth Blur allows users to make just the right amount of manual adjustments. You can redefine the focus area, adjust the blur intensity, and the focus range to suit your creative vision. The combination of AI automation and manual fine-tuning is what makes Depth Blur the optimal choice for both beginners and professional designers.
3. Step-by-step guide on blurring the background in Photoshop using Depth Blur
The process of blurring the background using Depth Blur in Photoshop is designed to be quite intuitive. However, to achieve the best results, you still need to understand each step and its purpose. Below is a detailed guide from opening the image to completing the process and exporting the file.
3.1. Step 1: Open the image and access Neural Filters
First, you need to open the image you want to edit in Photoshop. This could be a portrait, a product image, or any image with a clearly defined subject against a background. Once the image has loaded and is displayed in the workspace, navigate to the menu bar at the top of Photoshop.
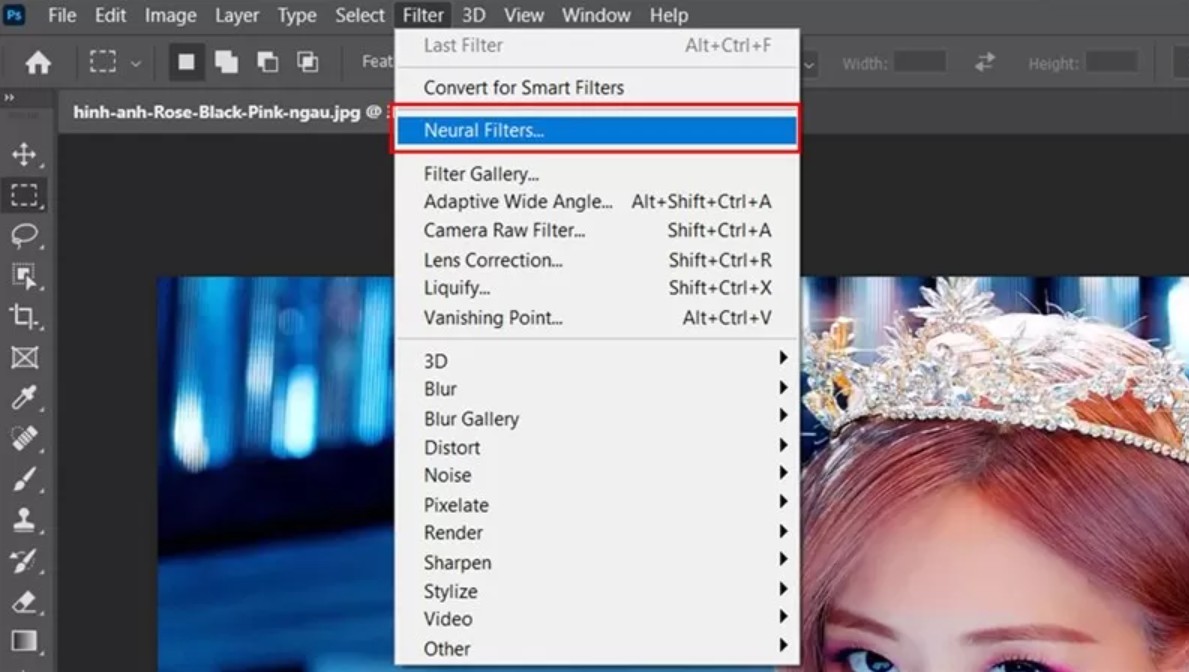
Here, select the Filter tab, then click on Neural Filters. Immediately, a new control panel will appear on the right side of the screen. This area contains Photoshop's intelligent AI-powered filters, including Depth Blur.
If you're using a newer version of Photoshop, Neural Filters are usually built-in. If Depth Blur isn't already downloaded, Photoshop will display an option to download it. This process only takes a few minutes and only needs to be done once.
3.2. Step 2: Activate Depth Blur and select the area to focus on.
After opening the Neural Filters panel, locate the Depth Blur tool. When you toggle it on, Photoshop will begin analyzing the image and automatically apply a blurring effect to the background.
At this stage, you'll see the background behind the subject begin to blur, while the main subject remains relatively sharp. However, because each image has a different structure, automatic recognition is sometimes imperfect. That's why Photoshop allows you to actively define the area to keep in focus.
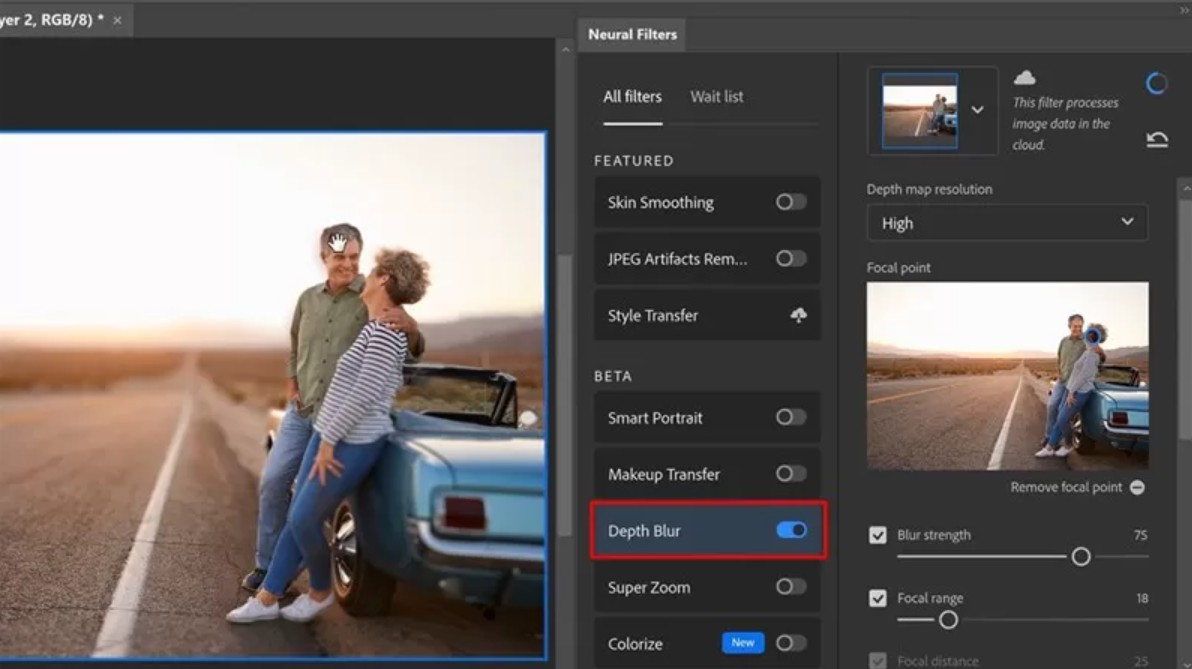
Simply use your left mouse button and click directly on the areas of the image you want to keep sharp, such as faces, bodies, or products. Depth Blur will recognize these points and readjust the depth map so that the selected areas are not affected by the blur effect.
This step is crucial in ensuring the subject stands out and doesn't lose detail. Clicking and selecting the right and sufficient points to keep in focus will make the final result look much more natural.
3.3. Step 3: Fine-tune Blur Strength and Focal Range settings
After defining the focus area, the next step is to fine-tune the parameters to control the degree of background blur. The two most important parameters in Depth Blur are Blur Strength and Focal Range.
Blur Strength is the parameter that determines the intensity of blur. Dragging this slider to the right will blur the background more, creating a clearer separation between the subject and the background. Conversely, decreasing Blur Strength will make the blurring effect softer and more subtle. Choosing the appropriate Blur Strength level depends on the image style and intended use. For artistic portraits, you can choose a high level of blur, while product photos usually require a moderate level of blur to avoid obscuring the background.
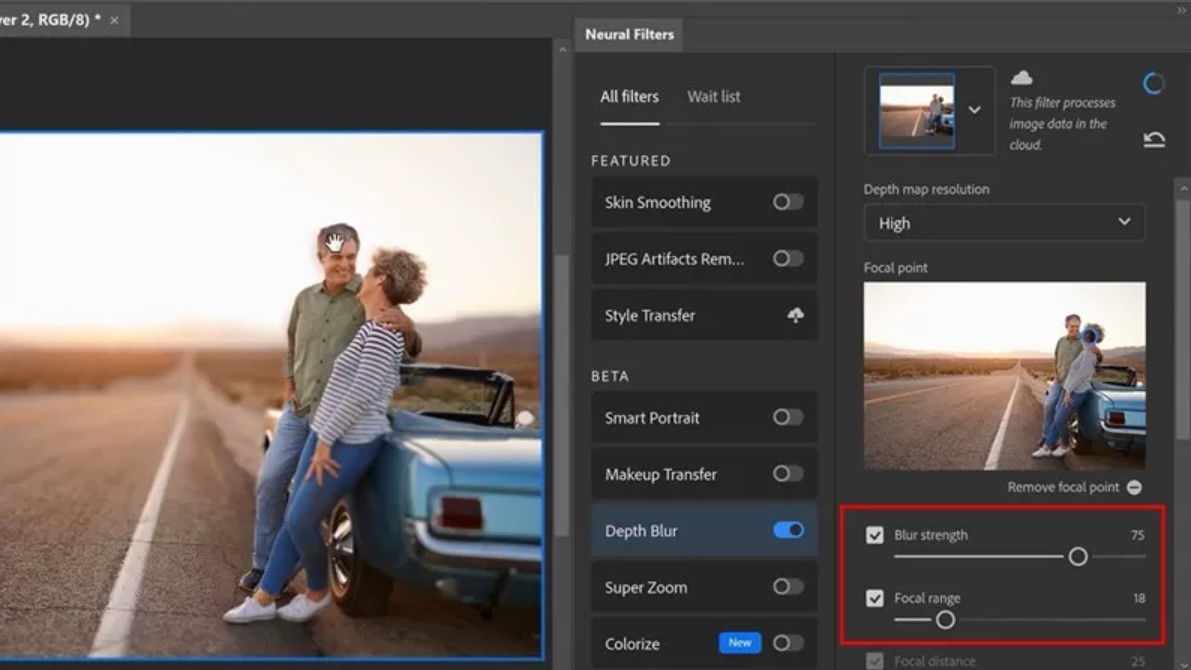
Focal Range is a parameter that controls the depth of field. Simply put, it determines the transitional boundary between the sharp and blurred areas. By adjusting Focal Range appropriately, you can create a bokeh effect with depth, avoiding the feeling that the subject is "cut out" from the background.
During the refinement process, you should carefully observe details such as hair, garment edges, or product edges. These are areas where flaws are easily revealed if the blurring effect is not handled skillfully. Take the time to experiment with different levels until you achieve a harmonious balance between the subject and the background.
Notably, in the modern work environment, process optimization goes beyond just image editing. Knowing how to effectively use online scheduling software is also a crucial office IT skill, helping you manage your time better when working on design projects with tight deadlines.
3.4. Step 4: Complete and export the image
After completing the adjustments, Depth Blur will automatically create a new layer containing the applied effect. Separating this layer from the original image makes it easier to continue editing without affecting the original data.
At this point, you can continue making other edits such as adjusting color, increasing contrast, adjusting lighting, or adding supplementary effects to perfect the image. Once you are satisfied with the result, simply export the image by going to File, selecting Export or Save As, and saving the image to your computer in a suitable format.
Using Depth Blur to blur the background not only saves time but also delivers high image quality, meeting the requirements of design, communication, and content creation.
Background blurring is an important technique that helps improve image quality and effectively highlight the subject. With the help of the Depth Blur tool in Neural Filters, Photoshop has made the background blurring process much simpler, faster, and more user-friendly, even for beginners.Buy a Cheap Licensed Adobe Photoshop


VIP Products


Best Selling Products
Upgrade Duolingo Super
29 USD
Upgrade Genuine Office 365
49 USD
ChatGPT Plus Account (GPT-4)
16 USD
Genuine Cheap Canva Pro
39 USD
Freepik Premium Account
59 USD
Adobe Premiere Pro Account
99 USD
Autodesk All App Account Copyright
120 USD
Windows 10 & 11 Pro Key
36 USD
Plugin Retouch4me
69 USD
Genuine Adobe Illustrator account
99 USD
Adobe Photoshop Copyright - Full App
120 USD
Copyright Adobe Lightroom Account
59 USD
Capcut Pro 1 Year
39 USD
MidJourney Account
29 USD
Upgrade genuine Capture One account
120 USD