Best Selling Products
How to convert images to vectors in Photoshop
Nội dung
- 1. Why should you vectorize images?
- 2. Instructions for converting images to vectors in Photoshop
- 3. Notes when converting images to vectors in Photoshop
- 3.1. Choose the appropriate photo
- 3.2. Create the correct path
- 3.3. Check type and details
- 3.4. Optimize the number of layers
- 3.5. Edit colors and styles
- 3.6. Backup original data
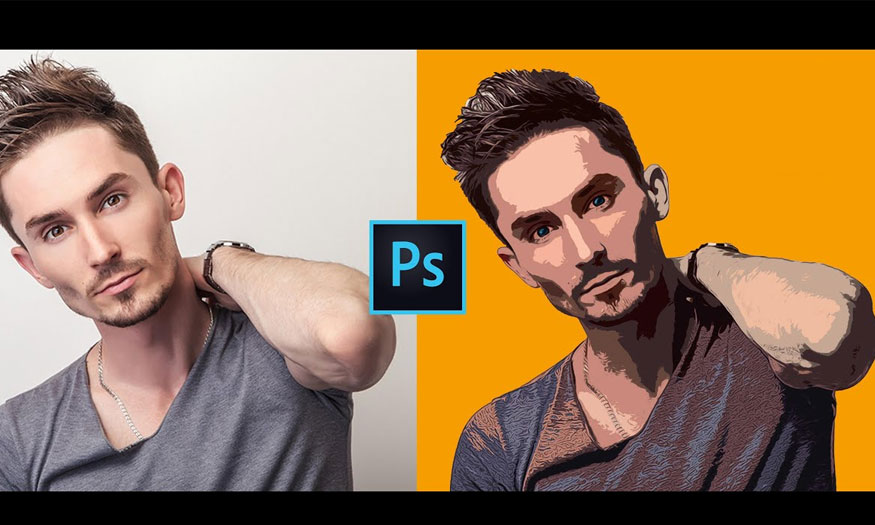
How to convert photos to vectors in Photoshop is a useful skill for those who do graphics, design, and printing. Vectors are graphics based on curves and points, which can be enlarged or reduced without losing quality. The following article Sadesign will guide you to convert photos to vectors in Photoshop in the most detailed way.

How to convert photos to vectors in Photoshop is a useful skill for those who do graphics, design, and printing. Vectors are graphics based on curves and points, which can be enlarged or reduced without losing quality. The following article Sadesign will guide you to convert photos to vectors in Photoshop in the most detailed way.
1. Why should you vectorize images?
Vector images are a type of graphics that possess many outstanding advantages.
(2).jpg)
Compared to bitmap, vector images are a type of graphics that possess many outstanding advantages such as:
High compatibility: Can open and edit vectors on many different software such as Illustrator, CorelDraw, Inkscape,...
Flexible resizing: Vectors can be enlarged or reduced without losing quality, which facilitates printing or displaying on different devices.
Easy Editability: Vectors are separated into separate parts that can be moved, rotated, deformed or recolored easily.
Economical storage capacity: Vector has a smaller capacity than bitmap, thus saving storage space and transmission bandwidth.
2. Instructions for converting images to vectors in Photoshop
The steps to convert images to vectors in Photoshop will follow these basic steps:
- Step 1: Choose a high-resolution, clear image with few complex details to convert to vector. Open the image in Photoshop by selecting File => Open => Select image or press the shortcut key Ctrl + O.
(1).jpg)
- Step 2: Create a selection for the object using the Quick Selection Tool. Place the tool on the object, then drag the mouse across the entire object.
(1).jpg)
- Step 3: Sharpen the image to create a detailed vector image. Create a Layer Mask for the selected object => menu => Filter => Sharpen => Smart Sharpen.
(1).jpg)
Smart Sharpen is capable of intelligently sharpening the overall image. At the same time, it also allows users to exercise control in many ways. You can also adjust the sharpness in both shadows and highlights individually, conveniently.
- Step 4: Adjust the parameters then observe the image accordingly, after achieving satisfactory results, press OK.
(1).jpg)
+ Amount: Is the level of sharpening, used to create intermediate pixels between color patches. The larger the Amount, the denser the pixels will be, helping to create more difference from the original image.
+ Radius: Pixel rotation, this parameter should not exceed 5px
+ Reduce Noise: This parameter helps reduce image noise.
- Step 5: Create 2 black and white colors for the object to continue with the next steps. Select Layer 0 => Right-click on Adjustment Layer in the lower right corner of the screen => Threshold.
(1).jpg)
- Step 6: In this step, adjust the Thresh́old to medium level to create moderate contrast for the photo.
(1).jpg)
Threshold helps convert black and white photos with high contrast. After adjusting the Threshold level, areas of the photo brighter than the Threshold level will be converted to white, and areas darker than the Threshold level will be converted to black.
- Step 7: Ctrl J to duplicate Layer 0
(1).jpg)
- Step 8: Select layer 0 copy => Filter => Other => High Pass, in this step you should apply an effect layer to layer 0 copy to help sharpen the image details. You can combine two image sharpening tools, Smart Sharpen and High Pass, to sharpen the image and make the details clearer.
(1).jpg)
- Step 9: Adjust the Radius parameter so that the white details of the object stand out on the gray background to increase the sharpness of the object's edges => Click OK.
(1).jpg)
- Step 10: Select all layers then press Ctrl + Shift + Alt + E to merge all layers in the previous steps into 1 complete layer.
(1).jpg)
- Step 11: Select Layer 1 in step 10 => Menu => Select => Color Range. Color Range mode helps you select areas by color like Magic Wand to select complex and detailed areas with different colors from the surrounding background.
(1).jpg)
- Step 12: Select the color suction tool to suck the dark part of the image, then select Fuzziness: 200 => Click OK.
(1).jpg)
- Step 13: After a selection of all the black points of the object, choose Layer Mask to create a vector line in the next step.
- Step 14: Create a Path for the pixels of the object.
To create a vector image, you need to create a Path for each image detail. The more detailed you make it, the more meticulous the image will be after converting to vector.
.jpg)
You select the black mask area in layer 1 => Select any selection tool => Right-click on the object => Mask Work Path.
- Step 15: For the Tolerance parameter, recommended: 2 then press OK.
.jpg)
Tolerance is used to determine the color range to select, choose the distance for the newly created Paths compared to the pixels, in this example, the distance between them will be 2 pixels.
- Step 16: Select File => Export => Paths to Illustrator to create a vector file with the .ai extension. Finally, export the file to vector format with the .ai extension of Illustrator.
.jpg)
Note : If you want to save the .PNG file to use as a normal photo, you can stop at step 15 and do as shown below:
.jpg)
3. Notes when converting images to vectors in Photoshop
To convert images to vectors in Photoshop effectively and with quality, you need to pay attention to the following basics:
3.1. Choose the appropriate photo
You should prioritize images with high resolution, clarity, and few complex details to help convert to vector effectively. Images that are too blurry, smudged, or noisy with many small details will be difficult to draw or export to vector accurately.
The original image should use high resolution image
Please keep the original resolution of the image when opening in Photoshop. If you change the size or resolution of the original image, you will lose the original detail of the image.
3.2. Create the correct path
When converting an image to a vector in Photoshop, you need to pay attention to creating a path that is accurate and close to the edge of the object in the image. You can use tools such as Add Anchor Point, Delete Anchor Point, Convert Point or Direct Selection to add, delete, move or adjust anchor points on the paths.
You can also use the Path Selection tool to move entire paths or groups of paths together.
3.3. Check type and details
Check the styles and details of the objects after converting to vector. You can use the Stroke tool to change the path stroke such as color, thickness, line style, etc. Or use the Fill tool to fill the areas inside the path with color. You should choose colors that match the original image or your own preferences.
.jpg)
3.4. Optimize the number of layers
To optimize the number of layers when converting images to vectors in Photoshop, you can use the Merge Layers tool to combine multiple layers with the same style and color together.
You can use the Delete Layer tool to remove unnecessary or duplicate layers. Optimizing the number of layers helps you manage and edit vectors more easily.
3.5. Edit colors and styles
You can color or style the vector as you like when converting an image file to a vector in Photoshop. You can use tools like Hue/Saturation, Color Balance, Gradient Map, Pattern Overlay, etc. to create different color effects for the vector.
You can also use tools like Drop Shadow, Bevel and Emboss, Inner Glow,… to create light and shadow effects for vectors. Experiment and combine these tools together to create unique and impressive vectors.
3.6. Backup original data
You should back up the original image data before converting to vector in Photoshop. Save the original image in JPG, PNG or PSD format to restore when necessary. You should also save the Photoshop file of the vector conversion process in PSD format to edit it later.
Above is the simplest and easiest way to convert images to vectors in Photoshop. Wish you success!


