Best Selling Products
How to remove wrinkles with Photoshop SIMPLE
Nội dung
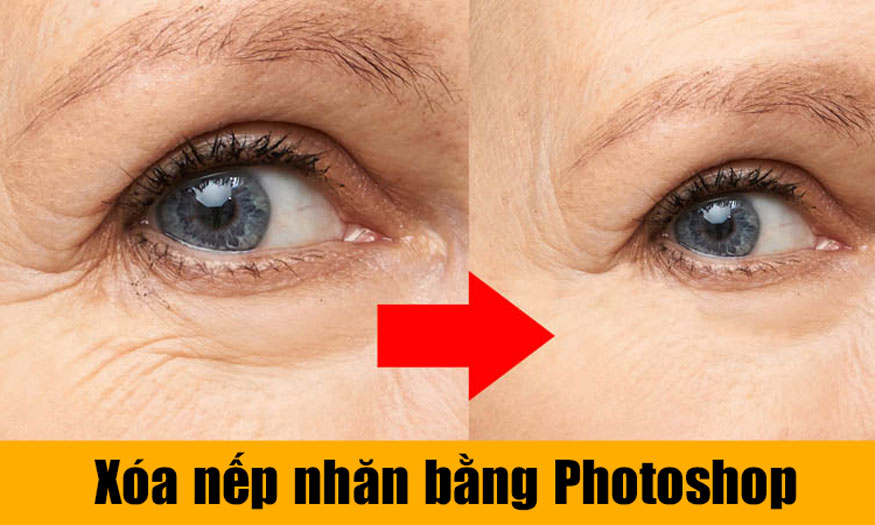
Wrinkle removal is an indispensable basic photo editing step in Photoshop. The subject with wrinkle removal will look younger and more radiant. Let's learn about how to remove wrinkles in Photoshop through the following sharing.

1. How to remove wrinkles in Photoshop with the Healing Brush Tool
Healing Brush Tool is a very familiar photo editing tool in Photoshop. It works by copying an area on the image and then pasting it onto the selected area you want. The Healing Brush tool will help you balance the colors of the copied area and the selected area effectively, making the image more natural and consistent. Therefore, many people choose to remove wrinkles in Photoshop with the Healing Brush. You can remove wrinkles by following these steps:
Step 1: First, we need to open the photo we want to remove wrinkles with Photoshop. To open that photo in Photoshop, select File on the menu bar => Open => select the photo to open => Open. Or you can press the key combination Ctrl + O. Then click Create a New Layer in the bottom right corner. You will have an additional Layer 1, located above the Background Layer.
.jpg)
Step 2: To continue, on the toolbar, we click on the Healing Brush Tool.
.jpg)
Step 3: Then, we adjust the size of the Healing Brush so that it is slightly larger than the wrinkle. In addition, you can use the shortcut key [ ] to change the size of the Healing Brush.
Next, click on Mode and select Lighten. This mode
.jpg)
will make the photo more natural than Normal.
.jpg)
In the Sample section, select Current & Below. This tells Photoshop to sample both Layer 1 and the Background layer below.
.jpg)
Step 4: We hold down the Alt key to sample the skin area that is not wrinkled. Then release the Alt key, and click on the wrinkles on the model's face. You will see Photoshop remove the wrinkles and replace them with better skin.
.jpg)
You need to take a sample close to the wrinkle to get the most similar and natural color. Just hold down the Alt key to take a sample, then erase it until the wrinkle is gone.
.jpg)
So you have completed the process of removing wrinkles in Photoshop with the Healing Brush, very simple right?
2. How to remove wrinkles in Photoshop with Clone Stamp Tool
Besides the Healing Brush, we can also remove wrinkles in Photoshop with the Clone Stamp Tool. The Clone Stamp Tool also works by copying an area on the image and then pasting it onto the selected area you want. However, the difference is that it cannot blend itself. To remove wrinkles in Photoshop with the Clone Stamp, you can refer to the following steps:
Step 1: First, we also need to open the photo we want to remove wrinkles with Photoshop. Then press the shortcut key Ctrl + J to duplicate the Layer. We will proceed to remove wrinkles on the Background Copy Layer.
.jpg)
Step 2: On the toolbar, select Clone Stamp Tool or press the shortcut key (S).
.jpg)
Step 3: We need to change the size of the Clone Stamp so that it is a little larger than the wrinkle. In addition, you can also press the shortcut key [ ] to increase or decrease the size.
.jpg)
Because Clone Stamp will copy the original sampled area and replace it with the area that needs to be erased. Therefore, we need to use Lighten mode to make the photo more natural. If you leave it Normal, the photo will not be very beautiful.
.jpg)
Step 4: Hold down the Alt key and click on the area of skin that is not wrinkled to get a sample. Then release Alt, and click on the wrinkles on the model's face. Each time you click, Photoshop will sample the selected area instead of the wrinkle. Take the sample as close to the wrinkled area as possible. The more careful you are, the more beautiful and natural the photo will be.
.jpg)
Above is a summary of two ways to remove wrinkles using Photoshop. The implementation is not difficult, right? Please proceed meticulously and carefully to make the photo beautiful and natural. Hopefully, SaDesign 's sharing can help you edit the most satisfactory photos.


