Best Selling Products
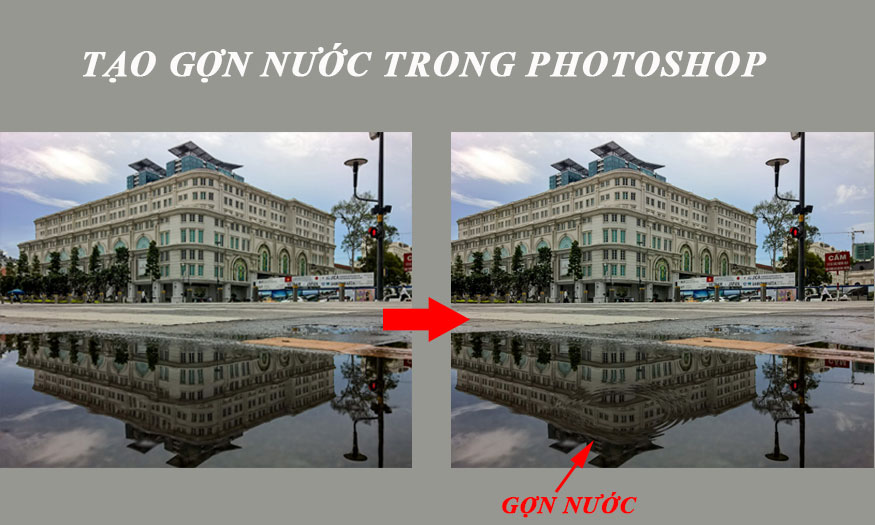
Create water ripples in Photoshop SUPER EASY with SaDesign
You want to create water ripples for your photos but don't know how to do it? Don't worry, now you can completely create water ripples in Photoshop. Just combine a few tools, go through a few basic steps and you will have a photo with extremely unique and realistic water ripples. Join Sadesign to learn how to create water ripples in Photoshop through the following shares.

1. Steps to create water ripples in Photoshop
The water ripple effect will help the photo become more natural and vivid. To create water ripples in Photoshop, let's refer to the following detailed steps.
Step 1: First, we need to open the photo we want to create water ripples in Photoshop. To open that photo in Photoshop, select File on the menu bar => select Open => select the photo to open => click Open. Or you can press the key combination Ctrl + O.
.jpg)
Step 2: According to the photo just uploaded, we will need to create water ripples in Photoshop on the water area on the road surface. Now on the toolbar, select the Elliptical Marquee Tool.
.jpg)
Then select the area of the photo where you want to create water ripples in Photoshop. The area should be of moderate size to have a realistic effect.
.jpg)
Step 3: Now we press the key combination Ctrl + J (Windows) or Command + J (Mac) twice to create 2 different copies.
.jpg)
Step 4: To continue, we need to temporarily hide the top Layer (here is Layer 1 copy) by clicking on the eye icon on the left side of the layer.
.jpg)
We will work on the layer below (layer 1). Hold down the Ctrl (Windows) or Command (Mac) key and select the layer you want to work on (here is Layer 1). The original selection will now reappear.
.jpg)
Step 5: On the menu bar, select Filter => select Distort => select ZigZag.
.jpg)
This filter is used to turn the details in the selected area into water ripples. In the ZigZag dialog box that appears, the Amount control that changes the intensity of the water ripples will appear, the Ridges parameter affects the number of water ripples. Depending on your own feelings and intuition, you should choose the appropriate parameter. In this test, SaDesign applies the Ridges 12, Amount 70 parameters and selects the Style as Pond Ripples. Finally, click OK.
.jpg)
Now we will get the result as shown:
.jpg)
Step 6: Show layer 1 copy again by clicking on the eye that was just turned off. Now we will use the ZigZag filter again. Press the shortcut key Ctrl + Alt + F (Windows) or Command + Option + F (Mac) to use the most recently used filter. Specifically, this time the area applying the effect will be the center of the new puddle just created in the previous step. So change the Style to Out From Center, Ridges to 4 and set the Amount to 100 then press OK.
.jpg)
Step 7: On the menu bar, select Select => select Transform Selection
(2).jpg)
The Transform Selection feature is similar to Photoshop’s Free Transform feature, except it affects the outer selection. Hold Shift + Alt (Windows) or Shift + Option (Mac) and select the upper-left corner of the rectangle, then drag it inward toward the center of the image until it is about 50–60% of its original size. Press Enter (Windows) or Return (Mac) to apply the changes.
.jpg)
Next, select the Select menu => select Inverse or use the shortcut key Shift + Ctrl + I (Windows) or Shift + Command + I (Mac). This process is to invert the selection, then press Backspace (Windows) or Delete (Mac) to delete all components around the center of the puddle. Press Ctrl + D (Windows) or press Command + D (Mac) to remove the selection. Now we get the result as shown.
.jpg)
Step 8: Continue to select the Layer menu => select Merge Down or press the shortcut key Ctrl + E (Windows) or Command + E (Mac) to merge. And then, we have a new Layer just created with the name layer 1 as shown.
.jpg)
Step 9: However, applying the ZigZag filter effect above has created water ripples with many jagged shapes. Therefore, the photo will not look really natural. Let's soften these details with the Gaussian Blur filter. On the menu bar, select Filter => select Blur => select Gaussian Blur.
.jpg)
.jpg)
Now we will have a water ripple image in Photoshop as shown.
.jpg)
You can see a very realistic ripple has been created right?
2. Conclusion
Above is a summary of how to create water ripples in Photoshop. Hopefully, the above sharing can help you create unique photos.
Sadesign Company Limited provides the number 1 quality cheap copyrighted software in Vietnam: Panel Retouch, Adobe Photoshop Full App, Capcut Pro, Canva Pro, Google Drive, Office 365, Retouch4me, Windows 10/11, Youtube Premium, Spotify Premium, Zoom Pro, Netflix, ELSA Speak...
️🎯 Genuine products, full-time warranty, free installation, and dedicated support!


