Best Selling Products

Windows 10 & 11 Pro Key
36 USD

Copyright Adobe Lightroom Account
59 USD

Autodesk All App Account Copyright
120 USD

Upgrade genuine Capture One account
120 USD

Upgrade Genuine Office 365
49 USD

ChatGPT Plus Account (GPT-4)
16 USD

Adobe Photoshop Copyright - Full App
120 USD

Capcut Pro 1 Year
39 USD

Plugin Retouch4me
69 USD

Upgrade Duolingo Super
29 USD

Adobe Premiere Pro Account
99 USD

MidJourney Account
29 USD

Genuine Adobe Illustrator account
99 USD

Genuine Cheap Canva Pro
39 USD

Freepik Premium Account
59 USD
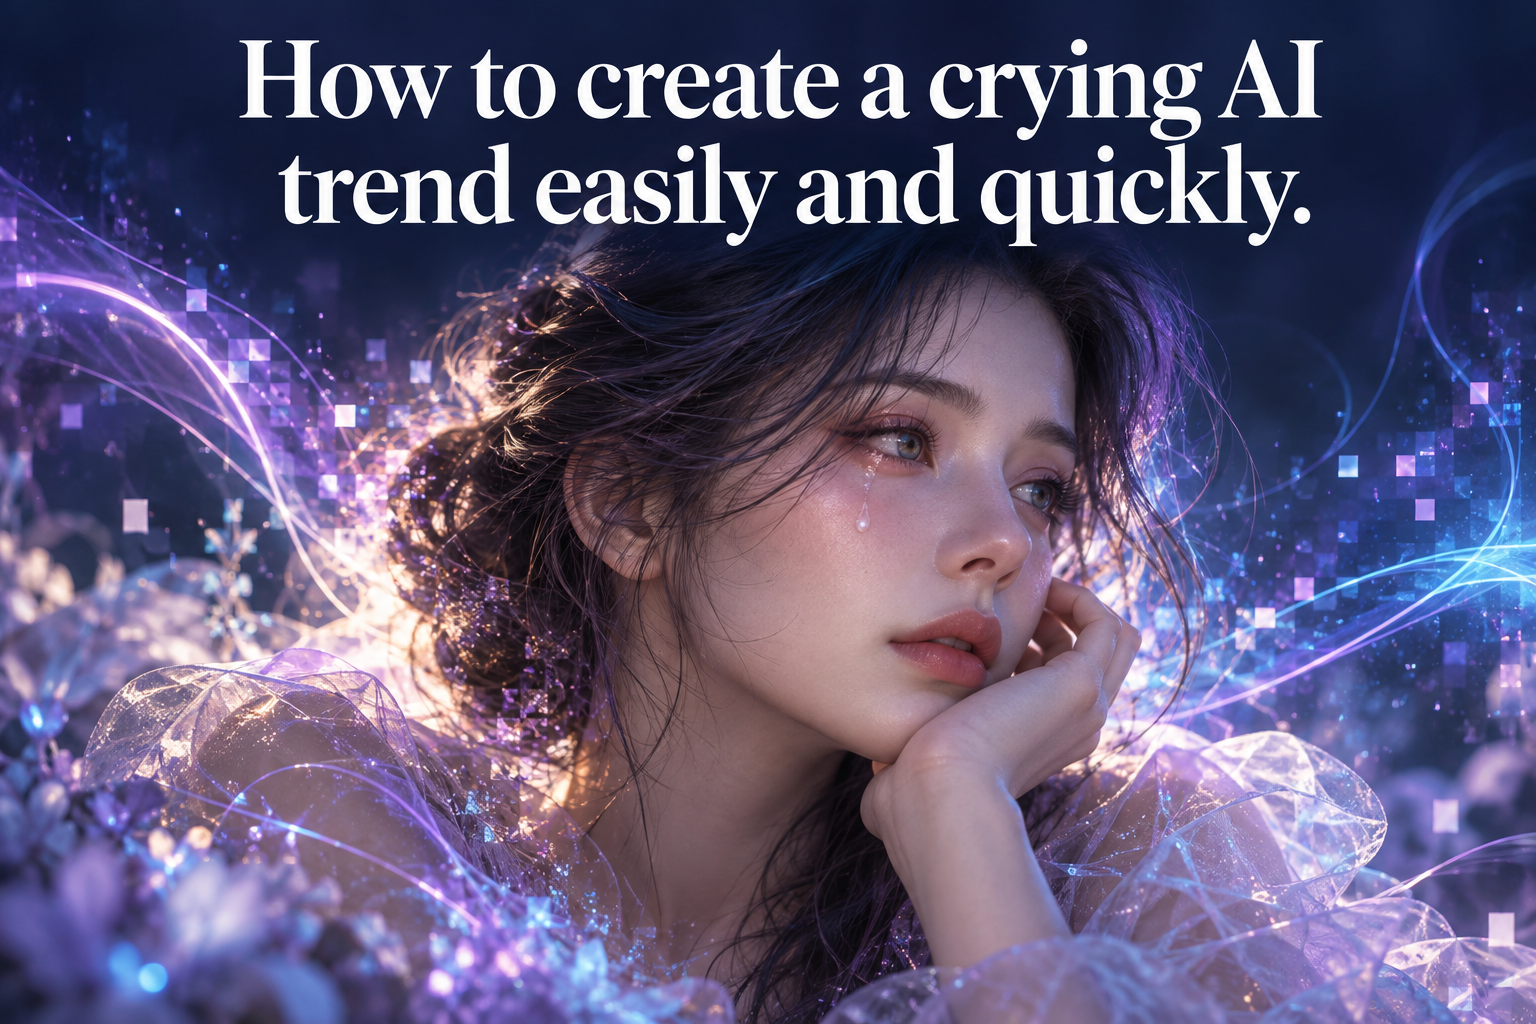
How to create a crying AI trend easily and quickly.
Nội dung
- 1. What is the crying AI trend? Why is it so popular?
- 2. How to create an AI crying trend using CapCut
- Step 1: Open CapCut and select AI Creation Tools.
- Step 2: Upload the photo you want to use to create the video.
- Step 3: Enter the prompt describing the crying effect.
- Step 4: Wait for CapCut to process and create the video.
- Step 5: Review and export the video
- 3. Tips for creating beautiful, natural-looking AI crying photos and videos.
- 4. Why should you use professional editing tools?
- 5. Sadesign: A solution that provides creative tools for users.
- 6. Conclusion
Using just a single existing photo, you can create an emotionally charged version of yourself without needing professional video editing skills. The interesting aspect of this trend lies in how AI handles facial expressions and movements. Instead of manually adding tear effects or adjusting each frame, users simply prepare the photo, enter their desired description, and wait for the tool to process it. In this article, Sadesign will guide you through creating the AI crying trend using CapCut from A to Z, along with tips to ensure your finished product looks natural, beautiful, and suitable for sharing on TikTok, Facebook, or Instagram.
1. What is the crying AI trend? Why is it so popular?
The "AI crying" trend is a type of content that uses artificial intelligence technology to transform portrait photos into images or videos that depict crying, teary-eyed, or sad expressions. The AI uses a reference image and descriptive commands to add movement to the face, eyes, expressions, and sometimes even the surrounding background. This transforms a static photo into a short video with clearer emotions. No complex editing software is needed; even mobile phone users can try this trend in just a few minutes. This is why the AI crying effect quickly gained attention on social media, especially for short videos that are entertaining, emotional, or tell a story through images.
Here are some reasons why the AI crying trend is so popular:
-
Simple operation: No in-depth knowledge of video editing is required.
-
Quickly evoke emotion: A static photograph can be transformed into something more vibrant and emotionally engaging.
-
Versatile: The setting, lighting, expressions, or movements can be changed as desired.
-
Suitable for short videos: The finished product can be used for TikTok, Reels, Shorts, and many other platforms.
-
Easy to experiment: You can use different images and prompts to find the version you like best.
2. How to create an AI crying trend using CapCut
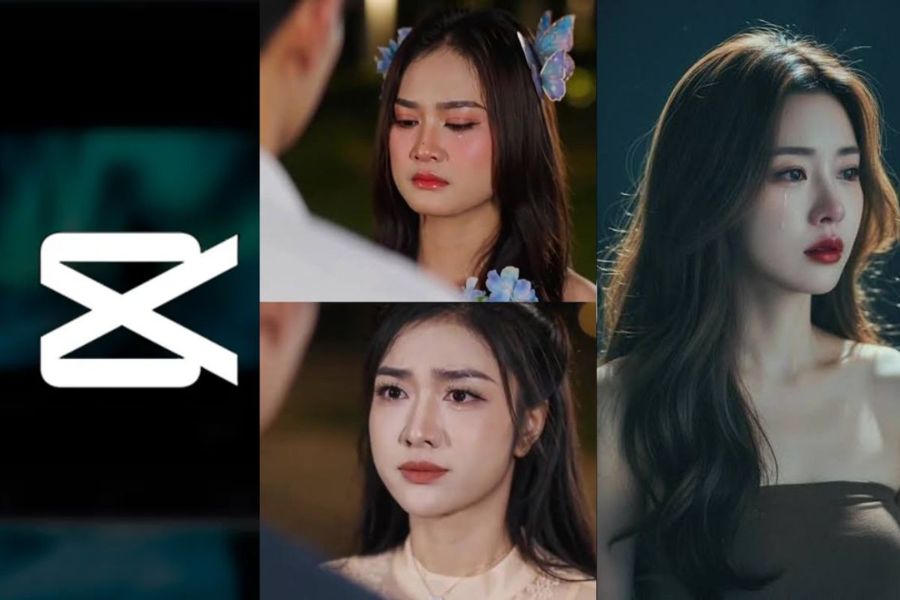
CapCut is a familiar tool for users who frequently create short videos. With its AI-powered content creation feature, you can incorporate portraits and specifically describe how the character moves, expresses emotions, or changes feelings. This makes creating AI crying memes more intuitive, especially for those trying AI-powered videos for the first time.
Step 1: Open CapCut and select AI Creation Tools.
First, open the CapCut app on your phone and find the AI Creation Tools section . Depending on the app version, the name or location of the feature may vary slightly, so just look for the section related to creating AI-powered content or creating videos from images.
After accessing the correct tool, you will see an interface that allows you to import images and describe the content you want to create. This is the first step in transforming a static image into a moving video. If you have never used this feature before, you should take some time to observe the options on the screen before starting to avoid selecting the wrong tool.

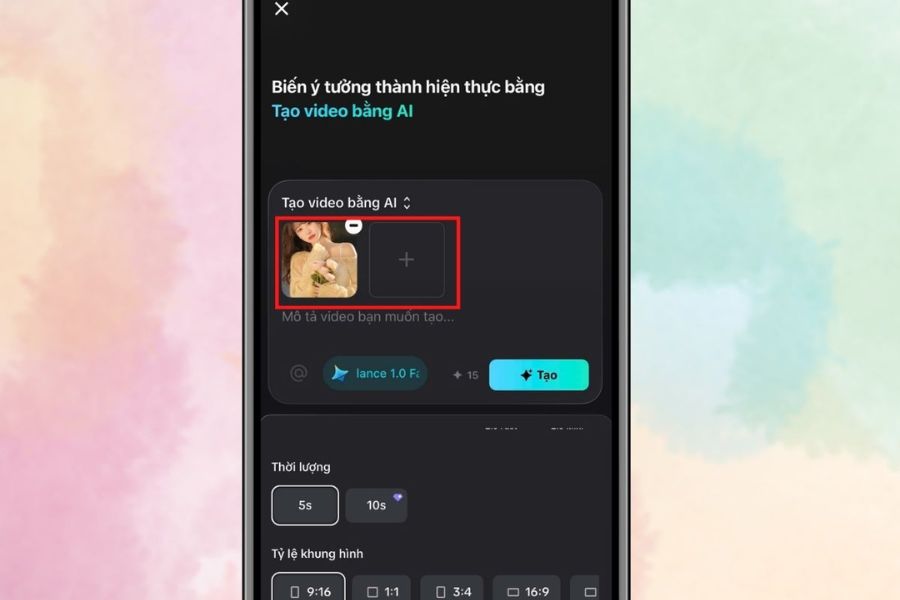
Step 2: Upload the photo you want to use to create the video.
Next, prepare a portrait photo that you want to use for the AI crying trend. Tap the "+" icon or the upload area, then select an image from your phone's gallery. A frontal or slightly angled photo, with a well-lit face and not too much hair covering it, will usually make it easier for the AI to recognize.
You should also prioritize photos with good resolution and faces that occupy a relatively clear area in the frame. It doesn't necessarily have to be a photo taken with a professional camera, but avoid photos that are too blurry, shaky, or have too many people in the frame. If the first attempt doesn't look natural, try changing the photo instead of trying to over-edit the same image.
Step 3: Enter the prompt describing the crying effect.
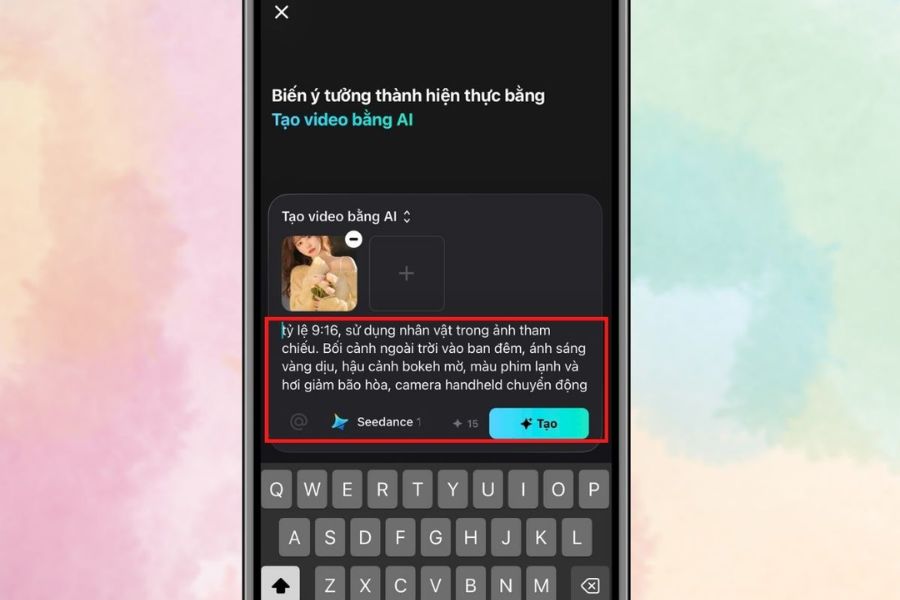
After uploading the image, find the description input box and enter it into the prompt so the AI understands how you want the character to express emotions. The more specific the prompt is about expression, movement, lighting, and camera angle, the better the result will be able to follow your wishes.
You can refer to the prompt below:
“9:16 aspect ratio, using the subject in the reference photo. Outdoor nighttime setting, soft yellow light, blurred bokeh background, cool and slightly undersaturated film colors, handheld camera with gentle, natural movement. 0–1 second: Close-up over a man's shoulder, the woman looks forward with red eyes, lips slightly parted, eyelashes trembling slightly. 1–2 seconds: She tries to force a sad smile, her eyes still wet and full of regret. 2–3 seconds: The smile disappears, she lowers her eyes to hold back tears. 3–4 seconds: She looks up at the man, her eyes filled with tears and heartbreak. 4–5 seconds: She lowers her eyes again, her face silent and lonely. 5–7 seconds: Medium close-up, she closes her eyes to hold back tears then opens them, a single tear appearing at the corner of her eye. 7–8 seconds: Side close-up, she silently bows her head. 8–10 seconds: She slowly turns and walks away into the night, her hair flowing.” "A gentle sway, leaving behind a lonely silhouette. Smooth movement, subtle expression, no exaggeration, no dialogue, no background music, no text on the screen."
Once you've entered the prompt, double-check the content and then select Create . With AI video creation tools, processing time may depend on video length, image quality, and system status. If the first version isn't to your liking, you can change the command, reference images, or some details in the description to try again.
Step 4: Wait for CapCut to process and create the video.
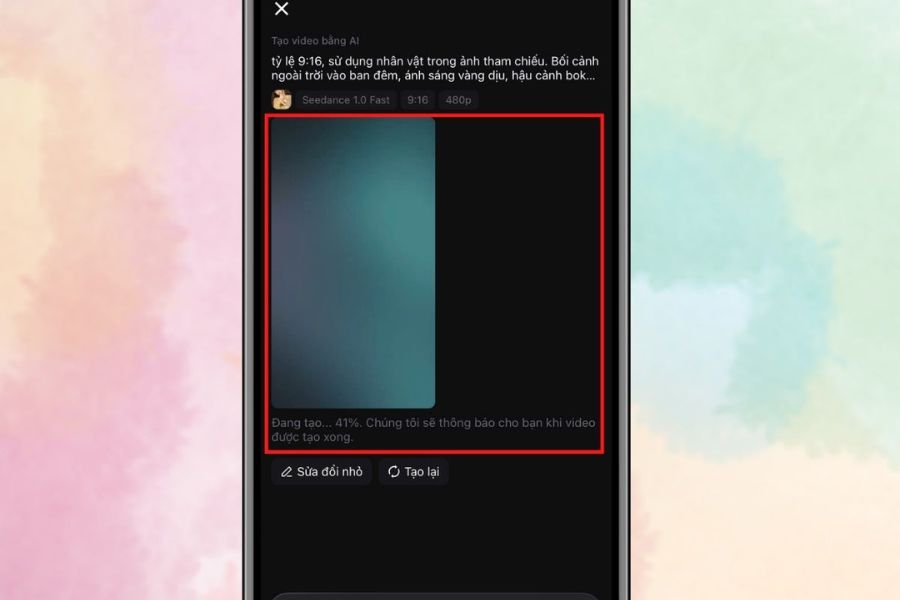
After you press create, CapCut will begin processing the image based on the reference image and prompt you provide. At this point, you just need to wait for the system to complete the video creation process. The AI will attempt to simulate facial movements, eye contact, tears, and other movements based on the description.
Don't judge the result based on just the first few seconds. Once the video is complete, watch the entire clip from beginning to end to check the facial expressions, eye contact, movements, and the naturalness of the tears. If a detail isn't quite right, you can adjust the prompt to be more specific and recreate it. This is a fairly effective way to find a suitable version instead of expecting the first attempt to be perfect.
Step 5: Review and export the video
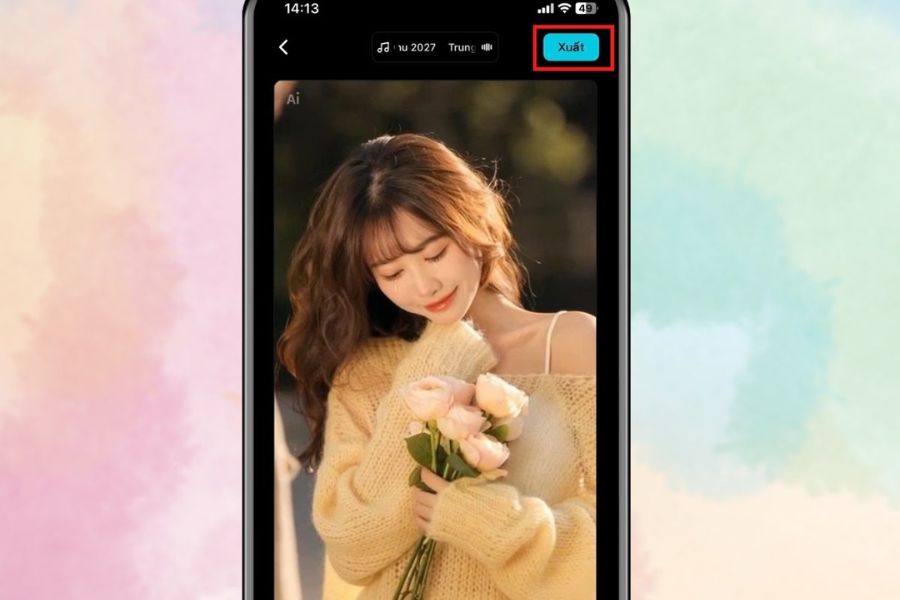
Once the captivity is complete, open the video to check the final product. Pay attention to details such as whether the face is distorted, whether the eyes move naturally, whether the tears appear in the correct position, and whether the movements between frames are jerky or erratic.
If the video meets your requirements, simply select Export to save the finished product to your phone. The video can then be used on TikTok, Facebook Reels, Instagram, or sent to friends. Before posting, you can also add music, text, or subtle effects if you want to give the video more personality, but avoid adding too many details that might detract from the main focus: the character's expression.
3. Tips for creating beautiful, natural-looking AI crying photos and videos.
AI can create many interesting effects, but the quality of the input image still significantly impacts the final product. A clear photo with stable lighting and a neat composition will provide the system with more data to process the expression. If the initial image is too blurry or the face is obscured, the tear effect may sometimes look unnatural. You also shouldn't rely too heavily on a single prompt. Try varying how you depict emotion and movement to find a style that suits the photo. Here are some tips you can apply:
-
Choose high-quality images: Clear images help AI recognize faces better.
-
Prioritize an unobstructed view of the face: Limit hair, glasses, or accessories that cover the eyes and most of the face.
-
Choose stable lighting: Well-lit photos are generally easier to work with than photos that are too dark.
-
Prioritize portrait photos: The clearer the face, the easier it is to convey expressive effects.
-
Avoid being too vague: Specify exactly how the character looks, closes their eyes, bows their head, or changes their expression.
-
Try multiple versions: If the first attempt isn't good, change the image or adjust the prompt and recreate it.
-
Keep the movement moderate: Subtle movements often make videos look more natural.
4. Why should you use professional editing tools?
Besides AI-powered video creation tools, professional image editing software will give you more control over the final product. After creating the video, you may need to adjust color, lighting, contrast, crop frames, or process certain details to give the video a more consistent look. If you frequently create image and video content or design for social media, using professional tools also expands your creative possibilities. You can combine AI with manual editing to transform a simple idea into unique content, instead of relying entirely on automated results.
Some benefits of combining AI with professional editing tools:
-
Proactive editing: You can fine-tune every detail after the AI generates the content.
-
Color control: Easily create a melancholic, cold, or cinematic atmosphere as desired.
-
Image refinement: This includes addressing lighting, composition, and any imperfections in the image.
-
Enhance creativity: AI provides the foundation, while users decide the final style.
-
Suitable for a wide range of needs: From personal photos to TikTok content, Reels, and media design.
5. Sadesign: A solution that provides creative tools for users.
If you frequently use design tools, image editing, and AI applications, having a suitable account will make the creative process more convenient. Sadesign provides solutions that help users access many creative tools, suitable for those who want to create image, video, or design content regularly. Instead of just sticking to the crying AI trend, you can continue to explore many other ways to edit and create content. With the right tools, turning an idea into a finished product becomes more flexible, especially for social media content creators or those who frequently need design work.
You can refer to Sadesign when you need to use creative tools:
-
Assistance in selecting and using tools that suit individual needs.
-
Convenient for those who frequently design and edit images.
-
AI tools can be combined with professional editing software.
-
Support the content creation process for social media.
-
Suitable for both beginners and experienced designers.
6. Conclusion
Creating an AI crying trend isn't too complicated if you have a clear photo and know how to describe the desired effect. With CapCut, the process from uploading the photo, importing the prompt, to creating the video can be done quite quickly on your phone. The most important thing is to choose a suitable photo and patiently experiment with different prompts to find the most natural expression. This trend also shows that AI is opening up many interesting ways to create content that previously required a lot of editing time. If you want a beautiful and unique final product, you can combine AI video creation with professional editing tools. From a simple photo, with a little creativity and the right editing techniques, you can create a unique AI crying video to share with everyone.





















VIP Products








Best Selling Products
Windows 10 & 11 Pro Key
36 USD
Copyright Adobe Lightroom Account
59 USD
Autodesk All App Account Copyright
120 USD
Upgrade genuine Capture One account
120 USD
Upgrade Genuine Office 365
49 USD
ChatGPT Plus Account (GPT-4)
16 USD
Adobe Photoshop Copyright - Full App
120 USD
Capcut Pro 1 Year
39 USD
Plugin Retouch4me
69 USD
Upgrade Duolingo Super
29 USD
Adobe Premiere Pro Account
99 USD
MidJourney Account
29 USD
Genuine Adobe Illustrator account
99 USD
Genuine Cheap Canva Pro
39 USD
Freepik Premium Account
59 USD