Best Selling Products
How to Create an Abstract 90s Rave Poster in Photoshop
Nội dung
Rave - rocking and letting your soul loose to the passionate tunes of DJs is currently very popular among young people. To attract people to the vibrant music party, we need to have extremely cool Rave posters, right? Join SaDesign to learn how to create an abstract 90s Rave Poster in Photoshop through the following shares.
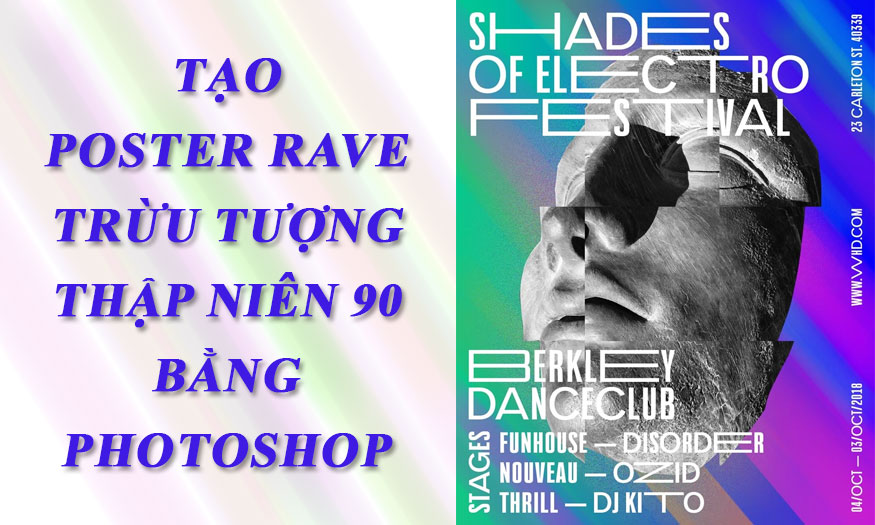
1. Create an Abstract 90s Rave Poster Background in Photoshop
To create an abstract 90s Rave Poster in Photoshop we first need to create a beautiful background layer.
Step 1: Create a new document in Photoshop and name it Rave-Poster. Set the Width to 1270 px, Height to 1600 px. Set Resolution to 72 Pixels/Inch. Then press OK.
.jpg)
Step 2: In the Layers panel, click Create a New Fill or Adjustment Layer (the bottom split circle icon), then select Gradient to create a color for the background. In the Gradient Fill dialog box that appears, set the Style to Linear and click the Gradient color swatch to set the color.
In Presets, select Foreground to Background. In Gradient Type, set the left swatch to #00a175 and the right swatch to #0500e8. Click OK. Now our background will have a very natural gradient effect.
.jpg)
2. Create Lights Effect for Rave Poster Background
Adding a little light and color will make the background of the poster more unique and impressive.
Step 1: On the Layers panel, create a new layer by pressing Shift+Ctrl+N. On the toolbar, select the Brush Tool (B). Right-click to set the brush Size to 250 px and select a round brush with Hardness 0.
.jpg)
Step 2: To make the background more colorful and vibrant, we will add more colors. Use the color codes below, then create single brush marks by clicking on the document. Dot the color irregularly at different locations.
Orange: #ff6600
Magenta: #ff00df
Red: #ff0055
The document we get will have colorful dots.
.jpg)
Step 3: Select the layer with the dots, then go to the menu and select Filter => Blur => Motion Blur. In the Motion Blur window, check the Preview box. Set the Angle to -50 and Distance to 1500 Pixels. Click OK.
.jpg)
Feel free to experiment with different options. Changing the Angle and Distance can give you surprising results.
Step 4: You can repeat this step as many times as you like. You can try making the brush size smaller or larger, or choosing different colors. I added another layer of the same color to give the background more dimension.
.jpg)
3. Create a Dusty Effect for an Abstract 90s Rave Poster Using Photoshop
A little bit of dust effect will make your poster more unique.
Step 1: To create the dust effect, we first need to create a new layer by pressing the key combination Shift+Ctrl+N.
Select the Brush Tool (B) and set the foreground color to #aeaeae. Right-click to set Brush options. Set the Size to 500 px and Hardness to 100%. Brush across the middle of the page.
.jpg)
Step 2: Select the layer containing the brush you just drew, on the menu bar go to Filter => Blur => Motion Blur. Depending on the Distance we set, we will get a blur that is almost non-existent or a blur that still maintains the original shape we started with. I will set the Angle to -50 and set the Distance to 531. Press OK.
.jpg)
Step 3: To create the dust effect, on the menu bar go to Filter => Noise => Add Noise. Here, we can set the size of the dust particles. We can always reduce the opacity later to create a “barely there” look. Check the Preview box to see how the result will look. I’ll set the Amount to 180% and the Distribution to Uniform. Click OK.
On the Layers panel, select the dust layer and reduce the Opacity to 35%.
.jpg)
4. Edit images for Rave Poster
With the 90s abstract style Rave Poster we need a unique image.
Step 1: Open the photo of the ruins and bronze statue of Pompeii from Envato Elements in Photoshop. In the Layers panel, double-click the Background layer to unlock it. Rename it Statue. Click OK.
.jpg)
Step 2: On the Layers panel, add a Layer Mask to the Statue layer.
.jpg)
Step 3: Using the Brush Tool (B), set the foreground color to black. Then use the brush to paint over the outside of the statue, in this case, we want to keep only the statue for use on the Rave-Poster file.
Use the backslash key (\) to view hidden parts.
.jpg)
Step 4: Crop the image so that it can be easily managed in the Rave-Poster file. On the toolbar, select the Crop Tool (C) and crop the image around the statue. Press Enter to continue.
.jpg)
Step 5: Right-click on the Statue layer and select Duplicate Layer. In Destination => Document, select the Rave-poster file. Click OK.
.jpg)
Step 6: Go to the Rave-Poster background. We need to resize and rotate the image. Select the Statue layer, press Ctrl+T to resize. Go to the options bar and enable the Maintain Aspect Ratio button. Set the Width and Height to 45% and the Rotation to -45 degrees.
.jpg)
Step 7: The advantage of working with Layer Masks is that we can hide and show parts of them without having to erase them. In this case, I want to refine the statue by keeping only the face and masking the neck area. Select the Layer Mask on the Statue layer and using the Brush Tool (B) with black as the foreground color, start erasing parts.
.jpg)
Step 8: Select the Statue layer, not the mask layer it is linked to. On the menu bar go to Filter => Distort => Wave. In the Wave settings dialog, set the Type to Square, which means the effect will split the image into squares. Set the Number of Generators to 20, Wavelength to Min 817 and Max 818, Amplitude to Min 1 and Max 2, and set the Scale to 100% both Horizontal and Vertical. Then click OK.
If the dust is covering the statue, feel free to zoom in or move it around to see it.
.jpg)
Step 9: In some cases, the image doesn’t exactly match the background color we’re working with and we need to find a way to make the image neutral. In this case, we’ll convert it to black and white. On the Layers panel, click Create a New Fill or Adjustment Layer => Black & White.
.jpg)
Step 10: If we only want a black and white image, we will need to create a Clipping Mask. While holding down the Alt key, hover between the Black & White Adjustment Layer and the layer below it, and click when you see the arrow pointing down. The Clipping Mask will apply the Adjustment Layer to the layer below it only.
.jpg)
Step 11: If the poster looks a little plain, we can adjust the Brightness/Contrast. On the Layers panel, click Create a New Fill or Adjustment Layer => Brightness/Contrast. In the Properties panel, we can adjust as much or as little as we like. There are benefits to adjusting Brightness/Contrast this way instead of through Image => Adjustment. We can hide and show the layer and adjust the settings using the Properties panel.
(1).jpg)
5. Add Text to an Abstract 90s Rave Poster Using Photoshop
A poster cannot lack text, right? Now we will proceed to add text to the poster.
Step 1: On the toolbar, select the Type Tool (B) and add the text "SHADES OF ELECTRO FESTIVAL". On the menu bar, select Type => Panel => Characters, set the font to Space Odyssey - Modern Sans Serif, Size to 140 pt, Leading to 130 pt and Tracking to 40.
.jpg)
Step 2: Open the Characters panel to tweak the text. We need to stretch some of the letters to make the design more unique. In this case, we will just use some alternatives to fit the width of the poster. In the text layer, select the letters H and A, go to the Characters panel and click the Stylistic Alternate button to use the alternative. Change the color of the text to white.
(2).jpg)
Step 3: I have changed the alternate of some of the other letters. Feel free to set the parameters to your liking.
(1).jpg)
Step 4: You can add some more details to the poster such as the stage, band, date, website and address to make it look more impressive. I have added some text in different places of the poster.
To rotate the text in different directions, create a text layer and use the Transform Tool by pressing Ctrl+T. Hover over a corner of the text, hold down the Shift key and drag to rotate it.
(1).jpg)
That's it, we've completed creating an abstract 90s Rave Poster in Photoshop. Now we have a cool abstract 90s Rave poster for our music party.
(1).jpg)
Step 5: Once you've created your poster, it's time to save it. On the menu bar, go to File => Save and save the file as normal.
To save a JPEG file for the web, go to File > Save for Web or Shift+ALT+Ctrl+S. Select the file type you want to save the document in and set the Quality to 100. Under Image Size, you can change the pixel size of the image if there are any size restrictions.
.jpg)
At the bottom left, you can see a preview of the file size. This is useful when there are size restrictions on a website and you need to reduce the quality or size of the image.
Click Save… to select a location in the new window and click Save again.
So you have completed creating an Abstract 90s Rave Poster in Photoshop. Actually, it involves quite a few steps but it is not too complicated, right? You can freely change the parameters to have the most unique transformations. Let's experiment right away to get extremely impressive posters.
See more:
Create a Star Wars inspired movie poster with Photoshop
How to create a powerful Cristiano Ronaldo text portrait poster


