Best Selling Products

Capcut Pro 1 Year
39 USD

Plugin Retouch4me
69 USD

Upgrade Genuine Office 365
49 USD

MidJourney Account
29 USD

ChatGPT Plus Account (GPT-4)
16 USD

Genuine Adobe Illustrator account
99 USD

Upgrade genuine Capture One account
120 USD

Autodesk All App Account Copyright
120 USD

Freepik Premium Account
59 USD

Adobe Photoshop Copyright - Full App
120 USD

Genuine Cheap Canva Pro
39 USD

Copyright Adobe Lightroom Account
59 USD

Upgrade Duolingo Super
29 USD

Windows 10 & 11 Pro Key
36 USD

Adobe Premiere Pro Account
99 USD
How to Enlarge Images in Photoshop
Nội dung
- 1. Step 1: Open the Image Size box
- 2. Step 2: 8 options to Enlarge photos in Photoshop
- 2.1. Automatic
- 2.2. Preserve Details
- 2.3. Preserve Details 2.0
- 2.4. Bicubic Smoother
- 2.5. Bicubic Sharper
- 2.6. Bicubic
- 2.7. Nearest Neighbor
- 2.8. Bilinear
- 3. So sánh Bicubic Smoother, Preserve Details và Preserve Details 2.0
Do you have beautiful photos but they are too small, not enough size to print or post on social networks? Don't worry, we can completely enlarge photos in Photoshop. Let's learn about this enlargement method with SaDesign through the following shares.
Do you have beautiful photos but they are too small, not enough size to print or post on social networks? Don't worry, we can completely enlarge photos in Photoshop. Let's learn about this enlargement method with SaDesign through the following shares.
1. Step 1: Open the Image Size box
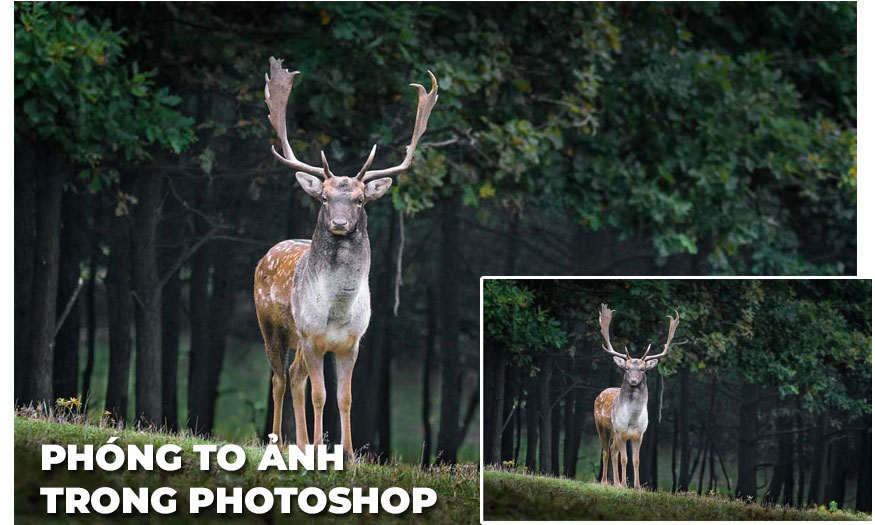
First, let's open the photo we want to enlarge in Photoshop. Here we use the image of a deer in the forest with the image size of 1280 x 800px.
.jpg)
Then on the menu bar, select Image => Image Size or press the shortcut key combination Ctrl + Alt + I (Windows) or Cmd + Opt + I (MacOS).
.jpg)
This will open the Image Size box.
.jpg)
2. Step 2: 8 options to Enlarge photos in Photoshop
To enlarge an image in Photoshop, we often choose to resample. Resampling means that you are changing the pixel size of the image. When we downsample, it means that we are removing pixels and therefore it removes information and details from your image. When we upsample, it means that we are adding pixels. Photoshop will add these pixels by using interpolation.
There are 8 resampling methods in Photoshop. But we need to enable Preserve Details 2.0 in Photoshop Preferences. Preserve Details 2.0 is only available for testing purposes and is not enabled by default. Go to Photoshop => Preferences (macOS) or Edit => Preferences (Windows). Go to Technology Preview.
.jpg)
Tick Preserve Details 2.0 to turn it on.
.jpg)
Now, back to the Image Size window. Here are screenshots of eight Photoshop resampling methods you can use to enlarge an image.
.jpg)
2.1. Automatic
Photoshop will decide on the best resampling method for your image and proceed to enlarge it.
2.2. Preserve Details
Preserve Details keeps edges sharp when you zoom in on an image in Photoshop. Let's take a look at an example. I'll zoom in on an image 400% as shown in the following illustration.
.jpg)
2.3. Preserve Details 2.0
Preserve Details 2.0 uses advanced deep learning AI to detect and preserve important image details without over-sharpening anything else. It sharpens edges when you zoom in on an image in Photoshop, but it makes sure the edges aren't over-sharpened. Here's an image zoomed in at 400%.
.jpg)
This method produces less noise than the previous method and the edges are even sharper.
2.4. Bicubic Smoother
The Bicubic Smoother resampling method is similar to Bicubic in the way it creates new pixels. However, it only blurs the pixels slightly to blend the new pixels into the old ones, making the image smoother and more natural looking.
Also, this method doesn't have a “Reduce noise” slider like the previous two methods.
.jpg)
2.5. Bicubic Sharper
Bicubic Sharper is similar to Bicubic in the way it creates new pixels. However, instead of blurring the entire pixel to improve the blending between new and old pixels like Bicubic Smoother, it only softens the edges of the pixels. Adobe recommends this method for shrinking images, but some Photoshop pros say it also produces better enlargements than Bicubic Smoother.
2.6. Bicubic
Bicubic resampling requires Photoshop to figure out the color of new pixels by averaging the colors of more pixels around the new pixel to get a better guess. This method takes longer than the previous two methods, but creates smoother transitions in areas where one color transitions to another.
2.7. Nearest Neighbor
Nearest Neighbor resampling gives you the lowest image quality. With this method, Photoshop looks at the colors of surrounding pixels and copies them. This method is notorious for creating jagged edges, so you should only use it on images with hard edges, like vector images.
2.8. Bilinear
Bilinear resampling asks Photoshop to guess the color of new pixels by averaging the colors of the pixels around it. It produces slightly better results than Nearest Neighbor and is still quite fast.
3. So sánh Bicubic Smoother, Preserve Details và Preserve Details 2.0
.jpg)
Of the eight methods listed above, the three most popular resampling methods are Preserve Details 2.0, Preserve Details, and Bicubic Smoother.
Bicubic Smoother softens edges making the image slightly blurry.
Preserve details zoom in well but edges are over sharpened.
Preserve Details 2.0 zooms in best and edges are not over-sharpened.
So Preserve Details 2.0 is the best option right now until Adobe comes out with a new and better sampling method in Photoshop.
Adobe Photoshop Genuine License
Above is a summary of ways to enlarge images in Photoshop. Each type has its own characteristics. Depending on your needs, you choose the appropriate method.


VIP Products


Best Selling Products
Capcut Pro 1 Year
39 USD
Plugin Retouch4me
69 USD
Upgrade Genuine Office 365
49 USD
MidJourney Account
29 USD
ChatGPT Plus Account (GPT-4)
16 USD
Genuine Adobe Illustrator account
99 USD
Upgrade genuine Capture One account
120 USD
Autodesk All App Account Copyright
120 USD
Freepik Premium Account
59 USD
Adobe Photoshop Copyright - Full App
120 USD
Genuine Cheap Canva Pro
39 USD
Copyright Adobe Lightroom Account
59 USD
Upgrade Duolingo Super
29 USD
Windows 10 & 11 Pro Key
36 USD
Adobe Premiere Pro Account
99 USD