Best Selling Products
How to Make a Baseball Card Template in Photoshop SIMPLE
Nội dung
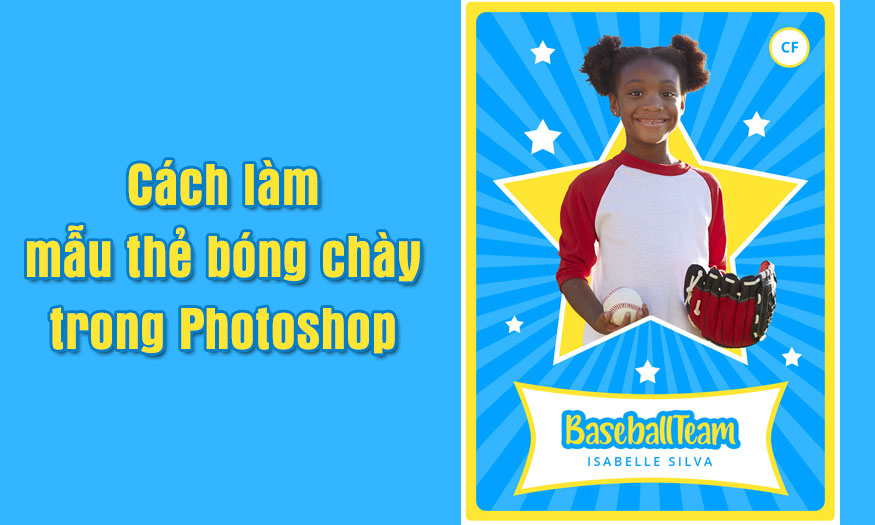
If you are passionate about baseball, you cannot help but know baseball cards. The cards are printed with images of players, teams, stadiums, etc. You can completely create your baseball cards using Photoshop software. Join Sadesign to learn how to make baseball card templates in Photoshop through the following shares.

1. Create a new file for the baseball card template in Photoshop
First we need to create a new document to proceed with creating the baseball card template in Photoshop. Please follow the steps below.
Step 1: In Photoshop, select File => New or press the shortcut key Ctrl + N and set the following parameters: Width is 2.5 in, Height is 3.5 in, and Resolution is 300 px/in.
(1).jpg)
Step 2: Create a border for the baseball card template. Select the Rounded Rectangle Tool on the toolbar, then use the scissors tool to create a rectangle with the Width of 730 px, Height of 1030 px, and Radius of 10 px. Then set the Fill Solid Color to #ffe533 and center it both vertically and horizontally on the frame. Name this layer Border.
(1).jpg)
2. Create a Baseball Card Template Background in Photoshop
To create a baseball card template background in Photoshop, follow these steps:
Step 1: On the toolbar, select the Rounded Rectangle Tool and draw a rounded rectangle with the following dimensions: Width is 690 px, Height is 990 px, and Radius is 20 px. Then set the Fill Solid Color to #00a2ff and center it vertically and horizontally on the frame. Name this layer Card Background.
(1).jpg)
Step 2: Next, on the toolbar, select Custom Shape Tool, then select Registration Target 2. Click anywhere and draw a shape with the following dimensions: Width and Height are both 1350 px. Then set the Fill Solid Color to #ffffff, then center it both vertically and horizontally on the frame.
(1).jpg)
Step 3: Press Ctrl and select the thumbnail of the Background Card to create a selection for this layer. Then, go to Layer => Layer Mask => Reveal Selection to add a mask to reveal the selected area of the layer.
(1).jpg)
Step 4: Now change the Opacity of this layer to 20% and name it Background Shape.
(1).jpg)
3. Add a photo to a baseball card template in Photoshop
Once we have the frame, let's add character images to the baseball card template in Photoshop following these steps:
Step 1: On the toolbar, select Custom Shape Tool, select the 5 Point Star shape, select any position and draw a star with the following dimensions: Width is 625 px and Height is 594 px. Then set the Fill Solid Color to color #ffe533, Stroke Solid Color to color #ffffff, and set Stroke Width to 10 px. Then, position this layer with coordinates X: 375.50 px and Y: 435 px and name it Photo Background.
(1).jpg)
Step 2: Now go to File => Open, select the character image to create the baseball card template and click Open. Then, isolate the subject from the image using the Quick Selection Tool or the Magic Eraser Tool. Then, right-click on the image layer and select Convert to Smart Object.
Using the Move Tool (V), click and drag the layer with the subject into the baseball card template PSD file. Then, press Ctrl+T on your keyboard to open the transform options and set the Width and Height of the layer to 24%. Then, position the layer as shown below and name it Photo.
(1).jpg)
Step 3: On the menu bar, select Layer => Layer Mask => Reveal All to add a mask. Then select the Brush Tool (B), choose a hard brush, and set the foreground color to #000000. While selecting the layer mask, brush as shown below. Instead of brushing on the layer mask, you can also create a selection and then paint over it.
(1).jpg)
4. Create Stars in a Baseball Card Template in Photoshop
Step 1: In this section, we will create the stars in our baseball card template in Photoshop. Select the Custom Shape Tool, select the 5 Point Star shape, click anywhere inside the canvas to create a new custom shape, and set the Width to 75 px and Height to 71 px. Then, set the Fill Solid Color to #ffffff and position this layer at coordinates X: 161.50 px and Y: 277.50 px. Name this layer Star_1.
(1).jpg)
Step 2: Now repeat this process to add as many layers as you want and name the layers in numerical order. Feel free to use different sizes to get different-sized stars. Then, select the first star layer and hold Shift while clicking on the last star layer to select all the layers in between. Press Ctrl+G on your keyboard to create a new group from the selected layers and name it Stars.
(2).jpg)
5. Add Text to the Baseball Card Template in Photoshop
So you have basically completed the baseball card template in Photoshop. However, let's add some text to make the baseball card more complete and attractive.
Step 1: On the toolbar, select the Custom Shape Tool, select the Banner 4 shape, click anywhere inside the canvas to create a new custom shape and set the Width to 545 px and Height to 228 px. Then, set the Fill Solid Color to #ffffff a and the Stroke Solid Color to #ffe533. Then, position this layer at coordinates X: 375.50 px and Y: 876 px and name it Banner.
(1).jpg)
Step 2: On the toolbar, select the Horizontal Type Tool (T), set the font to Lovely Kids, font size to 80 px, alignment to Center, and color to #ffe533. Then, click anywhere inside the canvas, type the text "Baseball Team" (or whatever text you want), and set this layer to X: 376 px and Y: 861.50 px.
(1).jpg)
Step 3: Right-click on this layer and select Blending Options. Then select the Stroke style and use the settings below:
(1).jpg)
Step 4: Now, select the Horizontal Type Tool (T) and set the font to Open Sans, font style to SemiBold, font size to 25 px, alignment to Center and color to #00a2ff. Then, in the Character panel, check the All Caps option and set Tracking to 200. Click anywhere inside the canvas, type the text "Isabelle Silva" or any character name of your choice and position this layer at coordinates X: 376.15 px and Y: 923.57 px.
(1).jpg)
Step 5: Select the Custom Shape Tool, select the Banner 4 shape, click anywhere inside the canvas to create a new custom shape and set the Width and Height to 80 px. Then, set the Fill Solid Color to #ffffff a and the Stroke Solid Color to #ffffff #ffe533. Then, position this layer at X: 650 px and Y: 100 px and name it Background.
(1).jpg)
Step 6: Now, select the Horizontal Type Tool (T) and set the font to Open Sans, font style to Bold, font size to 30 px, alignment to Center and color to #00a2ff. Then, click anywhere inside the canvas and type the text “CF”. Then, hold Ctrl while clicking on the Background layer thumbnail to make a selection of this layer, select the Move Tool (V) and click on Align Vertical Center and Align Horizontal Center to align this layer both vertically and horizontally.
(1).jpg)
Step 7: Select the Background layer and hold Ctrl while clicking on the CF layer to select both layers at once. Then press Ctrl+G on your keyboard to create a new group from the selected layers and name it Position.
(1).jpg)
So you have completed the baseball card template in Photoshop with a girl baseball player.
Above is a summary guide of the steps to create baseball card templates in Photoshop. Hopefully, you can create unique card templates.


