Best Selling Products
Adobe Premiere Pro Account
99 USD
Capcut Pro 1 Year
39 USD
Genuine Adobe Illustrator account
99 USD
Autodesk All App Account Copyright
120 USD

ChatGPT Plus Account (GPT-4)
16 USD
Copyright Adobe Lightroom Account
59 USD
Upgrade Genuine Office 365
49 USD
Adobe Photoshop Copyright - Full App
120 USD

Freepik Premium Account
59 USD
Genuine Cheap Canva Pro
39 USD
Windows 10 & 11 Pro Key
36 USD
Upgrade Duolingo Super
29 USD
Upgrade genuine Capture One account
120 USD
MidJourney Account
29 USD
Plugin Retouch4me
69 USD
How to quickly and easily fix text errors in AI images using Canva.
Nội dung
- 1. Why do AI images often have text errors?
- 2. How can Canva help correct text errors in AI images?
- 3. Instructions on how to fix text errors in AI images using Canva
- Step 1: Upload your AI image to Canva
- Step 2: Create a design frame that fits the image.
- Step 3: Remove the faulty text from the AI image.
- Step 4: Add new text and edit the font.
- Step 5: Align the text for a more natural design.
- Step 6: Check and download the completed image to your computer.
- 4. Tips for fixing AI text errors in Canva for a more beautiful and professional look.
- 5. Common mistakes when editing text on AI images using Canva
- 6. Conclusion
AI helps you create greeting cards, advertising posters, or social media images with just a few lines of text. However, the finished product sometimes contains spelling errors, missing Vietnamese diacritics, font errors, or distorted characters, making the design incomplete. Instead of recreating the image from scratch, you can use Canva to remove the faulty text and replace it with new content. In this article, let''s explore with Sadesign how to quickly and easily fix text errors in AI images using Canva, even if you don''t have much design experience.

1. Why do AI images often have text errors?
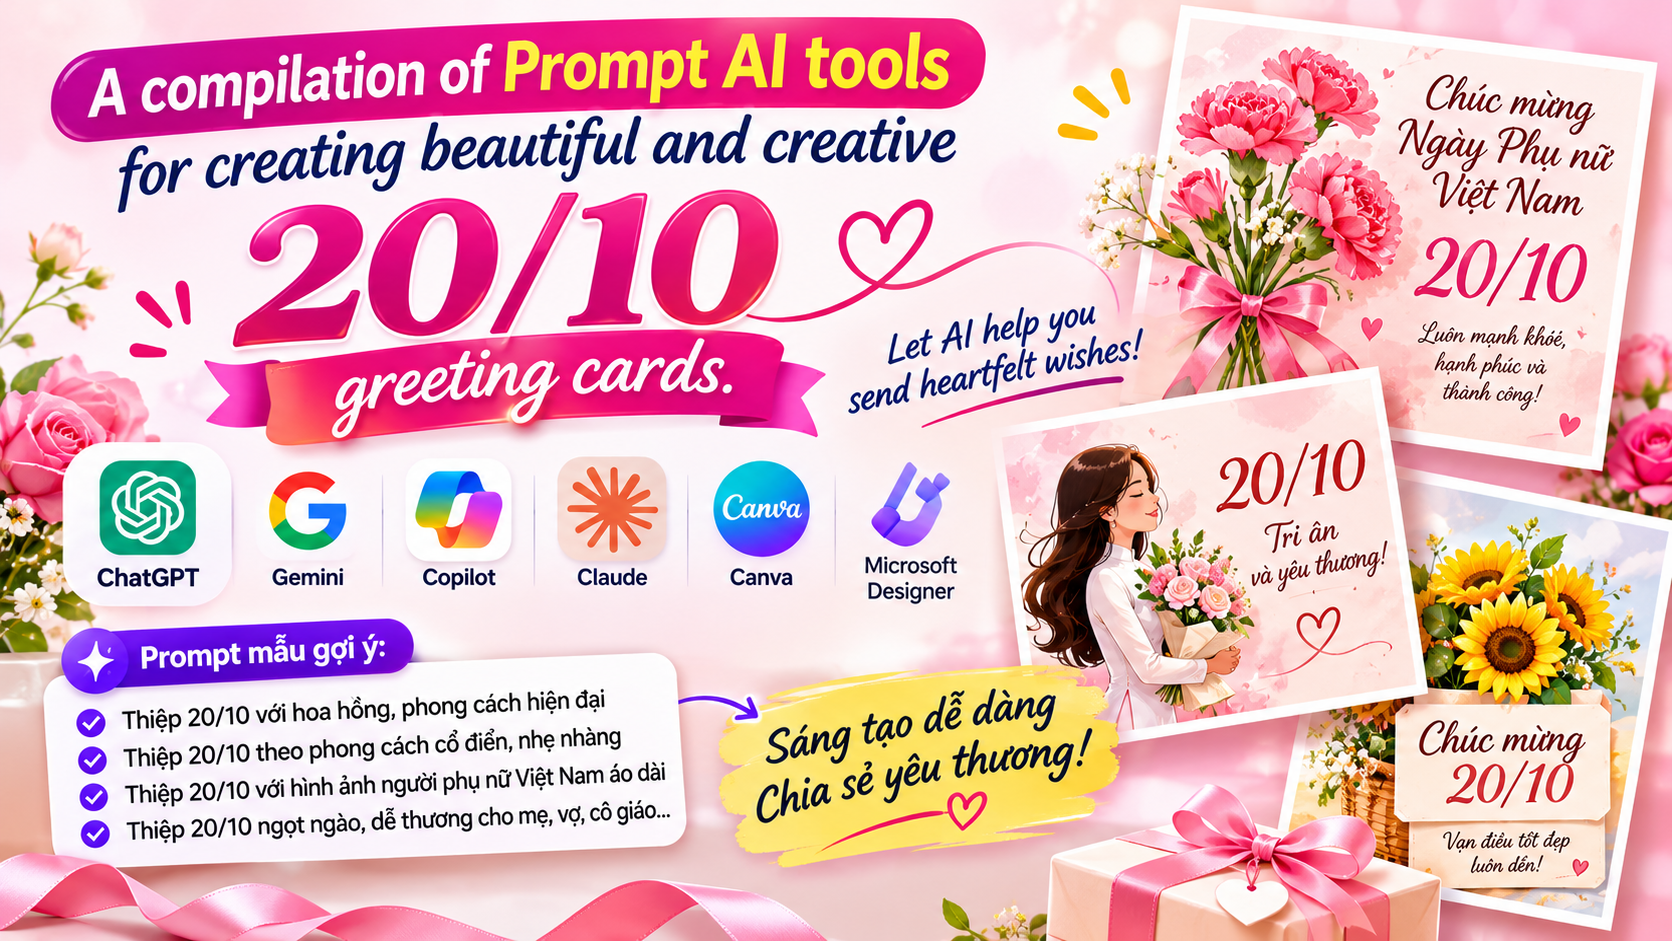
AI image creation tools can build images based on descriptions, from color and characters to composition and artistic style. However, accurately representing text remains a challenge, especially with Vietnamese, which has many tones and special characters. Therefore, when creating greeting cards for October 20th, sales posters, or event banners, you might get a beautiful image but the text might not be as desired. Some common errors when creating images with AI include:
-
Spelling errors: The AI creates meaningless words, misspells proper names, or omits letters in greetings.
-
Vietnamese accent errors: Letters like ă, â, ê, ô, ơ, ư may be distorted or have missing accent marks.
-
Distorted or crumpled letters: Characters overlap, spacing is uneven, or the strokes are altered.
-
Inconsistent font style: The headings and content have mismatched styles, making the overall look unprofessional.
-
The text layout is not well-designed: The text obscures the characters, decorative flowers, or other important details of the image.
These issues don't mean the entire image is a failure. If the background, colors, and textures are still good, you just need to fix the area with the faulty text and insert new text using Canva. This method saves time, preserves the original idea, and allows you to proactively control the content before sharing.
2. How can Canva help correct text errors in AI images?
Canva is an online design tool with an intuitive interface, suitable for beginners. After uploading an AI image, you can use editing features to fix misspelled text, add new titles, change font styles, and adjust colors to your desired style. This allows you to complete a greeting card with distorted text without having to start over. Useful features for editing text on AI images using Canva include:
-
Magic Erase or Object Removal Tool: Helps remove old text from certain images. Feature availability may vary depending on account and service plan.
-
Text: Allows you to add new titles, subtitles, or greetings with content you enter yourself.
-
Customize fonts: Change the font, size, color, boldness, and alignment for better readability.
-
Shapes and elements: Use rectangles, circles, or patterns to cover up old text when it cannot be erased directly.
-
Download: Export the complete design as PNG, JPG, or a format suitable for your intended use.
The key point is that Canva doesn't automatically correct every single character incorrectly created by the AI in all cases. Instead of trying to restore each distorted character, you should delete or obscure the old text and re-enter the correct content. This is the easiest way to control the results and minimize errors.
3. Instructions on how to fix text errors in AI images using Canva
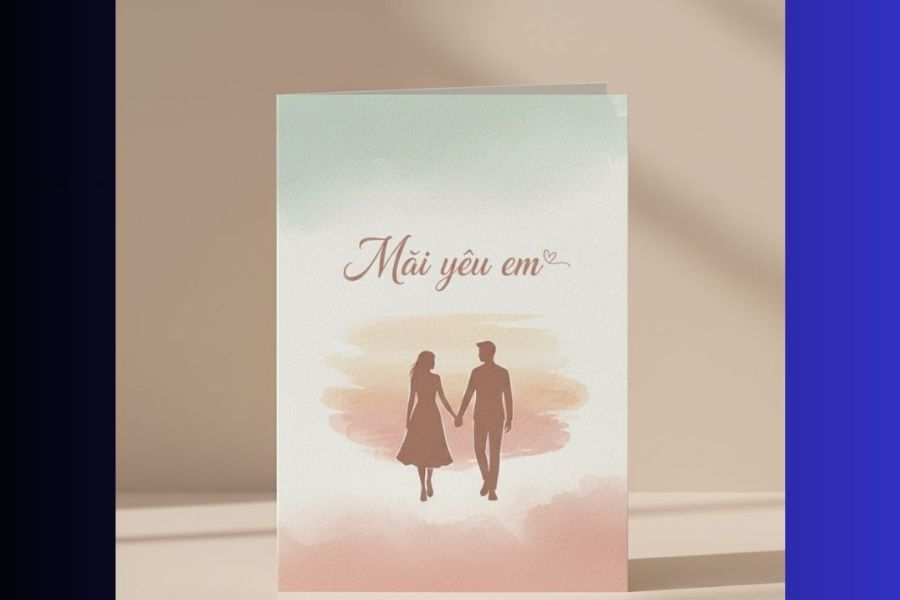
To do this, you need to prepare an image created using AI and saved on your computer or phone. In the example below, we will use a greeting card for Vietnamese Women's Day (October 20th) with incorrect punctuation in the greeting. You can apply the same process to advertising posters, product images, banners, or illustrations with text.
Step 1: Upload your AI image to Canva
First, access Canva in your browser or open the Canva app on your device. Log in to your account to begin designing. On the main interface, you can create a new design or upload existing images to edit.
Follow these steps:
-
Access Canva and log in to your account.
-
Find the Uploads section on the interface.
-
Select Upload files .
-
Find the AI image saved on your device and confirm the upload.
-
Once the image appears in the upload gallery, tap on the image or drag it onto the design page to begin editing.
At this step, you should choose an image with relatively good resolution so that the details around the text area remain clear. If the card has a floral background, patterns, or characters close to the text, carefully check the area to be processed to avoid accidentally deleting important elements.
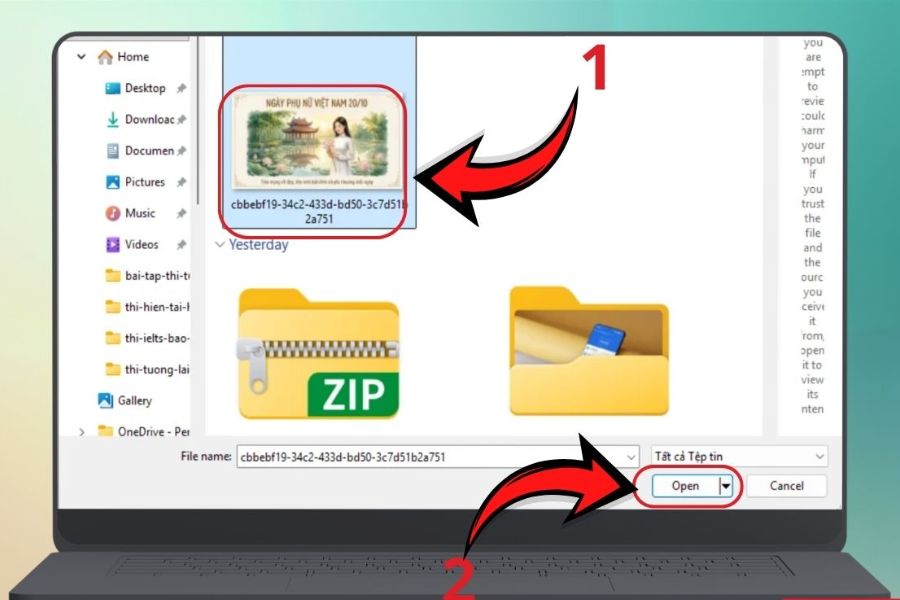
Step 2: Create a design frame that fits the image.
After successfully uploading the image, open it and choose the appropriate editing method. Depending on your current Canva interface, you may see the "Edit image" option or the option to create a design from the uploaded image.
The basic operations include:
-
Select the image you just uploaded from your library.
-
Click on the option to open or edit the image if the interface is displayed.
-
If you need a custom design page, select Create a design or create a design with the appropriate dimensions.
-
Insert the image into the page and adjust its size to fit the design frame.
If you're editing a 20/10 greeting card, prioritize maintaining the original image aspect ratio to avoid distorting patterns, characters, or decorative details. If creating a poster for social media, consider the output size from the start to avoid multiple image cropping sessions. A small note: button names and tool locations may vary depending on the Canva version, device, and account interface. Therefore, if you don't see the correct option as instructed, look for the equivalent function in the toolbar or open the image directly in the design editor.
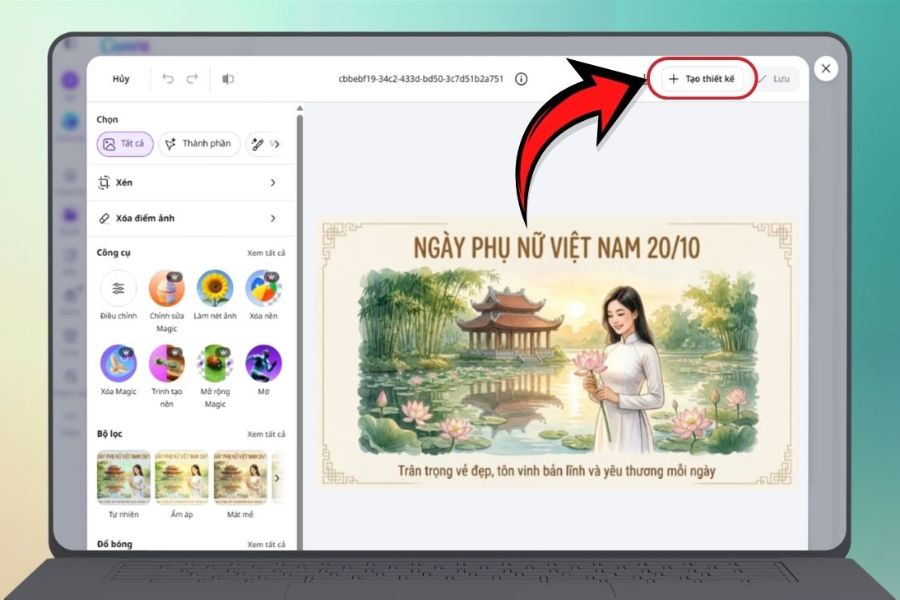
Step 3: Remove the faulty text from the AI image.
This is the most important step in the editing process. When AI images show misspelled, missing, or distorted text, you should correct the old text before adding new content. Keeping the incorrect text and then inserting new text over it can make the image look cluttered, especially if the background has many details.
To resolve this, you can follow these steps:
-
Method 1: Using Magic Erase. Open the image in the editor, find the image editing tools group, and select the Magic Erase feature if your account supports it. Draw over the text you want to erase and then apply the erase action so Canva attempts to recreate the background underneath.
-
Method 2: Use the equivalent object removal tool. If the interface provides a tool to remove objects or image areas, select the error text area and follow the on-screen instructions.
-
Method 3: Cover the old text with a shape. If you don't have a suitable eraser tool, add a shape that's a similar color to the background. Adjust its size and position to cover the old text before inserting the new content.
When using the eraser tool, select an area just large enough to avoid affecting surrounding details. If the text is on a simple background such as white, light pink, or a solid color, it's usually easier to remove. Conversely, with a background that has many petals, lighting, or complex patterns, the result may not be perfect, and you may need to try again or use a shape to cover it up.
It's important to note that some advanced editing features may require Canva Pro or may not be available on all accounts. If you can't use Magic Erase, you can still complete your design by manually covering up the old text and adding new text.
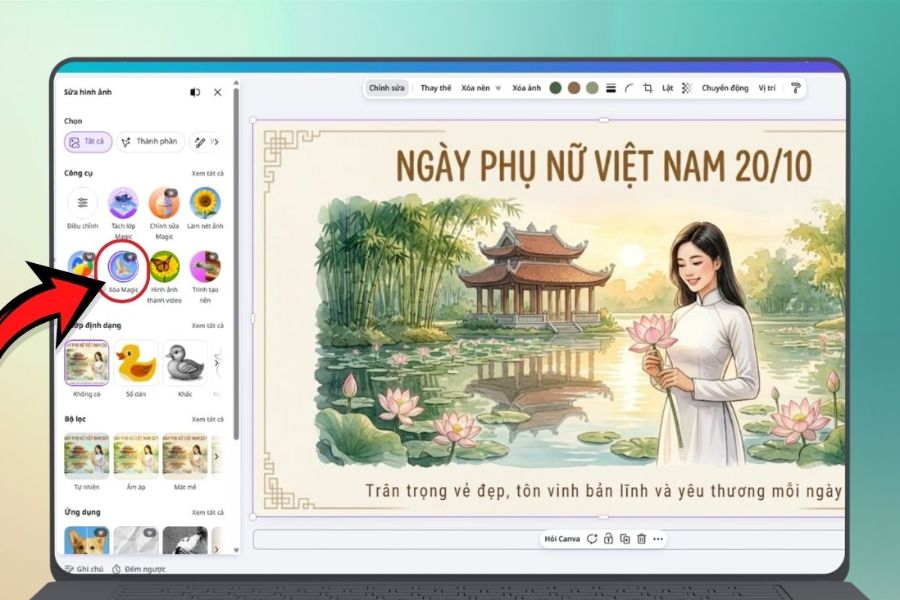
Step 4: Add new text and edit the font.
After processing the old text area, add the correct content to the design. This is when you can have complete control over the greeting, advertising message, or headline without relying on the AI's text generation capabilities.
Adding text to Canva is quite simple:
-
Select the Text option in the toolbar.
-
Click Add a heading to create the main text.
-
Re-enter the spell-checked content, for example: "Happy Vietnamese Women's Day 20/10".
-
Choose a font that matches the image style.
-
Adjust the size, color, boldness, and position of the text.
-
If you need to add more greetings, create a separate text box for a clearer layout.
For an attractive design, avoid using too many fonts on a single card. Choose one prominent font for the title and an easy-to-read font for the body text. If the image has a gentle, feminine style, you can prioritize soft fonts; for sales posters, a clear font with good contrast will be more suitable.
Additionally, carefully check the Vietnamese character display capabilities of the font. Some fonts may not fully support Vietnamese characters or diacritics, resulting in unexpected text display. You should try typing a complete sentence before adjusting the entire design.
Step 5: Align the text for a more natural design.
Once the content is accurate, you need to balance the text with the background image so that the final product doesn't look disjointed. The new text should harmonize with the colors, lighting, and style of the original image, while also being prominent enough for viewers to easily read the message.
Some helpful alignment tips include:
-
Choose font colors with good contrast: White text works well on dark backgrounds, while bold text is generally easier to read on light backgrounds.
-
Maintain proper spacing: Avoid placing text too close to the edge of the image or obscuring subjects, floral decorations, and other important details.
-
Adjust the size according to priority: The main title should stand out more than any secondary greeting or additional information.
-
Limit the use of overly strong effects: Shadows, text borders, and glow effects should only be used when absolutely necessary.
-
Consistent alignment: Text should be evenly spaced and positioned, avoiding slanted or overlapping content.
If the background after removing the text doesn't look natural, you can place a semi-transparent colored frame or a suitable decorative image behind the new text. This helps to conceal imperfections while highlighting the content. However, keep the design simple so the final product isn't overly detailed.
Step 6: Check and download the completed image to your computer.
Before exporting the image, take some time to check the entire design. A beautiful greeting card not only needs eye-catching images but also accurate content, a clear layout, and text that displays well on a phone screen. This step also helps you spot small errors that might be overlooked during the editing process.
Follow these steps:
-
Read the entire text again to check for spelling, punctuation, and Vietnamese accents.
-
Zoom in on the image to check the handwriting, the spacing between characters, and the area that was just deleted.
-
Scale down the design to assess the overall layout, contrast, and readability.
-
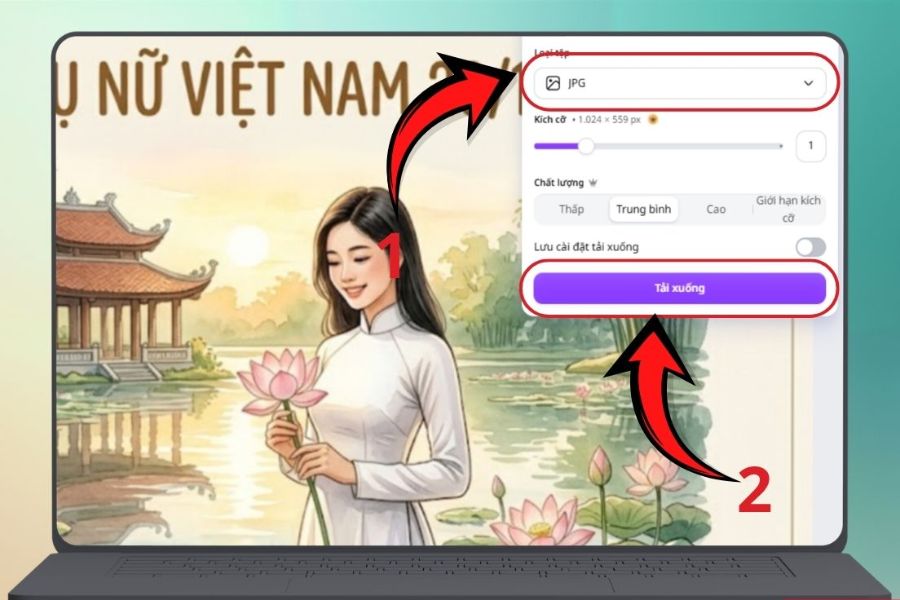
Select Share in the corner of the interface.
-
Click Download .
-
Choose a suitable file format, then download the image to your device.
You can choose PNG if you want to keep the image sharp, especially with designs that have small text and lines. JPG is usually suitable when prioritizing a small file size for quick sharing. After downloading, open the saved file to make sure the image displays correctly as designed in Canva.
4. Tips for fixing AI text errors in Canva for a more beautiful and professional look.
To save time, you should accurately identify the area that needs editing before you begin. Not every AI image needs complete retouching; sometimes just a misspelled line of text or a distorted title can ruin the design. Focusing on the right areas will help you preserve the best parts of the image and minimize unnecessary edits.
You can also apply the following tips:
-
Prioritize deleting words rather than fixing each character: If the text is severely distorted, re-entering the entire content is often faster and easier to manage.
-
Save an original copy: Keep the original AI image so you can revert to it if the editing process doesn't yield the desired results.
-
Use concise language: For greeting cards or posters, a short title makes the design easy to read and avoids excessive text.
-
Choose a font that supports Vietnamese: Prioritize fonts that display all diacritical marks and test them before finalizing.
-
Test across multiple sizes: Ensure the text remains legible when viewing the image on a phone or posting it on social media.
-
Avoid overusing effects: A clear, harmonious design is often more effective than adding too many shadows, borders, and colors.
If you frequently create images using AI, you should also consider letting the AI tool focus on creating the background, characters, and textures, and then adding text directly using Canva. This combination gives you better control over the content, fonts, and layout, especially when creating multiple greeting cards or banners with the same style.
5. Common mistakes when editing text on AI images using Canva
During the editing process, you may encounter situations where the final product doesn't meet your expectations. Most problems can be resolved by changing the text removal method, adjusting the layout, or selecting a more suitable font.
-
The Magic Erase tool was not found: This feature may not be available due to differences in account, service plan, or interface. Please check your photo editing tools and available features. If it is not available, cover the old text with a suitable colored shape and insert new text.
-
After removing the text, the background may appear blurry or distorted: This can happen when the area to be removed contains many details or is very close to the character. Try selecting a smaller area, repeating the process, or using decorative elements to cover the imperfections. For complex backgrounds, you may need to combine several methods.
-
The new text doesn't harmonize with the image: If the font is too rigid, too thin, or the colors lack contrast, the text will look out of place against the background. Choose a different font, adjust the size, and use a color palette closer to the original design. Don't forget to check readability before exporting the image.
-
The Vietnamese text still has diacritical marks: Please double-check the entered content and change to a font that fully supports Vietnamese. You should also try typing a short line first to confirm that the diacritical marks are displayed correctly before completing the rest of the text.
6. Conclusion
Correcting text errors in AI images using Canva isn't too complicated if you follow the correct procedure. With just a few steps—uploading the image, deleting or covering up the old text, adding new text, and adjusting the layout—you can complete a 20/10 greeting card, advertising poster, or social media banner without having to recreate the entire image. The most important thing is to carefully check spelling, choose a font that supports Vietnamese, and maintain harmony between the text and the image. Combining AI for illustration and Canva for text editing will give you more control over the creative process, save time, and produce visually appealing, easy-to-read designs that suit your purpose.





VIP Products

Best Selling Products
Adobe Premiere Pro Account
99 USD
Capcut Pro 1 Year
39 USD
Genuine Adobe Illustrator account
99 USD
Autodesk All App Account Copyright
120 USD
ChatGPT Plus Account (GPT-4)
16 USD
Copyright Adobe Lightroom Account
59 USD
Upgrade Genuine Office 365
49 USD
Adobe Photoshop Copyright - Full App
120 USD
Freepik Premium Account
59 USD
Genuine Cheap Canva Pro
39 USD
Windows 10 & 11 Pro Key
36 USD
Upgrade Duolingo Super
29 USD
Upgrade genuine Capture One account
120 USD
MidJourney Account
29 USD
Plugin Retouch4me
69 USD