Best Selling Products

Genuine Adobe Illustrator account
99 USD

Freepik Premium Account
59 USD

Copyright Adobe Lightroom Account
59 USD

Adobe Premiere Pro Account
99 USD

Upgrade Duolingo Super
29 USD

MidJourney Account
29 USD

Genuine Cheap Canva Pro
39 USD

Autodesk All App Account Copyright
120 USD

Capcut Pro 1 Year
39 USD

ChatGPT Plus Account (GPT-4)
16 USD

Upgrade Genuine Office 365
49 USD

Adobe Photoshop Copyright - Full App
120 USD

Upgrade genuine Capture One account
120 USD

Plugin Retouch4me
69 USD

Windows 10 & 11 Pro Key
36 USD
How to use Notion to effectively manage learning for students.
Nội dung
- 1. What is Notion? Why should you use Notion to manage your studies?
- 2. Instructions for creating a comprehensive learning management notification page.
- Step 1: Create a new learning page
- Step 2: Arrange the homepage layout
- Step 3: Create a to-do list
- 3. How to use Notion to take notes for each subject.
- Step 1: Create a lesson management table.
- Step 2: Take detailed notes for each lesson.
- Step 3: Create review questions using Toggle.
- 4. Instructions on creating a score sheet in Notion
- Step 1: Set up the scorecard
- Step 2: Set up the scoring formula
- Step 3: Check and evaluate the results
- 5. How to manage test schedules and deadlines using Notion
- Step 1: Create a task tracking chart.
- Step 2: Use Filter to filter tasks
- Step 3: Display the task directly on the homepage.
- 6. Create visual timetables and schedules on Notion.
- Step 1: Create a calendar from an existing database.
- Step 2: Customize the displayed information
- Step 3: Allocate study time wisely.
- 7. Tips for using Notion to manage your studies more effectively
- 8. Conclusion
In today''s technology-driven learning environment, scheduling study time, taking lecture notes, and tracking deadlines can sometimes feel overwhelming for students. If you frequently forget exams, misplace materials, or don''t know where to start studying, Notion can be a helpful tool to address these issues. With its flexible note-taking capabilities, data table creation, timetable setting, and task management all in one place, the application allows you to build a learning system tailored to your individual needs. So, how can you use Notion effectively to manage your studies? Let''s explore the detailed guide below to make learning more scientific, proactive, and effortless!

1. What is Notion? Why should you use Notion to manage your studies?
Notion is an application that helps you take notes, manage tasks, and organize information in a visual workspace. Instead of using multiple notebooks or separate applications, you can consolidate subject knowledge, timetables, exam schedules, and task lists into one system. A key feature of Notion is its flexible customization capabilities, allowing each person to create a learning space that suits their schedule and learning methods.
Some notable benefits of using Notion in learning include:
-
Centralized knowledge management: Store lectures, reference materials, and notes by subject for easy retrieval.
-
Track your learning progress: Record completed tasks, ongoing assignments, and unfinished work.
-
Avoid forgetting deadlines: Organize your test schedule, presentation schedule, and assignment deadlines on a data sheet or visual calendar.
-
Personalize your learning space: Change the colors, icons, cover photos, and layout to your liking.
-
Flexible learning: Access the workspace on supported devices, making it convenient to review material or update your plan whenever needed.

2. Instructions for creating a comprehensive learning management notification page.
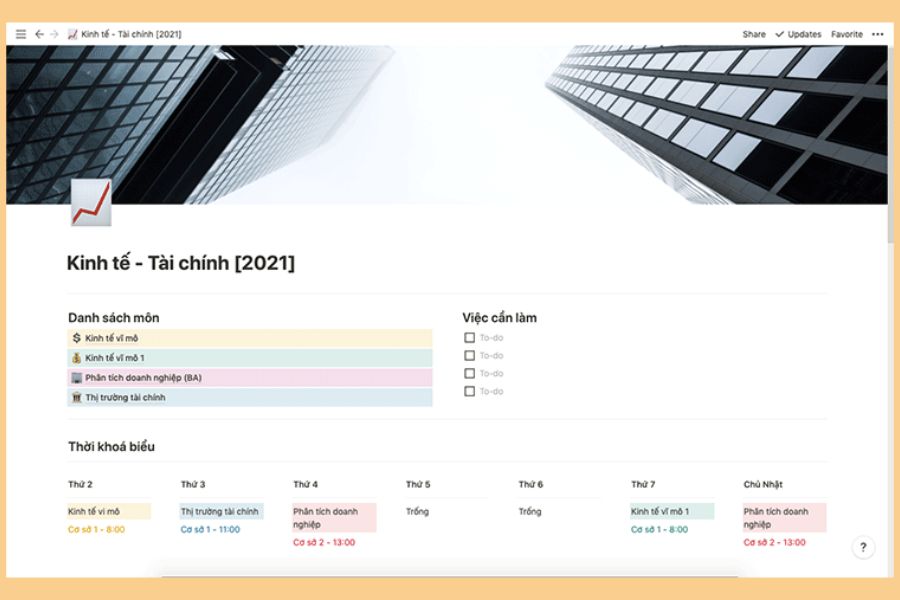
To begin managing your studies with Notion, you should build a homepage that serves as your central hub. This page will consolidate the most important information, from timetables and to-do lists to upcoming test schedules. When you open Notion, simply accessing the homepage will allow you to quickly see what you need to study today and which tasks should be prioritized.
Step 1: Create a new learning page
After logging into Notion, create a new page by selecting the "Create Page" option in the toolbar. You can name it something like "Study Planner," "Study Corner," or "Personal Study Plan." To make your homepage more engaging, add icons and a cover image of your choice.
Next, you can create subpages corresponding to each subject by entering the command /page . For example, students can create pages for Math, Literature, and English; university students can divide them into specialized subjects, general subjects, and group projects.
Step 2: Arrange the homepage layout
Notion allows you to drag and drop content blocks to build a suitable layout. You should divide the homepage into separate areas for easy viewing, avoiding putting too much information in one place.
-
Timetable: Displays the classes for the week.
-
Today's to-do list: Write down the tasks you need to complete today.
-
Upcoming deadlines: Keep track of assignments, presentations, and important exams.
-
Quick note: Save ideas or information that need to be processed later.
-
Learning goals: Set goals on a weekly, monthly, or semester basis.
You can use columns to place your schedule alongside your task list. However, prioritize clarity over excessive decoration, as the main purpose of the homepage is to help you find information quickly.
Step 3: Create a to-do list
A to-do list is an essential component if you want to use Notion to manage your studies effectively. Create checkboxes to track the progress of each task, from reading materials and completing assignments to preparing presentations.
You can prioritize tasks or assign deadlines. For example, assignments due tomorrow should be tackled before tasks without specific deadlines. Once a task is completed, simply mark it off to track progress and motivate yourself to continue learning.
3. How to use Notion to take notes for each subject.
Scientific notes can significantly save you time when reviewing. Instead of storing lecture content scattered across multiple files, you can create a separate note-taking system for each subject on Notion. Each lesson is saved as a separate page, allowing you to add content, illustrations, and related materials whenever needed.
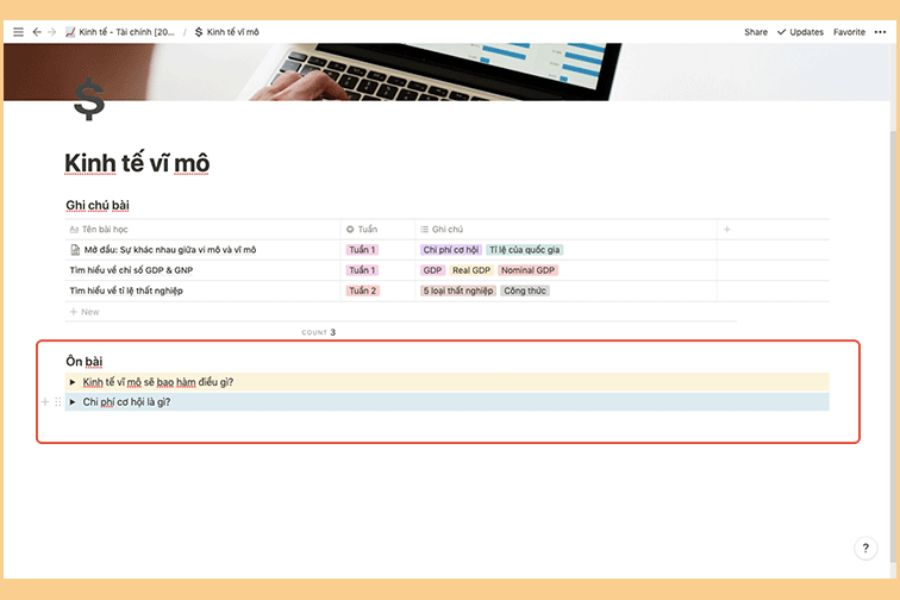
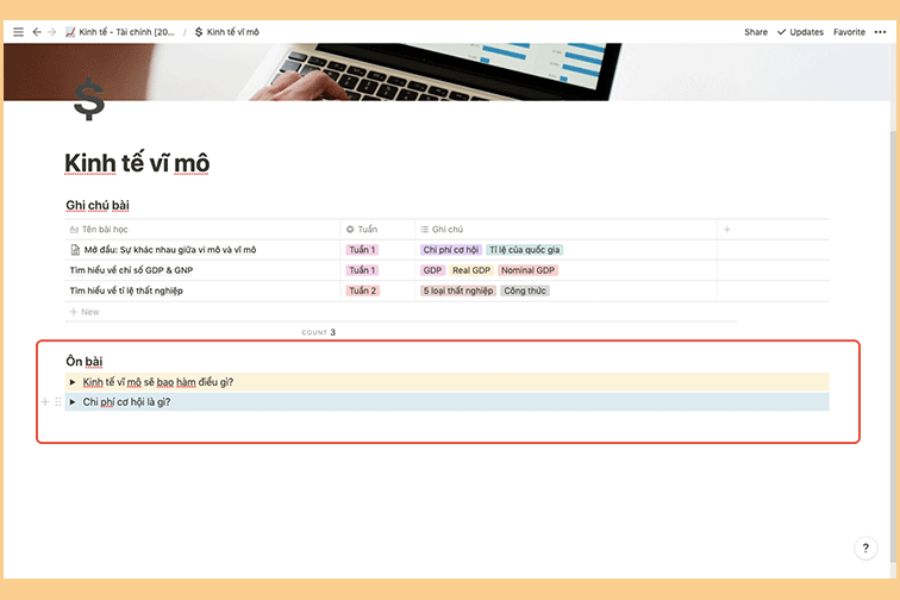
Step 1: Create a lesson management table.
Access the course page, then enter the command /table to create a data table. Depending on the interface version, you can either select a database table or create a new table on the current page.
For ease of tracking, set up the following basic columns:
-
Lesson Title: Write the name of the chapter or topic studied.
-
Week of study: Select the corresponding week to categorize the knowledge.
-
Date of study: Record the time when the content was received.
-
Review status: Mark as not studied, currently being reviewed, or already mastered.
-
Note: Add keywords or points to highlight.
As the number of lessons increases, this table will become a useful knowledge index, helping you see where you've left off and which parts need reviewing.
Step 2: Take detailed notes for each lesson.
When you add a lesson title to the database, you can open that item as a separate page to write detailed content. Here, present the knowledge by topic, using lists, headings, and tables to make the information easier to read.
Some effective note-taking methods include:
-
Summary of key points: Rewrite the knowledge in your own words instead of copying the entire lecture verbatim.
-
Highlight important content: Use bold text, color, or labels to identify recipes, definitions, and notes.
-
Add visuals: Insert diagrams, charts, illustrations, or photos of the content on the table as needed.
-
Add practical examples: Record sample exercises and their solutions to better understand how to apply the knowledge.
-
Document links: Save the link to a relevant reference document or notes page.
For example, in Biology, you can divide the lesson into sections such as concepts, characteristics, mechanisms of action, and examples. In Mathematics, prioritize formulas, application conditions, and common types of problems.
Step 3: Create review questions using Toggle.
Another useful feature of Notion is Toggle, which allows you to collapse or expand content. You can use this feature to self-test your knowledge before an exam.
Enter your question in the external display, then write your answer inside the condensed content. When reviewing, try answering the question first before checking the answer key. This method helps you proactively recall the knowledge instead of just rereading notes.
For example, in History, you could ask questions about the causes, developments, and significance of an event. In English, create questions about vocabulary, grammatical structures, and usage in sentences. After each review session, you can update your status to prioritize topics you haven't yet mastered.
4. Instructions on creating a score sheet in Notion
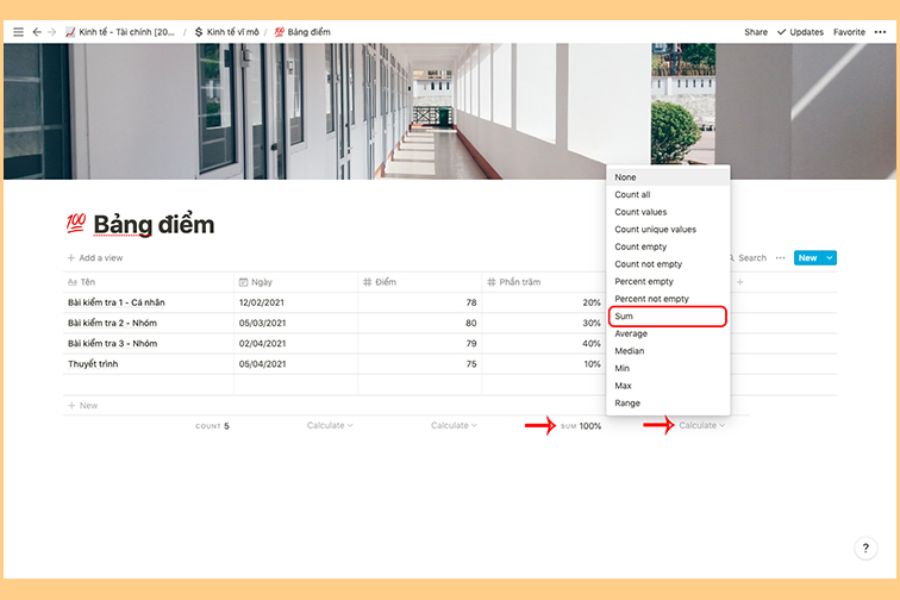
Regularly tracking your scores helps you assess your learning progress and adjust your study plan accordingly. Instead of manually calculating across multiple files, you can create a separate table for each subject, recording test scores and the weighting of each grade.
Step 1: Set up the scorecard
In the course page, create a tabular database and add the necessary attributes:
-
Test name: Regular test, midterm, final, or major assignment.
-
Test date: Record the date you took the test or the date you received your results.
-
Score: Record the points achieved.
-
Weighting: Enter the percentage contribution of each score to the overall result.
-
Conversion points: Calculate the points after multiplying by the weighting factor.
You should use date data types for the test date column, and numeric data types for scores and weights. Setting the correct format from the start will make the table easier to use and minimize errors.
Step 2: Set up the scoring formula
Notion supports the Formula property to automatically calculate based on data in the table. If the score column is named Score and the weight column is named Weight , you can use the formula:
prop("Score") * prop("Weight") / 100
The above formula applies when the weighting is entered as a percentage, such as 20 corresponding to 20%. If you enter the weighting as a decimal, for example 0.2, use the formula to directly multiply the score by the weighting.
Note that you need to adjust the formula according to the attribute names and the school's scoring regulations. If the score is calculated on a 10-point scale and the weighting of each component is 20%, 30%, and 50% respectively, the total converted score will reflect the contribution of each assignment to the final result.
Step 3: Check and evaluate the results
After entering the data, use the calculation function at the end of the column to see the appropriate total or average value. You can also check the total weight of the scores to ensure they match the subject's grading structure.
Your scorecard not only helps you track your results but also assists in identifying areas for improvement. If your recent test score was lower than expected, dedicate more time to reviewing the relevant material and adjust your plan for future tests.
5. How to manage test schedules and deadlines using Notion
One of the reasons students often fall into the trap of cramming is not keeping track of deadlines. When exams, assignments, and group activities all come up at the same time, relying solely on memory can lead to missing important tasks. Notion allows you to consolidate these deadlines into a single database, helping you proactively prepare.
Step 1: Create a task tracking chart.
On the homepage, enter the command /table to create a table for managing inspection and activity schedules. You can set up the following columns:
-
Status: Use the checkbox to mark it as complete.
-
Subject: Select the corresponding subject.
-
Task Name: Record tests, assignments, or presentations.
-
Due date: Select the completion date.
-
Priority level: High, medium, or low.
-
Note: Please add any additional requirements, required documents, or team information.
After completing the table, enter the tasks with known deadlines. You should also include smaller tasks such as reading documents, creating outlines, or preparing slides to make time allocation easier.
Step 2: Use Filter to filter tasks
When your spreadsheet has many subjects and dozens of assignments, you don't need to view all the data at once. The Filter feature allows you to filter by subject, status, or due date to display only the necessary information.
For example, you can create a filter to only display assignments that are not completed this week. If you want to focus on a specific subject, add a filter condition by subject name. Changes to how the data is displayed will not erase any data already saved in the original table.
Step 3: Display the task directly on the homepage.
To avoid having to open each page every time you need to check your work, add a linked view from the created database to the homepage. Depending on the Notion interface, you can use the command to create a linked view or add a linked database view.
Next, set up filters to only display tasks that are nearing their deadline or are not yet completed. When you access the homepage, you'll quickly know which tasks need to be addressed first, thus preventing you from forgetting deadlines or studying without a plan.
6. Create visual timetables and schedules on Notion.
In addition to a to-do list, a visual study schedule will help you visualize your entire weekly or monthly plan. You can combine a fixed timetable with test schedules, group study sessions, and self-study time to avoid scheduling conflicts.
Step 1: Create a calendar from an existing database.
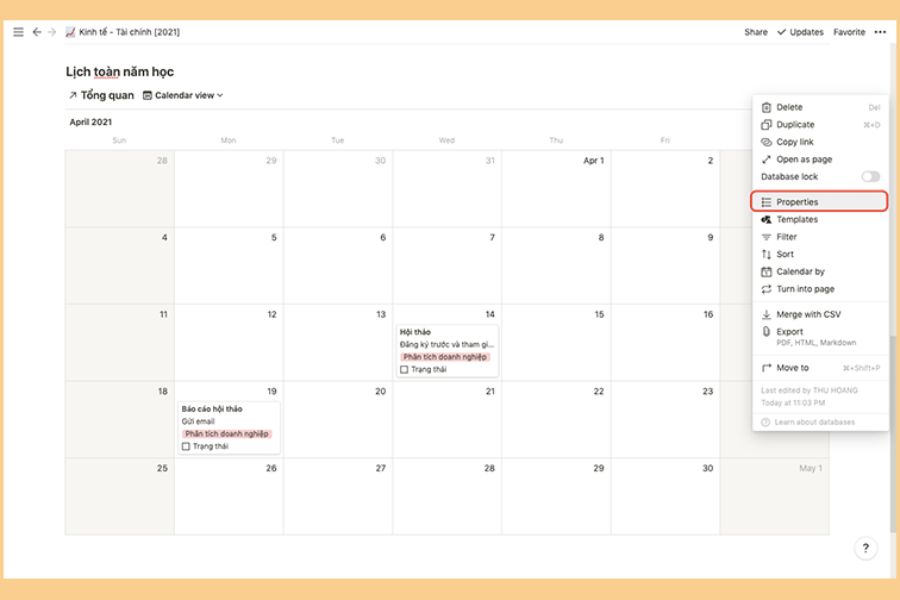
If you already have a working calendar for your check-in and activity management, you don't need to recreate the data from scratch. Add a linked view of that calendar to your homepage, then select Add New View and choose Calendar.
Notion will use the date attribute of each task to display information on the calendar. Therefore, you need to ensure that the tasks have been correctly dated before switching to this view.
Step 2: Customize the displayed information
In the view settings, you can choose which attributes you want to display on each calendar item. Prioritize task names, subjects, and statuses for easy identification of tasks without having to open each page.
You can also create different views, such as test schedules, assignment deadlines, or group activity plans. This type of organization makes your study page more organized, especially when you have multiple subjects at the same time.
Step 3: Allocate study time wisely.
After creating an overall schedule, dedicate time each week to organizing your self-study time. For important tests, you should break down the preparation process into smaller tasks such as reading theory, doing exercises, practicing with sample questions, and reviewing your knowledge.
-
Beginning of the week: Identify key tasks and deadlines.
-
During the week: Complete each section according to the schedule.
-
Weekend: Check progress, add any missing tasks, and adjust the plan.
This organizational method helps you avoid cramming all your studying into the day before the exam. However, leave some extra time for unexpected tasks so that your schedule doesn't become too stressful.
7. Tips for using Notion to manage your studies more effectively
Creating a visually appealing learning space is just the first step. For Notion to truly support your learning process, you need to maintain a habit of updating your data and choose an organization method that suits your needs. A simple but frequently used system will be more useful than an overly elaborate page that is quickly forgotten.
Here are some tips you can apply:
-
Start with practical needs: Prioritize note-taking, to-do lists, and check-in calendars before adding other features.
-
Update after each lesson: Take a few minutes to jot down the key takeaways, assigned exercises, and deadlines to remember.
-
Consistent naming convention: Use easily understandable names for each subject, chapter, and assignment to facilitate faster searching.
-
Utilize existing templates: You can refer to learning management templates on Notion and then adapt them to your schedule.
-
Active review: Combine Toggle with questions and answers to self-test your memorization level.
-
Regular review: At the end of the week, update your scores, mark tasks as completed, and plan for the following week.
-
Avoid excessive decoration: Only use icons, colors, and cover images when they help to categorize information more easily.
Furthermore, remember that Notes is a tool to help organize information and cannot replace actual learning and practice. You still need to read materials, practice exercises, discuss with your instructors, and proactively address any knowledge you don't understand.
8. Conclusion
Using Notion to manage your studies effectively is a way for students to organize their knowledge, track their schedules, and be more proactive in their learning process. With just one homepage, you can connect subject notes, grades, to-do lists, and exam schedules into a unified system. This makes searching for materials quick, deadlines clear, and study plans easier to adjust. If you're just starting out, you don't need to set up every feature immediately. Create your homepage, add subjects, and build your to-do list first, then gradually add grades or schedules as needed. By maintaining a daily update habit, Notion will become a powerful tool to help you plan your studies, manage your time better, and gradually improve your results.





















VIP Products








Best Selling Products
Genuine Adobe Illustrator account
99 USD
Freepik Premium Account
59 USD
Copyright Adobe Lightroom Account
59 USD
Adobe Premiere Pro Account
99 USD
Upgrade Duolingo Super
29 USD
MidJourney Account
29 USD
Genuine Cheap Canva Pro
39 USD
Autodesk All App Account Copyright
120 USD
Capcut Pro 1 Year
39 USD
ChatGPT Plus Account (GPT-4)
16 USD
Upgrade Genuine Office 365
49 USD
Adobe Photoshop Copyright - Full App
120 USD
Upgrade genuine Capture One account
120 USD
Plugin Retouch4me
69 USD
Windows 10 & 11 Pro Key
36 USD