Best Selling Products
Ice Text Effect in Photoshop
Nội dung
- 1. Create a background for the ice text effect in Photoshop
- 2. How to copy and paste Layer Style for ice text effect in Photoshop
- Step 1: Right-click on the Ground layer, select Copy Layer Style, then right-click on the Back layer and select Paste Layer Style.
- 3. Adjust the background of the ice text effect in Photoshop
- 4. Create text for the ice text effect in Photoshop
- 4. Create Layer Style for the original text layer of the ice text effect in Photoshop
- 5. Create Layer Style for the first copy text layer
- 6. Create Layer Style for the second copy text layer
- 7. Create a reflection for the ice text effect in Photoshop
- 8. Create a simple shadow for ice text effect in Photoshop
- 9. How to add snowflake textures to ice text effect in Photoshop
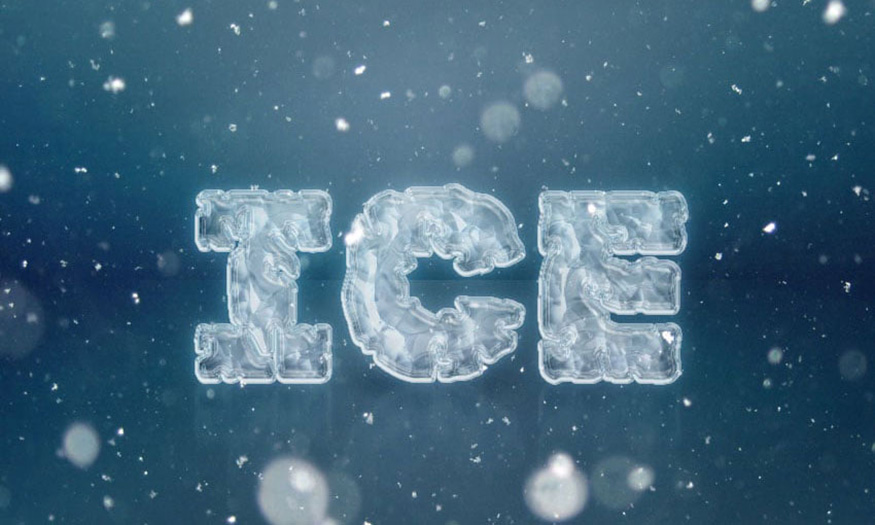
The ice-effect text will make your design more unique and impressive. You can completely create text with transparent, cracked ice effects,... through Photoshop software. Join SaDesign to learn how to create ice text effects in Photoshop through the following shares.
1. Create a background for the ice text effect in Photoshop
The first thing we need to do is create the background for the ice text effect in Photoshop. Let's do it through the following steps.
Step 1: Create a new document with size 1000 x 650 px
.jpg)
Step 2: On the toolbar, select the Rectangle Tool and create a rectangle that covers the bottom part of the document. Rename the rectangle layer to Ground.
.jpg)
Step 3: Create another rectangle covering the top part and rename this layer to Back.
.jpg)
Step 4: Double-click on the Ground layer to apply the following Layer Styles:
In the Layer Style window select Inner Shadow with the following settings:
Blend Mode: Linear Burn
Color: #9cb0be
Opacity: 15%
Distance: 0
Size: 250
Step 5: Continue to select Gradient Overlay and set the following parameters:
.jpg)
Tick the Dither box
Blend Mode: Linear Burn
Opacity: 20%
Style: Radial
Scale: 150%
Create a transparent gradient in Gradient with black color.
Step 6: Click the + icon next to the Gradient Overlay tab to add another Gradient Overlay effect with the following settings:
.jpg)
Tick the Dither box.
Tick the Reverse box.
In Gradient, use a gradient with one end being the color code #9dc6e4 and the other end being the code #275672. To get a blue gradient like the sky.
.jpg)
Step 7: Click back on the first Gradient Overlay tab, then click and drag inside the document to move the gradient so that the light is near the top of the rectangle.
.jpg)
The first rectangle should now look like this.
.jpg)
2. How to copy and paste Layer Style for ice text effect in Photoshop
Step 1: Right-click on the Ground layer, select Copy Layer Style, then right-click on the Back layer and select Paste Layer Style.
Double-click the Back layer to uncheck the Reverse box in the second Gradient Overlay effect.
.jpg)
Step 2: This will style the 2 rectangles as shown in the image. Move the layers to the appropriate position.
.jpg)
3. Adjust the background of the ice text effect in Photoshop
Step 1: Click the Create new fill or adjustment layer icon at the bottom of the Layers panel and select Hue/Saturation.
.jpg)
Step 2: Change the Hue to -3, Saturation to -25 and Lightness to -20.
.jpg)
Step 3: Add a Gradient fill layer. Make the fill transparent (Transparent to Fill Color) with black as shown. Then, change the Style to Radial and the Scale to 200 and check the Dither box.
.jpg)
Step 4: Change the Blend Mode of the Gradient layer to Soft Light.
.jpg)
Step 5: Place the Textures - Golds, Whites, And Greys image on top of all layers, rename the layer to BG Texture and resize it if needed. You can download Textures - Golds, Whites, And Greys here.
.jpg)
Step 6: On the menu bar, select Image => Adjustments => Desaturate, and change the Blend Mode of the BG Texture layer to Soft Light.
.jpg)
4. Create text for the ice text effect in Photoshop
Step 1: Create text in All Caps using the Kornik font. Here I wrote ICE. Then, set the Color to #367497, Size to 250 pt and Tracking to 25.
.jpg)
Step 2: Press Ctrl+J to duplicate the text layer, change the Fill value of the copy to 0, then press Ctrl+J on the copy layer to duplicate the copy layer.
.jpg)
4. Create Layer Style for the original text layer of the ice text effect in Photoshop
Step 1: Double-click the original text layer to apply the following Layer Styles:
In the Layer Style window select Bevel and Emboss and set the following parameters:
Style: Emboss
Technique: Chisel Soft
Depth: 200
Size: 10
Uncheck Use Global Light
Angle: 60
Altitude: 50
Gloss Contour: Sawtooth 1
Tick Anti-aliased
Highlight Mode:
Opacity: 20%
Shadow Mode: Screen
Color: #ffffff
Opacity: 80%
.jpg)
Step 2: In the Layer Style window, continue to select Contour and set the following parameters:
Contour: Rolling Slope - Ascending
Tick Anti-aliased.
Range: 100%
.jpg)
Step 3: Continue to select Inner Glow and set the following parameters:
Blend Mode: Linear Light
Opacity: 50%
Color: #edf1f4
Technique: Precise
Source: Center
Size: 90
Contour: Gaussian
Tick Anti-aliased
.jpg)
Step 4: In the Layer Style window, continue to select Satin and set the following parameters:
Blend Mode: Screen
Color: #afcbea
Opacity: 50%
Angle: 30
Distance: 38
Size: 50
Contour: Cone - Inverted
Tick Anti-aliased
Tick Invert
.jpg)
Step 5: Continue to select Gradient Overlay and set the following parameters:
Blend Mode: Multiply
Opacity: 70%
In Gradient select transparent gradient with color #275c8d on the left and color #274a71 on the right.
.jpg)
Step 6: Continue to select Outer Glow in Layer Style and set the following parameters:
Blend Mode: Soft Light
Opacity: 50%
Color: #b9dfff
Spread: 20
Size: 10
Contour: Cove - Deep
Tick Anti-aliased
Range: 80%
.jpg)
Step 7: Change the Fill of the text layer to 20%.
.jpg)
5. Create Layer Style for the first copy text layer
Double-click the first copied text layer to apply the following Layer Style:
Step 1: In the Layer Style window, select Bevel and Emboss and set the following parameters:
Technique: Chisel Hard
Size: 50
Gloss Contour: Ring
Tick Anti-aliased
Highlight Mode: Soft Light
Opacity: 50%
Shadow Mode: Soft Light
Color: #f4ffff
Opacity: 70%
.jpg)
Step 2: Select Contour and set the following parameters:
Contour: Cove - Deep
Tick Anti-aliased
.jpg)
Step 3: In the Layer Style window, continue to select Inner Shadow and set the following parameters:
Blend Mode: Linear Burn
Color: #8699a6
Opacity: 100%
Distance: 0
Size: 35
.jpg)
This will style the second text layer.
.jpg)
6. Create Layer Style for the second copy text layer
The way to create Layer Style for the second copy text layer is similar to the 2 text layers above. Please follow these steps:
Double-click the second copied text layer to apply the following Layer Style:
Step 1: In the Layer Style window, select Bevel and Emboss and set the following parameters:
Technique: Chisel Hard
Size: 50
Uncheck Use Global Light
Angle: -158
Altitude: 64
Tick Anti-aliased
Highlight Mode: Linear Light
Opacity: 50%
Shadow Mode: Linear Burn
Color: #90abc8
Opacity: 100%
.jpg)
Step 2: Select Contour and set the following parameters:
Contour: Cove - Deep
Tick Anti-aliased
.jpg)
Step 3: Continue to select Texture and set the following parameters:
Pattern: Molecular
Depth: 5%
Step 4: Continue to select Pattern Overlay and set the following parameters:
.jpg)
Blend Mode: Soft Light
Pattern: Satin
.jpg)
Step 5: Select Outer Glow and set the following parameters:
Opacity: 35%
Color: #7ab6ef
Spread: 20
Size: 30
.jpg)
Now we have created the ice effect. It is starting to look like an ice text effect font in Photoshop.
.jpg)
7. Create a reflection for the ice text effect in Photoshop
To make the ice text effect in Photoshop more impressive and beautiful, we need to have reflective text in the background. To make a reflection, follow these steps:
Step 1: Duplicate all three text layers you have, go to Layer => Merge Layers and rename the merged layer to Reflection.
.jpg)
Step 2: Press Ctrl+T to enter Free Transform Mode, then right-click the bounding box and select Flip Vertical.
.jpg)
Step 3: Move the mirrored text just below the original text and press Enter to accept the changes.
.jpg)
Step 4: Right-click on the Reflection layer, select Convert to Smart Object, then change the Blend Mode to Soft Light and place it below the original text layer.
.jpg)
Step 5: On the toolbar, select Filter => Blur => Motion Blur and change the Angle to 90 and Distance to 10.
.jpg)
Step 6: Click the Add Layer mask icon at the bottom of the Layers panel to add a mask.
.jpg)
Step 7: Select the Gradient Tool, set the Foreground and Background Colors to black and white, and select the Reflection layer mask's thumbnail.
Select Foreground to Transparent on the Options bar, make sure the Linear gradient icon is active.
Now hold down the Shift key and drag from the top of the original text to outside the bottom of the document, to fill the mask and hide the bottom of the reflection.
You may need to try again or repeat this step a few times to get the desired results.
.jpg)
8. Create a simple shadow for ice text effect in Photoshop
To make the ice text effect design in Photoshop more attractive, let's create a shadow for this ice text. The way to create a shadow is quite simple with the following basic steps:
Step 1: Press Ctrl+J to duplicate the original text layer, drag the copy below it and rename it Shadow.
.jpg)
Step 2: Right-click on the Shadow layer and select Rasterize Type. Press Ctrl+T and scale the text vertically to get the basic shadow shape.
.jpg)
Step 3: On the toolbar, select the Move tool to reposition the shadow below the text.
.jpg)
Step 4: On the menu bar go to Filter => Blur => Gaussian Blur and set Radius to 10.
.jpg)
Step 5: Change the Blend Mode of the Shadow layer to Multiply and set the Opacity to 70%.
.jpg)
9. How to add snowflake textures to ice text effect in Photoshop
Ice is often associated with snow, right? To design an ice text effect in Photoshop, try adding a little snowflake texture for realism.
Step 1: Place the Heavy Snow Texture image on top of all layers, rename the layer to Snow Texture, change the Blend Mode to Screen, and resize the texture if needed. You can download the Heavy Snow Texture here.
.jpg)
Step 2: Select the Spot Healing Brush Tool and make sure the Sample All Layers box in the Options bar is not checked. Use the soft round brush tip to paint over unwanted spots and remove them.
.jpg)
Above is a summary of the steps to create ice text effects in Photoshop. This is an impressive design, try it now. Hopefully, the above sharing can help you create impressive designs.
Sadesign Co., Ltd. provides the world's No. 1 warehouse of cheap copyrighted software with quality: Panel Retouch, Adobe Photoshop Full App, Premiere, Illustrator, CorelDraw, Chat GPT, Capcut Pro, Canva Pro, Windows Copyright Key, Office 365 , Spotify, Duolingo, Udemy, Zoom Pro...
Contact information
SADESIGN software Company Limited


