Best Selling Products
Instructions for editing RAW photos on Camera Raw – Photoshop
Nội dung
Normally, photos are taken in RAW or NEF format to be easily edited and achieve higher efficiency on photo editing software. The main reason is that RAW images are small, or very low, uncompressed formats, it can store more data than JPEG format.

What do you know about the Camera Raw window?
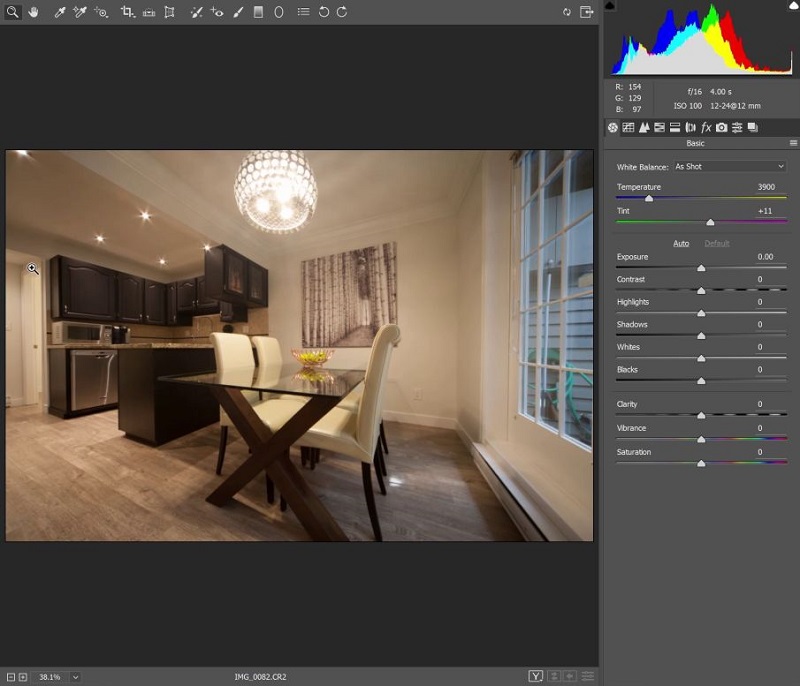
In fact, RAW image files have not been processed by the software installed on the camera. Therefore, these photos are not affected by many settings on the camera such as white balance, color tone, etc. First, when opening RAW images with different Photoshop browsers, such as CS, CS2, 3,4,5... The image will be displayed on the Camera Raw window with many editing toolbars to give different effects.
.jpg)
Edit Raw photos on cameraEdit Raw photos on camera
There are 2 main toolbars with many features and buttons to create different effects. The main function buttons are:
Toolbar 1 on the top left
Toolbar 2 on the right
Preview button: This button allows users to preview the effects of changes according to adjustments on Camera Raw.
Zoom in/out button: you can choose to view the image in close-up or further away, via 2 adjustment buttons (-/+) or according to the selected ratio.
Save Image button: used to save the image after editing in a number of different folders, in formats such as: JPEG, TIFF, PSD, etc...
Open Image button: can open the image to continue editing in Photoshop after editing in Camera Raw.
Cancel button: used to cancel all previous options. The photo will not be opened and previous adjustments will not be saved.
Done button: used to save the image and close the working window, do not open to continue editing on Photoshop
What is Toolbar 1? How to use it
As shared before, when opening Photoshop, toolbar 1 will appear with many different function buttons. To be able to edit Raw images successfully, users must know how to use and understand the features of these buttons. So how many buttons are there on the toolbar? How to use them? As soon as the toolbar is opened, customers can easily see 11 buttons with different functions on toolbar 1. Their functions include:
Used to enlarge or reduce images according to customer needs. You can carefully view each detail, part of the image. Combined with the second function
Move image view: this is the button to use when you want to zoom in on the image larger than the open window, but also want to move the image to the desired area. Just click and hold the mouse to move the image to the position you want to monitor to see the image and editing effects.
Determine white balance point: this is the button used to white balance the photo. By moving the mouse to a determined point that is white (compared to reality). Camera Raw will automatically base on the selected point to adjust the entire color of the photo. The photo will have more balanced colors.
.jpg)
How to use toolbar 1How to use toolbar 1
Color pattern identification: used to determine whether there is 1 or more colors in the same image.
Crop part of the original image: crop the image as desired. Click and hold the mouse and drag the crop frame to the required position to crop part of the image.
Vertical and horizontal alignment: Normally, the photo will be straight if it is taken well. However, there are cases where the photo is misaligned. This is the button used to straighten the photo (vertically and horizontally). Just select a line (vertically or horizontally) in the photo, then point the mouse to an end point of the selected line, press and hold the mouse. Continue moving the mouse to the other end point of the line and release the mouse. The photo will be adjusted according to the user's request.
Preliminary edit: if you want to heal or clone, simulate an area you can use this function. However, this button is usually used when the image is opened for further editing in Photoshop.
Red eye removal: eyes are red due to light, this button can be used.
Open default priority: used to open default priority or saved photos from previous edits.
10. Rotate image to the left: can rotate image to the left at an angle of 90 degrees.
Rotate image to the right: similar to the rotate left function, customers can rotate the image to the right by 90 degrees.
Basic functions of toolbar 2
On toolbar 2 of the Camera Raw section, there are also many different function buttons. Specifically:
Basic: this is the basic function button including: white balance above and light tone effect below. In which:
White balance includes default boxes such as: as shot (original color), auto (automatic balance), Daylight, Cloudy, Shade, Tungsten (red light / incandescent light), Fluorescent (tube light / neon), Flash (photo light / flash), Custom (Custom adjustment). In particular, when adjusting with the temperature slider and warm and cold tones, Photoshop will automatically switch to the custom option, Custom. When editing is not satisfactory, you can choose As shot to go back to the beginning.
.png)
Beautiful photo editing at SaDesignBeautiful photo editing at SaDesign
The light tone effect will include: Auto, Default. When using the sliders to adjust, Photoshop will switch to Default. The sliders include: Exposure, Recovery or Highlight Recovery. Fill light, Blacks, Brightness, Contrast, Clarity, Vibrance. In addition, Saturation is used to adjust the overall color intensity of the photo.
Tone Curve: used to adjust the light tone curve in different areas. There are 2 ways to adjust: Parametric adjustment, or Point adjustment.
Detail: This function button has 2 parts:
Sharpening: adjust Amount, Radius, Detail and Masking.
Noise reduction: Luminance and Color.
HSL/Grayscale function has 2 parts: color image correction, or black and white correction.
Split Toning
Lens Corrections. This section also includes 2 parts: correcting chromatic aberration, or correcting vignetting.
Camera Calibration
Presets (Stored defaults)
.jpg)
Instructions for editing photos using toolbar 2Instructions for editing photos using toolbar 2
What do the items on the edit menu mean?
In addition, there are many different items on the edit menu. Each item will be used for a separate function so that customers can freely change:
Image setting: used to restore the original image.
Camera Raw Defaults: can be adjusted based on the defaults saved on Camera Raw.
Previous Conversion: return to the last operation / change the last operation.
Custom Settings: Custom settings.
Preset Settings: Stored settings.
Apply Preset: Apply stored settings.
Clear Import Settings: Clear imported settings.
Export Settings to XMP: Export settings to XMP format.
Update DNG Preview: Update DNG preview.
Load Settings: Open saved settings.
Save Settings: Save current settings.
Save New Camera Raw Defaults: Save current settings as defaults for Camera Raw.
Reset Camera Raw Defaults: Reset Camera Raw defaults.
Currently, in the Photoshop CS6 browser, there is a separate installation version to upgrade Camera Raw. Customers can find it to download and use. In addition, you can contact SaDesign for advice and support.


