Best Selling Products
Moodboard and simple, quick ways to create a moodboard.
Nội dung
- 1. The secret to owning a beautiful and satisfactory Moodboard
- 1.1. Determine goals and topics
- 1.2. Collect materials and inspiration
- 1.3. Content selection and arrangement
- 1.4. Choose main colors and fonts
- 1.5. Using moodboard creation tool
- 2. Create beautiful moodboards using traditional manual methods
- 2.1. Prepare materials and tools
- 2.2. Determine ideas and style for moodboard
- 2.3. Search and collect images
- 2.4. Arrange and layout images
- 2.5. Paste pictures and other materials
- 2.6. Add notes and decorative details
- 2.7. Review and edit moodboard
- 2.8. Completion and display
- 3. Create moodboards through modern software applications
- 3.1. Canva
- 3.2. Pinterest
- 3.3. Milanese
- 3.4. Adobe Spark (now Adobe Express)
- 3.5. Photo
- 3.6. GoMoodboard
- 3.7. Nice
- 3.8. Pixlr
- 4. PowerPoint - Beautiful moodboard creation tool
- 4.1. Select the slide size
- 4.2. Set background and color scheme
- 4.3. Create image frames and layouts
- 4.4. Insert images and arrange layout
- 4.5. Add text and notes
- 4.6. Create highlights and textures
- 4.7. Refine and recheck the layout
- 4.8. Save moodboard and export file
- 5. Why is it said that Moodboard brings many great benefits?
- 5.1. Communicate ideas visually
- 5.2. Forming and clarifying ideas
- 5.3. Save time and avoid design errors
- 5.4. Is an effective communication tool with customers and work teams
- 5.5. Stimulate creativity
- 5.6. Build a consistent color palette and style
- 5.7. Easy to test and tweak
- 5.8. Increase engagement and inspire viewers
- CONCLUSION
A moodboard is a visual tool that conveys emotions, ideas, and styles for a design project. It helps users communicate various meaningful messages.
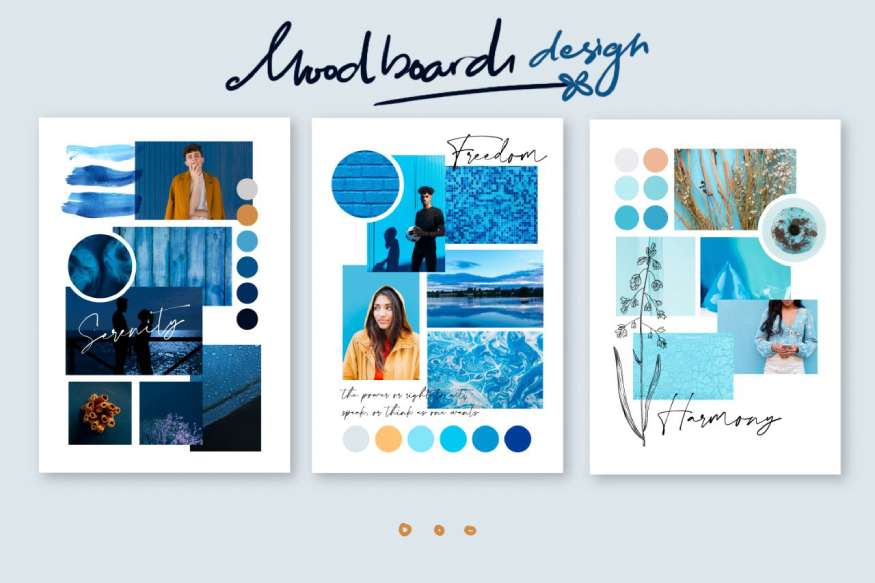
Moodboard is a visual tool that helps convey the feeling, ideas and style of a design project. It is commonly used in fields such as graphic design, interior design, fashion and communication. It helps designers and clients have an overview and agree on ideas and style before implementing the details. At the same time, it creates a foundation for developing the next stages of the project.

1. The secret to owning a beautiful and satisfactory Moodboard
An attractive moodboard will inspire the viewer. This is the first step of success for the transmitter. And to be successful, you need to grasp and apply some of the following tips:
1.1. Determine goals and topics
First, you need to clearly define the project's goals and the theme of your moodboard. You need to answer questions like:
What field is your project in? For example: Interior design, graphics, fashion,...etc.
What style or feeling do you want to express? Vintage, modern, minimalist, strong, gentle,...etc.
1.2. Collect materials and inspiration
Find and collect images, colors, shapes, textures, fonts, or other visual elements that represent your style. You can find them on:
Pinterest: This is a popular search source with many diverse ideas. It helps you quickly get a perfect idea that attracts all eyes right from the first time.
Behance and Dribbble: These sites feature creative projects from many professional designers.
Google Images or free photo sites like Unsplash, Pexels, Freepik.
1.3. Content selection and arrangement
Choose the most relevant documents and images to include on your moodboard. Remember that your moodboard should reflect the overall spirit of your project, so don’t overstuff it to avoid clutter.
Try to arrange the elements in a harmonious and purposeful way, for example:
By color: Place images of the same color close together for easy comparison and association.
By material: Place elements like fabric, wood, metal next to each other to create a sense of texture.
By size: Place larger elements in the center or in a prominent position to draw the eye.
1.4. Choose main colors and fonts
Try to combine and choose a main color palette for the moodboard and the project as a whole. You can also add some suggested fonts (if any), to define the typographic style of the project.

1.5. Using moodboard creation tool
Tools that help you organize and create moodboards quickly like Canva, Pinterest, Milanote,...etc.
2. Create beautiful moodboards using traditional manual methods
Creating a traditional, handmade moodboard is a fun way to express your ideas by hand and helps create an authentic, intimate mood board. This is currently the way to build an effective moodboard chosen by many users. Below are detailed instructions to create a beautiful moodboard:
2.1. Prepare materials and tools
Hardboard or cardboard: As a base for your moodboard, you can use a wooden board, cardboard or foam board.
Magazines, books, and printed images: These sources of images are rich and varied, and are easy to collage to create a moodboard.
Scissors, glue or tape: Used to cut and paste images onto the board.
Colored paper, fabric, other materials: If you want to add texture or color, you can prepare fabrics, colored paper or other materials such as leaves, string, etc.
Pencils, crayons, chalk, paint: For writing notes or decorating details on the mood board.
2.2. Determine ideas and style for moodboard
First, think about the style and theme you want to portray. Think about the dominant colors, the emotions you want to convey, and the important visual elements.
Ask a few questions like: Does the project have a prominent color? What feeling do you want to convey? What images or symbols are you using to represent the idea?
2.3. Search and collect images
Use magazines, books or print out images from the internet. You can find a wide variety of fashion, interior, and art images in magazines or free photo sites.
Cut out images, colors, or small details that can be used for your moodboard. You can choose images, color palettes, or other elements that fit your idea.
2.4. Arrange and layout images
Pre-arrange: Place the images on the board without pasting them right away. Move them around until the layout feels right and represents your idea.
Layout: Try arranging elements according to basic principles such as:
By color: Place images of the same color close together to create a color accent.
Themed: Place images of the same style or theme close together.
Create layers and depth: Layer images on top of each other to create depth in your moodboard.
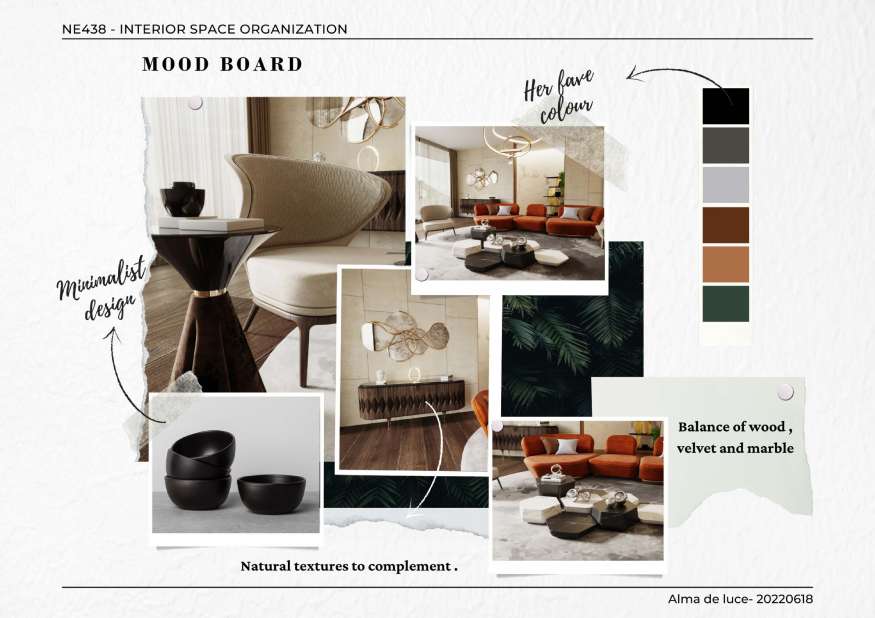
2.5. Paste pictures and other materials
Once you are happy with the layout, you can use glue or tape to attach pictures, paper, fabric, and other materials to the board.
If you want to add variety, incorporate textured materials like fabric, string, dried flowers, or embossed details to give your moodboard a more realistic feel.
2.6. Add notes and decorative details
Use pencils, crayons, or paint to add notes, titles, or decorations. You can write keywords, slogans, or inspirational phrases for the project.
This will help viewers grasp the idea more quickly and clearly.
2.7. Review and edit moodboard
Evaluate the overall moodboard, removing or adding any elements as necessary to create a balanced moodboard that conveys the right message.
2.8. Completion and display
Once you’re done, you can place your moodboard in a visible place in your office or workspace. It will be a useful tool for you to refer to and get inspiration during the project.
3. Create moodboards through modern software applications
Using software to create Moodboards is the number 1 and top choice of users. Because of the sophistication, speed and convenience that these tools bring. Below are some application software that help users feel satisfied and fulfilled with their own ideas.
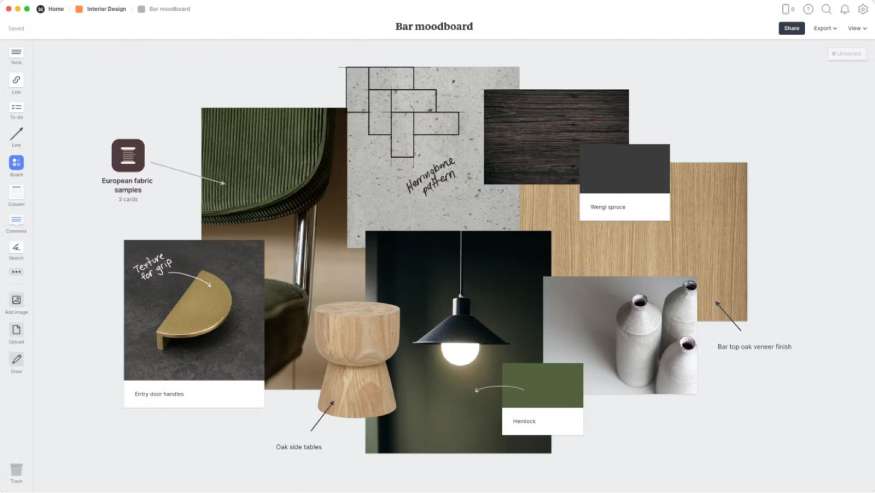
3.1. Canva
Key Features: Canva offers a wide range of moodboard templates, a large image library, and an easy-to-use drag-and-drop tool. You can easily customize images, text, and colors.
Pros: User-friendly interface, lots of free resources, suitable for beginners and has a free version.
3.2. Pinterest
Outstanding feature: Pinterest allows users to save and pin images from many different sources to a board, helping you collect and organize ideas quickly.
Pros: Rich resource, lots of ideas and inspiration from other users.
3.3. Milanese
Highlights: Milanote is an online tool with a blank slate interface that allows you to freely organize images, notes, and other documents flexibly.
Advantages: Easy to use interface, supports many formats such as images, text, videos and links, suitable for creative projects.
3.4. Adobe Spark (now Adobe Express)
Highlights: Adobe Express offers a variety of moodboard templates and powerful photo editing tools, helping to create impressive moodboards.
Pros: Supports professional features, easily synchronizes with other Adobe products.
3.5. Photo
Highlights: Fotor is an online photo editor with many available moodboard layout templates. You can use photo collage and text adding features to create moodboard quickly.
Pros: Free, easy to use, lots of free templates and no account registration required.
3.6. GoMoodboard
Highlights: GoMoodboard offers simple and easy-to-use moodboard templates. It is the ideal tool if you just want to create a quick moodboard without an account.
Advantages: No need to register an account, easy to use with minimalist interface, quickly create moodboard.
3.7. Nice
Highlights: Niice is a professional moodboard creation tool for creative teams, providing the ability to share and comment on moodboards.
Pros: Great for teamwork, integrated project management tools and idea storage space.
3.8. Pixlr
Highlights: Pixlr is an online photo editor with collage tools to create beautiful moodboards. Easily add photos, text, and effects to make them more engaging.
Pros: Free, offers many advanced photo editing tools, familiar and easy-to-use interface.
4. PowerPoint - Beautiful moodboard creation tool

PowerPoint is a very flexible tool for creating moodboards, thanks to its customizability, ease of use, and support for a wide range of formats. Here are the steps to help you create a beautiful moodboard using PowerPoint:
4.1. Select the slide size
Go to Design > Slide Size to select your desired size, such as 16:9 or A4 for printing. This will optimize your slide layout and suit your intended use.
4.2. Set background and color scheme
You can choose a background color according to your project style by going to Design > Format Background.
Color Palette: To create a color palette, you can use small squares to add your colors to the moodboard. Use Shape Fill to select colors.
4.3. Create image frames and layouts
Use Insert > Shapes to create a frame for your image. You can create a variety of shapes (square, circle, triangle) and arrange them in a free-form layout or on a grid.
To make the image frames look neater, select the entire frame, right-click, and choose Align > Align Middle/Center to align them evenly.
4.4. Insert images and arrange layout
Insert pictures: Use Insert > Pictures to insert pictures from your computer or from PowerPoint's online photo library.
Place the image in the frame: To make the image fit the frame, you can use the Crop function to cut off the excess.
Layer images: Use Bring to Front or Send to Back to layer images and frames, creating a depth effect for your moodboard.
4.5. Add text and notes
Use Insert > Text Box to add notes, keywords, or titles to different parts of your moodboard.
You can adjust the font, size, and color of the text to match the style of your moodboard.
4.6. Create highlights and textures
Using effects: PowerPoint has many effects like Shadow, Reflection and Glow for images and frames to create depth and highlight elements on the moodboard.
Insert icons and shapes: Go to Insert > Icons to add stylish icons or decorative shapes to your moodboard.
4.7. Refine and recheck the layout
Check the entire moodboard to ensure the elements are harmonious, balanced and true to the original idea.
Consider removing unnecessary elements to keep your moodboard clean and focused on the theme.
4.8. Save moodboard and export file
Once finished, you can save the file as a PDF or PNG/JPEG image by going to File > Export.
PowerPoint lets you save each slide as an image, suitable for sharing or using online.
5. Why is it said that Moodboard brings many great benefits?

Moodboards bring many important benefits in the process of creating and developing ideas for design projects. In other words, it plays an indispensable role in the graphic, interior, fashion and media industries. Below are the main benefits of moodboards:
5.1. Communicate ideas visually
Moodboards help you express the feeling, style, and spirit of a project quickly and visually. They make it easy for both your team and your client to understand the idea without much explanation.
5.2. Forming and clarifying ideas
Selecting and arranging the elements on the moodboard helps you clarify the style and direction of the project. This is an important preparation step to help the project develop in the right direction.
5.3. Save time and avoid design errors
Moodboards are an important reference tool in the design process, helping to reduce errors and save time. Once everyone has agreed on the style and inspiration on the moodboard. The subsequent design steps can proceed more quickly and easily.
5.4. Is an effective communication tool with customers and work teams
Moodboards make it easy to communicate ideas with clients and team members. Clients can clearly visualize the project and provide early feedback, avoiding misunderstandings later.
For creative teams, moodboards help everyone stay on the same page and work in the same style.
5.5. Stimulate creativity
As you search and select elements to create your moodboard, you can discover new ideas, different styles, and a wealth of inspiration. A moodboard is like a creative brainstorming board, encouraging you to explore more creative avenues.
5.6. Build a consistent color palette and style
Moodboards help define the color palette, fonts, and style of your project, helping you maintain consistency across your entire design. This is important for branding or creating a unified visual experience. This is what makes mood boards more sophisticated, sharp, and stand out. Through this, you can explore and express your own unique creative ideas.
5.7. Easy to test and tweak
Moodboards allow you to experiment with different elements, colors, and images before deciding on a final choice. You can easily change and tweak elements without much effort. This gives you more time to think and be creative.
5.8. Increase engagement and inspire viewers
Moodboards are a powerful tool for engaging and inspiring. Beautiful moodboards not only help viewers understand ideas, but also make a strong impression and motivate them to take the next steps.
In short, Moodboard is not only a supporting tool but also a core element that helps creative projects become more effective. It acts as a bridge, helping to turn abstract ideas into a clear and vivid image. It creates a solid foundation for the next stages of project development.
@old
CONCLUSION
In the creative world, Moodboard is an indispensable tool to help turn vague ideas into inspiring visual images. Recognizing its role and importance, SADESIGN has revealed tools to help readers create a Moodboard with their own unique copyright. Wish you success in your first creative attempt!


