Best Selling Products

Windows 10 & 11 Pro Key
36 USD

Capcut Pro 1 Year
39 USD

Genuine Adobe Illustrator account
99 USD

Adobe Photoshop Copyright - Full App
120 USD

Adobe Premiere Pro Account
99 USD

Plugin Retouch4me
69 USD

ChatGPT Plus Account (GPT-4)
16 USD

Genuine Cheap Canva Pro
39 USD

Upgrade Genuine Office 365
49 USD

Freepik Premium Account
59 USD

Autodesk All App Account Copyright
120 USD

MidJourney Account
29 USD

Upgrade genuine Capture One account
120 USD

Copyright Adobe Lightroom Account
59 USD

Upgrade Duolingo Super
29 USD
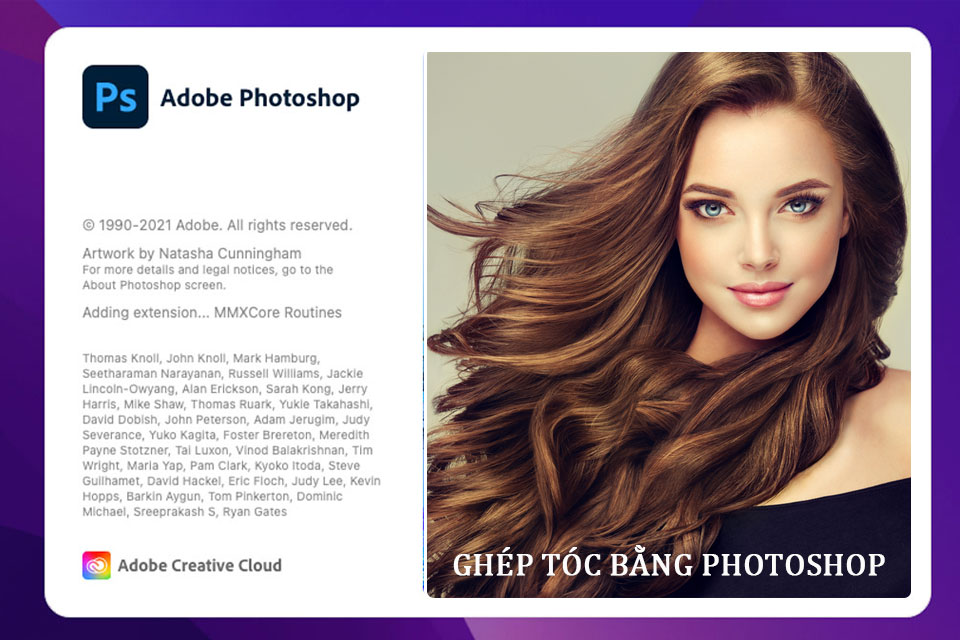
Instructions for performing hair transplant using Photoshop
With the latest version of Photoshop (Beta), performing hair transplant using Photoshop becomes simple and easy. Even if you do not have much experience, you can perform hair transplant quickly in a short time. For details on how to do this, please read and join us to learn in the article below.
With the latest version of Photoshop (Beta), performing hair transplant using Photoshop becomes simple and easy. Even if you do not have much experience, you can perform hair transplant quickly in a short time. For details on how to do this, please read and join us to learn in the article below.

First of all, how to transplant hair by using Photoshop, you need to register for an Adobe account, then, you install the Photoshop beta version, because currently this feature is only in testing and available in Photoshop beta.
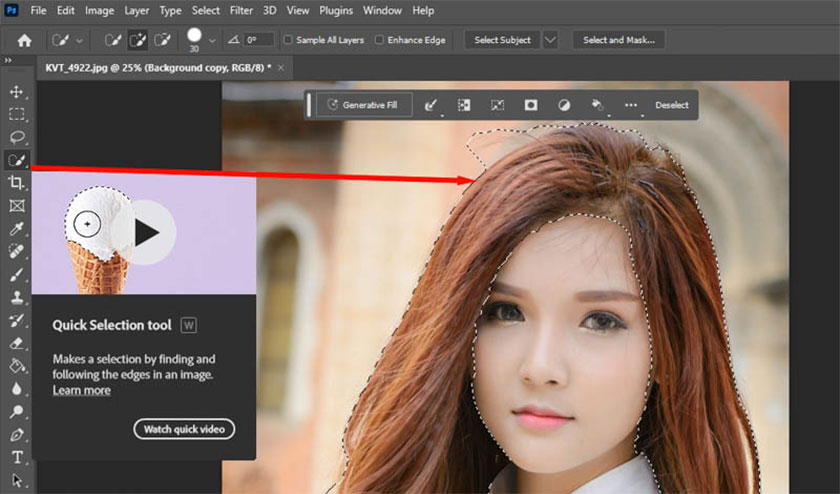
After successfully accessing, open the photo you want to transplant hair in Photoshop by clicking File -> select Open or you can press the shortcut Ctrl + O. Next, you need to use the Quick Selection Tool to create a selection around the model's hair. The interesting thing about this new version is that you don't have to choose exactly the same as in the old version.
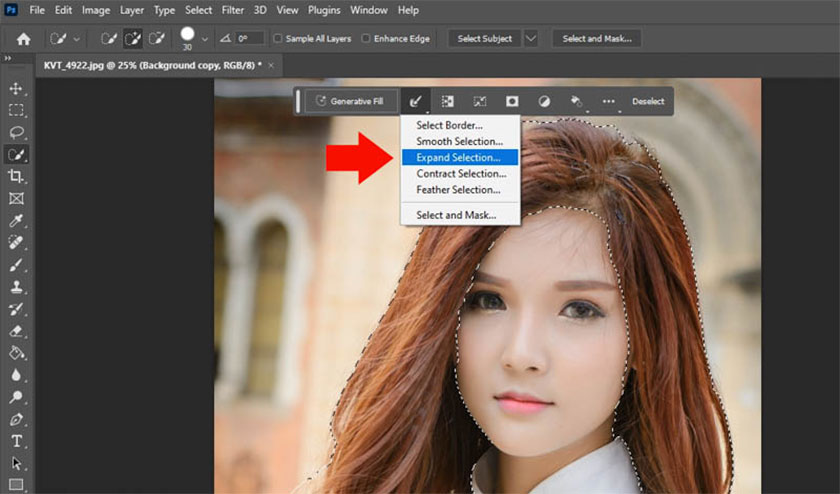
Next, you need to log in to Expand Selection to expand the selection. Sometimes you won't see the Menu on the toolbar. Now you need to click Windows -> select Contextual Task Bar or you can click Select -> Modify -> Expand Selection.
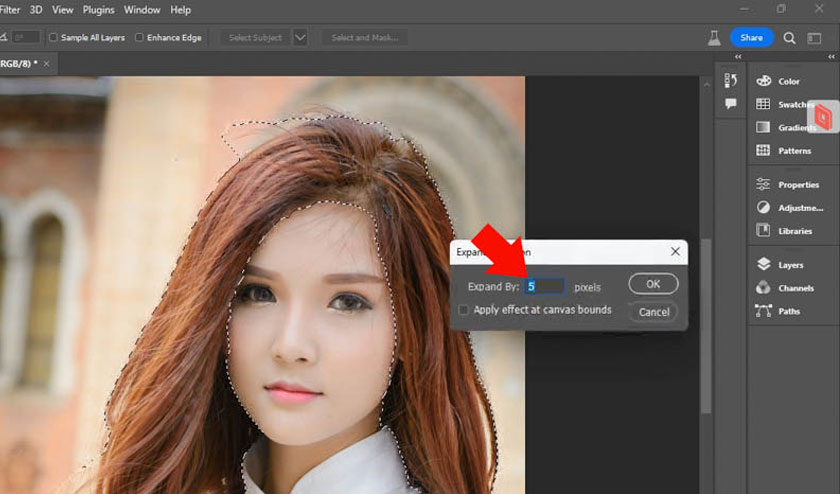
Please enter the number of pixels to expand the selection area, for example we will enter 5 pixels -> click OK. You can absolutely increase the pixels to match reality. Because this is the tool that uses artificial intelligence, you only need to do it relatively without having to be too accurate.
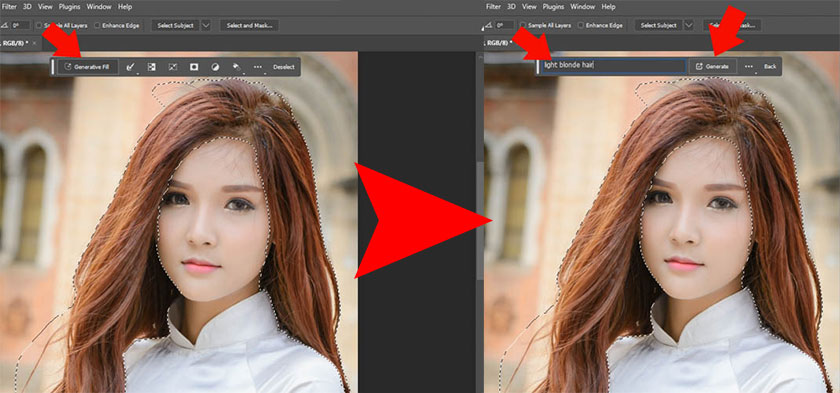
Next, click Generative Fill or you can click Edit -> select Generative Fill, then enter the type of hair you want to transplant in Photoshop. For example, if you want to transplant blonde hair, enter "Light Blonde Hair" -> press Generate so that Photoshop can match the type of hair suitably.
After each click, we receive 3 photos after the hair transplant. Now your job is choosing the best photo. It can be easily recognized, although initially the selected area is a bit blurry, the resulting image is very natural. If the results are not satisfactory, just click Generate to search for better results.

In addition, you can also find and add other details to the hair, for example, if you want to add flowers in your hair, enter a symbol (,) then add the type of flower, if adding roses, write “Rose”. For other details, we also do like this.
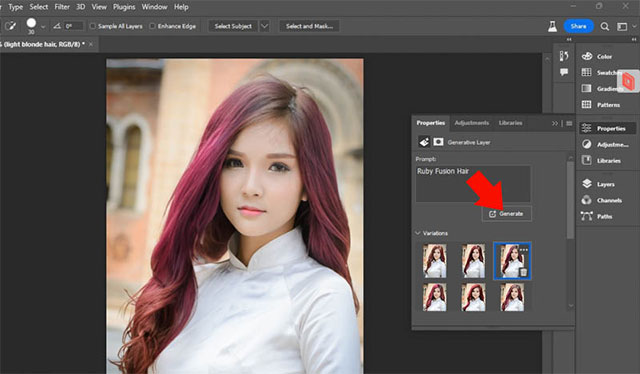
You can completely change the content entered into Generative Fill, for example, if you want to combine Ruby red hair with Photoshop, enter "Ruby Fusion Hair", then press Generate again and the result will be quite impressive.
Instructions on how to transplant hair with Photoshop Online
In addition to the above method, we can also perform hair transplanting with Photoshop online with the following simple steps:
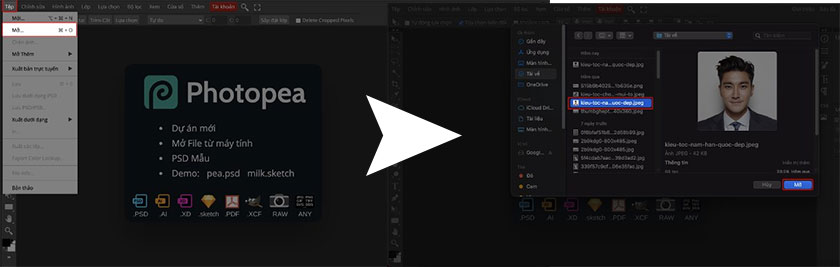
- Step 1: First of all, you need to access the online photoshop page here
- Step 2: Open the photo that needs to be transplanted hair by selecting File -> Open or you can press the key combination Ctrl + O
- Step 3: Select the photo that needs hair transplant -> Open
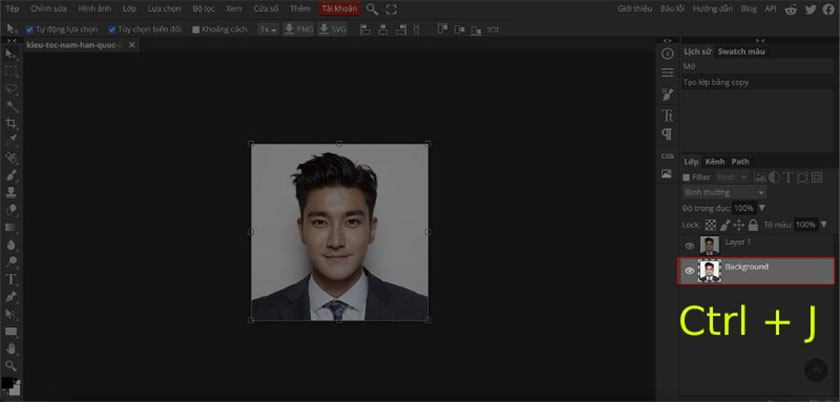
- Step 4: Select Background then press Ctrl + J to create a new layer.
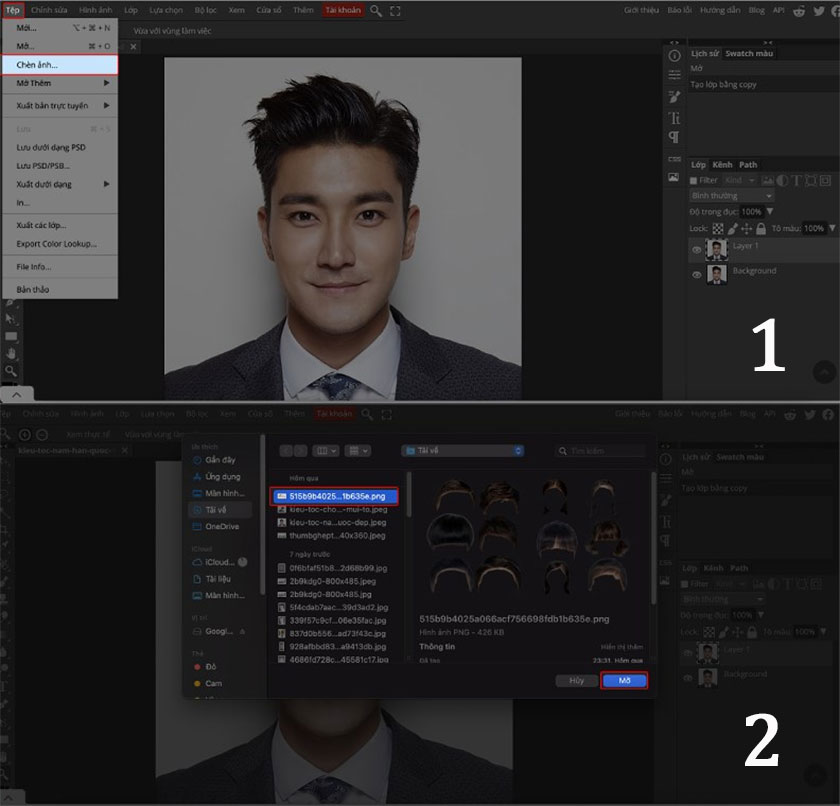
- Step 5: At the layer, click File -> select Insert
- Step 6: Select the hair model you want to transplant -> select Open
- Step 7: To create a selection for the hair, you can press letter L .
- Step 8: Use the mouse to create a selection around the hair model you like, you should zoom in the image to make it easier.
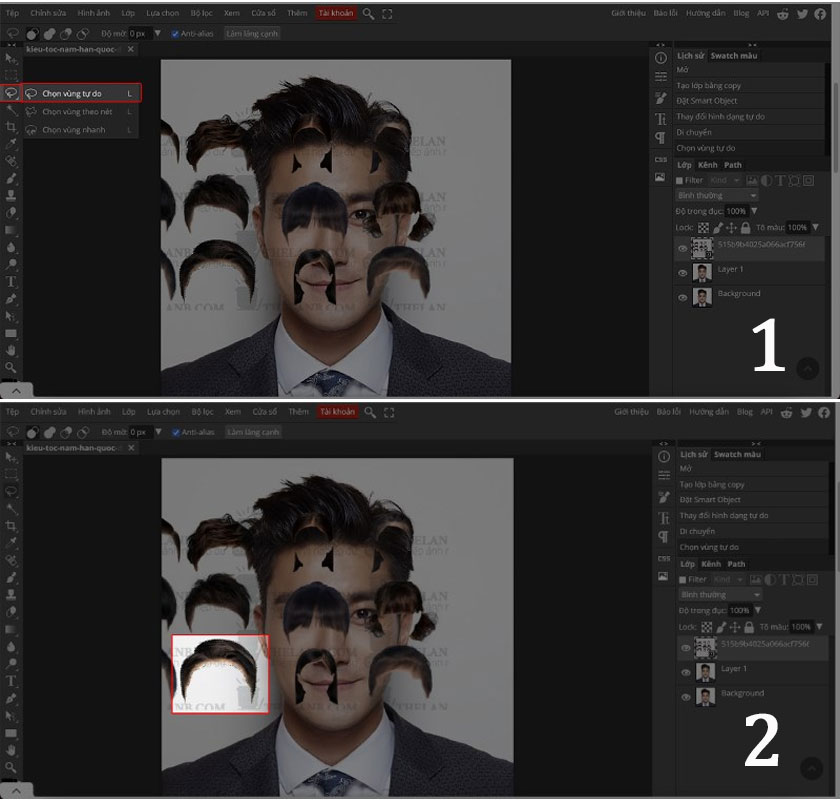
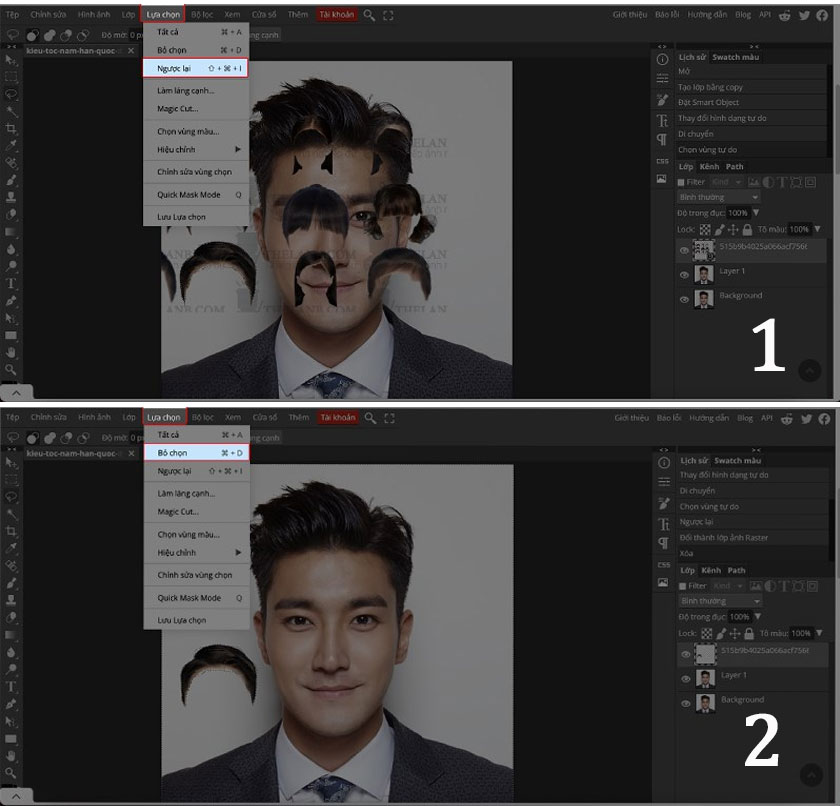
- Step 9: Right-click -> Select inverse -> press the Delete key or press the key combination Ctrl + Shift + I -> Delete the excess area above the layer.
- Step 10: Right-click -> Deselect or press the key combination Ctrl + D to help deselect the selection.
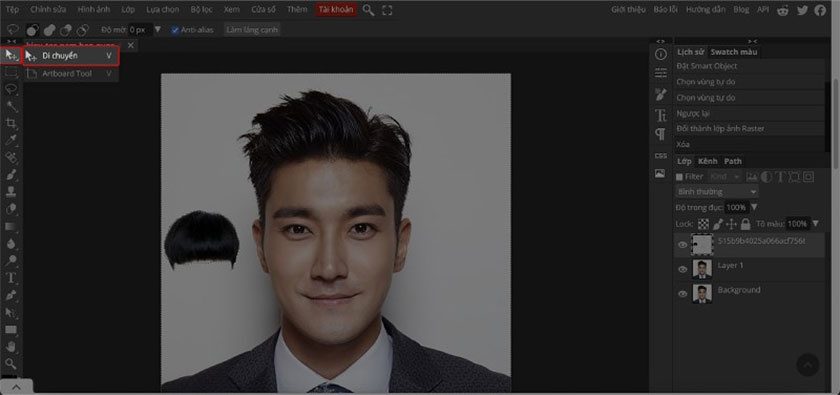
- Step 11: On the toolbar, select the Move tool or press the V key, then use the mouse to move the hair layer to the position where the transplanting is needed.
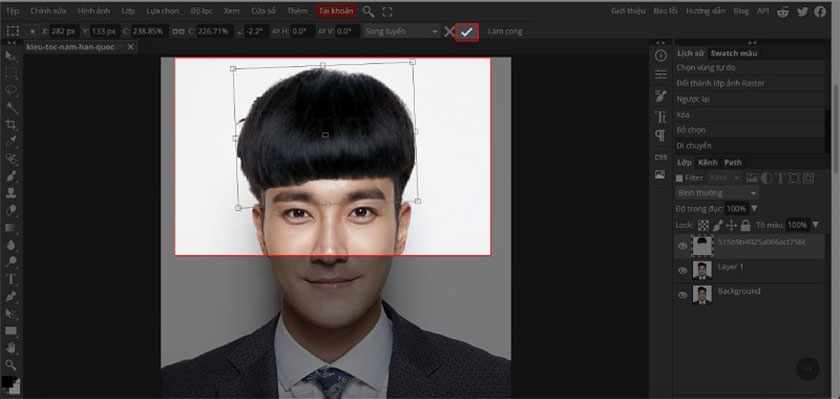
- Step 12: Press the key combination Ctrl + T -> use the mouse to resize and rotate the image suitably -> press the tick mark to complete.
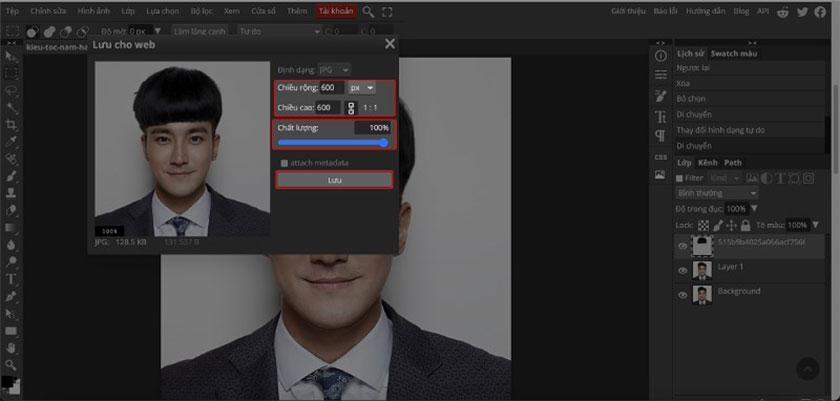
- Step 13: Select File -> select Export as -> choose a format to save the image
- Step 14: Adjust the size and quality to suit your needs -> Save to complete. You can search for hair color on google to change it to match the actual photo.
So SaDesign have finished learning the simplest and fastest ways to perform hair transplanting with photoshop. Wishing you success and don't forget to follow us to update more useful information!


VIP Products


Best Selling Products
Windows 10 & 11 Pro Key
36 USD
Capcut Pro 1 Year
39 USD
Genuine Adobe Illustrator account
99 USD
Adobe Photoshop Copyright - Full App
120 USD
Adobe Premiere Pro Account
99 USD
Plugin Retouch4me
69 USD
ChatGPT Plus Account (GPT-4)
16 USD
Genuine Cheap Canva Pro
39 USD
Upgrade Genuine Office 365
49 USD
Freepik Premium Account
59 USD
Autodesk All App Account Copyright
120 USD
MidJourney Account
29 USD
Upgrade genuine Capture One account
120 USD
Copyright Adobe Lightroom Account
59 USD
Upgrade Duolingo Super
29 USD