Best Selling Products

Upgrade Genuine Office 365
49 USD

Plugin Retouch4me
69 USD

Copyright Adobe Lightroom Account
59 USD

Upgrade Duolingo Super
29 USD

Windows 10 & 11 Pro Key
36 USD

Freepik Premium Account
59 USD

Adobe Photoshop Copyright - Full App
120 USD

Genuine Adobe Illustrator account
99 USD

Upgrade genuine Capture One account
120 USD

ChatGPT Plus Account (GPT-4)
16 USD

Autodesk All App Account Copyright
120 USD

Adobe Premiere Pro Account
99 USD

Genuine Cheap Canva Pro
39 USD

MidJourney Account
29 USD

Capcut Pro 1 Year
39 USD
Professional 3D modeling tutorial with Adobe Illustrator
Nội dung
- 1. Overview of 3D Capabilities in Adobe Illustrator
- 1.1. Advantages of Creating 3D Models in Illustrator
- 1.2. Limitations to Note
- 2. Get Familiar with Basic 3D Effects in Illustrator
- 2.1. Extrude & Bevel Effect: Creating Depth for Flat Objects
- 2.2. Revolve Effect: Create Rotating Circles
- 2.3. Rotate Effect: Rotate Objects in 3D Space
- 3. Advanced Customization with Map Art: Paste Images onto 3D Objects
- 3.1. Preparing Objects for Map Art:
- 3.2. How to Use Map Art:
- 4. Advanced Techniques and Tips for 3D Modeling
- 4.1. Optimizing 2D Native Objects
- 4.2. Understanding Perspective
- 4.3. Using Multiple Lights
- 4.4. Experiment with Blend Steps
- 4.5. Get Creative with Bevel
- 5. Practical Applications of 3D Images in Illustrator
- 6. Conclusion
Discover how to create professional 3D shapes with Adobe Illustrator through detailed, easy-to-understand tutorials that will help improve your graphic design and creativity skills.
Although Adobe Illustrator is famous for its powerful 2D vector design capabilities, few people know that this software also offers extremely impressive 3D tools and effects. This article sadesign will be a comprehensive, step-by-step guide for you to explore and master 3D modeling techniques in Adobe Illustrator. From getting acquainted with basic effects to applying materials, lighting and perspective, we will go into each aspect together so that you can confidently create beautiful 3D images, serving many different design purposes.
1. Overview of 3D Capabilities in Adobe Illustrator
When it comes to 3D design, many people immediately think of specialized software such as Blender, Cinema 4D or 3ds Max. However, Adobe Illustrator, as a leading vector design software, has integrated powerful 3D effects, allowing users to create objects with depth without having to switch to another application. 3D effects in Illustrator do not create complete 3D models to export to other 3D software, but they are effects applied to 2D objects, creating a 2D vector image that simulates three-dimensional space.
1.1. Advantages of Creating 3D Models in Illustrator
-
Seamless integration: You can easily switch between 2D and 3D design in the same working environment.
-
Easy to learn and use: Compared to professional 3D software, Illustrator's 3D tools have a more intuitive and accessible interface for beginners.
-
Sharp vector results: Although it is a 3D image, the final result is still vector, ensuring absolute sharpness when enlarged or printed.
-
Save time and resources: For small projects or simple 3D effects, using Illustrator is faster and less resource-intensive.
-
Unlimited creativity: From logos and icons to infographics or complex illustrations, 3D effects can bring depth and life to your designs.
1.2. Limitations to Note
-
Not a dedicated 3D software: Illustrator cannot create complex 3D models, apply detailed textures, or do animations like dedicated 3D software.
-
Limited lighting and material customization: While there are options, they cannot compare to the flexibility of professional 3D tools.
-
Performance: With very complex 3D objects, Illustrator can become sluggish.
2. Get Familiar with Basic 3D Effects in Illustrator
Adobe Illustrator offers three main 3D effects in the Effect > 3D menu:
-
Extrude & Bevel: Add depth to flat 2D objects, turning them into volumes.
-
Revolve: Rotates a 2D object around an axis, creating circularly symmetrical shapes.
-
Rotate: Rotates a 2D object in 3D space without adding depth, changing the perspective.
2.1. Extrude & Bevel Effect: Creating Depth for Flat Objects
Extrude & Bevel is the most commonly used 3D effect to transform 2D shapes into objects with volume.
2.1.1. How to Apply Extrude & Bevel Effect:
-
Draw or select a 2D object: This can be a rectangle, circle, letter, or any shape you want to create depth in.
-
Access the effect: Select the object, then go to Effect > 3D > Extrude & Bevel...
-
3D Extrude & Bevel Options Dialog Box: A dialog box will appear with several options.
-
"Preview": Always check this box to instantly see the changes you make.
-
Position:
-
Cube: This is the area that controls the viewing angle of the 3D object. You can drag the edges of the cube or enter specific values in the X Axis , Y Axis , Z Axis boxes to rotate the object along three axes.
-
Perspective: This slider adjusts the perspective of the object. Dragging it to the right will create a stronger perspective effect (objects farther away appear much smaller than objects closer to them). A value of 0 is parallel perspective.
-
-
Extrude Depth:
-
Depth: Enter a value to define the depth of the 3D object. The larger the value, the thicker the object.
-
Caps:
-
On: Keeps the front and back of the object intact. This is the default and commonly used setting.
-
Off: Removes the front and back, leaving only the side edges (often used to create a hollow tube effect).
-
-
-
Bevel: Creates a bevel effect on the edges of a 3D object, making the object look softer or sharper.
-
Bevel Types: Illustrator provides many preset bevel types like "Classic", "Complex 1", "Rounded", etc. You can experiment with each one to see the effect.
-
Height: Adjust the thickness of the chamfer.
-
Extrude options for bevel:
-
Extrude (Add to Extrude): The chamfer will be added outside the Extrude depth.
-
Height (Decrease from Extrude): The chamfer will decrease the depth of the Extrude object.
-
-
-
Surface:
-
Plastic Shading: Soft, glossy, plastic-like shadow effect. This is the most popular and commonly used option.
-
Diffuse Shading: A more matte, less glossy shadow effect.
-
No Shading: The object will not have any shading effects, looking flat.
-
Wireframe: Shows only the wireframe structure of the 3D object. Useful for checking structures.
-
-
More Options: Click this button to expand the dialog and access lighting customizations.
-
2.1.2. Working with Light in Extrude & Bevel (More Options):
When you expand More Options , you'll see the lighting control options:
-
Light Sources:
-
Light control circle: Drag the white dot on the sphere to adjust the position of the main light source.
-
"New Light": Add additional light sources. You can have multiple light sources to create more complex effects.
-
"Delete Light": Delete the selected light source.
-
-
Intensity: Adjusts the brightness of the selected light source.
-
Ambient Light: The overall light intensity that shines evenly on an object from all sides.
-
Highlight Intensity: Adjusts the brightness of the specular highlight.
-
Highlight Size: Adjust the size of the light reflection area.
-
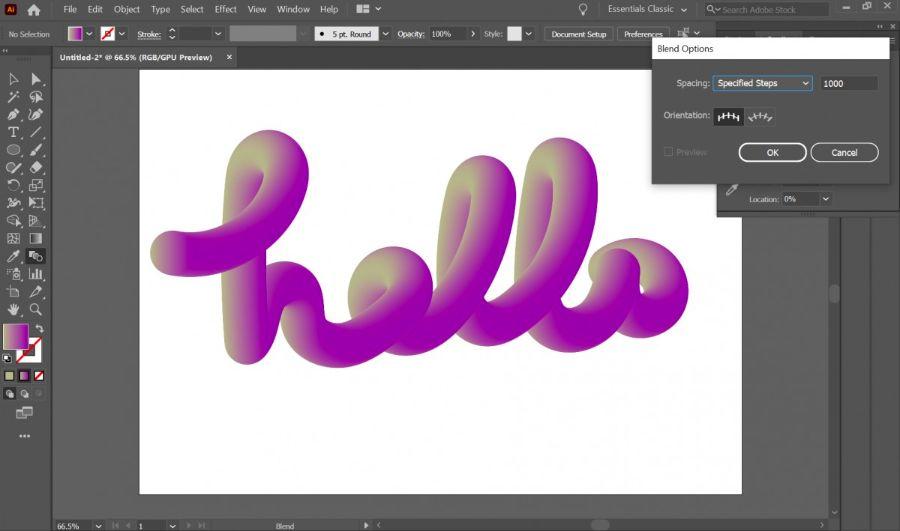
Blend Steps: Controls the smoothness of the color transition between shadow areas. Higher values result in smoother transitions but may increase file size.
-
Color: Set the color of the 3D object.
-
Draw Hidden Faces: Make sure the hidden faces of the object are also drawn.
-
Map Art: This is a powerful feature that allows you to paste 2D images or symbols onto the surfaces of 3D objects. We will go into more detail later.
2.2. Revolve Effect: Create Rotating Circles
The Revolve effect allows you to create circularly symmetrical 3D objects by rotating a 2D object around an axis. This is a great tool for creating bottles, cups, plates, or other circular geometric shapes.
2.2.1. How to Apply the Revolve Effect:
-
Draw half a cross section of an object: For example, to create a glass, you would simply draw half the outline of the glass. Make sure the Path is closed or open depending on the shape you want.
-
Access the effect: Select the object, then go to Effect > 3D > Revolve...
-
3D Revolve Options dialog box:
-
Position: Similar to Extrude & Bevel, controls the viewing angle and perspective.
-
Angle: Controls the rotation angle of the object. The default is 360 degrees to create a complete circle. You can decrease the value to create a semicircle or a part of a circle.
-
Offset: Controls the distance between the rotation axis and your 2D object.
-
Left Edge: Rotate the object along its left edge.
-
Right Edge: Rotate the object along its right edge.
-
Usually you will want to leave the Offset value at 0 and choose the appropriate edge to rotate.
-
-
Surface: Similar to Extrude & Bevel, with shading options.
-
More Options: Similar to Extrude & Bevel, allows for lighting adjustments and the use of Map Art.
-
2.3. Rotate Effect: Rotate Objects in 3D Space
The Rotate effect does not add depth to an object like Extrude or Revolve. Instead, it allows you to rotate a 2D object (or a 3D object created by Extrude/Revolve) in 3D space, changing its perspective without distorting the object.
2.3.1. How to Apply the Rotate Effect:
-
Draw or select an object: The object can be a 2D or a 3D object that has an effect applied.
-
Access the effect: Select the object, then go to Effect > 3D > Rotate...
-
3D Rotate Options dialog box:
-
Position: Controls rotation and perspective, similar to the above effects.
-
Map Art: This option is also available to paste an image onto the surface.
-
3. Advanced Customization with Map Art: Paste Images onto 3D Objects
Map Art is an extremely powerful feature that allows you to paste icons, logos, or other 2D images onto the surface of a 3D object you created with Extrude & Bevel or Revolve.
3.1. Preparing Objects for Map Art:
-
Create symbols for the image you want to paste:
-
Draw or import a 2D image (logo, pattern, text, etc.) that you want to paste onto the 3D object.
-
Select that image.
-
Open the Symbols panel ( Window > Symbols ).
-
Drag the selected image into the Symbols panel or click the New Symbol icon at the bottom of the panel. Name your Symbol.
-
(Optional) Delete the original 2D object on the Artboard, since it was saved as a Symbol.
-
3.2. How to Use Map Art:
-
Select 3D object: Make sure your object has a 3D effect applied (Extrude & Bevel or Revolve).
-
Revisit the 3D effects dialog box: Open the Appearance panel ( Window > Appearance ), click a 3D effect (e.g. 3D Extrude & Bevel ) to reopen the dialog box.
-
Click the "Map Art..." button: A new dialog box will appear.
-
Surface:
-
The Surface slider allows you to cycle through the different surfaces of a 3D object. The surfaces are numbered.
-
Dark blue (gridded) surfaces are visible from the current perspective. Gray (non-gridded) surfaces are hidden.
-
-
Symbol: Select the Symbol you created in step 3.1 from the drop-down list.
-
Scale to Fit: The icon size will automatically adjust to fit the surface.
-
Clear: Deletes the pasted Symbol from the current surface.
-
Clear All: Clears all pasted Symbols from all surfaces of the 3D object.
-
Shade Artwork: Check this box to apply the shadow effect of the 3D object to the pasted Symbol. This makes the Symbol look more natural, blending with the 3D object.
-
Invisible Geometry: If you want the Symbol to be applied to a surface but don't want to see the surface, you can check Invisible Geometry. This is useful when you want to create holes or clipping effects on a 3D object without clipping the original object.
-
Working with Symbols on the surface:
-
You can drag, rotate, zoom in/out the Symbol on the surface directly in the Map Art dialog box.
-
Drag the mouse to move the Symbol.
-
Hold Shift and drag the corner to zoom in/out proportionally.
-
Hover outside the Symbol corner and drag to rotate.
-
-
-
Click "OK" to close the Map Art dialog box, then continue to "OK" in the 3D dialog box to apply.
4. Advanced Techniques and Tips for 3D Modeling
To improve the quality and creativity of your 3D images in Illustrator, check out these techniques and tips:
4.1. Optimizing 2D Native Objects
-
Simple Objects: For complex 2D objects, try to simplify them before applying 3D effects. Fewer anchor points will help the 3D effect to be calculated faster and give smoother results.
-
Using Pathfinder: Combine 2D shapes using Pathfinder options (Unite, Minus Front, Intersect, etc.) to create complex shapes while maintaining a clean vector structure.
-
Avoid sharp curves: Curves that are too sharp can create unwanted distortions when applying the 3D effect. Try to smooth them out.
4.2. Understanding Perspective
-
Adjusting the Perspective slider can dramatically change the sense of depth an object feels. A high perspective value will make the object appear closer and more curved, while a low or zero value will create a straight-on or isometric perspective effect.
-
Use the Perspective Grid Tool ( Shift + P ) to create 3D images that look more accurate in perspective space, especially useful when designing architecture or landscapes.
4.3. Using Multiple Lights
-
A single light source can create hard, flat shadows. Add additional light sources of varying intensity and position to create more complex highlights and shadows, bringing out the detail and volume of 3D objects.
-
The main light source creates the strongest highlights and clear shadows.
-
Fill light softens shadows and brightens dark areas.
-
A rim light is placed behind a subject to create a bright edge, helping to separate the subject from the background.
4.4. Experiment with Blend Steps
-
A higher Blend Steps value will produce smoother shadow transitions, but also increase file size and render time.
-
Low values can create a banding effect, especially on monochrome objects. Find the right balance.
4.5. Get Creative with Bevel
-
Different Bevel styles can create different edge effects, from soft to sharp.
-
Experiment with Bevel to create small details on the edges of the object, making it look more complex and interesting.
5. Practical Applications of 3D Images in Illustrator
3D modeling skills in Illustrator can be applied to countless design projects:
-
Logo and Icon Design: Turn 2D logos into striking 3D versions that look professional and modern.
-
Illustrations and Infographics: Add depth to illustrations, charts, and infographics to make them more engaging and easier to understand.
-
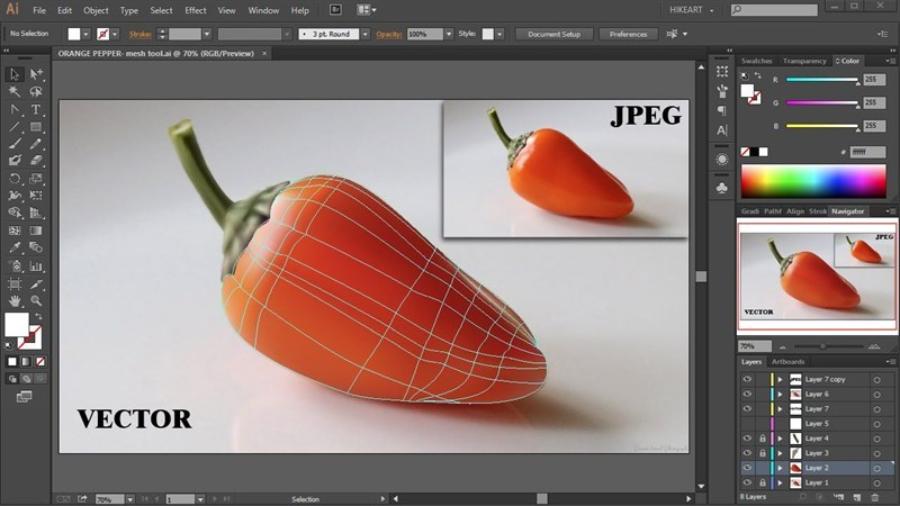
Packaging and Product Design: Create preliminary mockups for product packaging, bottles, or other items.
-
Text and Title Design: Create impressive 3D text effects for website titles, posters, or book covers.
-
User Interface (UI) Design: Create buttons, icons, or UI elements with depth to increase interactivity and aesthetics.
-
Web Design and Marketing: Create banners, advertising images with 3D effects to attract attention.
-
Game Design (simple): Create simple 3D graphic assets for isometric 2D games.
6. Conclusion
Mastering the 3D modeling tools in Adobe Illustrator will open up a new horizon for your creativity. Although Illustrator is not a professional 3D software, the effects and features it provides are more than enough for you to turn flat 2D ideas into 3D images with depth, volume and appeal.


VIP Products


Best Selling Products
Upgrade Genuine Office 365
49 USD
Plugin Retouch4me
69 USD
Copyright Adobe Lightroom Account
59 USD
Upgrade Duolingo Super
29 USD
Windows 10 & 11 Pro Key
36 USD
Freepik Premium Account
59 USD
Adobe Photoshop Copyright - Full App
120 USD
Genuine Adobe Illustrator account
99 USD
Upgrade genuine Capture One account
120 USD
ChatGPT Plus Account (GPT-4)
16 USD
Autodesk All App Account Copyright
120 USD
Adobe Premiere Pro Account
99 USD
Genuine Cheap Canva Pro
39 USD
MidJourney Account
29 USD
Capcut Pro 1 Year
39 USD