Best Selling Products

Adobe Photoshop Copyright - Full App
120 USD

Upgrade Genuine Office 365
49 USD

Genuine Adobe Illustrator account
99 USD

Genuine Cheap Canva Pro
39 USD

MidJourney Account
29 USD

Adobe Premiere Pro Account
99 USD

Copyright Adobe Lightroom Account
59 USD

Freepik Premium Account
59 USD

Autodesk All App Account Copyright
120 USD

Upgrade Duolingo Super
29 USD

ChatGPT Plus Account (GPT-4)
16 USD

Plugin Retouch4me
69 USD

Capcut Pro 1 Year
39 USD

Windows 10 & 11 Pro Key
36 USD

Upgrade genuine Capture One account
120 USD
Secrets to Taking Bright, Sharp, and Perfect Photos Using Manual Mode
Nội dung
- 1. Learn about Manual Mode
- 2. Things to know when shooting in Manual Mode
- 2.1. Aperture
- 2.2. Shutter Speed
- 2.3. ISO
- 2.4. Mastering Manual Mode
- 3. How to take photos in Manual Mode for beginners
- 3.1. Step 1: Consider the photo to be taken.
- 3.2. Step 2: Perform light metering
- 3.3. Step 3: Set aperture, shutter speed, and ISO
- 3.4. Important notes regarding the reciprocal rule
- 4. Should you always use Manual mode to take photos?
- 4.1 When should you shoot in Manual mode?
- 4.2 When should you avoid shooting in Manual mode?
Manual mode isn't as difficult as you think. Just understand three key elements: shutter speed, aperture, and ISO. This article will help you overcome your fear of manual mode and create purposeful photos.
Modern cameras are increasingly intelligent, with better sensors and more powerful algorithms, yet they still can't read the artistic intent or emotion you want to convey. This is why Manual Mode has become a skill every photographer should learn.
Manual Mode gives you complete control over lighting, depth of field, motion, and image style. It allows you to transform ordinary moments into something unique and artistic. Manual Mode also gives you a deeper understanding of how your camera works, why a photo might be brighter or darker, why the background is blurred, and when motion freezes or becomes blurry. If you're a beginner, Manual Mode might be challenging the first few times you try it. But once you get used to it, everything feels natural, even enjoyable, because you're actively creating your own image style.
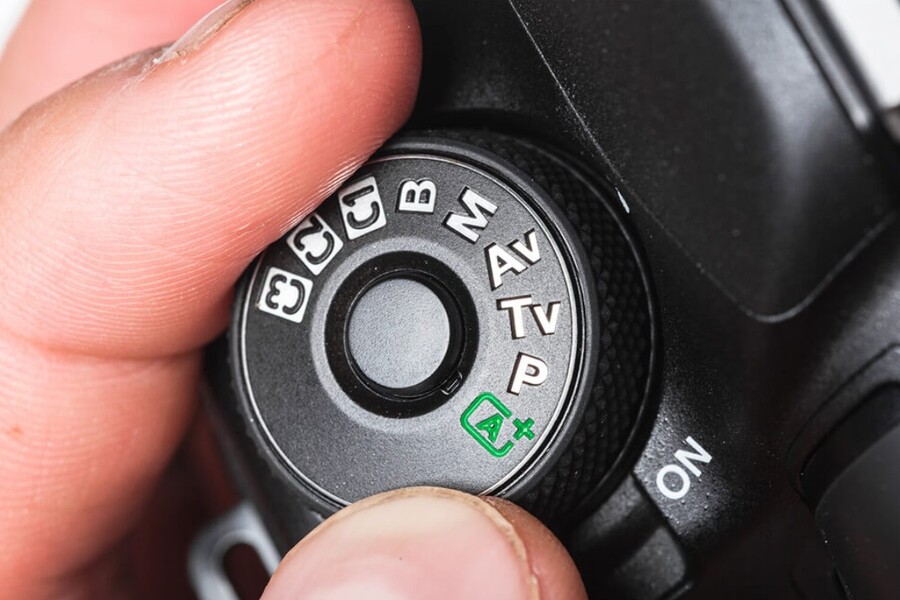
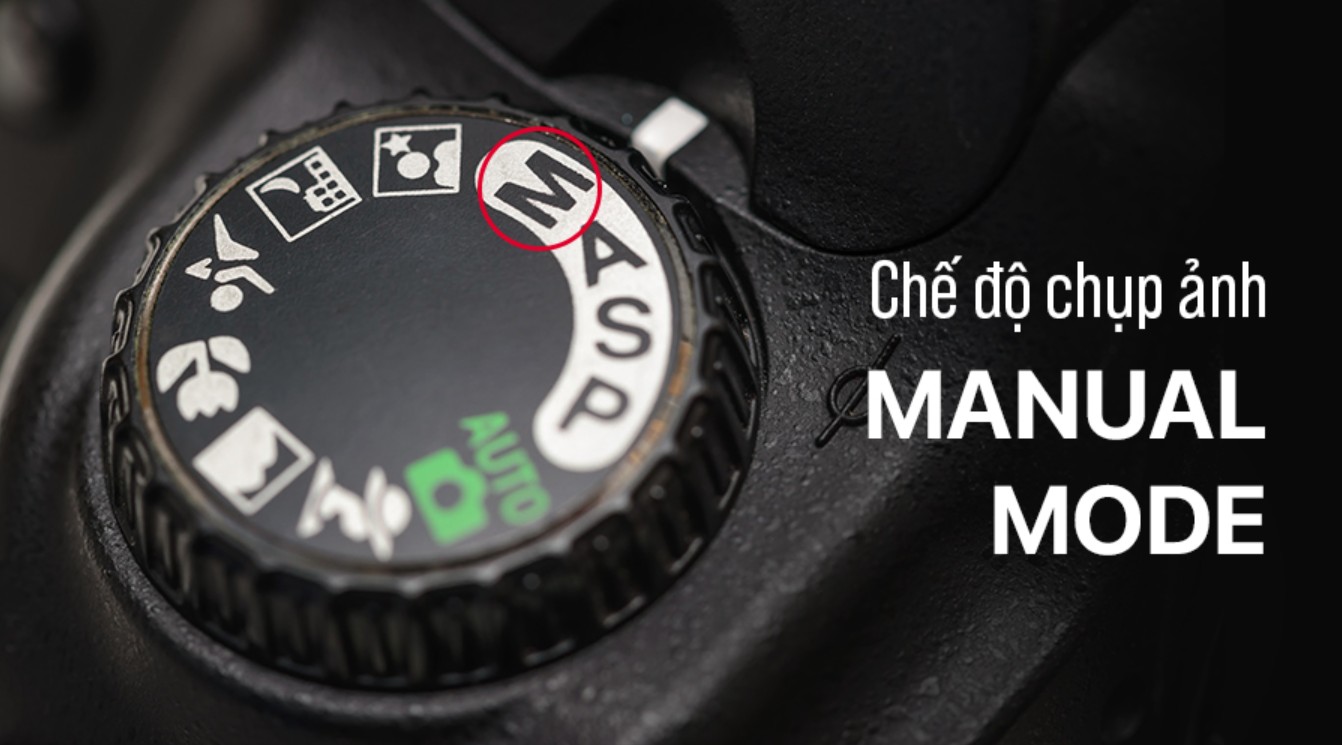
1. Learn about Manual Mode
Manual Mode gives the photographer full control over the three most important parameters in photography: aperture, shutter speed, and ISO. While automatic or semi-automatic modes assist in calculating some of these parameters, Manual Mode requires the photographer to make all the necessary choices.
When you activate Manual Mode (M mode), you are no longer dependent on pre-programmed metering algorithms. The camera will not automatically adjust the shutter speed to compensate for the aperture you choose, nor will it automatically increase the ISO to make the image brighter. Everything is based on your active decisions. This may sound complicated to beginners, but Manual Mode actually offers a great deal of freedom. With M, you can create your own image style without being limited by how the camera "understands" light.
This is why every professional photographer needs to understand and regularly use Manual Mode. When used correctly, it allows you to perfectly control the depth of field in portraits, preserve detail from near to far in landscapes, create smooth motion effects in long exposures, or simply maintain consistency throughout a shoot even with constantly changing lighting.
2. Things to know when shooting in Manual Mode
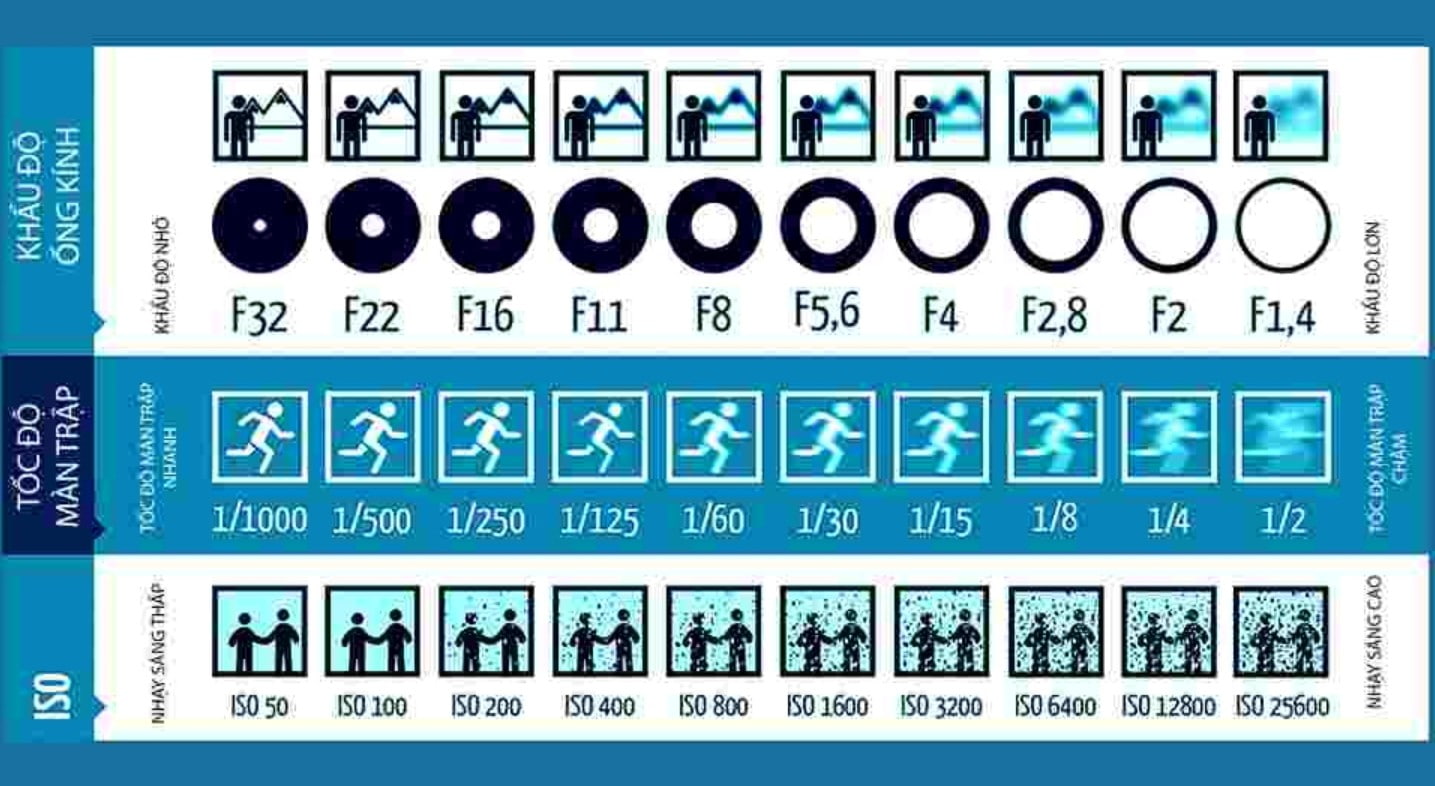
As explained above, exposure is a core element in photography and is determined by three parameters: aperture, shutter speed, and ISO. Each parameter affects the image in a different way, both technically and expressively. By understanding their nature, you will know how to combine them harmoniously to create the desired photograph.
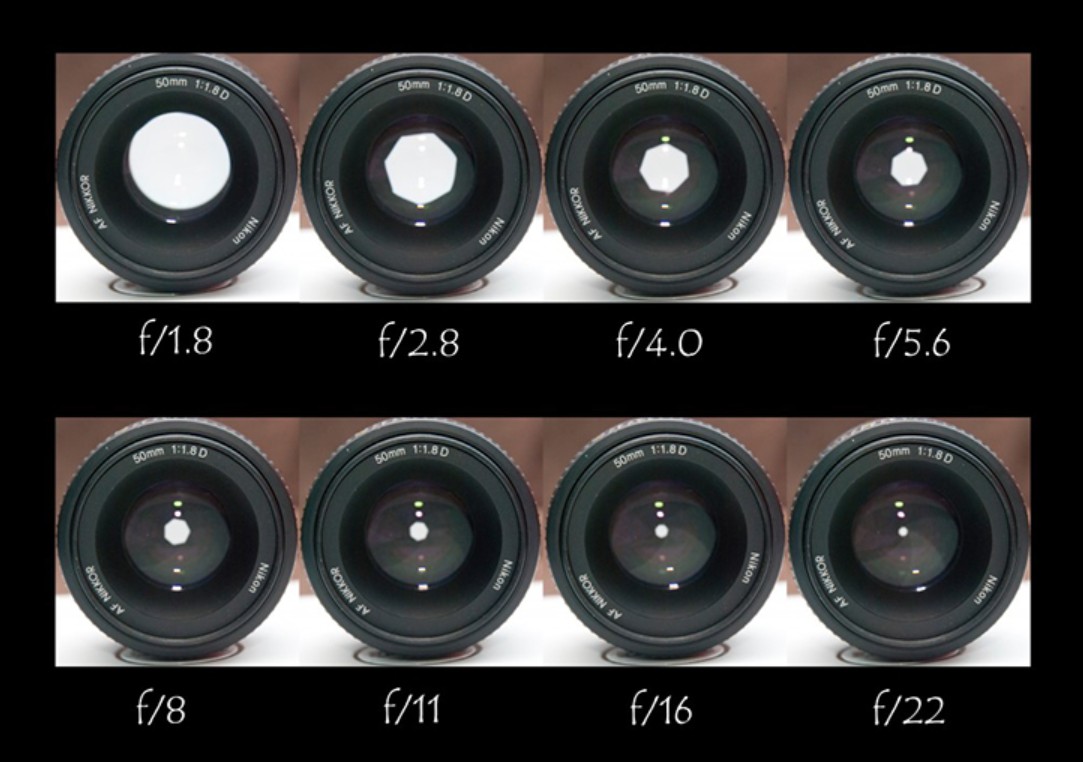
2.1. Aperture
Aperture is the opening of the lens and is expressed in f-stops. This parameter greatly influences light handling and depth of field. Large apertures (f/2.0, f/1.8, etc.) allow more light to enter, creating a smooth, blurred background that helps to highlight the subject from the background. Conversely, small apertures (f/8, f/11, f/16) allow less light but ensure that all details in the frame are clearly visible.
In practice, photographers will choose the appropriate aperture depending on their purpose. If you're shooting food, portraits, macro photography, or want to create a strong sense of depth, a large aperture is the optimal choice. If you're shooting landscapes, architecture, or want to keep every detail sharp from the foreground to the background, a small aperture will yield better results.
2.2. Shutter Speed
Shutter speed determines the amount of time the sensor is exposed to light. If this time is short, motion will be frozen; conversely, if it is long, the motion will create a unique blurring effect. This is why shutter speed is crucial when photographing fast-moving subjects such as sports, animals, or vehicles.
Slow shutter speeds are also key to special techniques such as long exposures, capturing starry skies, or creating the effect of a gently flowing stream. However, using slow speeds always carries the risk of camera shake, requiring a tripod and precise handling.
2.3. ISO
ISO reflects the light sensitivity of the sensor. Low ISO results in high-quality images with less noise and more detail. High ISO makes images brighter in low-light conditions but comes at the cost of noise and reduced sharpness.
The responsibility of a photographer using Manual Mode is to balance the ISO to achieve sufficient light while maintaining the best possible image quality. ISO should always be the lowest setting, unless circumstances necessitate raising it to address low light issues or to maintain an appropriate shutter speed.
2.4. Mastering Manual Mode
Manual photography is essentially about balancing the light in the frame. The beauty of Manual Mode lies in understanding which elements need prioritizing in each situation. You can disregard rules to pursue a particular visual emotion. Even when the light is constantly changing, Manual Mode allows you to proactively make decisions to create the most accurate photograph according to your intentions.
3. How to take photos in Manual Mode for beginners
To take good photos in Manual Mode, you can follow the three-step process below. This process helps beginners avoid confusion when having to adjust all three parameters at once, while also practicing their ability to observe light and handle real-life situations.
3.1. Step 1: Consider the photo to be taken.
Before pressing the shutter button, take a few seconds to observe the subject and background. This is a crucial step, but it's often overlooked. Beginners often rush to adjust settings, forgetting that what the photograph itself needs is what truly matters.

If your goal is to photograph landscapes, you'll prioritize a small aperture to increase the depth of field. This means the photo might be underexposed if you don't increase the shutter speed or ISO. However, increasing the ISO too much will reduce image quality. Reducing the shutter speed too low risks blurring the image due to camera shake. You must choose between these two factors to suit the specific situation.
If you want to shoot portraits, a large aperture like f/2.0 or f/1.4 will create a soft bokeh effect, helping the subject stand out. However, with a large aperture, the depth of field will be very shallow. Even a slight movement of the subject is enough to cause the image to be out of focus. This requires you to observe carefully to keep the subject still, or increase the shutter speed to ensure sharpness.
When the subject is moving, such as a runner, a motorcycle, or a small animal, you must prioritize shutter speed. If the speed is too slow, you will get an undesirable motion blur effect. A runner might need a speed of 1/250s – 1/500s. A flying bird might need 1/1600s or faster. Once you prioritize speed, you will configure the aperture and ISO to compensate for the exposure.
3.2. Step 2: Perform light metering
After deciding on your priorities, begin metering. On your camera, switch to Manual mode, select your desired aperture, and then look at the meter. The camera will suggest a shutter speed that will bring the exposure to zero.
Take a test shot and review it on the screen. If the image is slightly underexposed but to your liking, you can fix that exposure level. If the image is overexposed, reduce the aperture or increase the shutter speed. This step helps you begin to understand that the zero on the light meter isn't always the "ideal" exposure, but rather just the average level calculated by the camera.
3.3. Step 3: Set aperture, shutter speed, and ISO
Once you have the appropriate exposure level, try fine-tuning the parameters to better understand their nature. For example, you are at f/8 and 1/250s. When you switch to f/5.6, more light enters, so you need to increase the shutter speed to 1/500s to balance the light. Then take a test shot and observe the results.
You can continue experimenting with different aperture settings like f/11 and corresponding shutter speeds like 1/125s to see which change produces the best image. These experiments help you understand the relationship between aperture and shutter speed, as well as learn how to quickly adjust in real-world situations.
3.4. Important notes regarding the reciprocal rule
The reciprocal rule requires the shutter speed to be faster than or equal to 1/lens focal length to avoid camera shake. This means that with a 50mm lens, the minimum speed should be 1/50s. With a 200mm lens, this ratio is maintained to avoid image blur due to hand shake.
Adhering to this rule helps you maintain sharpness and minimize the need for high ISO. Once you become familiar with Manual Mode, you'll gradually learn how to break the rule in special circumstances to create artistic effects.
4. Should you always use Manual mode to take photos?
4.1 When should you shoot in Manual mode?
Manual Mode is particularly well-suited to situations requiring precise lighting and parameter stability. Artistic portraits, studio photography, product photography, landscape photography, night photography, or video recording are examples where Manual Mode clearly demonstrates its advantages. In these conditions, lighting needs careful control, and you don't want the camera to automatically change parameters unintentionally.

4.2 When should you avoid shooting in Manual mode?
Manual mode isn't always the best option. When the lighting changes constantly, such as during events, parades, or sporting events, semi-automatic modes like Aperture Priority or Shutter Priority will help you react faster. In these situations, the key isn't the precision of the settings, but the ability to capture the moment perfectly.
Manual mode is also unsuitable when you need to shoot quickly without much time for fine-tuning. In situations like photographing children, animals unexpectedly, or fleeting moments, using aperture priority mode will give you more flexibility while still achieving good results.
Manual Mode is the most powerful tool any photographer can have, allowing you to master lighting, completely control how your photos are captured, and freely create in your own style. Using Manual Mode not only improves your skills but also helps you gain a deeper understanding of light, image structure, and how space is represented through the lens.


VIP Products


Best Selling Products
Adobe Photoshop Copyright - Full App
120 USD
Upgrade Genuine Office 365
49 USD
Genuine Adobe Illustrator account
99 USD
Genuine Cheap Canva Pro
39 USD
MidJourney Account
29 USD
Adobe Premiere Pro Account
99 USD
Copyright Adobe Lightroom Account
59 USD
Freepik Premium Account
59 USD
Autodesk All App Account Copyright
120 USD
Upgrade Duolingo Super
29 USD
ChatGPT Plus Account (GPT-4)
16 USD
Plugin Retouch4me
69 USD
Capcut Pro 1 Year
39 USD
Windows 10 & 11 Pro Key
36 USD
Upgrade genuine Capture One account
120 USD