
Best Selling Products
Genuine Cheap Canva Pro
39 USD

Upgrade Duolingo Super
29 USD
Upgrade Genuine Office 365
49 USD
Autodesk All App Account Copyright
120 USD

MidJourney Account
29 USD

ChatGPT Plus Account (GPT-4)
16 USD

Windows 10 & 11 Pro Key
36 USD

Adobe Premiere Pro Account
99 USD

Freepik Premium Account
59 USD

Genuine Adobe Illustrator account
99 USD
Upgrade genuine Capture One account
120 USD

Copyright Adobe Lightroom Account
59 USD
Capcut Pro 1 Year
39 USD
Plugin Retouch4me
69 USD
Adobe Photoshop Copyright - Full App
120 USD
Setting up and using Adobe in Claude: Simple and detailed instructions.
Nội dung
- 1. What does Adobe mean to Claude?
- 2. Benefits of integrating Adobe with Claude
- 3. What do I need to prepare before using Adobe in Claude?
- 4. Instructions for setting up Adobe in Claude
- Step 1: Access the Customize section on Claude.
- Step 2: Search for Adobe utilities
- Step 3: Install Adobe on Claude
- Step 4: Connect the Adobe Connector
- Step 5: Log in to your Adobe account
- Step 6: Grant permissions and complete the setup.
- 5. Detailed guide on using Adobe in Claude
- Step 1: Open a conversation with Adobe
- Step 2: Enter the command that describes the request.
- Step 3: Upload the image or document you want to process.
- Step 4: Allow Claude to perform the operation.
- Step 5: Review the results and request revisions.
- Step 6: Save and download the finished product.
- 6. Conclusion
Integrating Adobe into Claude offers a more flexible workflow, especially for those who frequently create posters, banners, advertising images, edit PDFs, or build media content. Using only natural language commands, you can describe your ideas and receive support from suitable Adobe tools without having to memorize complex operations. In this article, let''s explore what Adobe in Claude is, how to set up the connection, detailed usage instructions, and important notes for maximizing its effectiveness.

1. What does Adobe mean to Claude?
Adobe in Claude is a way to connect Adobe tools and services with the Claude AI assistant, allowing users to perform a number of creative tasks, image editing, and document processing through conversation. Instead of having to directly interact with each software from the start, you can describe your needs and Claude will help you find features, suggest solutions, or perform integrated operations.
Through this connection, users can leverage the Adobe ecosystem to support their design and content creation work. Depending on the application, supported features, and account access, usability may include:
-
Visual design: Assistance in searching for design templates, creating visual content, and selecting styles, colors, and layouts suitable for the intended use.
-
Image editing: Supports tasks such as adjusting images, resizing, improving layout, or processing details as required.
-
PDF processing: Supports reading, editing, organizing, converting, or performing various operations on PDF documents through compatible tools.
-
Media content creation: Assisting in brainstorming ideas for banners, posters, advertising images, social media posts, and other publications for work purposes.
-
Optimize workflows: Reduce application switching time, support users in describing requirements using natural language, and continue refining content within Adobe.
Notably, Claude acts as an assistant, helping you articulate your requirements and interact with connected tools. However, more in-depth editing, detailed customization, or file export may still need to be performed directly within the corresponding Adobe interface.

2. Benefits of integrating Adobe with Claude
Connecting Adobe with Claude offers numerous benefits for designers, content creators, marketers, and anyone who frequently works with documents. The combination of AI-powered language analysis and creative tools makes workflows more seamless.
-
Save time: You can directly describe your design ideas, purpose, and requirements instead of spending a lot of time searching for features or starting from a blank page.
-
Supporting those without design experience: Claude can help suggest layouts, colors, content, and implementation methods, making it easier for newcomers to approach creative work.
-
Easily customizable to your needs: If the results aren't satisfactory, you can continue to request changes to refine the content, style, or layout.
-
Increased work efficiency: Connecting applications reduces the need for manual interaction, making it more convenient to work with images, documents, and media content.
-
Inspiring creativity: Claude can help develop ideas from a short description, suggest various styles, and give you more options when you start designing.
This feature is especially useful when you need to create content quickly, brainstorm ideas for a marketing campaign, or handle basic design tasks but don't have much experience using professional software.

3. What do I need to prepare before using Adobe in Claude?
Before setting up, you should prepare some basic conditions to ensure a smooth connection and use of Adobe in Claude. Currently, users can start with a Claude account and use some Adobe features in guest mode. However, logging in with an Adobe account will expand usability, increase limits on certain tasks, and save work on your account when supported.
Things to prepare include:
-
Claude Account: Log in to Claude on your web browser or desktop application to access built-in features.
-
Adobe Account: You can sign in to your personal Adobe account to access additional features, store content, and continue editing your work within the Adobe ecosystem.
-
Stable internet connection: Connectivity, image processing, document creation, and creative content creation require an internet connection for the system to function.
-
Files to process: If you want to edit images, videos, or documents, have the files ready to upload to the chat when needed.
-
Specific ideas and requirements: Define the content to be created beforehand, including size, style, color, or intended use, so that Claude can easily understand and implement it accurately.
4. Instructions for setting up Adobe in Claude
To use Adobe tools directly in Claude, you need to install Adobe utilities and connect your account. The process is quite simple, mainly involving operations in the Customize section of the Claude interface.
Step 1: Access the Customize section on Claude.
First, access the Claude website and log in to your personal account. On the main interface, find the Customize section in the left-hand menu and click on it to open the area for managing utilities, connections, and extensions. This is where you can search for Adobe applications to integrate into Claude.

Step 2: Search for Adobe utilities
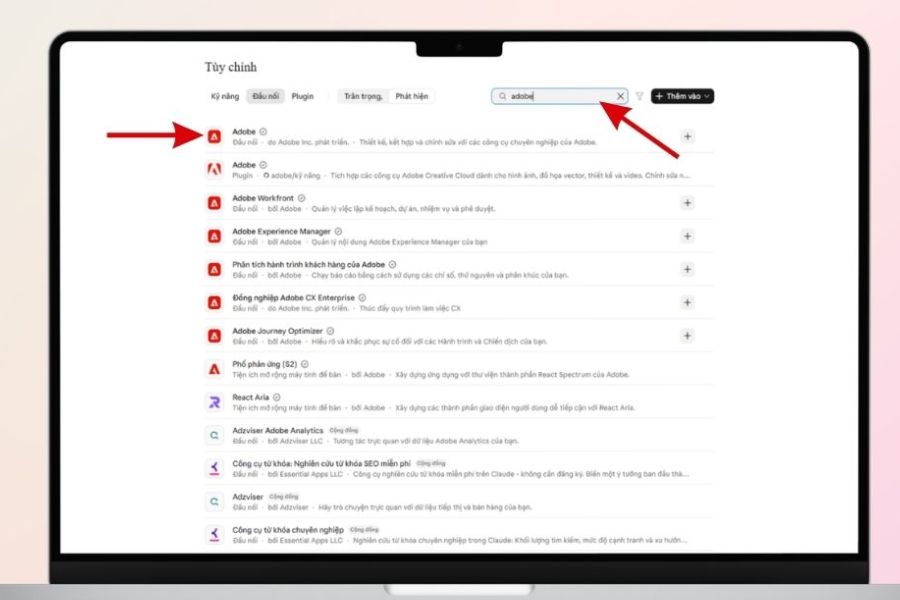
After going to Customize, switch to the Plugins tab and make sure you're in the Discover interface to find new extensions. Next, enter the keyword "Adobe" into the search bar. When the Adobe extension appears in the list, click on it to open the information page and view the supported capabilities before installing.
Step 3: Install Adobe on Claude
On the Adobe add-ons page, click Install or the Add Add-on button corresponding to the displayed interface. Claude will proceed with the installation and request confirmation of some necessary permissions. Read the provided information, then agree to complete the integration process. After successful installation, Adobe will appear in the list of add-ons added to your account.
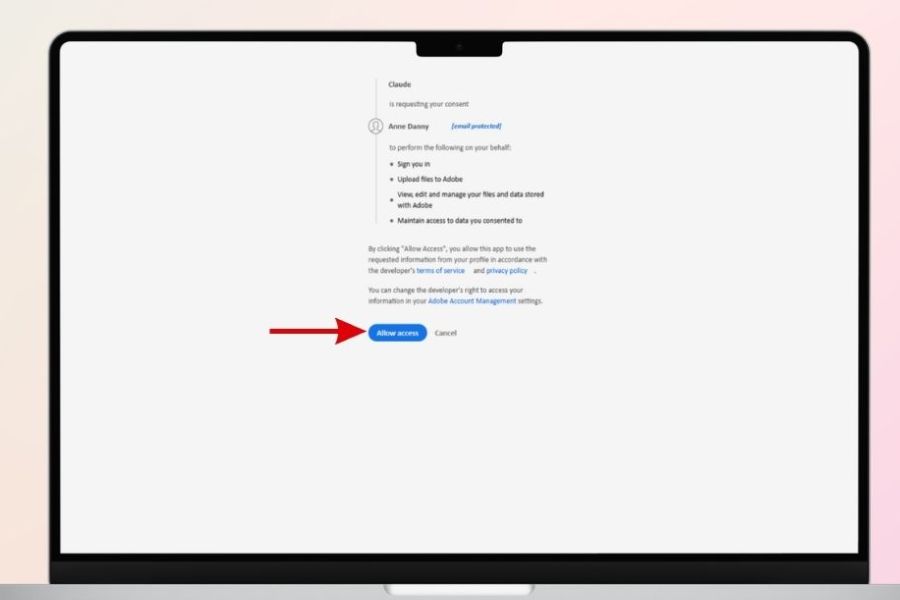
Step 4: Connect the Adobe Connector
Next, open the Adobe utility page you just installed and go to the Connectors tab. Find the Adobe section and click Connect to establish a link with the creative tools. This is an important step that allows Claude to access supported Adobe features during chat and request processing.
Step 5: Log in to your Adobe account
When the system redirects to the verification page, log in using your personal Adobe account. If you don't have an account, you can register a new one to use the appropriate features. In some cases, users can choose to continue as a guest without logging in, however, usability may be limited. After successful verification, check the connection status to ensure Adobe is linked to Claude.
Step 6: Grant permissions and complete the setup.
After connecting, check the access permissions Claude requests for Adobe. If you want to limit the system from constantly asking for confirmation with each operation, you can open the Connector permission settings and select "Always allow" for the tools you trust, if this option appears. Carefully consider the permissions granted before confirming, especially when using an account containing personal documents or data.
5. Detailed guide on using Adobe in Claude
Once successfully set up, you can start using Adobe directly within your conversation with Claude. Instead of learning each software individually, simply describe the task you want to perform using specific commands, and the AI will assist in selecting and deploying compatible features.
Step 1: Open a conversation with Adobe
You return to Claude's chat interface and create a new conversation. To start using the utility, you can enter the command /Adobe into the chat box if the system supports this launch command. Claude will then identify the tool and help you begin your creative tasks. If you don't use a command, you can also directly describe your requirements and select Adobe when Claude suggests the appropriate tool.

Step 2: Enter the command that describes the request.
Once Adobe is ready, enter the content you want to create into the chat box. The command should clearly state the purpose, target audience, design style, colors, size, and details you want to include in the product. For example, you might request a minimalist-style cosmetic advertising poster using pastel pink tones, a modern layout, a prominent title, and a size suitable for Facebook posting. The more specific your request, the easier it is to achieve the desired result.
Step 3: Upload the image or document you want to process.
If you want Adobe to edit an existing image, click the file attachment icon in the chat window and upload the image to Claude. You can also attach PDF documents, videos, or other supported files for the system to process as requested. After uploading the file, clearly describe the changes needed, such as adjusting the lighting, blurring the background, cropping the image, or rearranging the document content.

Step 4: Allow Claude to perform the operation.
After receiving the request, Claude will analyze the content and use the appropriate Adobe tools if needed. During processing, the system may display a request to confirm permission to use certain features. You check the information and click agree to continue. Depending on the task, Claude may perform one or more operations consecutively, reducing the time spent on manual editing.
Step 5: Review the results and request revisions.
Once complete, review the created design, image, or document. If you're not satisfied, continue entering commands to adjust each detail. For example, you can request to increase brightness, change the background color to white, shrink the title, adjust the layout, or remove an unnecessary detail. Making specific adjustments will give you better control over the result instead of having to start everything from scratch.

Step 6: Save and download the finished product.
Once the results meet your requirements, you can use the download option if provided by the system, or open the content in the corresponding Adobe application for further editing. With a logged-in Adobe account, some content can be saved to Creative Cloud, allowing you to continue working on software such as Photoshop, Adobe Express, or other compatible applications. Before using the product for commercial purposes, carefully check the content, image quality, and related copyright elements.
6. Conclusion
Setting up and using Adobe in Claude is a useful solution for those who want to leverage AI to support creative work, image editing, and document processing. With just a few simple connection steps, you can bring Adobe tools into the conversation, describe ideas in natural language, and perform many tasks more conveniently. This feature is especially suitable for marketers, designers, content creators, online businesses, or anyone who frequently needs to create advertising images, posters, documents, and media publications. While AI can significantly assist in the process, you should still check and fine-tune the results to ensure the best possible final product quality.

















VIP Products




Best Selling Products
Genuine Cheap Canva Pro
39 USD
Upgrade Duolingo Super
29 USD
Upgrade Genuine Office 365
49 USD
Autodesk All App Account Copyright
120 USD
MidJourney Account
29 USD
ChatGPT Plus Account (GPT-4)
16 USD
Windows 10 & 11 Pro Key
36 USD
Adobe Premiere Pro Account
99 USD
Freepik Premium Account
59 USD
Genuine Adobe Illustrator account
99 USD
Upgrade genuine Capture One account
120 USD
Copyright Adobe Lightroom Account
59 USD
Capcut Pro 1 Year
39 USD
Plugin Retouch4me
69 USD
Adobe Photoshop Copyright - Full App
120 USD