Best Selling Products
The Simplest Guide To Blurring Logos In Photoshop
Nội dung
- 1. Blur the logo using the Blur Tool in Photoshop
- 1.1 Step 1: Start Photoshop and open the image
- 1.2 Step 2: Select the Blur Tool
- 1.3 Step 3: Adjust the opacity
- 1.4 Step 4: Blur the Logo
- 1.5 Step 5: Save edited photo
- 2. Blur the logo using the Lasso Tool in Photoshop
- 2.1 Step 1: Open the image in Photoshop
- 2.2 Step 2: Select the Lasso Tool
- 2.3 Step 3: Draw a selection around the Logo
- 2.4 Step 4: Apply Gaussian Blur effect
- 3. Eraser Tool combined with Gaussian Blur to blur logo in Photoshop
- 3.1 Step 1: Open the photo and select the area to blur
- 3.2 Step 2: Create a copy of the Layer
- 3.3 Step 3: Name the new Layer
- 3.4 Step 4: Apply Gaussian Blur
- 3.5 Step 5: Using the Eraser Tool
- 4. Blur the logo with the Iris Blur effect
- 4.1 Step 1: Open the image in Photoshop
- 4.2 Step 2: Select the Iris Blur effect
- 4.3 Step 3: Set the blur point
- 4.4 Step 4: Adjust the shape of the blurred area
- 4.5 Step 5: Fine-tune the effect
- 4.6 Step 6: Save the image
- 5. Conclusion
Photoshop, the legendary photo editing software, not only serves design professionals but also attracts creative enthusiasts. With millions of diverse features, from simple to complex, Photoshop opens up an endless world of art. One of the useful techniques that you need to master is blurring the logo. Let's explore with Sadesign the simplest ways to blur the logo in Photoshop!
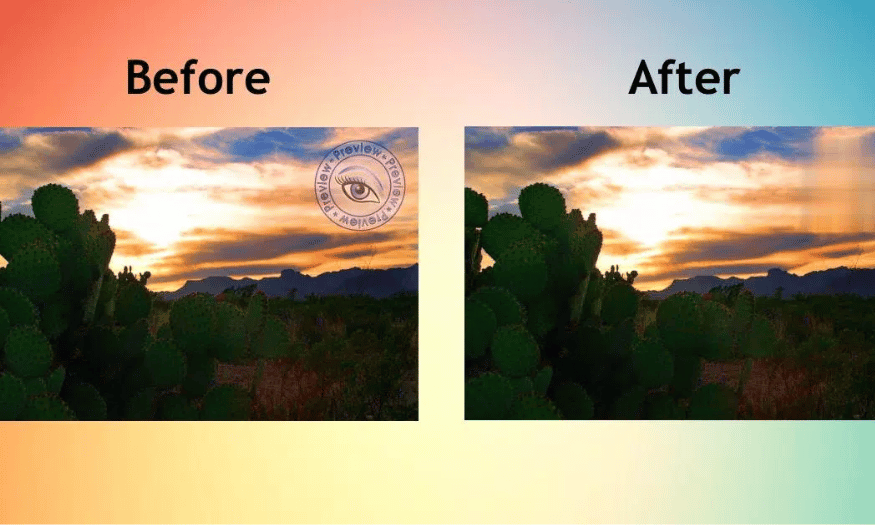
Photoshop, the legendary photo editing software, not only serves design professionals but also attracts creative enthusiasts. With millions of diverse features, from simple to complex, Photoshop opens up an endless world of art. One of the useful techniques that you need to master is blurring the logo. Let's explore with Sadesign the simplest ways to blur the logo in Photoshop!
1. Blur the logo using the Blur Tool in Photoshop
1.1 Step 1: Start Photoshop and open the image
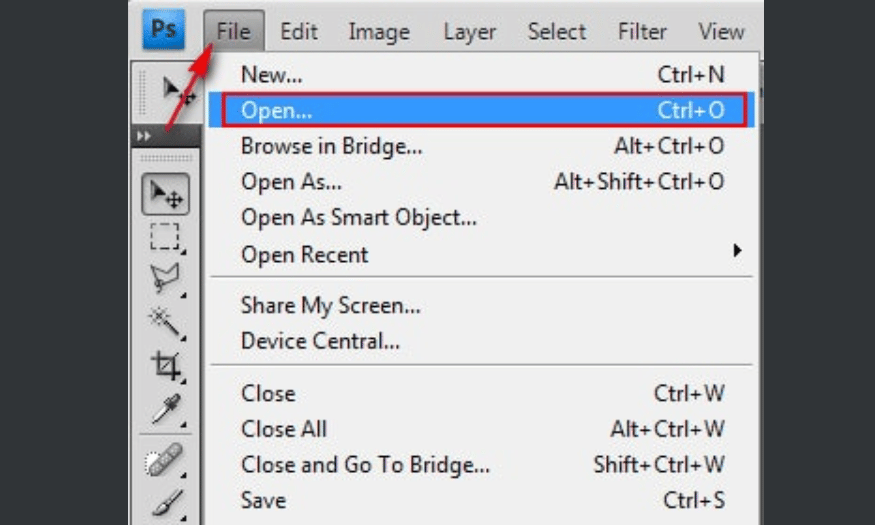
First, launch Photoshop on your computer. Once the main Photoshop interface appears, you can open the image you want to blur the logo by clicking on the File menu and selecting Open . A quicker way is to use the Ctrl + O key combination . Navigate to the image file in your folder and click Open .
1.2 Step 2: Select the Blur Tool
Once the photo is open, the next thing you need to do is select the Blur Tool . You can find the icon for this tool in the toolbar on the left. If you don’t see it, don’t hesitate to click on the icon that looks like a brush and hold it down to reveal the other tools. Select the Blur Tool to get started.
1.3 Step 3: Adjust the opacity
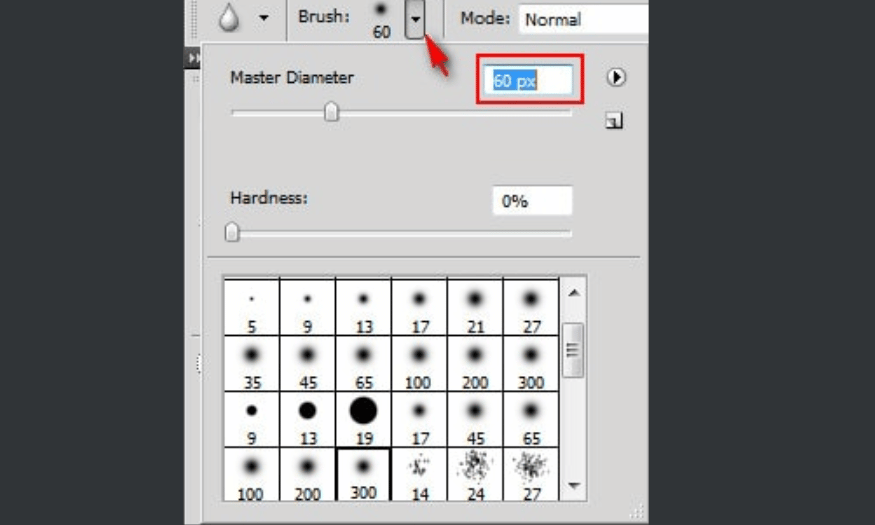
Before you start blurring your logo, you need to adjust the blur to match the size of your image. On the options bar at the top, you'll see Master Diameter . You can drag the slider to change the size of the tool, or click the box next to it to enter a precise value. The ideal blur will be easy to work with without losing the sharpness of the rest of your image.
1.4 Step 4: Blur the Logo
Now, move your mouse to the location of the logo that you want to blur. Hold down the mouse button and drag it across the logo area. Make sure you move the tool gently and continuously to achieve the desired blur. If necessary, you can repeat this process several times until you feel that the logo has been blurred in a way that blends in with the rest of the image.
1.5 Step 5: Save edited photo
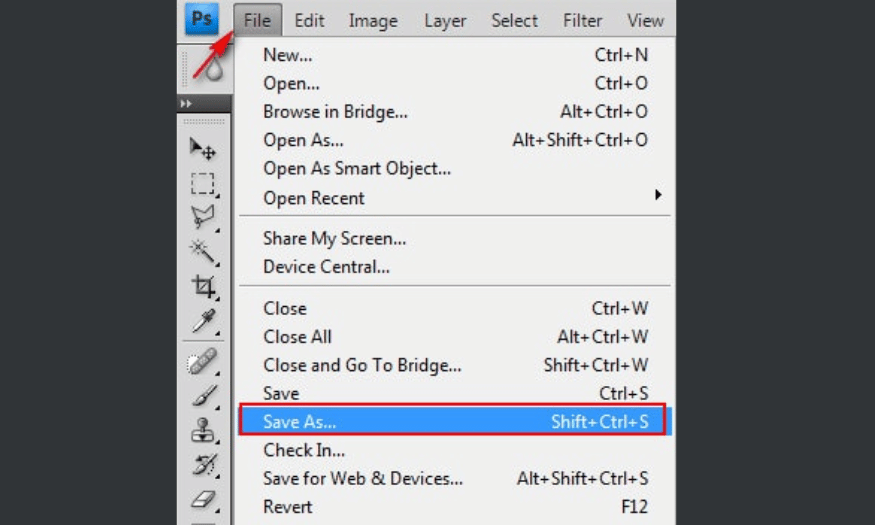
Once you're happy with the results, save your image. Click the File menu and select Save As to save your edited version of the image. You can also use the Ctrl + Shift + S keyboard shortcut to quickly open the Save File dialog box. Name your file and select the appropriate format (JPEG, PNG, etc.) before clicking Save .
2. Blur the logo using the Lasso Tool in Photoshop
2.1 Step 1: Open the image in Photoshop
First, launch Photoshop on your computer. When the main interface appears, you can open the photo you want to edit by clicking on the File menu and selecting Open . Or, you can use the Ctrl + O key combination to quickly open the dialog box. Navigate to the photo file whose logo you want to blur and click Open .
2.2 Step 2: Select the Lasso Tool
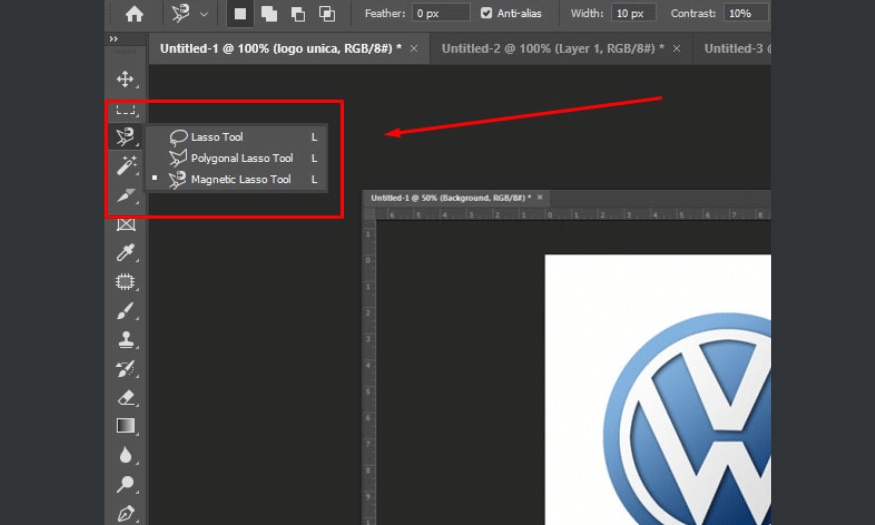
Once your photo has uploaded, look for the Lasso Tool in the toolbar on the left. This is the tool that allows you to draw freehand selections. If you don’t see the icon, you can tap and hold the icon that looks like a paintbrush to reveal other tools. Select the Lasso Tool to get started.
2.3 Step 3: Draw a selection around the Logo
Next, hold down the Shift key on your keyboard. Then, use your mouse to circle the logo or area you want to blur. When you're done, release the Shift key . The selection will appear with a flashing outline, showing that you've selected the correct area to blur.
2.4 Step 4: Apply Gaussian Blur effect
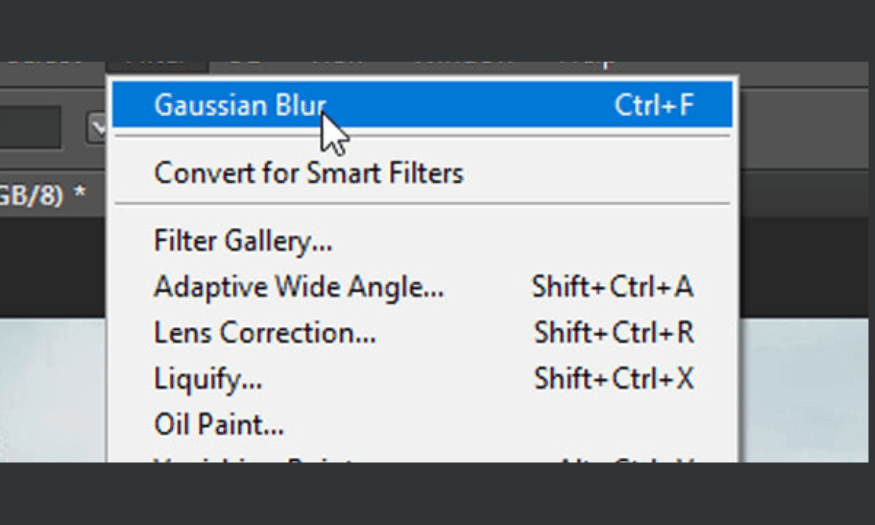
Now, to blur the logo, go to the Filter menu at the top of the screen. From the drop-down menu, select Blur and then select Gaussian Blur . A dialog box will appear, allowing you to adjust the level of blur. You can move the slider to preview the effect and choose the right blur level. When you are satisfied, press OK to apply.
3. Eraser Tool combined with Gaussian Blur to blur logo in Photoshop
3.1 Step 1: Open the photo and select the area to blur
Like the previous steps, open the photo you want to edit in Photoshop. Navigate to the location of the logo you want to blur.
3.2 Step 2: Create a copy of the Layer
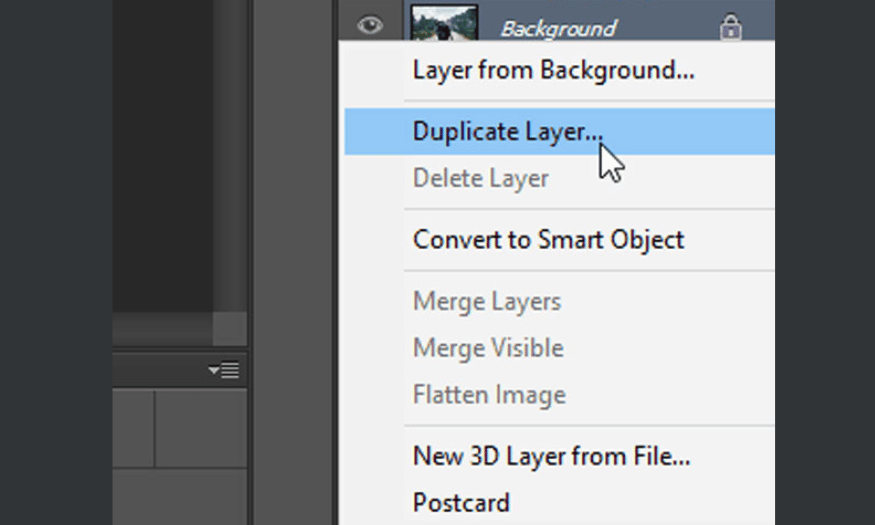
In the Layers panel on the right side of the screen, right-click on the photo layer and select Duplicate Layer . This is an important step to ensure that you have a copy of the original photo, making it easier to adjust later.
3.3 Step 3: Name the new Layer
The Duplicate Layer dialog box will appear. You can keep the default name or give it a new name by typing it in the As box . This makes it easier to manage layers during editing.
3.4 Step 4: Apply Gaussian Blur
Go to the Filter menu and select Gaussian Blur . Use the slider to adjust the blur until you get the result you want, then press OK .
3.5 Step 5: Using the Eraser Tool
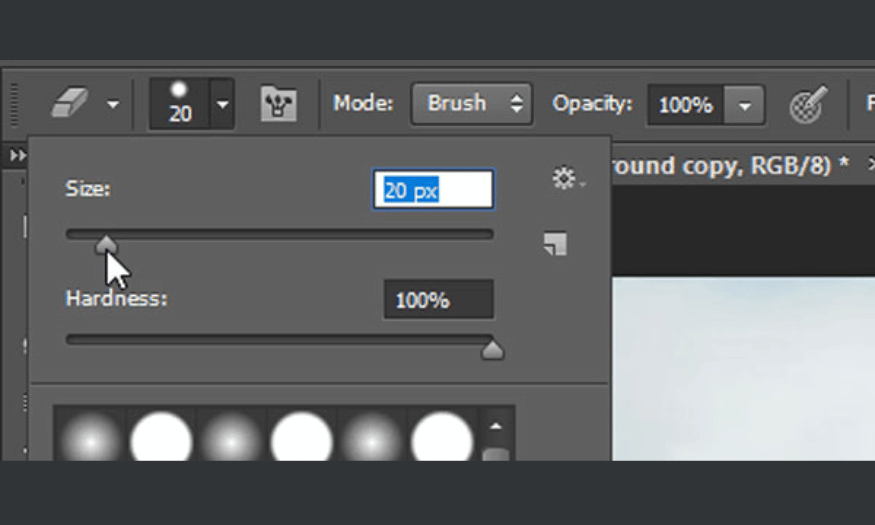
Finally, select the Eraser Tool from the toolbar. Move your mouse to the area you want to highlight. If you find the eraser is too big or small, click the small arrow below Edit and adjust the size under Size .
4. Blur the logo with the Iris Blur effect
4.1 Step 1: Open the image in Photoshop
First, you need to open Photoshop on your computer. When the main interface appears, insert the photo you want to blur by going to the File menu and selecting Open . You can also use the Ctrl + O key combination to quickly open it. Find the photo file in your folder and click Open . Make sure the photo has been uploaded to the Photoshop working interface.
4.2 Step 2: Select the Iris Blur effect
Once the photo is open, go to the Filter menu in the top toolbar. From the drop-down menu, select Blur and then Iris Blur . A new dialog box will appear, allowing you to apply a blur effect to the photo. The Iris Blur effect will create a blur point shaped like a lens, making it easy to adjust the area of the photo you want to blur.
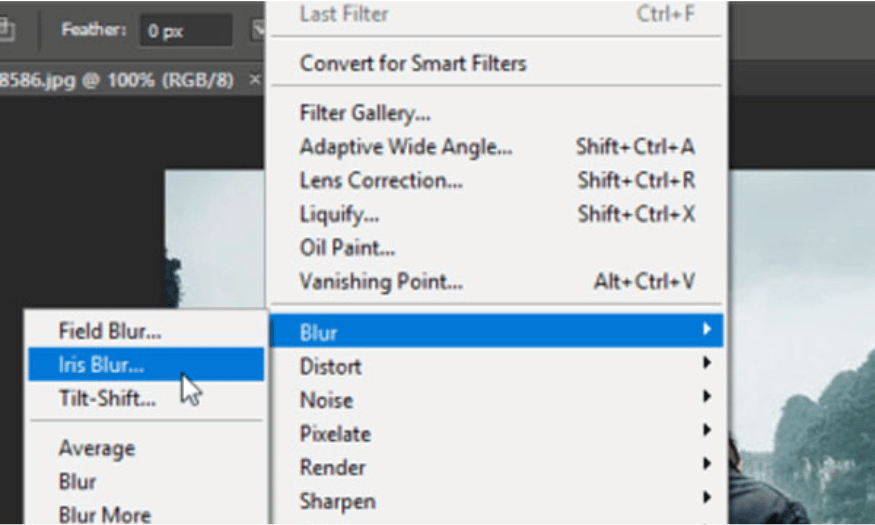
4.3 Step 3: Set the blur point
When the Iris Blur effect is applied, you will see a circle appear in the center of the photo. This point is the area that you want to keep in focus. Click and move this circle point to the location of the object you want to highlight. As you move this point, the surrounding areas will automatically blur, creating a highlight effect for the main object.
4.4 Step 4: Adjust the shape of the blurred area
If you want to change the size or shape of the blur, move your mouse to one of the four small dots located around the circle. When the mouse pointer changes to a double-headed arrow, hold down the mouse button and drag to adjust the size of the blur to your liking. You can stretch or shrink the blur to create a smooth transition between the in-focus and blurred areas.

4.5 Step 5: Fine-tune the effect
Once you have adjusted the shape and size, you can customize some more parameters to perfect the effect. In the Iris Blur panel, you will see options to change the blur and the falloff of the blur area. Experiment with these parameters to achieve the effect you want. Don’t forget to preview the results to make sure the photo looks perfect.
4.6 Step 6: Save the image
Once you are satisfied with the results, save your edited photo. Click the File menu and select Save As to save a new version of your photo. You can use the Ctrl + Shift + S keyboard shortcut to quickly open the save dialog box. Choose a file format and name your photo before clicking Save .
5. Conclusion
Each technique has its own advantages, experiment with different methods to find the logo blur that best suits your style. With these simple instructions, you will easily create beautiful images that still retain the uniqueness of your brand. Get started today and explore the limitless world of creativity with Photoshop.


