Best Selling Products
What is Channel in Photoshop?
Nội dung
- 1. About Channels in Photoshop
- 2. Channel Overview
- 2.1. How to display the Channel table
- 2.2. How to resize or shrink a Channel in Photoshop
- 3. How to show or hide Channel
- 4. Display Color Channel in Color
- 5. Select and Edit Channel
- 6. Rearrange and rename alpha and spot channels
- 7. How to delete a Channel in Photoshop
- 8. Duplicate Channels
- 8.1. Duplicate a Channel
- 8.2. Duplicate a Channel in an Image
- 8.3. Duplicate a Channel in another image
- 9. Split Channel into separate images
- 10. Merge Channels
Channel is the color channel of images in Photoshop. Many color channels will create a picture with perfect color. We can use the Channel name to edit images, but not everyone knows about it. Let's learn more about Channel in Photoshop through the following shares with SaDesign.
1. About Channels in Photoshop
Channels, also known as color channels, are grayscale images the same size as color images, made up of only one of the primary colors. These are channels of color information that are automatically created when you open a new image in Photoshop. The color mode of the image determines the number of color channels that are created.
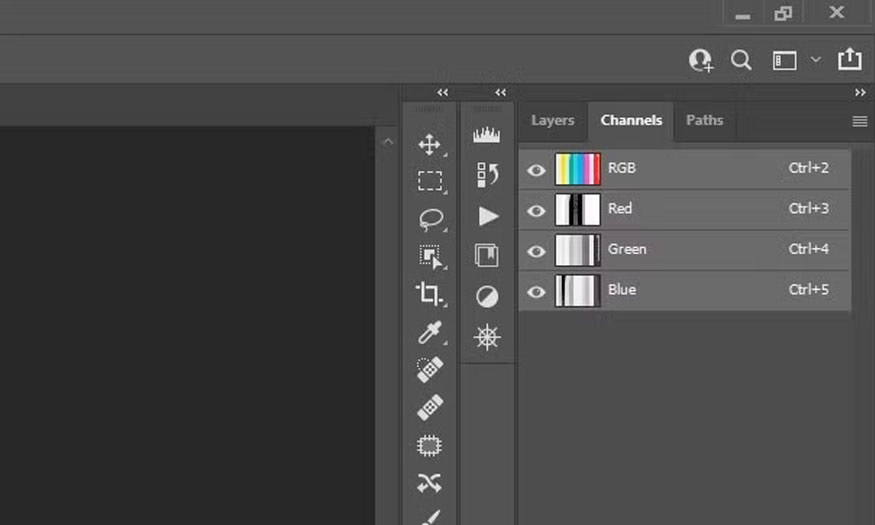
For example, an RGB image will have 4 channels, including 1 RGB channel and 3 channels for each color, including Red, Green, Blue. Each channel will contain pixels that describe the color depth or richness of those colors.
If the image contains an additional Alpha channel, it is called RGBA, the last A is understood as Alpha, which is also a channel.
Each image can contain more than 3-4 channels, max is 56 channels, depending on the file format (extension) is formatted to contain multiple channels. At this time it will be called Multi Channel Image.
The size of an image depends on the number of color channels, color depth data, and resolution. The higher the quality of the image, the more channels it has, the greater the color depth, and the more storage space it requires.
When you save a file in a format that supports the image's color mode, the color channels are preserved. Alpha channels are preserved only when saving the file in Photoshop, PDF, TIFF, PSB, or raw format. The DCS 2.0 format only preserves the channels in place. Saving to other formats may result in the loss of channel information.
2. Channel Overview
Channels are divided into 3 groups: Color channels, Spot channels and Alpha channels.
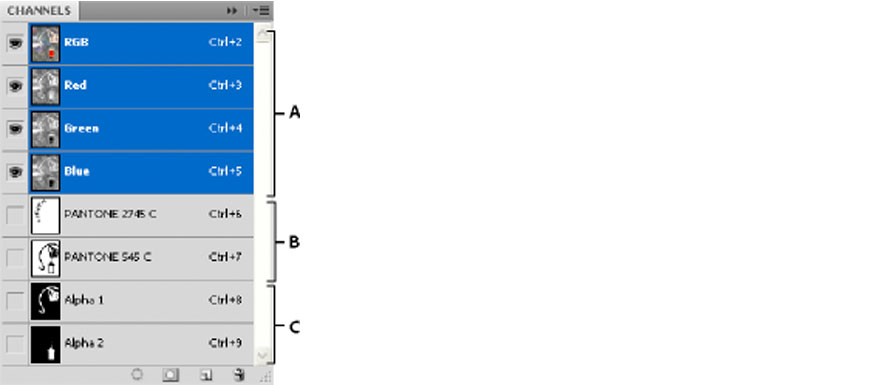
Refer to more details about Channel through the following shares.
2.1. How to display the Channel table
The Channel panel lists all the channels in the image, with the composite channel first (for RGB, CMYK, and Lab images). Thumbnails of the channel contents appear to the left of the channel name; the thumbnails update automatically as you edit the channel.
To display the Channel panel on the menu bar, select Windows => Channels.
2.2. How to resize or shrink a Channel in Photoshop
To change the size or thumbnail of the Channel, do the following:
Select the Options panel from the Channel panel menu. Click Thumbnail Size or click None to turn off thumbnails.
Viewing thumbnails is a convenient way to monitor Channel content; however, turning off thumbnails may improve performance.
3. How to show or hide Channel
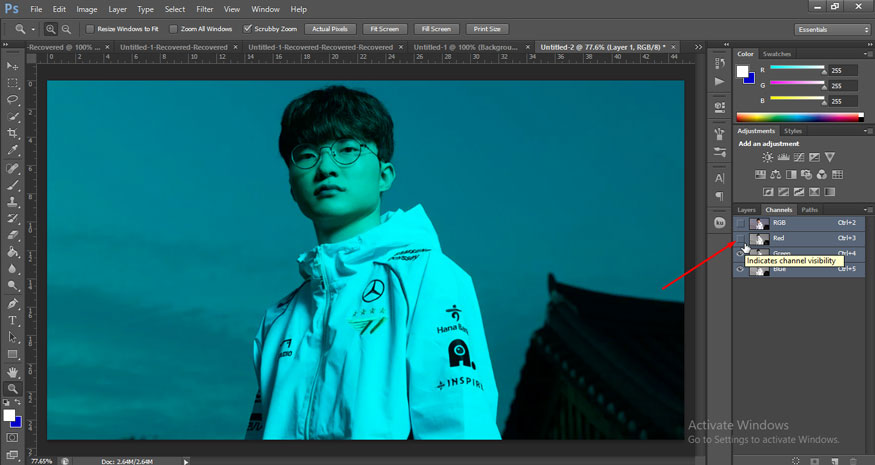
You can use the Channels panel to view any combination of channels in the document window. For example, you can view an Alpha Channel and a Composite Channel together to see how changes in the Alpha Channel relate to the entire image.
To show a Channel, click the eye to the left of its Channel. Click the Composite Channel to see all the default Color Channels. The Composite Channel is visible when all the Color Channels are visible.
To hide a Channel, click the eye to turn it off.
4. Display Color Channel in Color
Individual Channels are displayed in grayscale. In RGB, CMYK, or Lab images, you can view individual Channels in color. If more than one Channel is active, they always appear in color.
You can change the default to display individual color channels by color. When a channel is visible in the image, an eye icon appears to the left of that channel in the panel. To display the channel color:
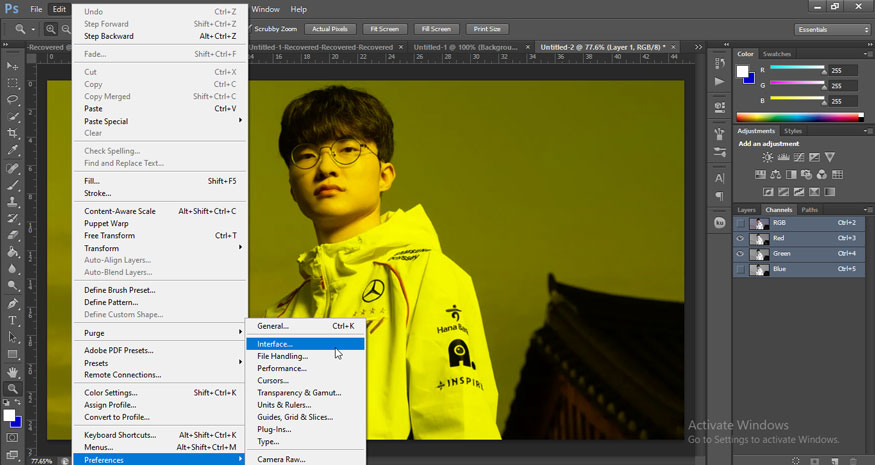
Do the following:
- In Windows, on the menu bar select Edit => Preferences => Interface.
- In Mac OS, select Photoshop => Preferences => Interface.
Select Show Channels In Color and click OK.
5. Select and Edit Channel
The user can select one or more Channels in the Channel panel. The names of all selected or active Channels will be highlighted.
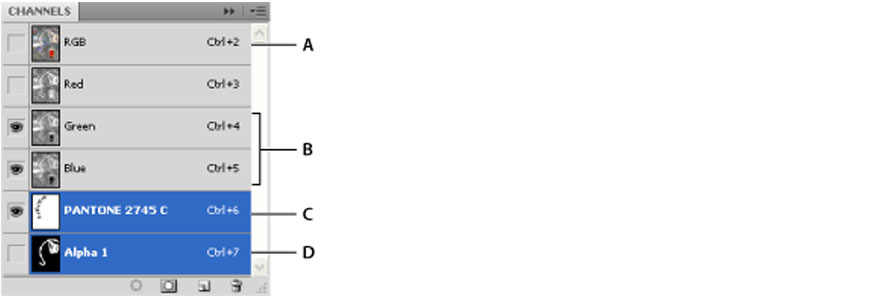
As illustrated above we can see:
- A is a general channel that is not displayed (eye icon is off)
- B consists of the Green and Blue Channels that are displayed but not selected for editing.
- C is the channel selected for viewing and editing.
- D is the channel selected for editing but not displayed.
To select a channel, click on the channel name. Hold Shift to select (or deselect) multiple channels. To edit a channel, select it and use the drawing tool on the image. You can only adjust one channel at a time. Painting with white adds the selected channel's color at 100% intensity. Painting with gray adds the channel's color at a lower intensity. Painting with black removes all of the channel's color.
6. Rearrange and rename alpha and spot channels
You can only move Alpha or Spot channels above the default Color Channels if the image is in Multi Channel mode (Image > Mode > Multi Channel). For information about that Mode's limitations, see Multi Channel.
- To change the order of alpha or spot channels, drag the channel up or down in the channels panel. When a horizontal line appears in the position you want, release the mouse button.
- To rename an alpha or spot channel, double-click the Channel name in the Channel panel and type a new name.
7. How to delete a Channel in Photoshop
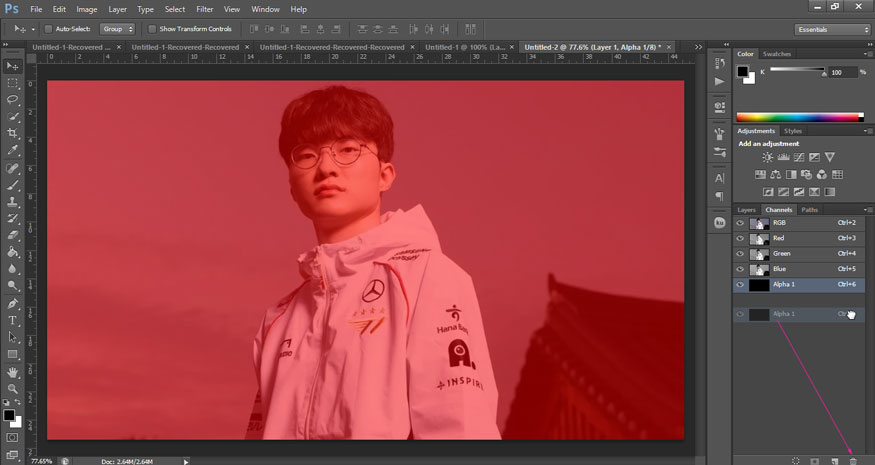
In addition to the above operations, you can also delete any unwanted spots or alpha channels before saving the image. Complex alpha channels can significantly increase the disk space when saving, so deleting them is necessary.
To delete a channel in Photoshop, select the channel in the Channels panel and perform the following group of operations:
- Alt-click (Windows) or Option-click (Mac OS) the Delete icon.
- Drag the channel name in the dashboard to the Delete icon.
- Select Delete channel from the channel panel menu.
- Click the Delete icon at the bottom of the panel and then click Yes.
Note that when you delete a color channel from a file with layers, visible layers are flattened and hidden layers are removed. Because deleting a color channel converts the image to Multichannel mode, which does not support layers. Images are not flattened when you delete an alpha channel, spot, or mask.
8. Duplicate Channels
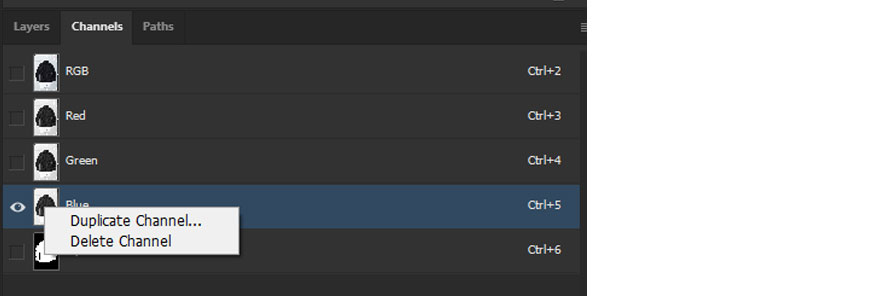
You can copy a channel and use it in the current image or for other images.
For example, you might want to use the Duplicate Channel feature to create a mask channel, or you might want to back up a copy of a channel before editing.
8.1. Duplicate a Channel
If you want to copy alpha channels between images, the channels must be the same pixel size. You cannot copy channels to Bitmap images. To copy, follow these steps:
- In the Channel panel, select the channel to copy.
- Select Duplicate Channel from the Channels panel menu.
- Enter a name for the duplicate channel.
- For Document, do one of the following:
- Select destination. Only open images that are the same pixel size as the current image. To copy a channel in the same file, select the channel's current file.
- Select New to copy the channel to a new image, creating a Multi Channel image containing a single channel. Enter a name for the new image.
To invert the selected and masked areas in the duplicate channel, select Invert.
8.2. Duplicate a Channel in an Image
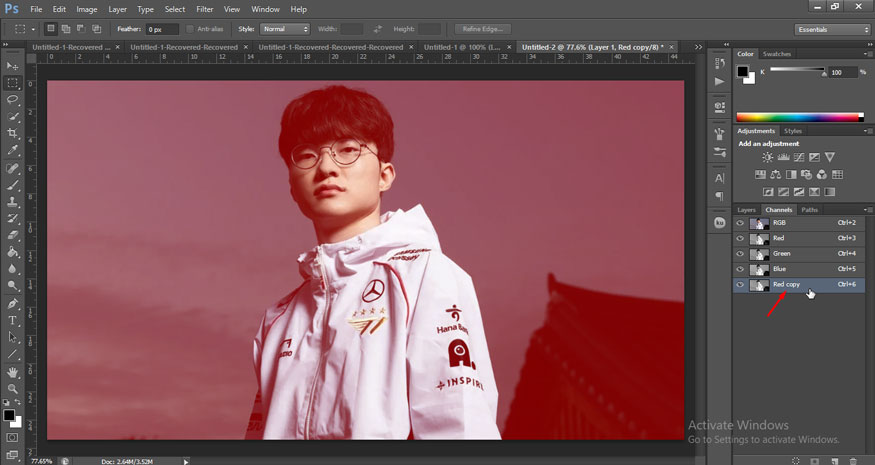
You can duplicate a channel in an image by following these steps:
- In the Channel panel, select the Channel you want to copy.
- Drag the Channel to the Create New Channel button at the bottom of the panel.
8.3. Duplicate a Channel in another image
To duplicate a Channel in another image, do the following:
- In the Channel panel, select the channel you want to copy.
- Make sure the destination image is open. The destination image does not need to have the same pixel size as the copied channel.
- Do one of the following:
- Drag a channel from the Channels panel to the destination image window. The copied channel appears at the bottom of the Channels panel.
- Select Select => All, then select Edit => Copy. Select the channel in the destination image and select Edit => Paste. The pasted channel will overwrite the existing channel.
9. Split Channel into separate images

You can only split channels of a planar image. Splitting channels is useful when you want to preserve individual k-channel information in a file format that does not preserve channels.
To split channels into separate images, select Split Channels from the Channel panel menu.
The original file is closed and the individual channels appear in separate grayscale image windows. The title bar in the new windows shows the original file name along with the channel. You save and edit the new images separately.
10. Merge Channels
Channels can be merged into a single image. However, the images you want to merge must be grayscale, flattened (no layers), have the same pixel size, and be open. The number of grayscale images you have open determines the color modes available when merging channels. For example, if you have three images open, you can merge them into one RGB image; if you have four images open, they can become one CMYK image.
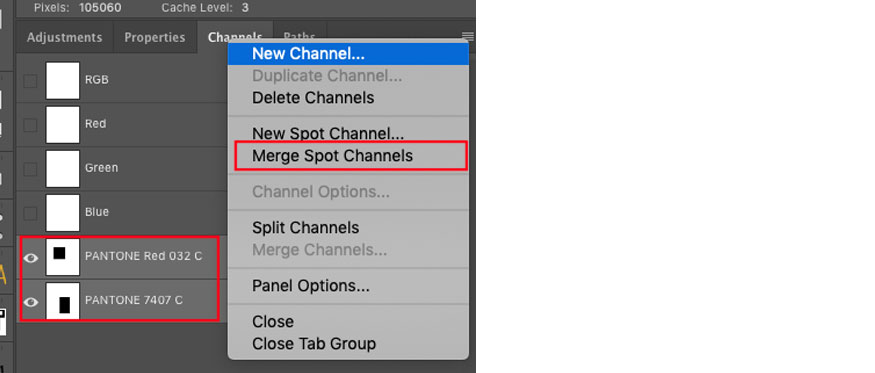
- Open the grayscale images that contain the channels you want to merge and activate one of them.
- You must open more than one image to be able to use the Merge Channels option.
- Select Merge Channels from the Channels panel menu.
- For Mode, select the color mode you want to create. The channel number that matches the mode will appear in the Channels text box.
- If necessary, enter a number in the channel text box.
- If you enter a number that is not compatible with the selected mode, Multichannel mode is automatically selected. This creates a multichannel image with two or more channels.
- Click OK.
- For each channel, make sure the image you want to open is selected. If you change your mind about the image type, click Mode to return to the Merge Channels dialog box.
- If you are merging channels into a multi-channel image, click Next and select the remaining channels.
- Once you have selected your channel, click OK.
- The selected channels are merged into a new image of the specified type and the original images are closed without any changes. The new image appears in an untitled window.
Above is the summary information about Channel in Photoshop. Hopefully, this sharing will help you understand more about channel operations.


