
Best Selling Products
Plugin Retouch4me
69 USD
Upgrade Genuine Office 365
49 USD

ChatGPT Plus Account (GPT-4)
16 USD

MidJourney Account
29 USD
Windows 10 & 11 Pro Key
36 USD
Copyright Adobe Lightroom Account
59 USD

Freepik Premium Account
59 USD
Genuine Cheap Canva Pro
39 USD

Upgrade Duolingo Super
29 USD
Autodesk All App Account Copyright
120 USD

Capcut Pro 1 Year
39 USD
Adobe Premiere Pro Account
99 USD
Genuine Adobe Illustrator account
99 USD
Upgrade genuine Capture One account
120 USD
Adobe Photoshop Copyright - Full App
120 USD
What is Photoshop Generative Fill AI? A step-by-step guide for beginners.
Nội dung
- 1. What is Photoshop Generative Fill AI?
- 2. What are the outstanding features of Photoshop Generative Fill AI?
- 3. Detailed instructions on how to install and use Photoshop Generating Fill AI
- 4. How to use Generative Fill AI in real-world situations
- 5. Tips for writing effective Photoshop Generative Fill AI prompts
- 6. Common mistakes when using Photoshop Generative Fill AI
- 7. Conclusion
Photoshop Generative Fill AI is an AI-powered image editing feature that allows users to easily add objects, remove unwanted details, or change the background with just a few words of description. Instead of spending a lot of time manually cutting and pasting, you can leverage AI to transform your ideas into visual images right within Adobe Photoshop. So what makes Photoshop Generative Fill AI stand out and how do you use it? In this article, let''s explore the main features, installation instructions, and detailed usage steps for beginners.

1. What is Photoshop Generative Fill AI?
Photoshop Generative Fill is an AI-powered content creation feature integrated into Adobe Photoshop, utilizing Adobe Firefly technology to assist in on-demand image editing. The tool allows users to add objects, remove unwanted details, change the background, or expand the frame through selections and text commands.
The highlight of Generative Fill lies in its ability to analyze existing images to create new content that matches the layout, color, lighting, and perspective. This allows even those with little design experience to perform complex edits more easily, saving time when creating product images, banners, or social media content.
2. What are the outstanding features of Photoshop Generative Fill AI?
Generative Fill makes the photo editing process more intuitive by understanding requests in natural language. Users simply select the area to be changed, enter a description of their desired changes, and let the AI generate the content. Instead of manually searching for images, cropping, and adjusting every detail, you can quickly experiment with different ideas right within Photoshop. Some notable advantages of the tool include:
-
Add objects: Add flowers, plants, accessories, or decorations to the photo.
-
Remove unnecessary details: Eliminate distracting objects and recreate the background.
-
Change the background: Create a new background that suits the subject and purpose.
-
Expand the frame: Add scenery to empty areas when you need to change the image scale.
-
Create multiple options: Provide variations so users can compare and choose the most suitable result.
3. Detailed instructions on how to install and use Photoshop Generating Fill AI
To use Photoshop Generative Fill AI, you need to install a version of Photoshop that supports this feature and log in with a suitable Adobe account. The process involves registering an account, installing the software, opening an image, selecting the area to be edited, and entering commands for the AI to create the content. The interface or terms of use may vary depending on the version, so you should check Adobe's official information before you begin.
Step 1: Access the Adobe Photoshop website.
Open your browser on your computer and go to https://www.adobe.com/products/photoshop.html . Here you can find information about the software, system requirements, and available subscription packages. It's recommended to download Photoshop directly from Adobe to ensure safety and avoid installation files from unknown sources.
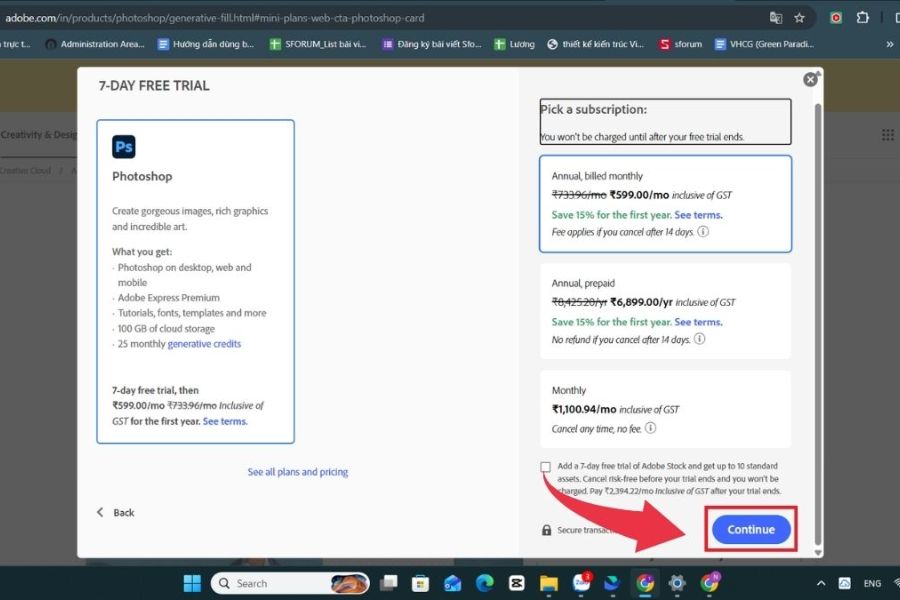
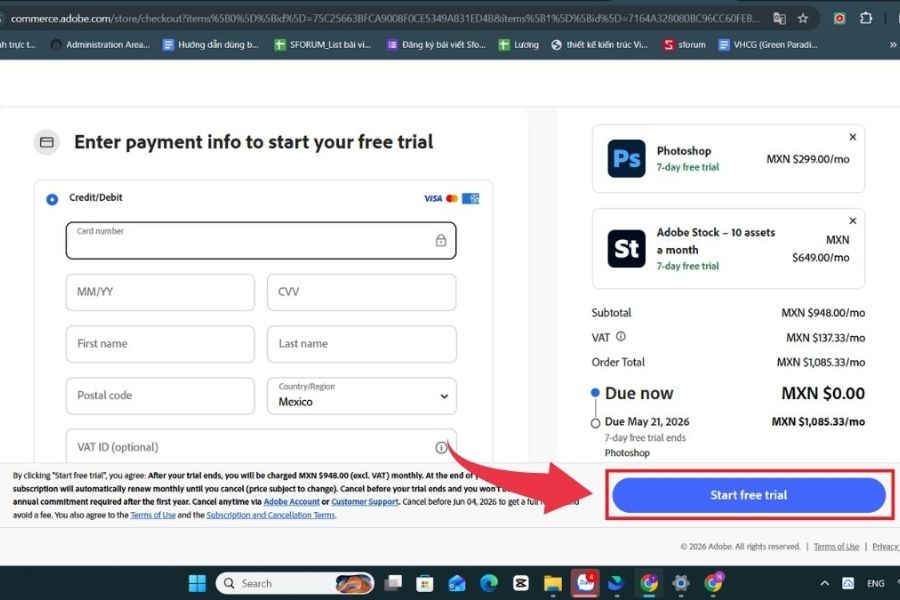
Step 2: Choose a suitable subscription plan.
Look for a subscription or trial option if the program is being offered for your account and region. Before confirming, check the validity period, fees, renewal conditions, and cancellation policy. Payment information and offers may vary from time to time.
Step 3: Log in or create an Adobe account.
Enter your email and password to sign in to your existing Adobe account. If you don't have an account yet, choose to sign up and follow the on-screen instructions. You should use your frequently accessed email address for convenient account verification, subscription management, and password recovery when needed.
Step 4: Install Adobe Creative Cloud
After completing the registration, download the Adobe Creative Cloud application following the instructions on the official website. Open the downloaded installation file and follow the on-screen instructions. During the installation process, maintain a stable internet connection and ensure your computer has sufficient storage space.
Step 5: Download and install Photoshop
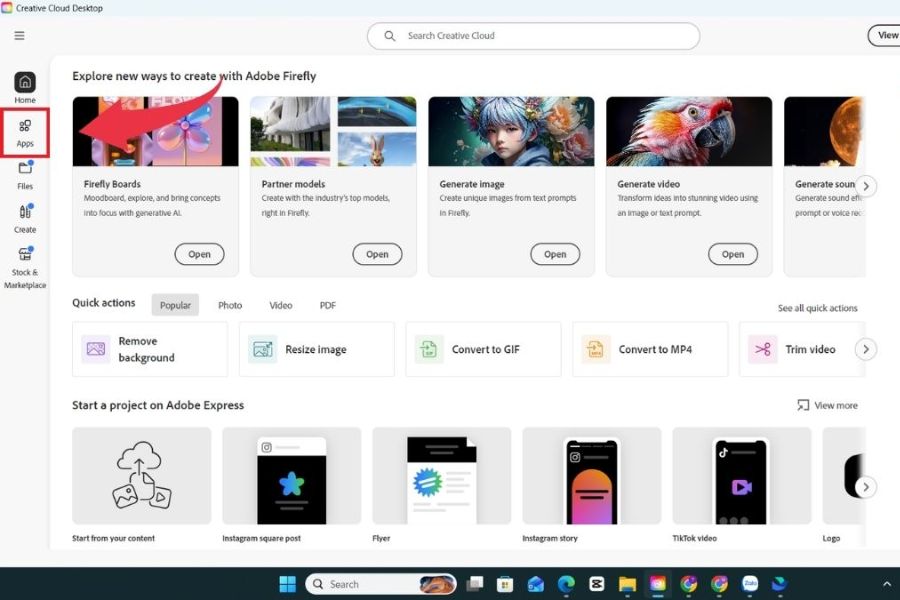
Open Adobe Creative Cloud, sign in to your account, and access the applications section. Find Adobe Photoshop and click the install button. Once the download is complete, launch the software to check the interface and available features. If you don't see Generative Fill, check your Photoshop version and account support conditions.
Step 6: Open the image you want to edit.
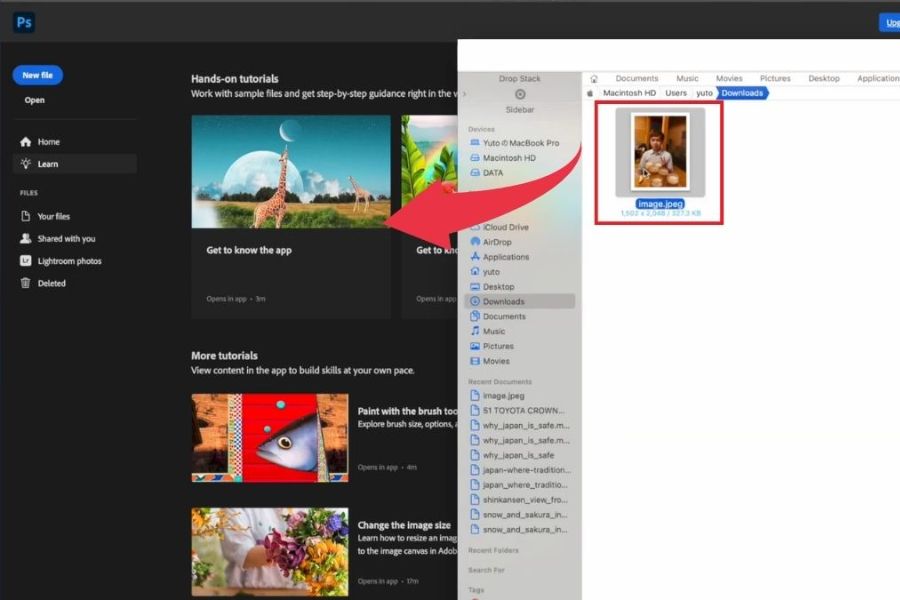
In Photoshop, select File > Open, then locate the image you want to process on your computer. You can also drag and drop the image file directly into the software interface. For beginners, it's recommended to start with an image that has a clear subject and a simple composition to easily observe the results after using AI.
Step 7: Select the area to be edited
Use the Lasso Tool, Object Selection Tool, or Rectangular Marquee Tool to select the area you want to change. For example, if you want to add a vase to the table, select the area where you intend to place the vase and a portion of the surrounding space. A well-selected area will provide the AI with more data to create content that fits the image composition.
Step 8: Enter commands for the AI
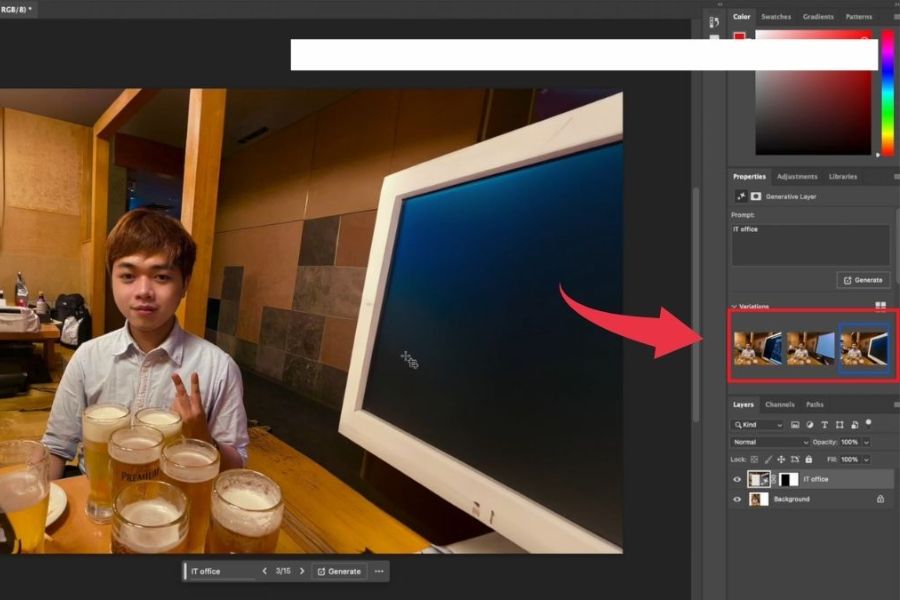
After creating the selection, locate the context taskbar or the Generative Fill option in the Photoshop interface. Enter a description of what you want to add or change and then click Generate. The command should be clear, specific, and focused on the object being created, for example: "A vase of white tulips on a wooden table, natural light, minimalist style."
Step 9: Wait for the AI to create the image.
Photoshop will process the selection and commands to create the new content. The processing time depends on your internet connection, service availability, and the complexity of the request. While waiting, you should keep the edited area as is to easily check and compare the results with the original image.
Step 10: Select the result and save the image.
Once created, Photoshop offers several variations for you to choose from. Check the object's shape, color, lighting, and harmony with the rest of the image. If you're not satisfied, you can edit the commands or recreate it. When finished, select File > Save As to save the PSD file if you want to continue editing, or export it to JPEG or PNG for sharing.
4. How to use Generative Fill AI in real-world situations
Beyond basic operations, Photoshop Generative Fill supports various other editing needs. For example, if a person or object appears unintentionally in an image, you can select that detail and then use Generative Fill to recreate the background. If the result doesn't look natural, adjust the selection and try again to minimize unusual seams or textures.
For adding objects or expanding the frame, the description is also crucial. You should clearly state the object, its position, color, and style so that the AI can easily guide the results. For example, when adding an accessory to a handbag image, you could enter: "A cream-colored silk bow placed next to the handbag, soft lighting, commercial photography style." If you need to expand the image, use the Crop Tool to create more empty space, then select that area and run Generative Fill.
5. Tips for writing effective Photoshop Generative Fill AI prompts
A clear command will give you better control over the outcome and reduce trial-and-error time. Instead of using a general description like "add decorations," specify the desired object, location, and characteristics. You can also add visual styles such as realistic, minimalist, or vintage to make the result closer to your original idea.
When writing prompts, keep the following points in mind:
-
Detailed description: Specify the object, its color, and its material.
-
Identify the location: Use phrases such as "to the left," "behind," or "on the table."
-
Light synchronization: Describes natural light, soft light, or warm tones.
-
Keep your commands clear: Focus on the main content and avoid including too many irrelevant requests.
-
Try each change individually: If the result isn't right, adjust a few details in the prompt instead of rewriting the entire thing.
6. Common mistakes when using Photoshop Generative Fill AI
During use, you may encounter situations where Generative Fill is not found, the AI creates the wrong object, or the image appears to have unnatural details. This could be due to the software version, internet connection, an inappropriate selection area, or unclear commands. You should check each element to identify the problem instead of repeating the entire process.
Some common solutions include:
-
Generative Fill not visible: Check your Photoshop version, account login, and feature support conditions.
-
The AI generated incorrect content: Rewrite the prompt to be more specific and adjust the selection area.
-
Image is distorted: Narrow the editing area or try creating a different variation.
-
Unable to create content: Check your network connection, error message, and update your software if necessary.
-
New photos are inconsistent: Adjust the color, brightness, and contrast using Photoshop tools.
7. Conclusion
Photoshop Generative Fill AI is a useful tool that simplifies the image editing process, from adding objects and removing unwanted details to expanding the frame. Thanks to its intuitive operation and ability to generate content based on descriptions, this feature is suitable for both Photoshop beginners and experienced image designers. To use it effectively, you should start with simple requirements, write specific prompts, and carefully check the variations generated by the AI. Once you are familiar with selecting areas and describing content, you can apply Generative Fill to product images, advertising banners, and many other creative projects.










VIP Products


Best Selling Products
Plugin Retouch4me
69 USD
Upgrade Genuine Office 365
49 USD
ChatGPT Plus Account (GPT-4)
16 USD
MidJourney Account
29 USD
Windows 10 & 11 Pro Key
36 USD
Copyright Adobe Lightroom Account
59 USD
Freepik Premium Account
59 USD
Genuine Cheap Canva Pro
39 USD
Upgrade Duolingo Super
29 USD
Autodesk All App Account Copyright
120 USD
Capcut Pro 1 Year
39 USD
Adobe Premiere Pro Account
99 USD
Genuine Adobe Illustrator account
99 USD
Upgrade genuine Capture One account
120 USD
Adobe Photoshop Copyright - Full App
120 USD