Best Selling Products

ChatGPT Plus Account (GPT-4)
16 USD

Capcut Pro 1 Year
39 USD

Genuine Cheap Canva Pro
39 USD

Copyright Adobe Lightroom Account
59 USD

Autodesk All App Account Copyright
120 USD

Freepik Premium Account
59 USD

Plugin Retouch4me
69 USD

Upgrade Duolingo Super
29 USD

Windows 10 & 11 Pro Key
36 USD

Genuine Adobe Illustrator account
99 USD

Adobe Premiere Pro Account
99 USD

Adobe Photoshop Copyright - Full App
120 USD

Upgrade genuine Capture One account
120 USD

MidJourney Account
29 USD

Upgrade Genuine Office 365
49 USD
3 Locations to Find Camera Settings in Lightroom
Nội dung
When you take a photo, the camera automatically saves all the technical details of that shot directly within the image file. However, not everyone knows how to access this information in post-processing software, especially with Lightroom.
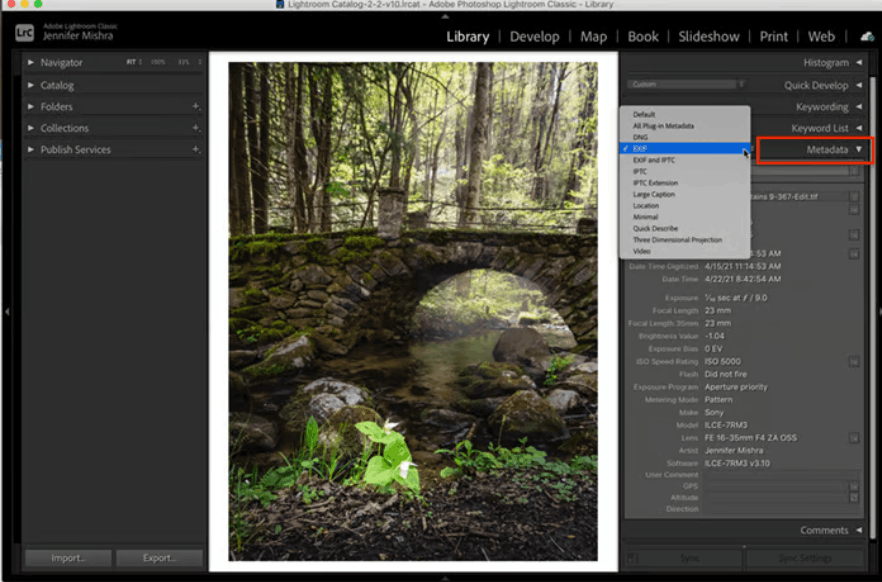
1. What is Lightroom?
Lightroom is photo editing and management software developed by Adobe, the same company behind popular software like Photoshop and a range of tools for computers, phones, and tablets. It's one of the most popular tools in the photography world thanks to its ability to organize photo libraries scientifically, allowing users to easily categorize, tag, and search thousands of photos in seconds.

Lightroom's unique feature lies in its non-destructive editing mechanism. This means that when you make any changes to a photo, such as adjusting exposure, white balance, or contrast, the original image file remains completely unaffected. Instead, Lightroom only saves the editing parameters as separate data, and only when you export the image does the software create a new image file containing those changes. Thanks to this mechanism, users can freely experiment with many different editing styles without worrying about losing original data, and can always revert to the original state or reset a specific parameter if they are not satisfied.
Because of its powerful information storage and management capabilities, Lightroom is also the ideal place to store all the technical data accompanying each photo, including camera specifications, which we will explore shortly.
2. What are Camera Settings?
Camera settings, also known as shooting parameters, are a set of technical information that accurately reflects how you set up your camera at the moment you press the shutter button for a specific photo. This information is often referred to in technical terms as EXIF data, also known as metadata. Simply put, this is all the technical data hidden behind each photo you take.
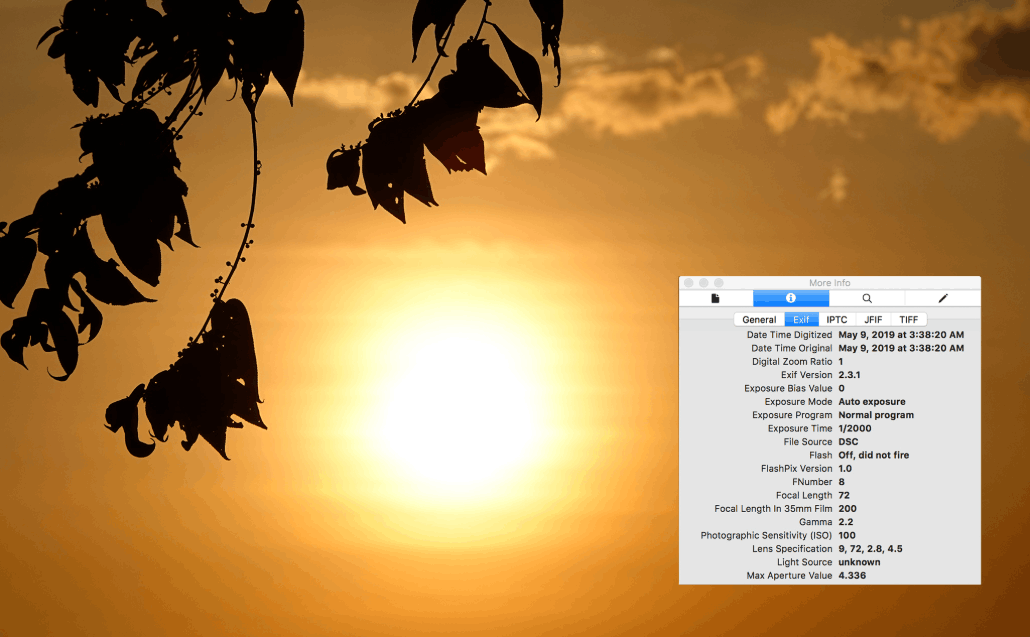
Among the many parameters recorded, four are the most important that any photographer should pay attention to: aperture, shutter speed, ISO, and the focal length of the lens used. These four parameters form the foundation of the exposure triangle in photography; understanding them after shooting will help you accurately determine how you set up your camera to create the lighting effects, depth of field, or motion blur seen in the final image.
Beyond just providing a reference, this data is incredibly useful for troubleshooting when a photo doesn't turn out as expected. If a photo is blurry, underexposed, or overexposed, reviewing the camera settings will help you quickly identify the cause, allowing you to learn from your mistakes for future shots. We'll delve deeper into this aspect in the troubleshooting section below.
3. Metadata Dropdown Table
The most comprehensive and complete location for accessing camera settings in Lightroom Classic is the Library module. When you open an image in this module, you'll see a column of information on the right side of the screen; this is where all the important Lightroom controls are located.
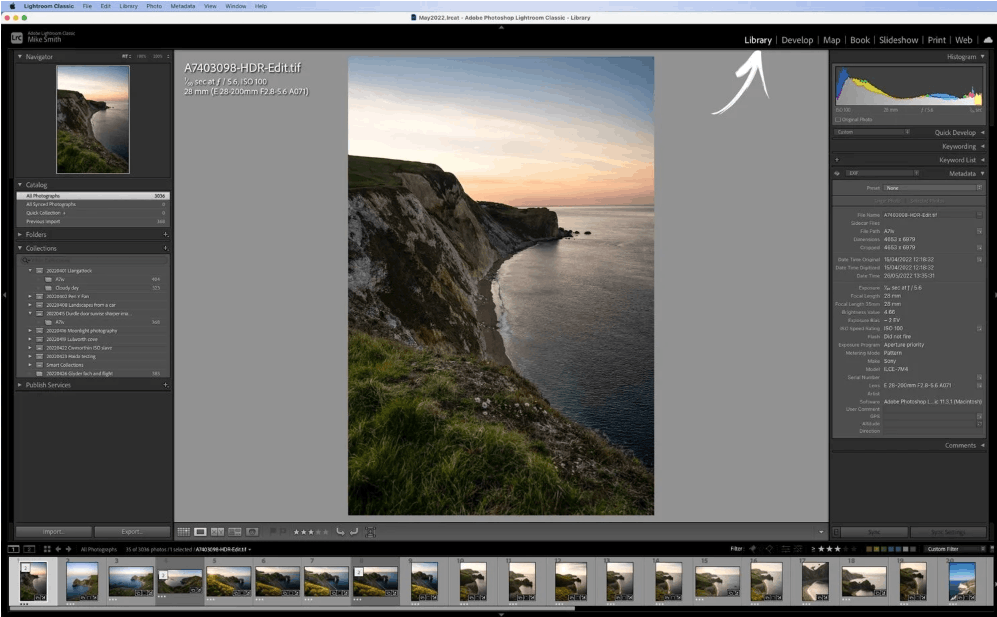
This right-hand column comprises several different tables stacked in order, specifically the Histogram table for viewing the exposure histogram, the Quick Develop table for quick editing, the Keywording and Keyword List tables for assigning keywords to images, the Metadata table containing all technical information, and finally the Comments table for notes.
Among these tables, the Metadata table is the most comprehensive source of all the data you need. If the table is minimized, simply click the small triangle icon next to the Metadata title to expand the full content. Once the table is open, all the shooting parameters will be clearly displayed, allowing you to know exactly how you took the photo, or sometimes even identify where you went wrong in the camera setup.
4. Which Camera Settings Are Saved?
When you open the Metadata panel in Lightroom Classic, you'll notice a rather long list of information that's automatically stored for each photo. Below are some of the most common data fields you'll find.
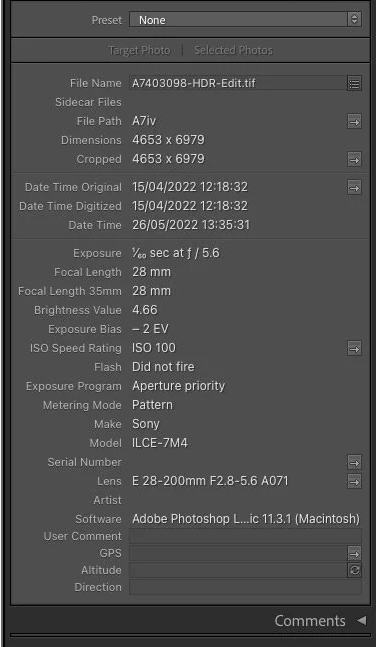
First, you'll see the file name, image size in pixels, information indicating whether the image has been cropped, and the exact date and time the photo was taken. Next are the core technical specifications, including exposure time (or shutter speed), the focal length of the lens used, and the equivalent focal length on a full-frame sensor if you're using a crop sensor camera.
Additionally, Lightroom records the brightness value, the exposure compensation you've adjusted, the ISO index, the flash usage status, the exposure mode indicating which shooting mode you're using (automatic, aperture priority, or fully manual), and the metering mode the camera uses when calculating exposure.
Besides lighting parameters, the metadata panel also provides information about the equipment used, including the camera manufacturer, specific model, type of lens attached, and the firmware version running on the device at the time of shooting. If you want to record your personal thoughts about the photo, the comments section below these parameters also allows you to add your own notes.
In particular, if your camera or phone has built-in GPS and this feature is enabled when shooting, Lightroom will also display the geographical coordinates where the photo was taken, making it easy for you to remember the exact location later.
5. Other Places to Find Your Specifications
In addition to the Metadata panel, Lightroom provides two other locations where you can quickly review camera settings without expanding the entire right-hand panel. These are more convenient options when you only need to quickly check a few basic parameters.
5.1 Histogram Table
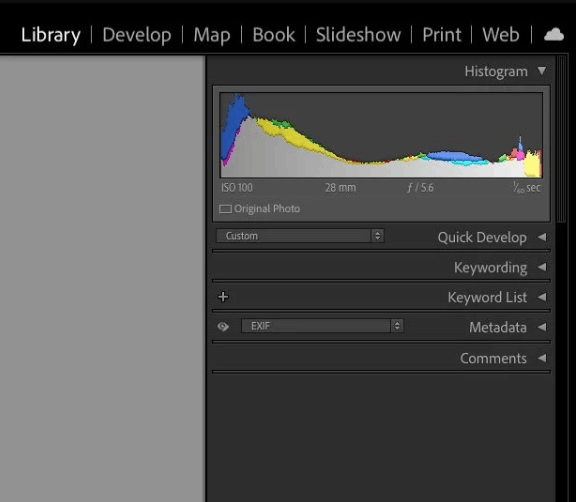
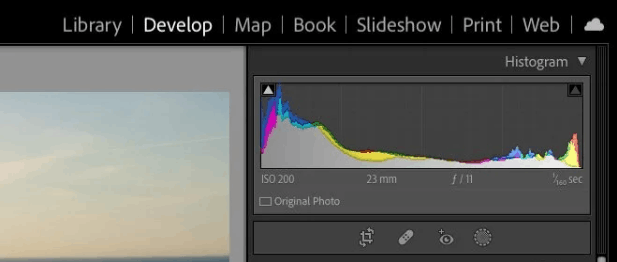
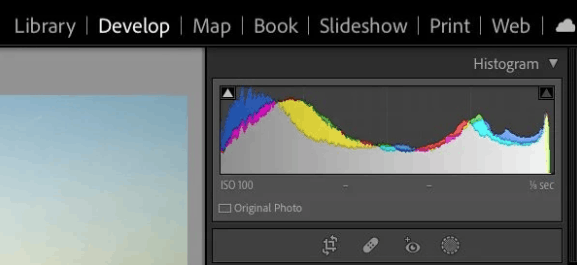
In both the Library and Develop modules, you can find a brief summary of the parameters right below the Histogram chart in the right-hand column of the screen. If the Histogram isn't displayed, simply click the small triangle icon next to the word "Histogram" in the upper right corner of the Lightroom interface to open it.
Once the histogram is displayed, simply move your mouse cursor away from the main image viewing area, and important parameters such as focal length, ISO, aperture, and shutter speed will automatically appear below the histogram. This is the quickest way to glance at an image's parameters without opening any other panels, making it ideal when browsing through multiple images consecutively and needing a quick reference.
5.2 Loupe Info
The second option is to display the parameters directly on the main image view, in the upper left corner of the screen, using a feature called Loupe Info. This is a useful option for those who want to see the parameters immediately without having to glance at the right-hand column.
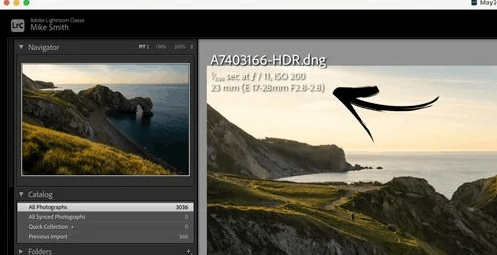
To activate this feature, go to the View menu, then select Loupe Info, and then select Show Info Overlay. Once the overlay appears, go back to the View menu, select Loupe Info again, and choose Info 2. This option will fix the image parameters in the upper left corner of the main frame for any image you are viewing in Lightroom.
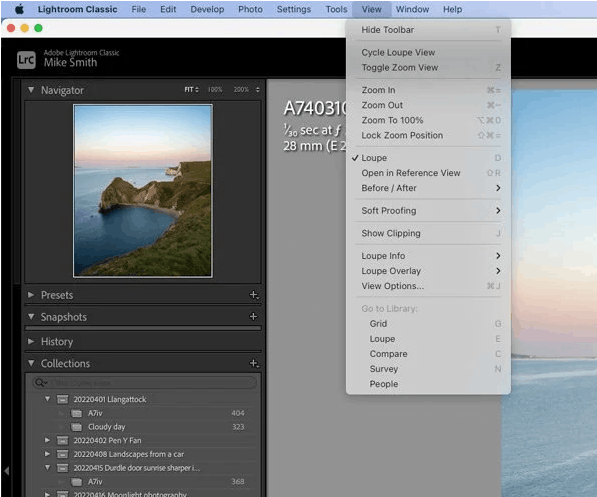
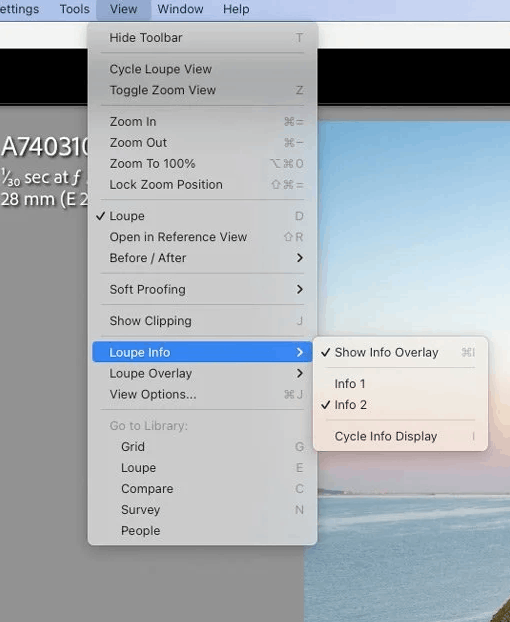
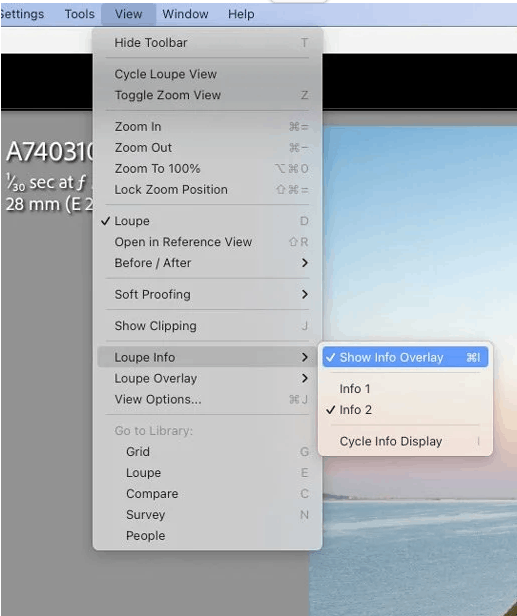
If you find this information layer distracting while working, simply go back to the View menu, select Loupe Info, and uncheck Show Info Overlay to hide it. You can also use a keyboard shortcut to quickly toggle this feature on and off, specifically the Command and I key combination on a Mac, or CTRL and I on a Windows computer.
In addition to Info 2, which displays full technical specifications, Lightroom also has an Info 1 option, which only shows the image file name, date and time of shooting, and resolution. This is suitable when you only need basic information and don't want too much data taking up screen space.
6. Troubleshooting
In some cases, you may notice that the areas where parameters like aperture or focal length should be displayed are instead marked with slashes or left completely blank. The most common cause of this is that you are using a fully manual lens, meaning a lens that has no electronic connection to the camera body.
With such manual focus lenses, because there is no electronic signal transmission between the lens and the camera body, the camera cannot record parameters such as aperture or focal length into the image's EXIF data. This is one of the common limitations when using manual focus lenses, although they still offer very good optical quality and are often more affordable than autofocus lenses.
Besides helping to identify the cause of missing data, camera settings are also an incredibly useful tool for reviewing and improving your own photography process. For example, if you have a blurry photo that lacks the desired sharpness, checking your shooting parameters will help you pinpoint the exact problem – it could be due to an inappropriate ISO setting, a focusing error, or a shutter speed that's too slow for the shooting conditions.
In the early days of film photography, photographers had almost no way of knowing exactly what aperture or shutter speed they used, unless they carefully recorded it in a notebook at the time of shooting—a habit not everyone maintained. Today, thanks to metadata automatically stored in each digital photograph, retrieving all this information is incredibly simple and accurate.
However, it's important to note that the sharpness of a photograph can be affected by many factors other than choosing the wrong shutter speed, such as camera shake, an unstable tripod, or inaccurate focusing technique. Therefore, having complete technical data available after each shot will give you the opportunity to systematically learn from mistakes, thereby gradually improving your photography skills over time.
7. Frequently Asked Questions About Lightroom and Camera Settings
Will the camera settings in Lightroom be lost when I edit photos?
No. Because Lightroom works on a non-destructive editing mechanism, any changes you make are saved only as separate editing data, completely separate from the original EXIF data of the image. Therefore, no matter what you adjust, whether it's exposure, color, or any other parameter, the original camera settings are always preserved and can be retrieved at any time.
Why aren't some of my photos showing the full camera settings?
This situation often occurs when using a manual focus lens that isn't electronically connected to the camera body, preventing the camera from recording parameters like aperture or focal length. Additionally, some third-party editing software or improper image export processes can sometimes cause the loss of some of the original metadata.
Where is the most convenient place to view camera settings when quickly browsing through many photos?
If you want to quickly view parameters while browsing through multiple images consecutively, the Histogram table in the right-hand column is the most convenient option as the information is displayed directly below the chart without needing to expand to any additional tables. Meanwhile, if you want a more complete and detailed view, the Metadata table in the Library module still provides the most comprehensive information.
Does Loupe Info affect the quality or data of the original photo?
Absolutely not. Loupe Info is simply an information overlay that appears on top of the image view while you're working with Lightroom; it doesn't affect the original image file or any data stored within the image. You can turn this feature on or off at any time without worrying about affecting the image quality or information.
Will camera settings be retained after I export photos from Lightroom?
In most cases, the original EXIF data, including aperture, shutter speed, ISO, and other technical information, will remain in the image file after export, unless you actively choose to remove metadata during the export process—a feature often used to protect privacy, such as hiding GPS location information before sharing photos online.





















VIP Products








Best Selling Products
ChatGPT Plus Account (GPT-4)
16 USD
Capcut Pro 1 Year
39 USD
Genuine Cheap Canva Pro
39 USD
Copyright Adobe Lightroom Account
59 USD
Autodesk All App Account Copyright
120 USD
Freepik Premium Account
59 USD
Plugin Retouch4me
69 USD
Upgrade Duolingo Super
29 USD
Windows 10 & 11 Pro Key
36 USD
Genuine Adobe Illustrator account
99 USD
Adobe Premiere Pro Account
99 USD
Adobe Photoshop Copyright - Full App
120 USD
Upgrade genuine Capture One account
120 USD
MidJourney Account
29 USD
Upgrade Genuine Office 365
49 USD