Best Selling Products

Windows 10 & 11 Pro Key
36 USD

Genuine Adobe Illustrator account
99 USD

Autodesk All App Account Copyright
120 USD

Genuine Cheap Canva Pro
39 USD

Adobe Photoshop Copyright - Full App
120 USD

Copyright Adobe Lightroom Account
59 USD

Upgrade Duolingo Super
29 USD

Capcut Pro 1 Year
39 USD

ChatGPT Plus Account (GPT-4)
16 USD

MidJourney Account
29 USD

Adobe Premiere Pro Account
99 USD

Upgrade genuine Capture One account
120 USD

Upgrade Genuine Office 365
49 USD

Freepik Premium Account
59 USD

Plugin Retouch4me
69 USD
What is Perspective Warp in Photoshop? How to use it and tips for effective photo editing.
Nội dung
- 1. What is Perspective Warp?
- 2. When should you use Perspective Warp?
- 3. Step-by-step guide on how to use the Perspective Warp tool
- 3.1 Step 1: Prepare the images
- 3.2 Step 2: Open the Perspective Warp tool
- 3.3 Step 3: Create a quadrilateral frame
- 3.4 Step 4: Align the quadrilateral frame with the subject
- 3.5 Step 5: Complete the quadrilateral frames
- 3.6 Step 6: Adjust the perspective for the subject
- 4. Alternatives to the Perspective Warp tool
- 4.1 Shape Transformation Tools Group
- 4.2 Vanishing Point Filter
- 5. Conclusion
If you''ve ever photographed a building and noticed the vertical lines are annoyingly tilted, or ever combined two photos from completely different angles and felt they just wouldn''t fit together naturally, then Photoshop''s Perspective Warp tool is the solution you''re looking for. This article will explain in detail what this tool is, when to use it, how to operate it step-by-step for best results, and alternative options you can consider.
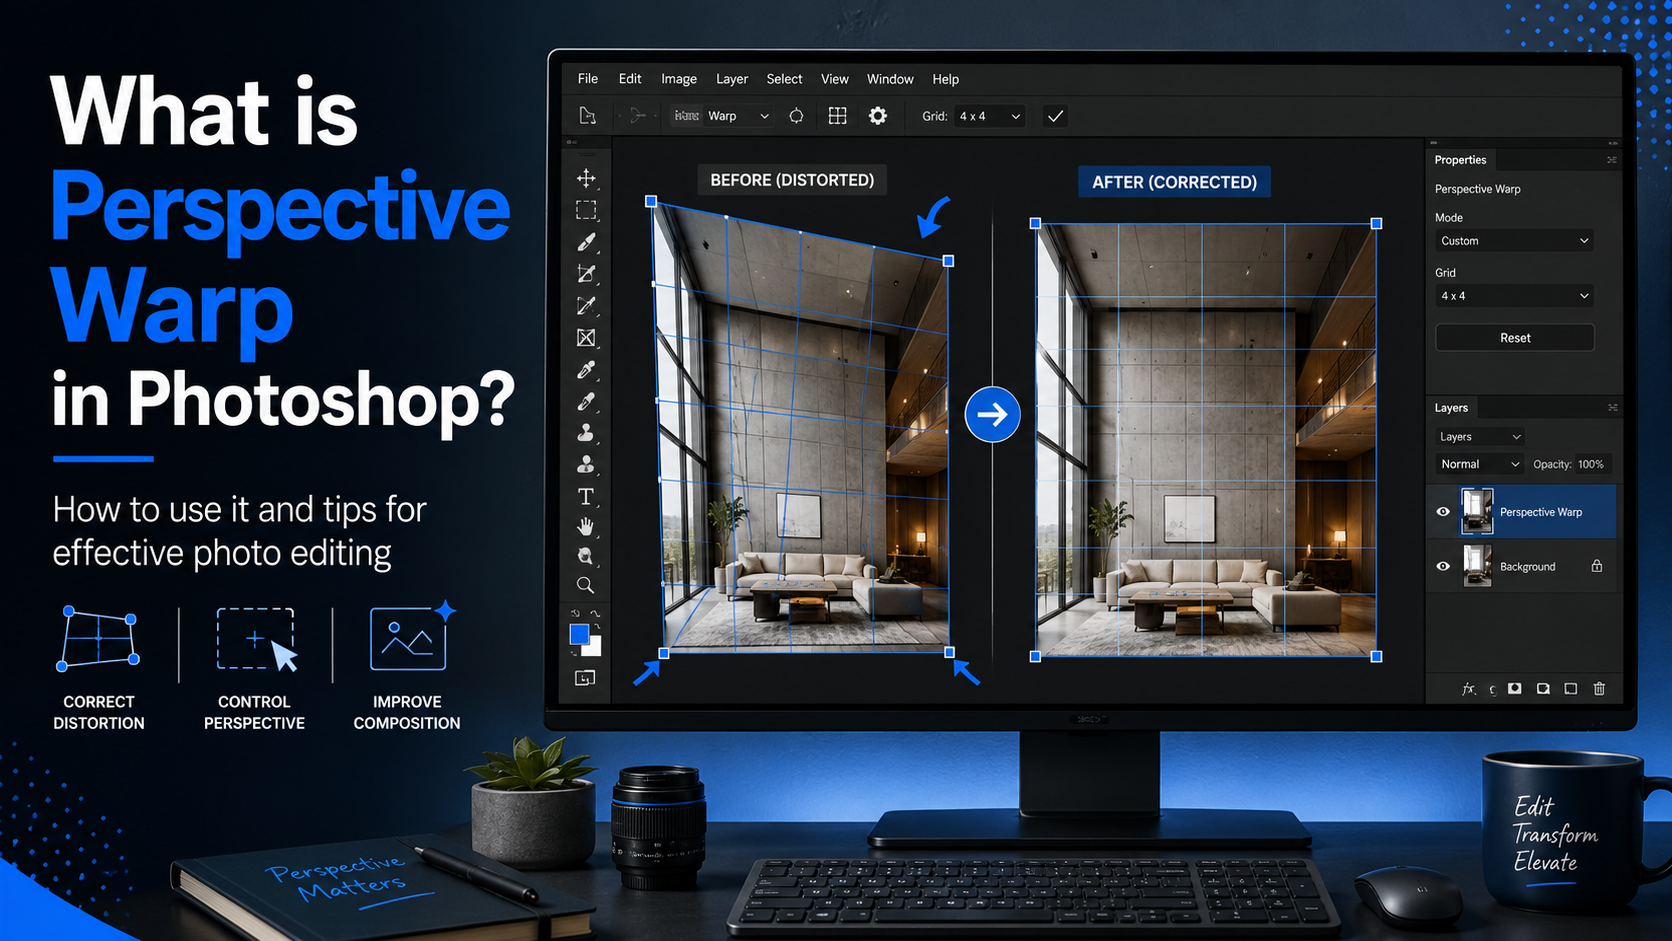
1. What is Perspective Warp?
Perspective Warp is a tool designed to provide extremely detailed control over perspective in images. Initially developed primarily for architectural photography and construction-related photos, where perspective distortion frequently needs correction, its applications extend beyond that. You can use Perspective Warp to address perspective issues in image manipulation, product photography, and many other photographic genres.
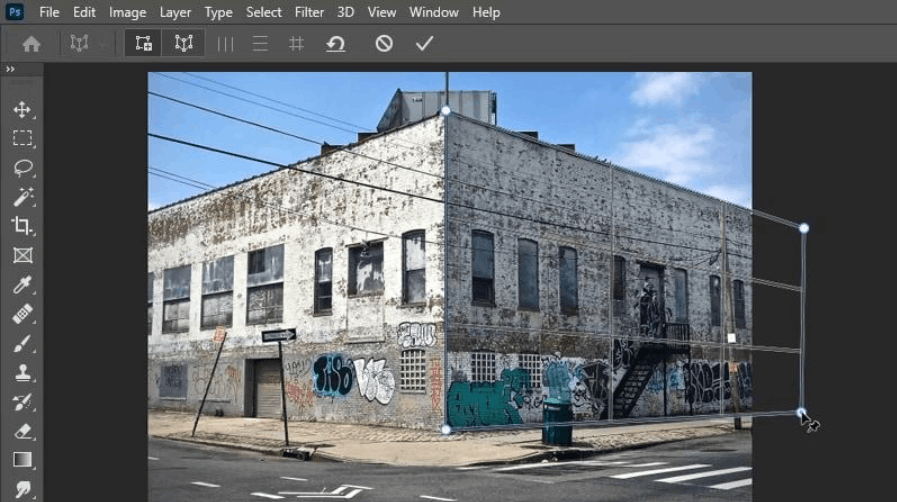
Essentially, this tool works on the principle of dividing the image surface into independently adjustable grids, allowing users to precisely bend or reshape the viewing angle of individual image areas without affecting the rest of the overall composition.
It's important to note that the Perspective Warp tool is only available in Photoshop CC. If you're still using an older version of Photoshop, you'll need to upgrade to Creative Cloud to experience this feature.
2. When should you use Perspective Warp?
The Perspective Warp tool serves various purposes depending on the real-world situation the photographer encounters. Its main and most common function is to correct perspective distortion, a problem frequently encountered when photographing architecture, interiors, and real estate, where the vertical lines of buildings are easily tilted due to the shooting angle or lens characteristics.
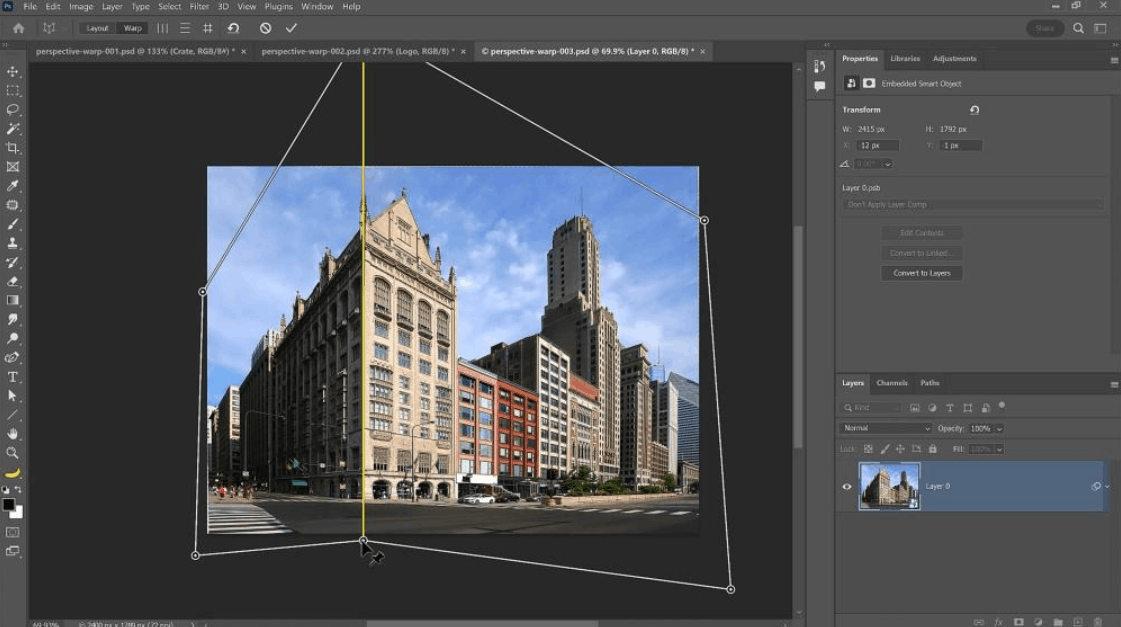
Besides professional architectural photography, many travel photographers also frequently have to work with photos of famous landmarks or city skylines, where subtle adjustments to perspective can make the image look much more balanced and professional.
Another group of users who often encounter perspective issues are those who shoot flat photos from above. When the camera sensor is not perfectly parallel to the surface being photographed, distortion appears, and one of the simplest solutions is to use the Perspective Warp tool to correct the perspective.
Beyond its error-correcting applications, Perspective Warp opens up more exciting creative possibilities. You can use this tool to completely change the perspective of an object, such as adjusting the perspective of multiple different objects when creating composite images, making the elements in the combined image look more harmonious and natural. Finally, for those who enjoy artistic experimentation, this tool also allows you to change the perspective of objects and structures to create unrealistic, even surreal, effects.
3. Step-by-step guide on how to use the Perspective Warp tool
This section will detail the entire process of using the Perspective Warp tool, from initial preparation to the completion of perspective correction for the subject in the image.
3.1 Step 1: Prepare the images
You can apply the Perspective Warp tool to any type of layer; however, it's best to work with a smart object so you can revert to editing whenever necessary without losing the original image quality. Also, you should duplicate the original image and only work on the copy, avoiding any impact on the original file.
To begin, open the image in Photoshop and duplicate the background layer by selecting the Layers menu, then selecting Duplicate Layer. Next, right-click on the duplicated layer and select Convert to Smart Object. Note that using a smart object is not mandatory; if you wish, you can manipulate the original image layer directly.
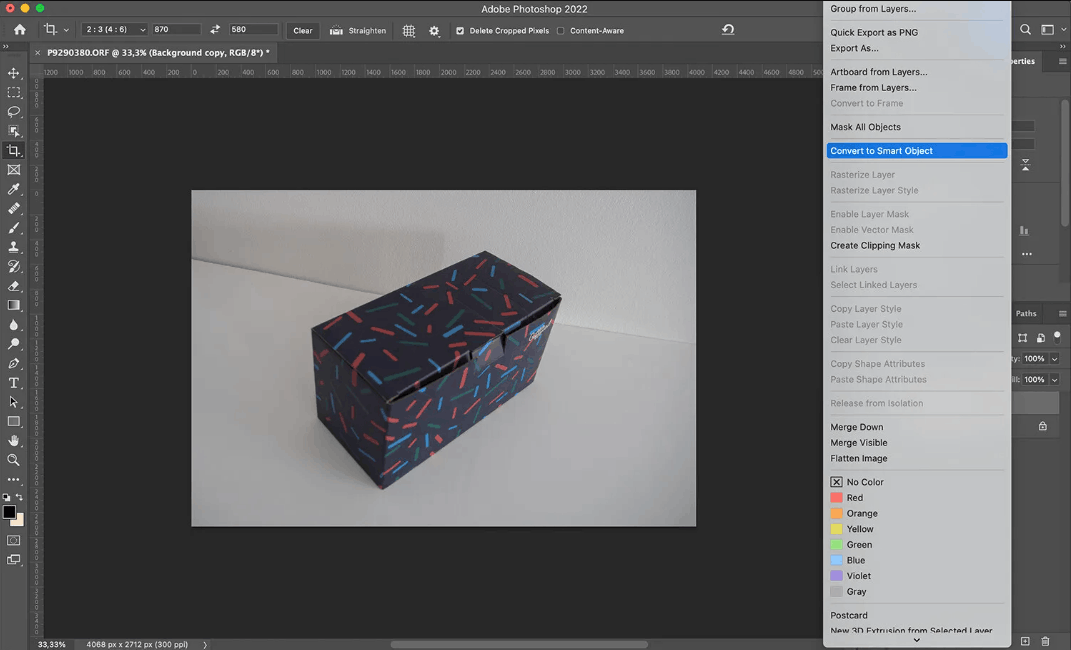
3.2 Step 2: Open the Perspective Warp tool
To activate this tool, go to the editing section and select Perspective Warp. This will open a new workspace, sometimes with a small tutorial window that you can read through and then close.
In the toolbar, you'll find two main modes: layout and alignment. When you first open the tool, the layout mode is usually selected by default; this is the mode used to draw grids, also known as quadrilateral frames.
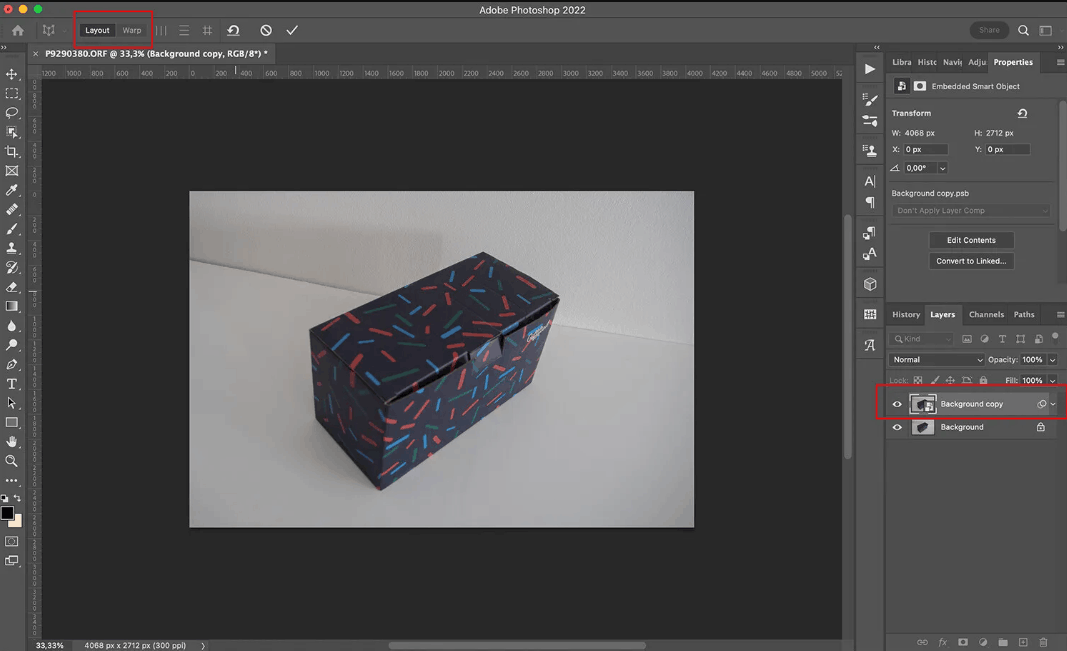
3.3 Step 3: Create a quadrilateral frame
To draw a quadrilateral frame, simply click and drag the cursor across the entire image frame. You just need to draw a grid and then release the mouse. At this stage, the quadrilateral frame doesn't need to perfectly fit the subject in the image; precise alignment will be done in the next step.
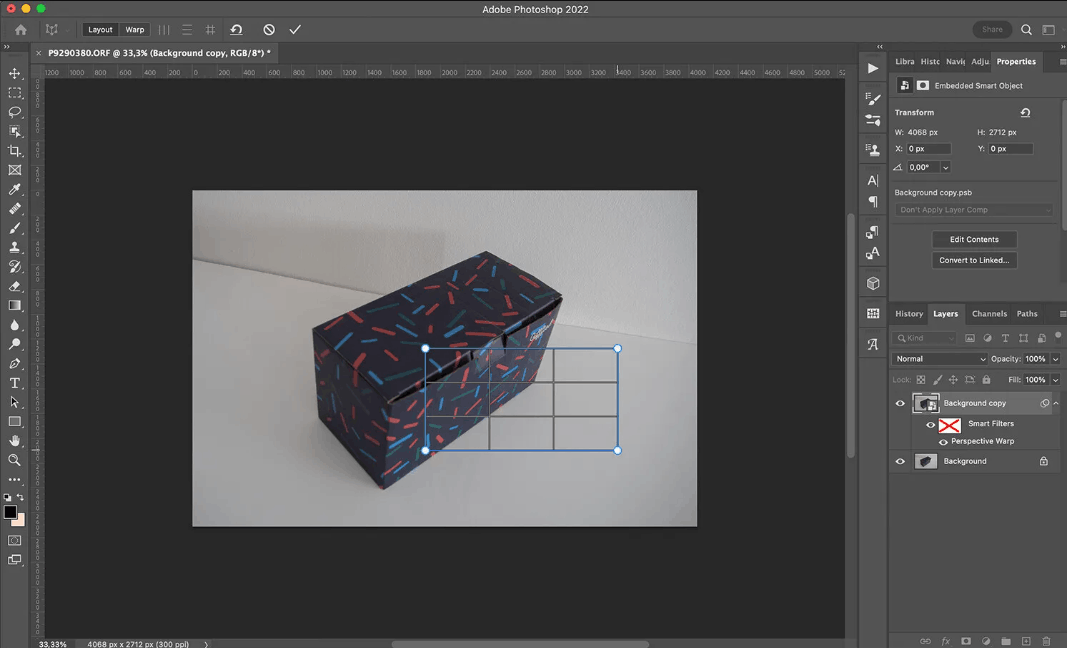
3.4 Step 4: Align the quadrilateral frame with the subject
Click and drag the grid's control points to adjust the overall shape of the quadrilateral frame. The goal is to make the quadrilateral frame align with the edges of the subject you want to manipulate, such as the edges of a building or a specific object in the image. The more precise the alignment, the more natural and convincing the resulting perspective correction will be in the next step.
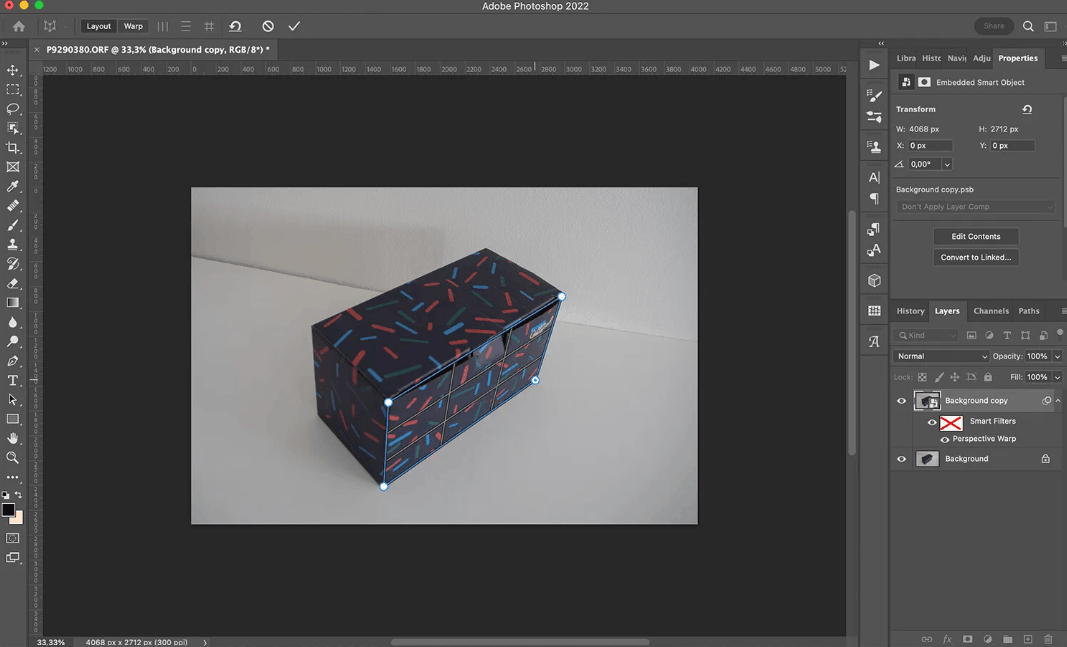
3.5 Step 5: Complete the quadrilateral frames
At this stage, you can continue with a single quadrilateral frame, or draw more frames if needed. Adding frames is only really necessary when you can see more than one side of the subject, or when you want to manipulate different parts of the subject independently.
Connecting two or more quadrilateral frames is quite simple. You just need to draw the edge of one frame close to another, making the border of the frame thicker, and as soon as you release the mouse, both frames will automatically fit together.
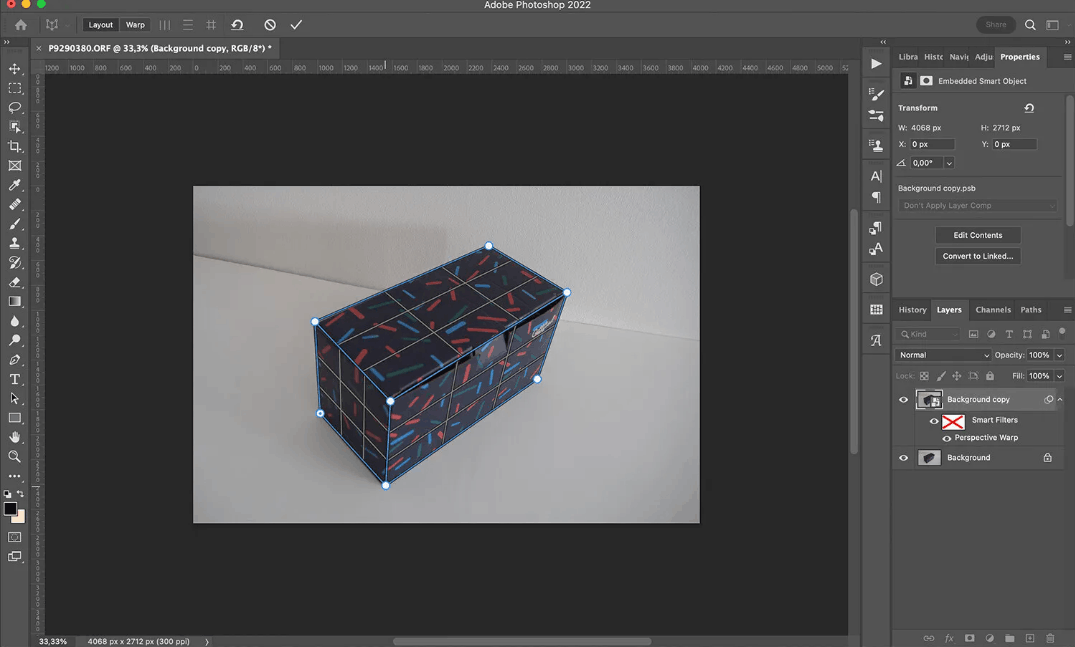
3.6 Step 6: Adjust the perspective for the subject
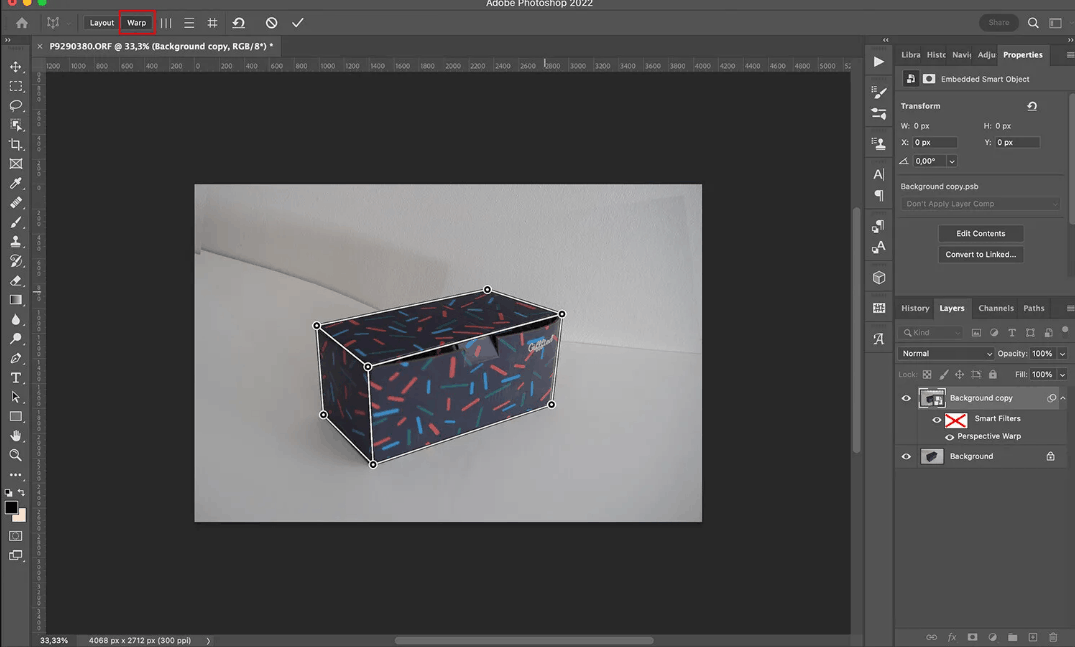
Once the quadrilaterals are ready, switch from layout mode to alignment mode in the tool's menu bar, or simply press the W shortcut key on your keyboard.
You can choose one of the automatic editing options by clicking the icons on the toolbar above, or manually click and drag the quadrilateral's control points to adjust the perspective. If you need to return to layout mode to readjust the frame, simply press the L key.
Once you are satisfied with the adjustment results, press the Enter key on your keyboard or click the checkmark icon in the tool menu bar to finish. Changing the perspective sometimes leaves gaps at the edges of the image; in that case, you can crop out these gaps or use the content-aware fill tool to naturally add missing details.
4. Alternatives to the Perspective Warp tool
Besides Perspective Warp, Photoshop offers several other tools capable of handling perspective issues, although each tool has its own approach and limitations.
4.1 Shape Transformation Tools Group
The tools in the shape transformation menu help correct image distortion and can also be used to create creative distortion effects. This group includes various options such as scaling, rotating, tilting, distorting, perspective correction, and shape reshaping. You can combine these options to achieve results similar to those obtained using Perspective Warp.
-
Scale : allows you to reduce or increase the size of the subject in proportion to its original size.
-
Rotate : allows you to rotate the image clockwise or counterclockwise around a fixed reference point.
-
Skew : allows you to tilt the edges of an image vertically or horizontally.
-
Distort : allows stretching and distorting the subject independently at each corner of the transformation selection area.
-
Perspective correction : helps to correct straight lines according to the principle of single-point perspective.
-
Warp : This tool can also be used to change the perspective of an object, although it is primarily designed to transform the shape of the object rather than to manipulate the overall perspective.
One point to note is that the shape transformation tools cannot be applied as smart filters. This means you won't be able to revert to later edits even when working on a smart object; if you want to change the result, you'll have to undo the transformation and start over. However, a significant advantage of this tool group is that they were available even in versions of Photoshop prior to the Creative Cloud model.
4.2 Vanishing Point Filter
The vanishing point filter allows users to adhere to the correct perspective of the image when painting, duplicating, or adding new elements to the image. This tool has its own workspace where you can draw grids directly onto the subject in the image.
Although you can always return to this workspace and retrieve the drawn grids, you won't be able to undo previously made edits. Therefore, to ensure the editing process doesn't destroy the original data, make sure you're working on a duplicated image layer.
Unfortunately, vanishing point filters cannot be applied to intelligent objects. In image manipulation, vanishing point filters might be an alternative to Perspective Warp, however, it won't be useful if your goal is to correct or change the perspective of a detail within the original image.
5. Conclusion
Like many other features in Photoshop, there are always different ways to achieve the same desired result. Correcting the perspective of an object has always been possible, but the Perspective Warp tool makes this process significantly more efficient while saving considerable effort.
Next time you need to make any perspective adjustments to a photo, whether it's correcting a tilted structure or piecing together subjects with different viewpoints, try the Perspective Warp tool. With its detailed control and the flexibility of its quadrilateral frames, it could become an indispensable tool in your post-processing workflow.





















VIP Products








Best Selling Products
Windows 10 & 11 Pro Key
36 USD
Genuine Adobe Illustrator account
99 USD
Autodesk All App Account Copyright
120 USD
Genuine Cheap Canva Pro
39 USD
Adobe Photoshop Copyright - Full App
120 USD
Copyright Adobe Lightroom Account
59 USD
Upgrade Duolingo Super
29 USD
Capcut Pro 1 Year
39 USD
ChatGPT Plus Account (GPT-4)
16 USD
MidJourney Account
29 USD
Adobe Premiere Pro Account
99 USD
Upgrade genuine Capture One account
120 USD
Upgrade Genuine Office 365
49 USD
Freepik Premium Account
59 USD
Plugin Retouch4me
69 USD