Best Selling Products

Adobe Premiere Pro Account
99 USD

Upgrade Duolingo Super
29 USD

Adobe Photoshop Copyright - Full App
120 USD

Genuine Cheap Canva Pro
39 USD

Autodesk All App Account Copyright
120 USD

Windows 10 & 11 Pro Key
36 USD

Copyright Adobe Lightroom Account
59 USD

Upgrade genuine Capture One account
120 USD

Upgrade Genuine Office 365
49 USD

MidJourney Account
29 USD

Genuine Adobe Illustrator account
99 USD

ChatGPT Plus Account (GPT-4)
16 USD

Capcut Pro 1 Year
39 USD

Freepik Premium Account
59 USD

Plugin Retouch4me
69 USD
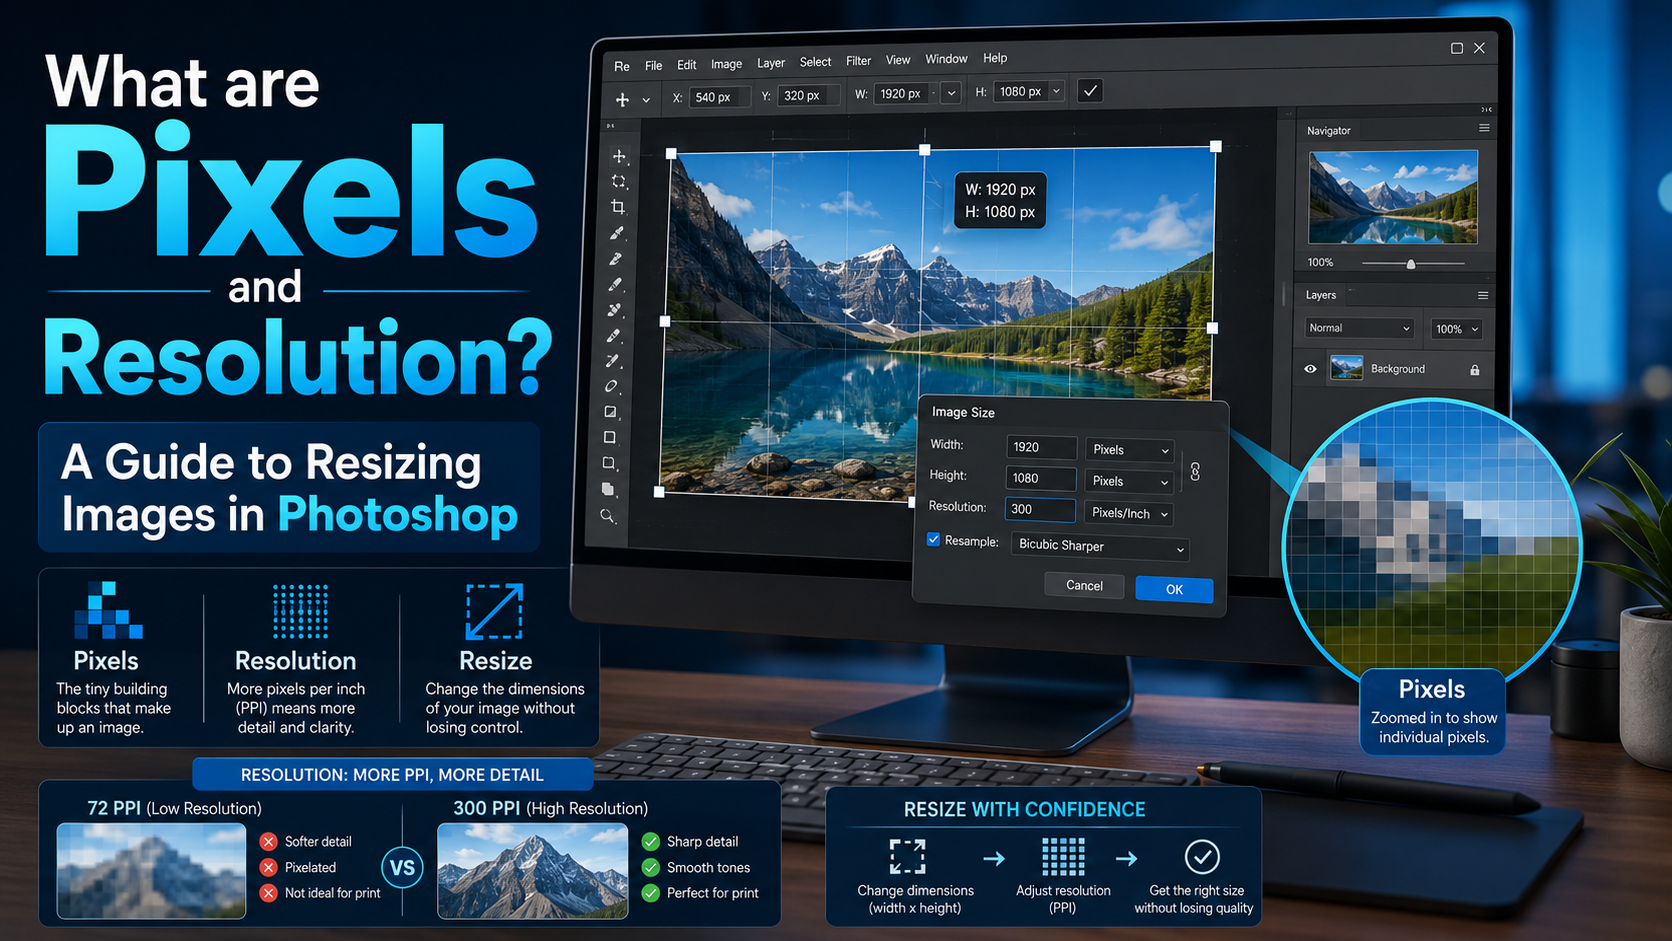
What are Pixels and Resolution? A Guide to Resizing Images in Photoshop
Nội dung
Have you ever chosen a camera solely based on the high megapixel count on the box? Have you ever struggled to share photos online because of the large file sizes? Or do your photos look sharp on screen but are blurry and low-quality when printed? All of these problems stem from a very common misconception: confusing pixels with bytes, and image size with file size.
1. Does the resolution match the image size?
One of the biggest misconceptions when it comes to digital images is the concept of resolution. If you're still confused about this, don't worry, because many people face the same problem.
The problem is that resolution can refer to many different things, including two concepts directly related to the topic we're discussing. Both concepts have one thing in common that needs to be clarified first: they both relate to pixels.
You've probably heard a lot about pixels, especially when choosing a camera, as it's one of the most advertised and sought-after specifications on the market. Therefore, to properly understand resolution, we first need to understand what pixels actually are.
2. What is a pixel?
A digital photograph is not a single, indivisible block. If you zoom in enough, you'll see the image resembles a mosaic made up of countless tiny squares, and in photography, those tiny squares are called pixels.
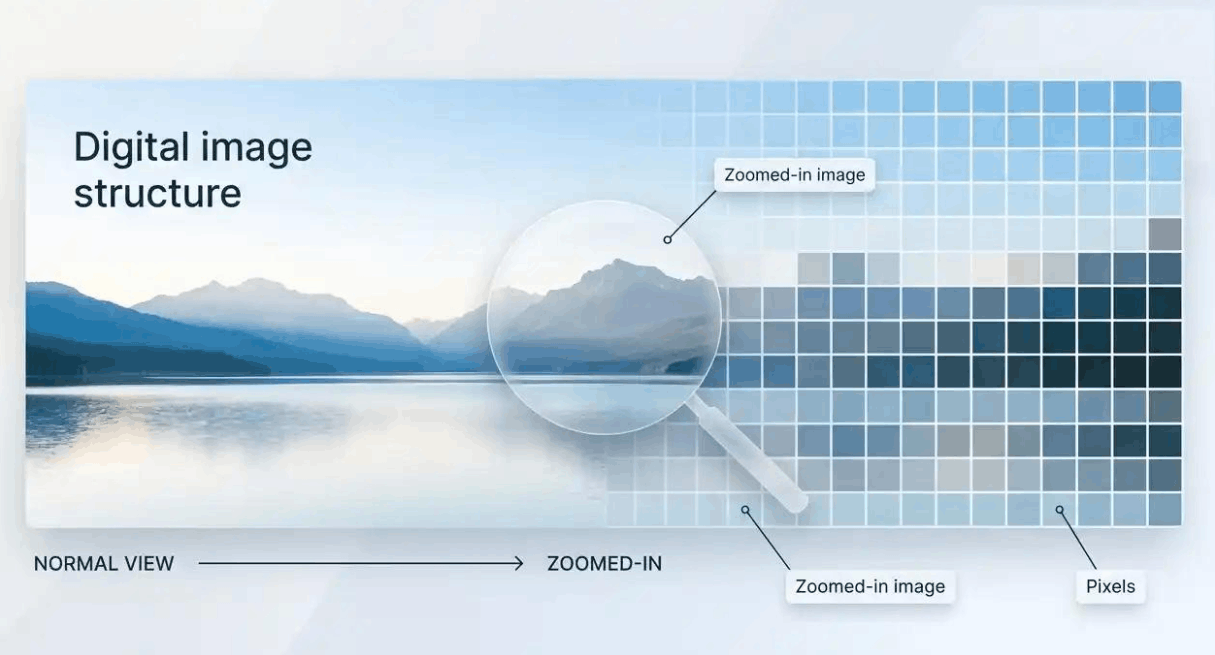
The number of pixels and how they are arranged and distributed are the two most important factors you need to understand to properly grasp resolution.
2.1 Number of pixels
The first type of resolution relates to the number of pixels, that is, the total number of pixels that make up your image. To calculate this number, you apply the same formula as calculating the area of a rectangle, which is to multiply the length by the width.
For example, if your image has 4500 pixels horizontally and 3000 pixels vertically, multiplying these two numbers together gives you a total of 13,500,000 pixels.
Because this number is quite cumbersome and inconvenient to use, people usually divide by one million to convert it to megapixels. Thus, 13,500,000 divided by 1,000,000 will give the result 13.5 megapixels, which is the number commonly printed on the specifications of cameras or phones.
2.2 Pixel Density
The second type of resolution relates to how you distribute the total number of pixels available, and this concept is often referred to as pixel density.
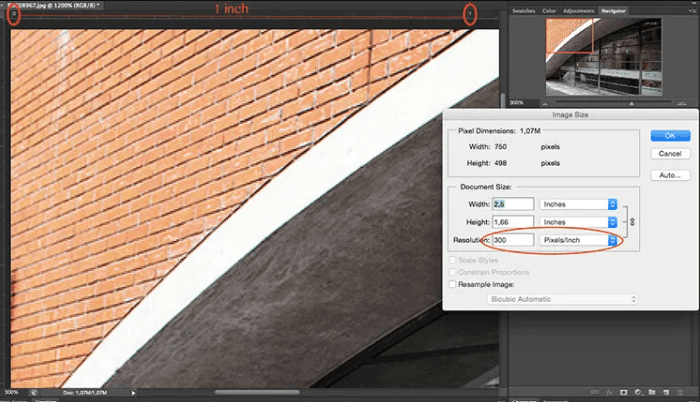
Pixel density is usually expressed in dpi, which is the number of dots per inch, or ppi, which is the number of pixels per inch. If you see an image labeled 72 dpi, it means each inch of the image contains 72 dots; if the image is set at 300 ppi, then each inch contains 300 pixels.
The final size of the printed image depends heavily on the resolution you choose. For example, a 4500 x 3000 pixel image will print as a 15 x 10 inch image at 300 dpi, but the same image could print as large as 62.5 x 41.6 inches at 72 dpi.
The key point here is that while the print size changes, you don't change the original file size; you're simply redistributing the available pixels across a different area.
In short, resolution is not synonymous with image size, but there is a close relationship between the two concepts.
2.3 Does quantity equate to quality?
Because of the correlation between size and resolution, many people mistakenly believe that the higher the megapixel count, the better the image quality. This isn't entirely wrong, as a higher pixel count also means a higher pixel density per unit area.
However, you also need to consider another factor: the bit depth of the pixel, which determines the number of tonal values an image can store. Bit depth corresponds to the number of colors each pixel can represent. For example, a 2-bit pixel can only store black, white, and two shades of gray. 8-bit pixels are more common today.
This value increases exponentially, so with an 8-bit image, which is 2 to the power of 8 equals 256, you would have 256 shades of green, 256 shades of blue, and 256 shades of red, totaling approximately 16 million different colors.
This number far exceeds the human eye's ability to distinguish colors, so 16-bit and 32-bit images will look relatively similar to the naked eye. However, the higher the bit depth, the larger the file size, even if the image size remains the same, because each pixel now has to store more information. This is why quality and quantity are not always the same.
The number of pixels is certainly useful, but the size and depth of each pixel also contribute to the final image quality. Therefore, when evaluating a camera, you should consider all the sensor specifications, not just the megapixel count. After all, image size or print size always has certain limits; exceeding those limits only increases file size without actually improving image size or quality.
3. How to select and control image size and file size
First, you need to clearly define where your image will be displayed or used, as the ultimate purpose will greatly influence the ideal image size.
For example, newspapers are typically printed at 72 dpi, so if your photo will be published in a newspaper, submitting a 72 dpi file is usually appropriate. However, there are exceptions; if the newspaper uses a higher-density printing technology, you will need to increase the image size accordingly.
72 dpi is too low for high-quality art prints. For prints requiring true sharpness, you typically need a minimum of 300 dpi for the best results. However, this number also depends on the type of printer used, as some printers can handle very high pixel densities while others are limited to lower levels.
You should also consider the distance and how viewers will approach the image. A 200 dpi print might not look good if you enlarge it to 8 x 10 inches and view it up close, but if printed at 40 x 60 inches, viewers will typically stand further away, and then 200 dpi will still produce a very pleasing image.
Once you've determined the ideal pixel density, you can calculate the necessary image size for a specific print run. For example, if you want to print an 8 x 10 inch image at 300 dpi, you need an image with a width of 2400 pixels (300 dpi multiplied by 8 inches) and a height of 3000 pixels (300 dpi multiplied by 10 inches). Therefore, the required image size would be 2400 x 3000 pixels.
4. How to resize an image in Photoshop
First, open the main menu and select Image. Next, select Image Size, and in the window that appears, check the Resample Image box. If you don't activate this resample option, Photoshop will only redistribute the existing pixels across the new area, rather than actually changing the total number of pixels in the image.
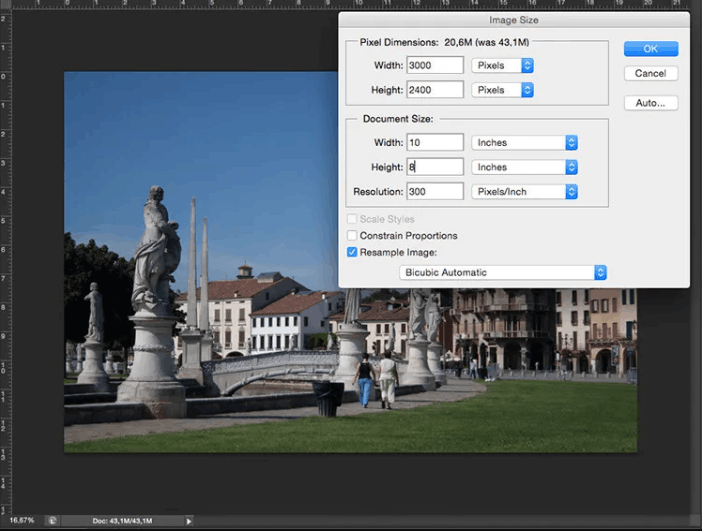
For example, if you need to print an 8 x 10 inch photo at 300 ppi, the corresponding pixel size you need to achieve is 3000 x 2400 pixels.
At the top of the Image Size window, you'll also see the file size changing in real time. This number represents the size of the uncompressed image, and it's directly related to the principle mentioned earlier: the fewer pixels, the less information can be stored.
If you want to change the file size without changing the image size, you need to do this during the file saving step, not during the Image Size adjustment step. Before saving, you can choose the file format that suits your needs.
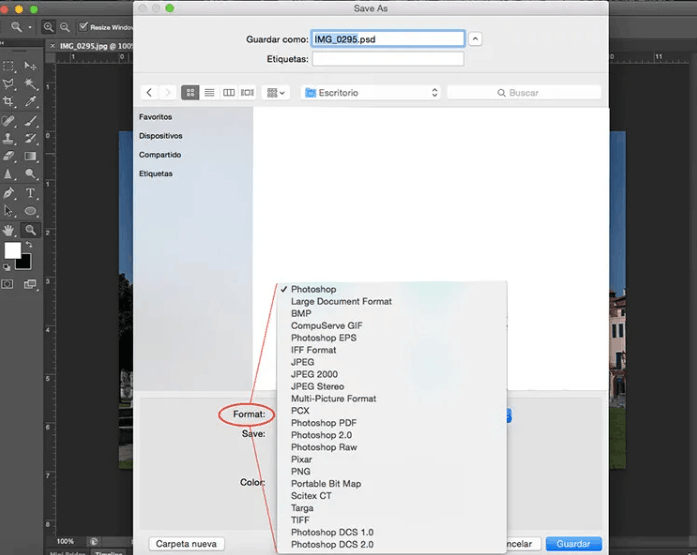
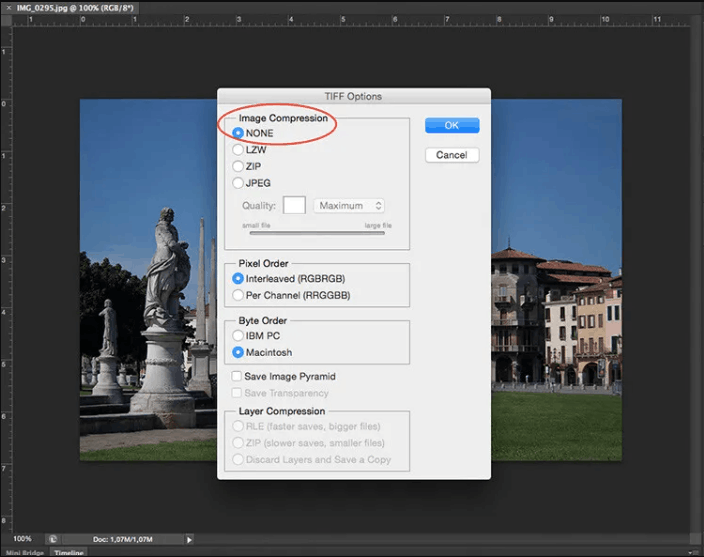
If you don't want to lose any image information, save it in an uncompressed format. The most common and easiest-to-share format in this category is TIFF.
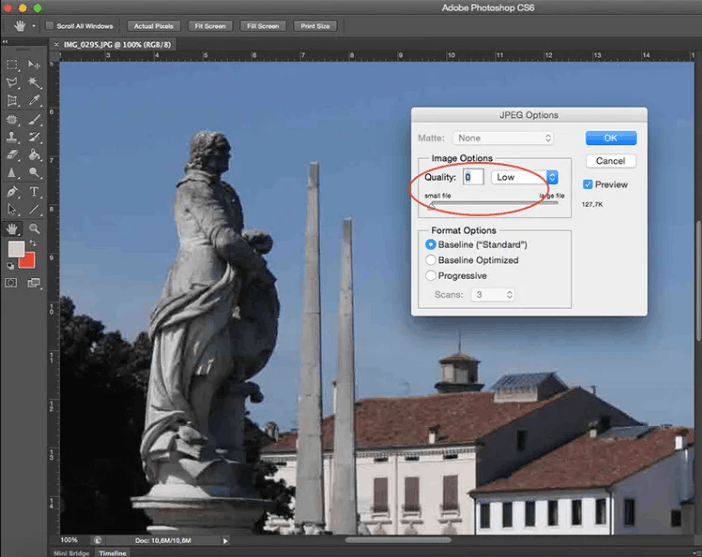
If you're not too concerned about losing some information for a smaller file size, you can choose the JPEG format and adjust the compression level yourself. The lower the compression level, the more information will be lost. Fortunately, Photoshop has a preview button so you can check the effect of the compression level before saving.
When you choose a high JPEG quality level, the image retains its sharpness and detail almost entirely. Conversely, if you choose a low quality level, the image will appear grainy, with pixelation becoming more pronounced, significantly reducing the visual quality of the image. Therefore, if you over-compress the file or choose a quality that is too low, you risk significantly damaging the image.
5. Conclusion
Understanding the relationship between quality, quantity, size, and resolution is essential for anyone working with digital images, whether for professional or purely hobby purposes. Pixels, as the basic building blocks of any digital image, play a crucial role in determining these factors. When you understand how pixel count and pixel density interact, you'll have a solid foundation for making informed decisions about your images, ensuring they meet both display and printing needs.
With the knowledge presented above, you should have the confidence to make the best choices when printing, sharing, or storing your images. Whether you are a professional photographer, a photography enthusiast, or simply someone who likes to preserve memorable moments, this understanding will help you achieve the best possible results with your digital photos.





















VIP Products








Best Selling Products
Adobe Premiere Pro Account
99 USD
Upgrade Duolingo Super
29 USD
Adobe Photoshop Copyright - Full App
120 USD
Genuine Cheap Canva Pro
39 USD
Autodesk All App Account Copyright
120 USD
Windows 10 & 11 Pro Key
36 USD
Copyright Adobe Lightroom Account
59 USD
Upgrade genuine Capture One account
120 USD
Upgrade Genuine Office 365
49 USD
MidJourney Account
29 USD
Genuine Adobe Illustrator account
99 USD
ChatGPT Plus Account (GPT-4)
16 USD
Capcut Pro 1 Year
39 USD
Freepik Premium Account
59 USD
Plugin Retouch4me
69 USD