Best Selling Products

Adobe Premiere Pro Account
99 USD

Freepik Premium Account
59 USD

Adobe Photoshop Copyright - Full App
120 USD

Plugin Retouch4me
69 USD

Genuine Adobe Illustrator account
99 USD

Windows 10 & 11 Pro Key
36 USD

Genuine Cheap Canva Pro
39 USD

Capcut Pro 1 Year
39 USD

Upgrade Genuine Office 365
49 USD

MidJourney Account
29 USD

Autodesk All App Account Copyright
120 USD

Upgrade Duolingo Super
29 USD

Upgrade genuine Capture One account
120 USD

Copyright Adobe Lightroom Account
59 USD

ChatGPT Plus Account (GPT-4)
16 USD
How to create a 3D Marquee light bulb text effect in Photoshop
Nội dung
- 1. Instructions for adjusting background textures
- 2. Instructions for creating editable 3D text
- 3. How to work with 3D scenes
- 4. How to adjust mesh settings and 3D cap
- 5. How to create a textured material
- 6. How to save and reapply 3D materials
- 7. How to create more textured materials
- 8. Instructions for adjusting 3D scene lighting
- 9. How to adjust other 3D settings
- 10. How to Render and Modify a Rendered 3D Scene
- 11. How to create a vignette effect
- 12. How to add light bulb
- 13. How to build Layer Style and duplicate objects
- 14. How to add a non-lit light bulb
- 15. How to add sparks
- 16. How to add general adjustments
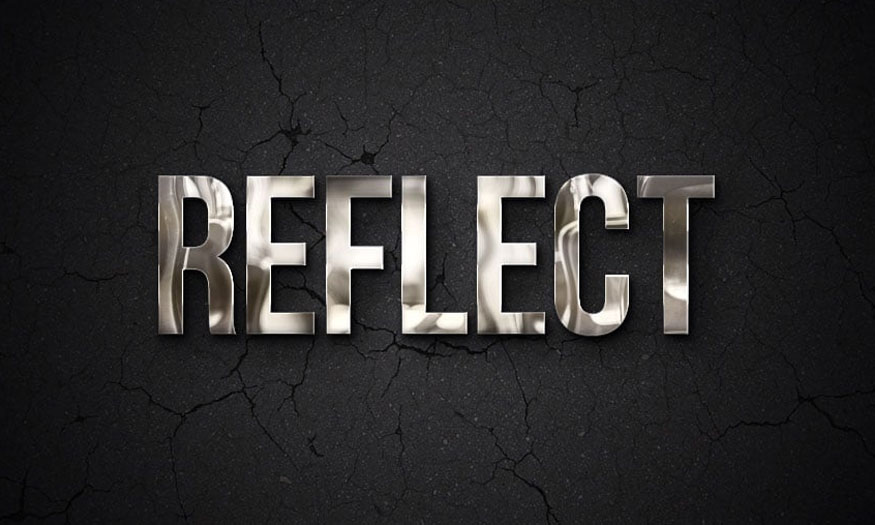
The 3D Marquee light bulb text effect in Photoshop helps make the design more impressive. Creating this effect is not as complicated as you think. The following article Sadesign will give detailed instructions on how to perform this effect in the simplest and fastest way.

The 3D Marquee light bulb text effect in Photoshop helps make the design more impressive. Creating this effect is not as complicated as you think. The following article Sadesign will give detailed instructions on how to perform this effect in the simplest and fastest way.

1. Instructions for adjusting background textures
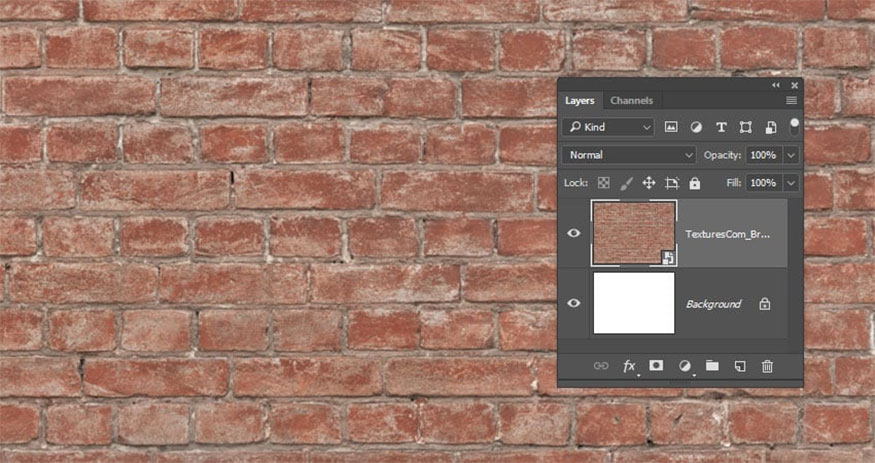
Step 1: First you need to create a new document with dimensions of 1000 x 750px, then go to File => Place Linked and open the BrickSmallBrown0478 images to add them as Smart Objects.
Resize the image, then fill the document and press the Return key.
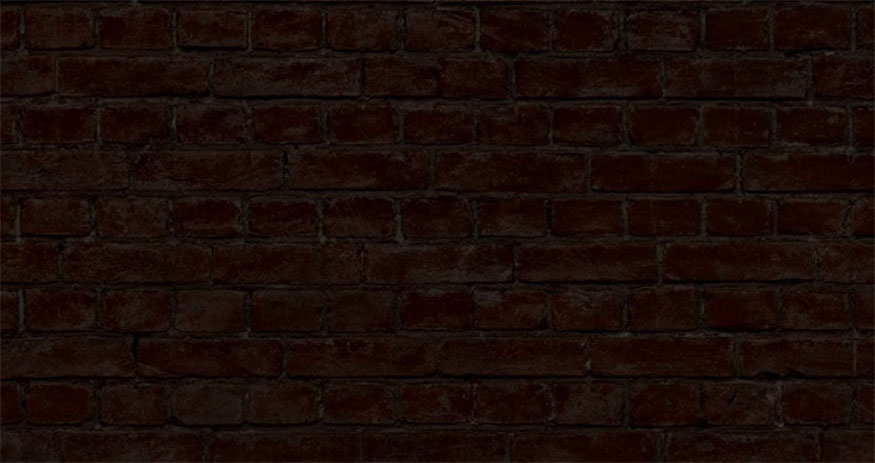
Step 2: Image => Adjustmentments => Hue/Saturation and change Lightness to -65.
.jpg)
Step 3: Double click on the BrickSmallBrown0478 layer to apply the Color Overlay effect, and make the following settings:
- Color: #e0e0e0
- Blend Mode: Linear Burn
.jpg)
This will create a dark background texture that will help contrast the digital signage.
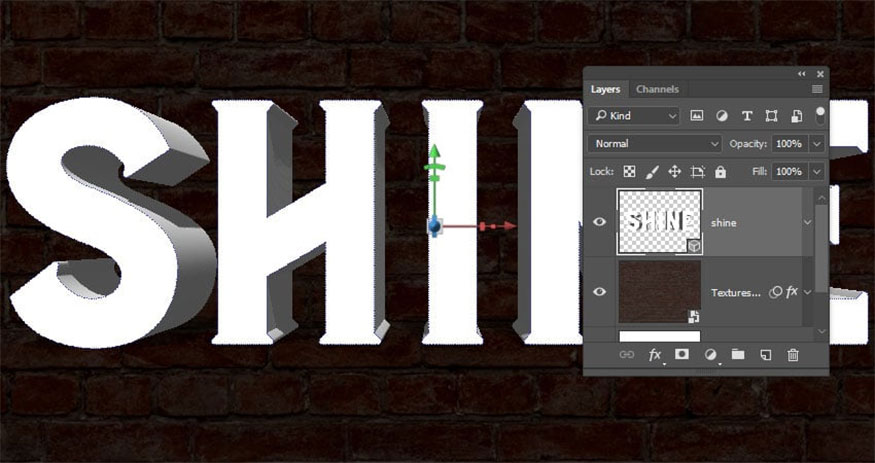
2. Instructions for creating editable 3D text
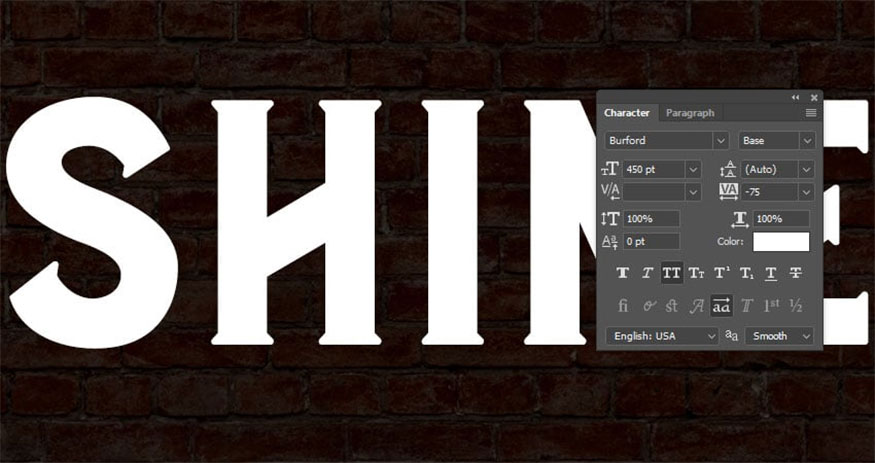
Step 1: Create text in All Caps format, using Vintage Rough font. Change the Size to 450 pt and the Tracking to -75.
Step 2: Go to 3D => New 3D Extrusion from Selected Layer to convert the type layer into an editable 3D layer.
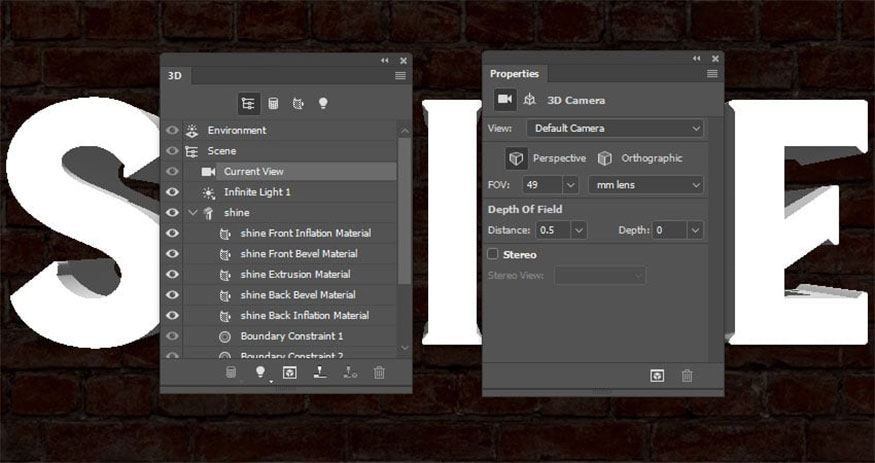
3. How to work with 3D scenes
Step 1: To access 3D mesh settings and properties, you need to open two panels: the 3D panel and the Properties panel.
The 3D panel contains all the elements of the 3D scene, clicking on the name of any of them will access its settings in the Properties panel. So, make sure to always select the tab of the component you want to modify in the 3D panel before making changes to that component's settings in the Properties panel.
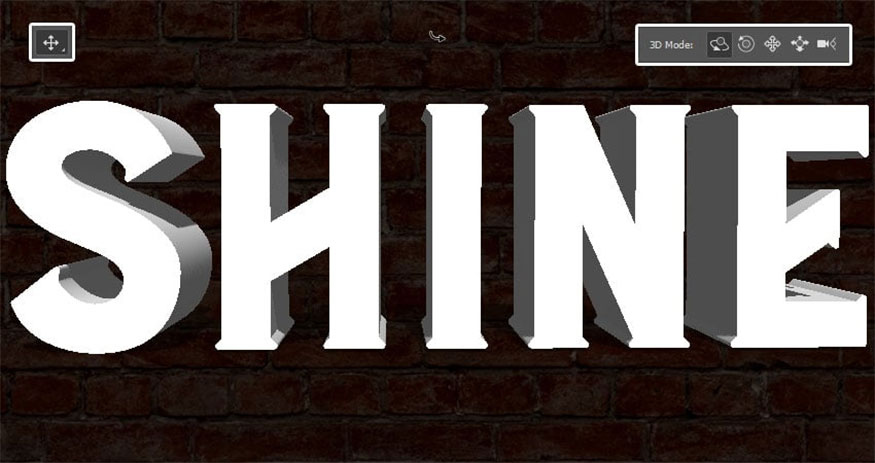
Step 2: If you select the Move Tool, you will find a set of 3D Modes just to the right of the Options bar. When you select one of these modes, you can click and drag to make changes (on the selected element in the 3D panel).
Use these modes to change the Options Mode to an angle you like.
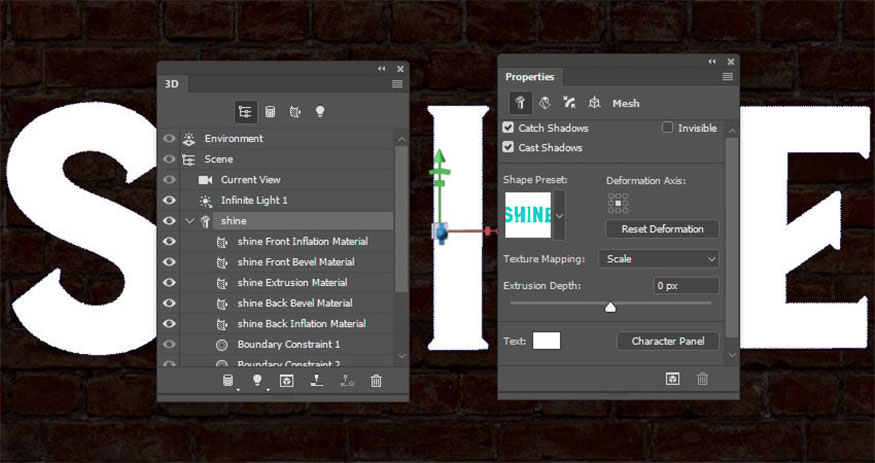
4. How to adjust mesh settings and 3D cap
Step 1: Select the text mesh tab in the 3D panel and change its Extrusion Depth in the Properties panel to 0.
Step 2: Click the Cap icon at the top of the Properties panel to access its settings.
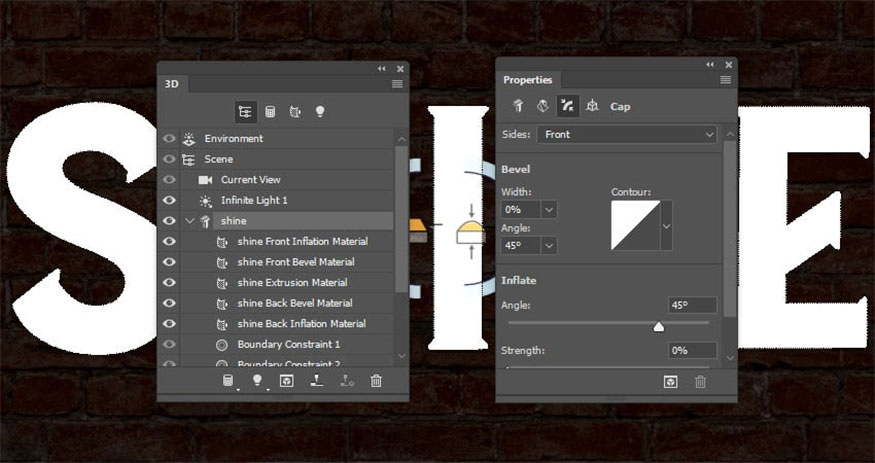
Step 3: Click the Contour tool to create a custom contour. When the Contour Editor opens, click on the line to add points.
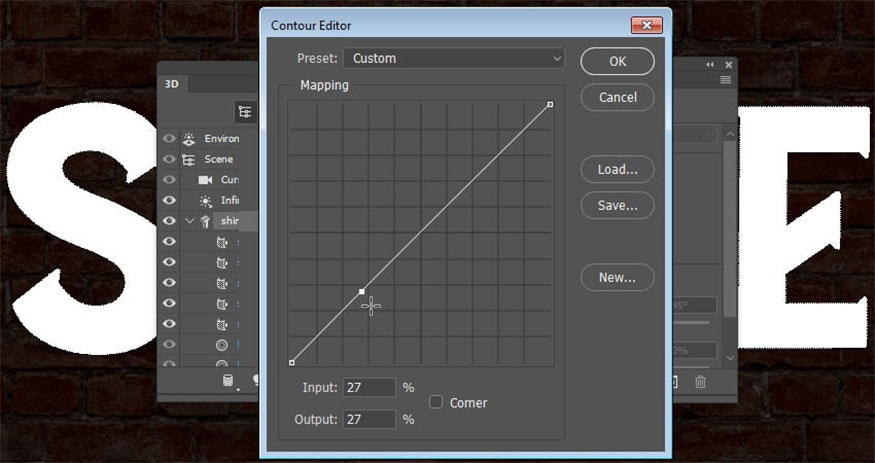
Step 4: With the added points selected, select the Corner box at the bottom.

Step 5: Add another point and check Corner box.
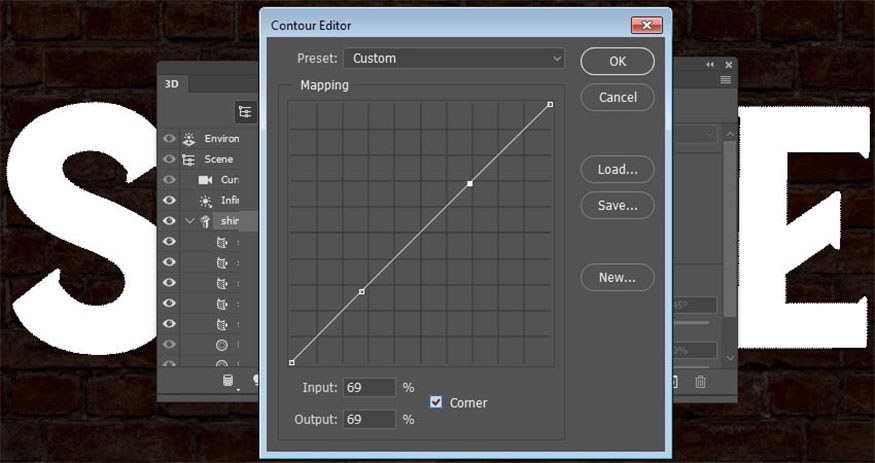
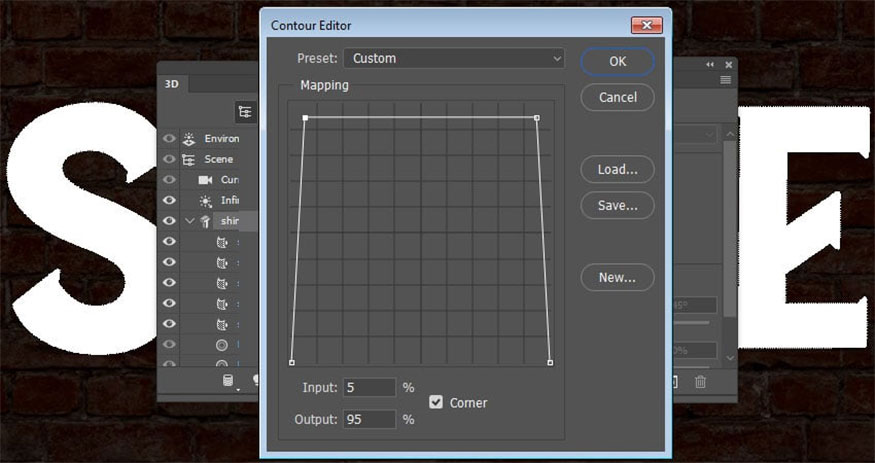
Step 6: Select each point you added and enter its Input and Output values at the bottom.
Enter the values of the left point as follows:
- Input: 5
- Output: 95
Values of the left point:
- Input: 95
- Output: 95
Click OK.
Step 7: Change the Bevel Width value to 12 and Angle to 85%, you can use other values to achieve the effect you want.
.jpg)
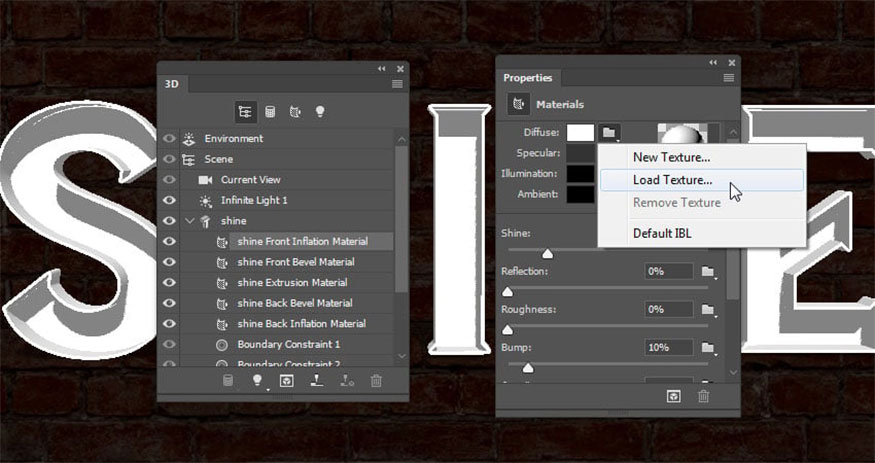
5. How to create a textured material
Step 1: First, select the Front Inflation Material tab of the text grid and click the Diffuse folder icon in the Properties panel to select Load Texture.
Next, open “misto 1.jpg” image from Metal gradient seamless textures.
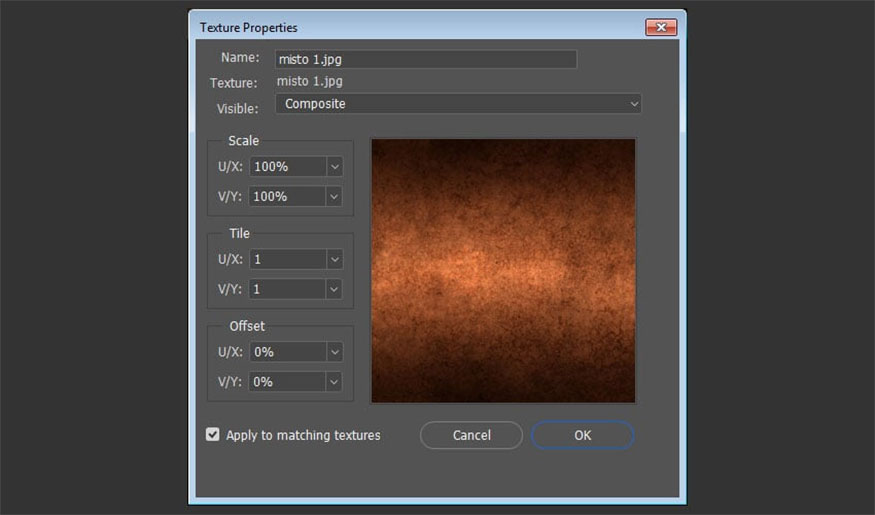
Step 2: Click on the Diffuse texture icon and select Edit UV Properties.

Step 3: Adjust the Tile and Offset values to get the result you want.
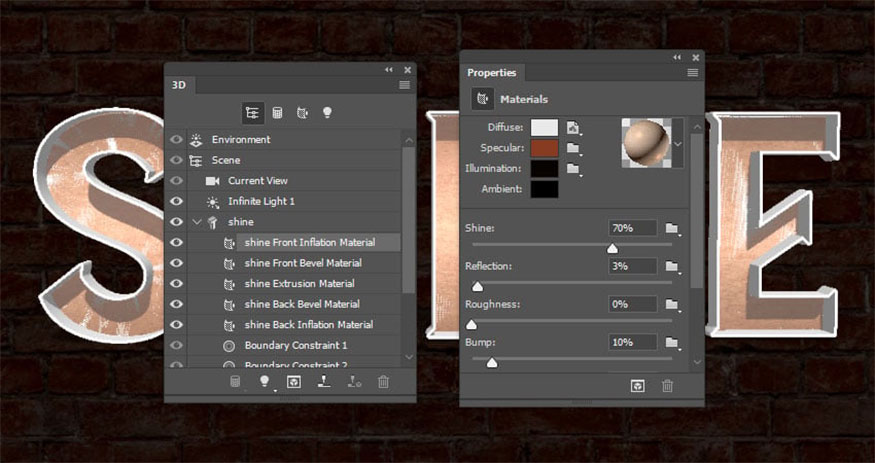
Step 4: For the remaining settings, use these values (color values used are RGB):
- Specular: 135, 59, 33
- Illumination: 191, 96, 27 - Intensity -4.77
- Shine: 70%
- Reflection: 3%
6. How to save and reapply 3D materials
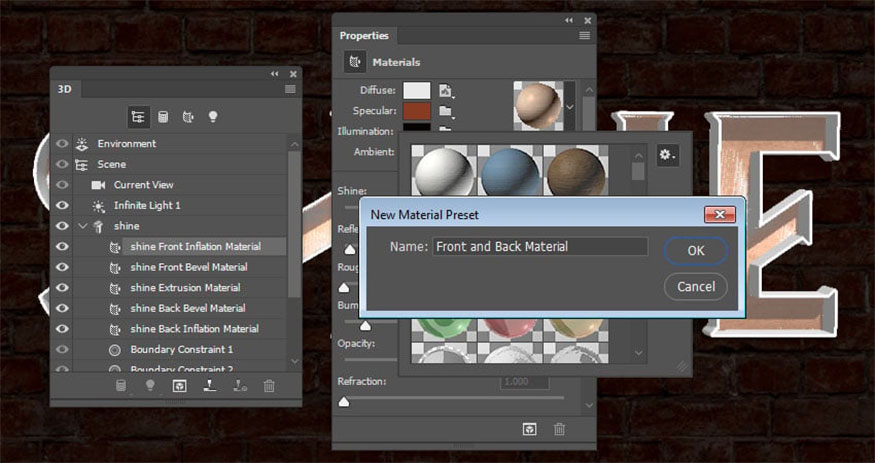
Step 1: Click on the Material Picker box => select the pop-up menu icon and press New Material.
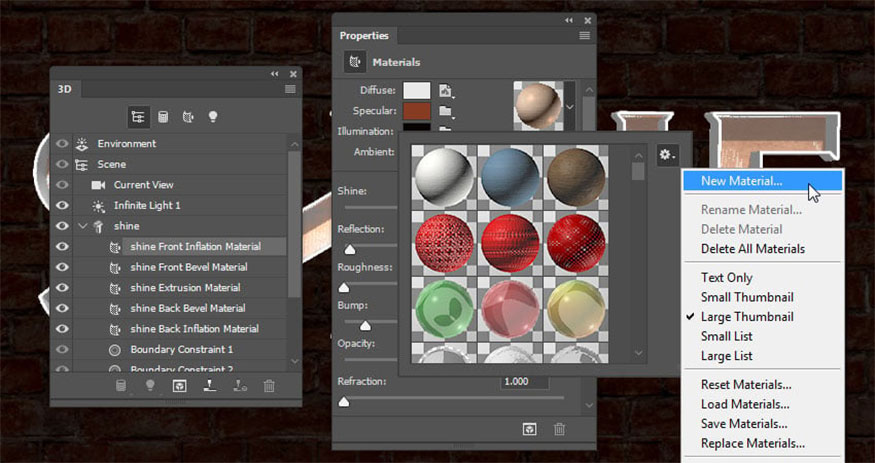
Step 2: Enter Front and Back Material in the Name field and click OK. This adds the material to the selector so you can reapply it later.
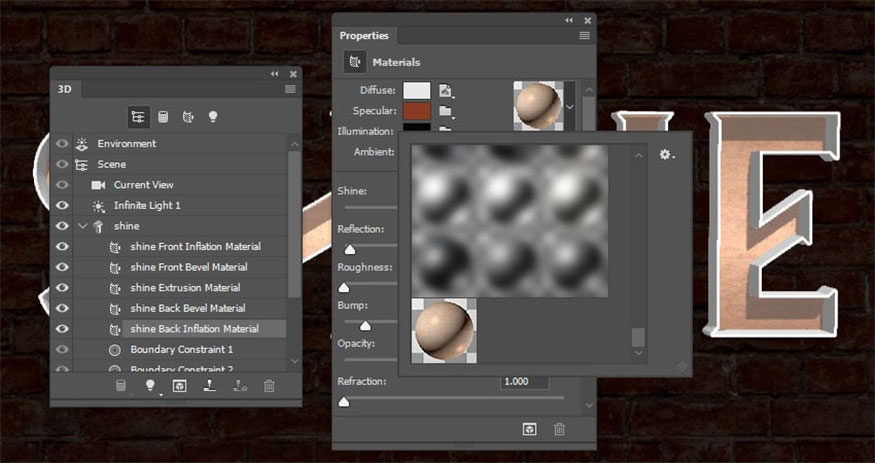
Step 3: Select the Back Inflation Material tab => open Material Picker => scroll down to the Front and Back Material icon and click on them to apply.
7. How to create more textured materials
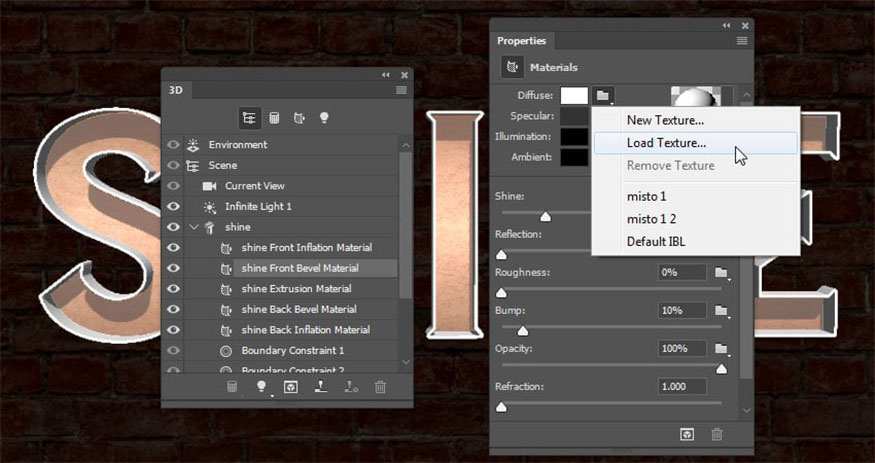
Step 1: Click on the Front Bevel Material tab of the text grid => click on the Diffuse folder icon and select Load Texture to open the “d.jpg” image from the Metal gradient seamless textures pack.
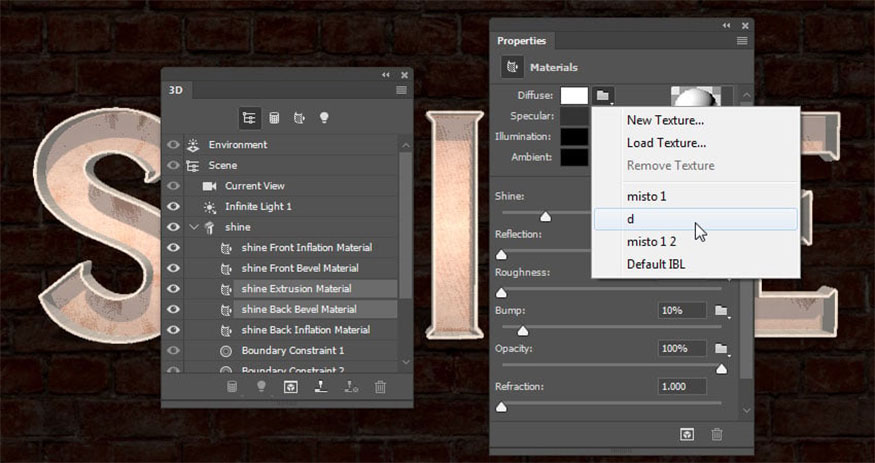
Step 2: Select the Extrusion and Back Bevel Material tab => click the Diffuse folder icon and select the d texture name from the list.
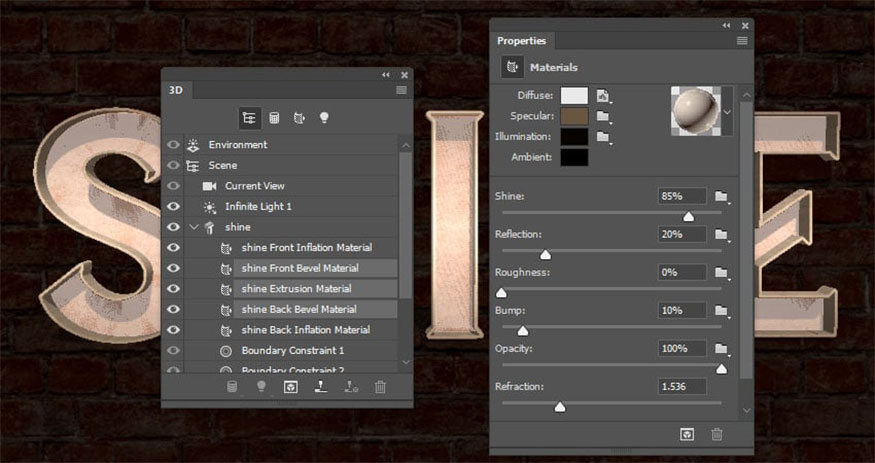
Step 3: Select the Front Bevel, Extrusion and Back Bevel Material tabs. Make the following settings:
- Specular: 104, 86, 64
- Illumination: 191, 96, 27 - Intensity -4.77
- Shine: 85%
- Reflection: 20%
- Refraction: 1.536%
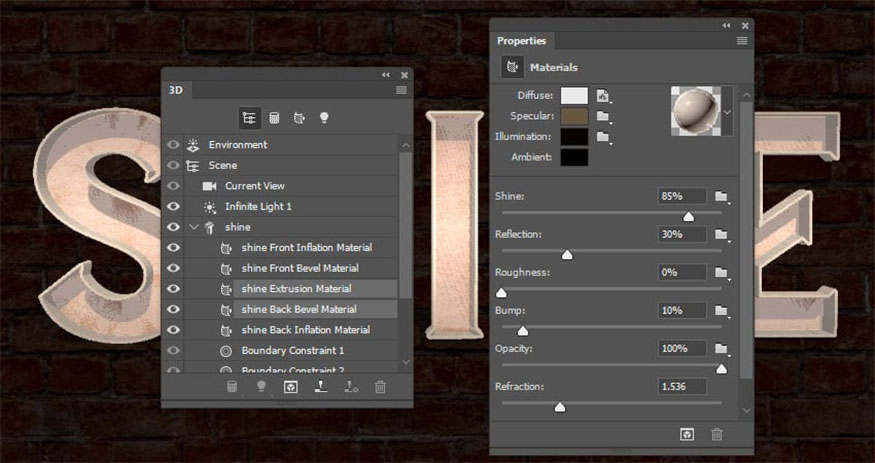
Step 4: Select only the Extrusion and Back Bevel Material tabs, and change Shine value to 30%.
8. Instructions for adjusting 3D scene lighting
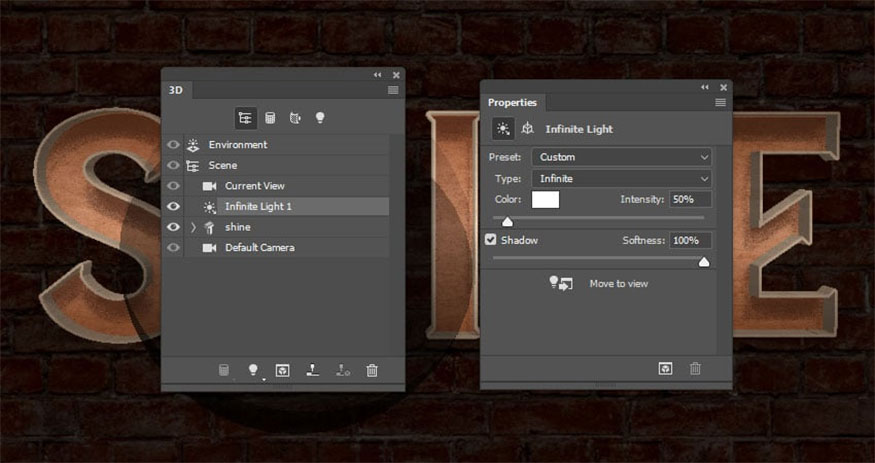
Step 1: Select the Infinite Light 1 tab and change Intensity to 50% and Shadow Softness to 100%.
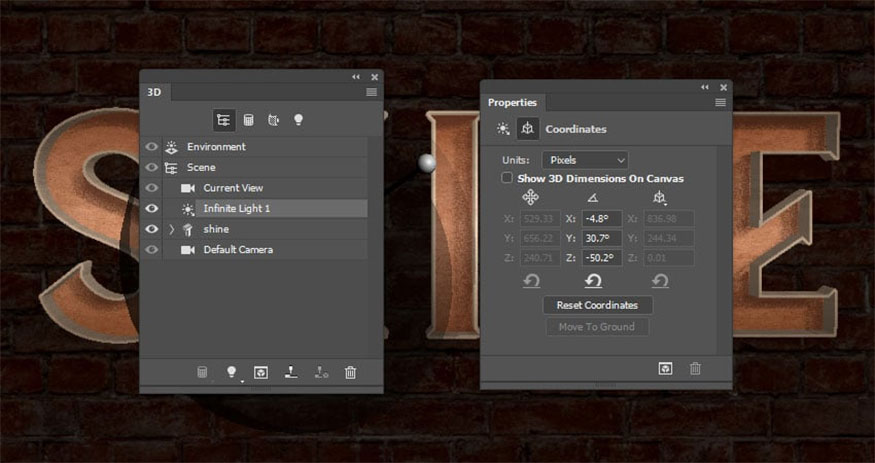
Step 2: Use the Move Tool to move the light to the angle you like, or you can click the Coordinates icon right at the top of the Properties panel to use the values.
9. How to adjust other 3D settings
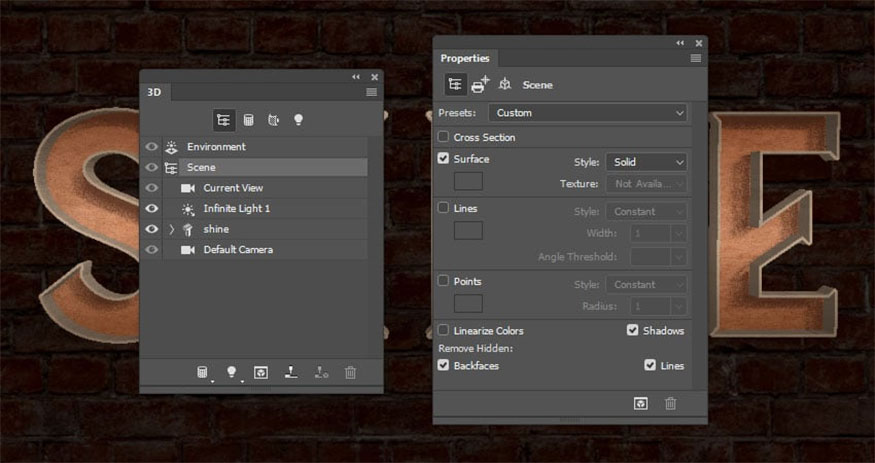
Step 1: Because we are using Bevel Contour to create the 3D mesh without Extrusion Depth, so some random lines will appear throughout the text.
To remove these lines, click on the Scene tab, under Remove Hidden in the Properties panel, you check both the Backfaces and Lines boxes.
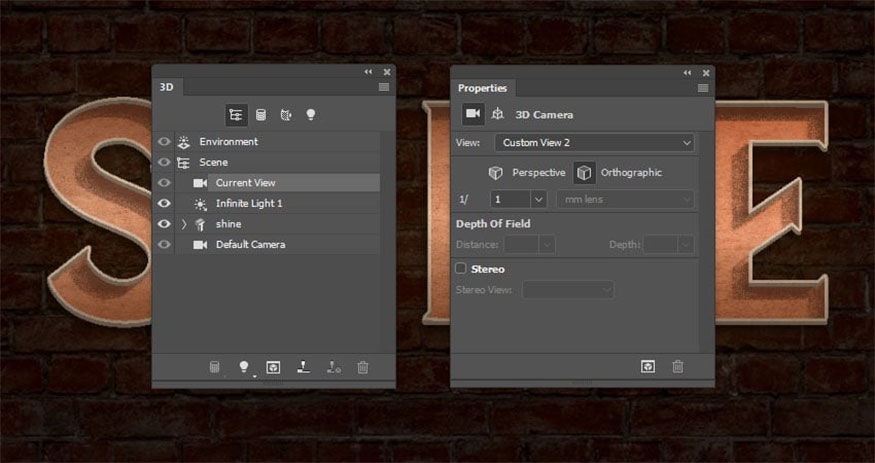
Step 2: Since we will add the light bulb manually using an existing image, it’s difficult to match the perspective of the 3D text. There are two ways to fix this,
+ Way 1: Select the Custom View tab and select the Front setting from the View menu.
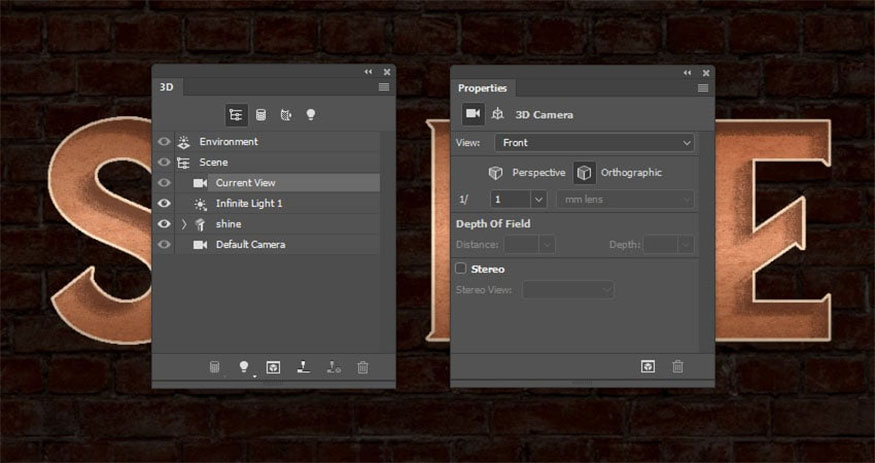
+ Way 2: You can manually adjust the view by using the 3D Mode of Move Tool, then click the Current View tab and click the Orthographic icon.
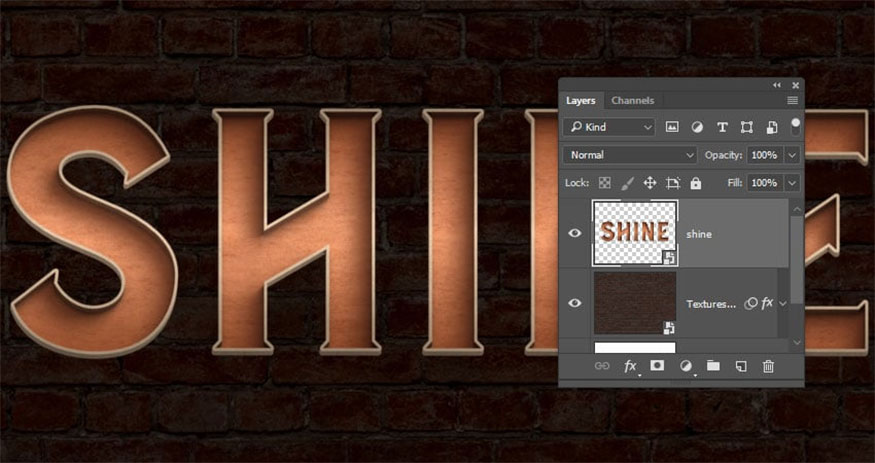
10. How to Render and Modify a Rendered 3D Scene
Step 1: Once you are done making adjustments and changes, go to 3D => Render 3D Layer. The display process will take some time, you can stop this process at any time by pressing the Esc key.
After finishing rendering, right-click on the 3D layer and select Convert to Smart Object to avoid making any changes.
Double-click the 3D layer to apply the layer style.
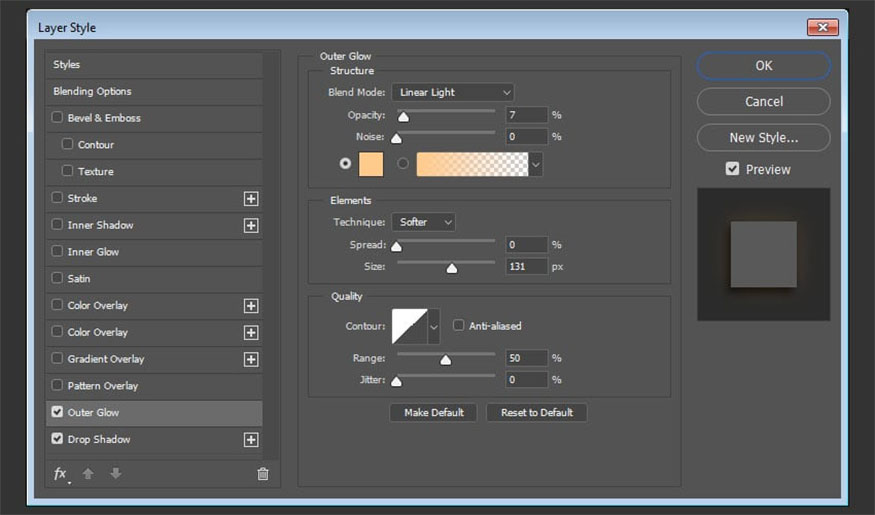
Step 2: Add Outer Glow with the following settings:
- Blend Mode: Linear Light
- Opacity: 7%
- Color: #ffcb8d
- Size: 131
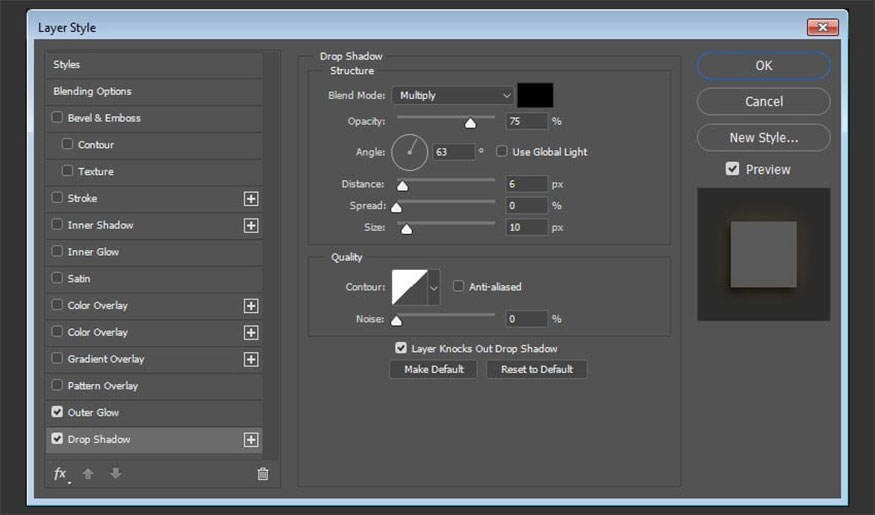
Step 3: Add Drop Shadow with the following settings:
- Opacity: 75%
- Uncheck the Use Global Light box
- Angle: 63
- Distance: 6
- Size: 10
11. How to create a vignette effect
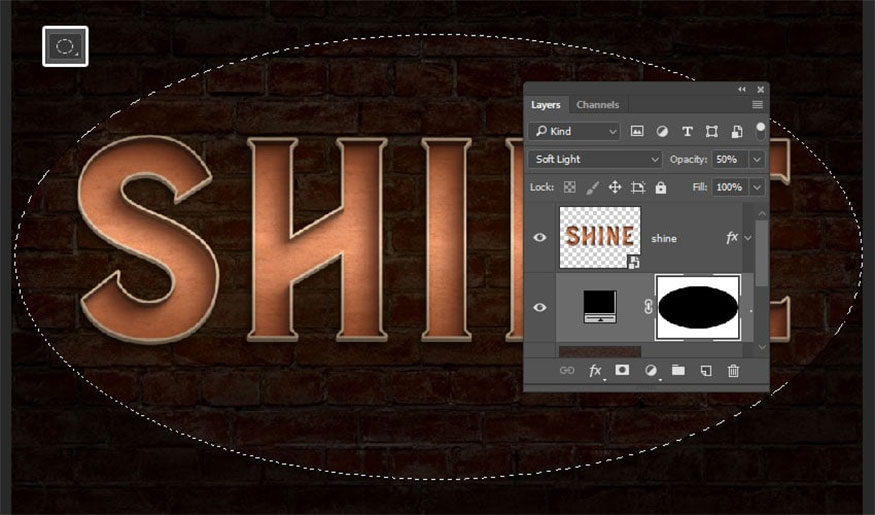
Step 1: Click the Create new fill or adjustment layer icon at the bottom of the Layers panel and choose Solid Color. Set the Fill Color to Black, change Blend Mode to Soft Light and Opacity to 50%.

Step 2: Select the Elliptical Marquee Tool and create a selection around the text.
Select the Solid Color layer mask thumbnail and fill the selection with Black.
Press Command-D to deselect.
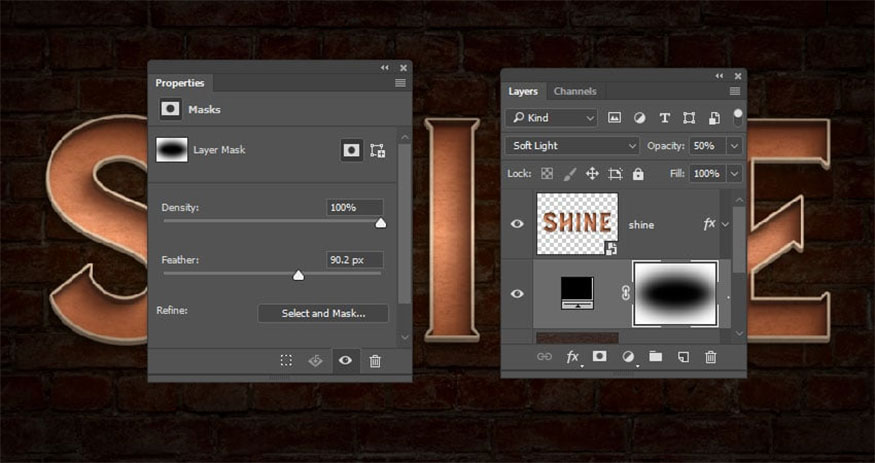
Step 3: With the mask thumbnail still selected, open the Properties panel and increase the Feather value to soften the edges and create vignette effect.
12. How to add light bulb
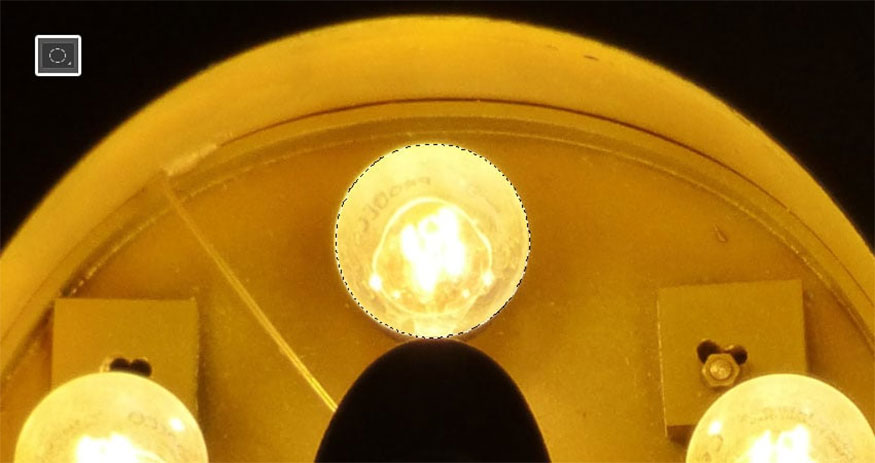
Step 1: Now, add the marquee light bulbs, open the Letter E Bulbs image and use the Elliptical Marquee Tool to select the light bulb at the beginning of the letter. Go to Edit => Copy to copy the selection.
Step 2: Return to the original 3D document => Edit => Paste and rename the layer “Bulb 01” and convert it to Smart Object.
.jpg)
Step 3: Double click on the Smart Object thumbnail to open the marquee light bulb file.
Go to Image => Image Size to change the Width and Height values to 56.
.jpg)
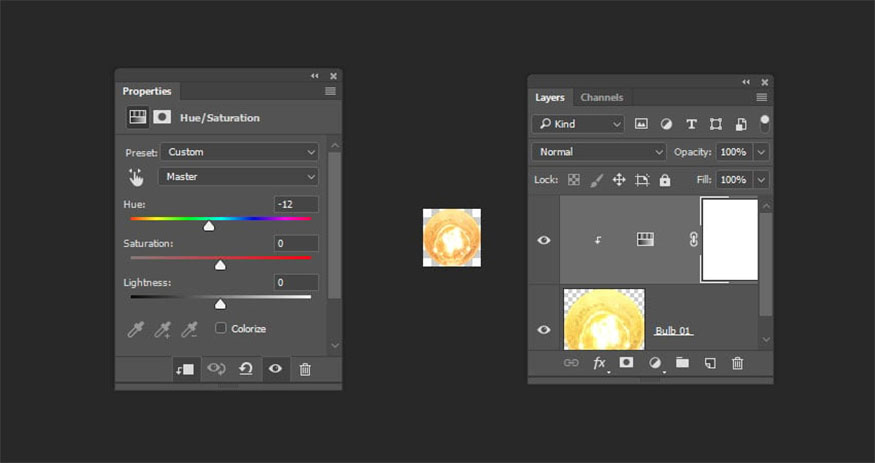
Step 4: Add a Hue/Saturation layer above the “Bulb 01” layer and cut it in. Change the Hue value to -12.
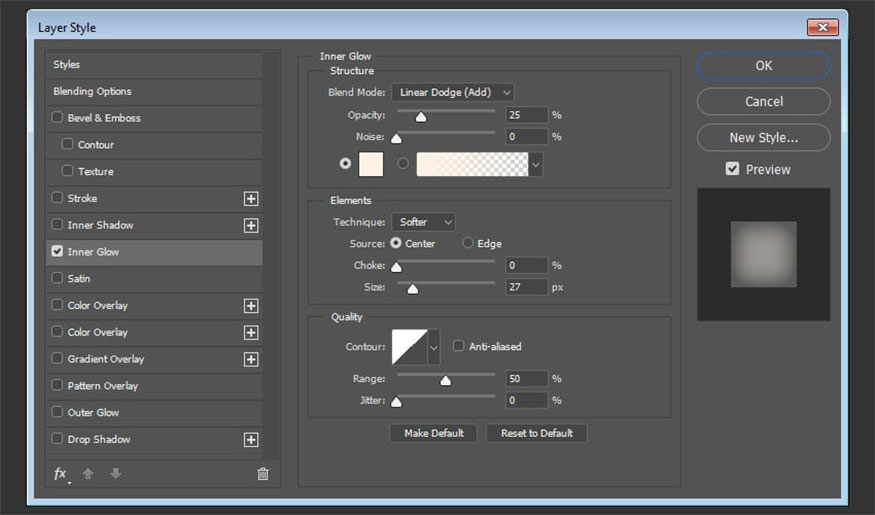
Step 5: Double click on the Bulb 01 layer to apply the Inner Glow effect with the following settings:
- Blend Mode: Linear Dodge (Add)
- Opacity: 25%
- Color: #fff2e3
- Source: Center
- Size: 27
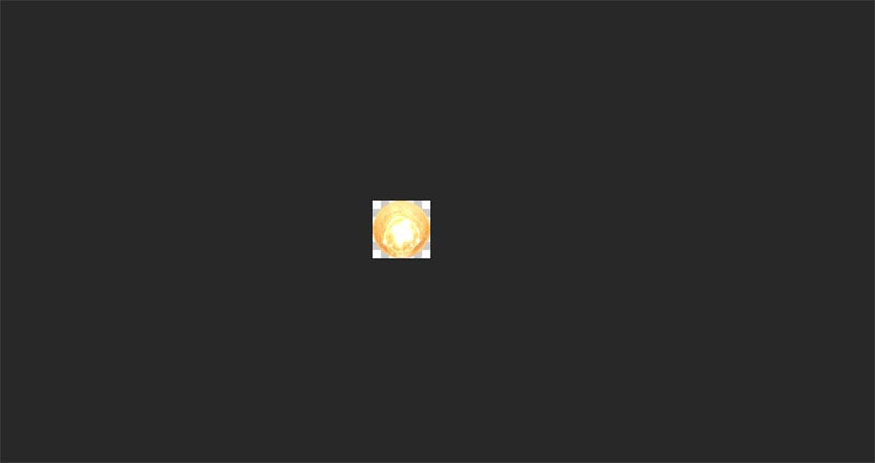
Step 6: Save the file and close it to return to the original document.
13. How to build Layer Style and duplicate objects
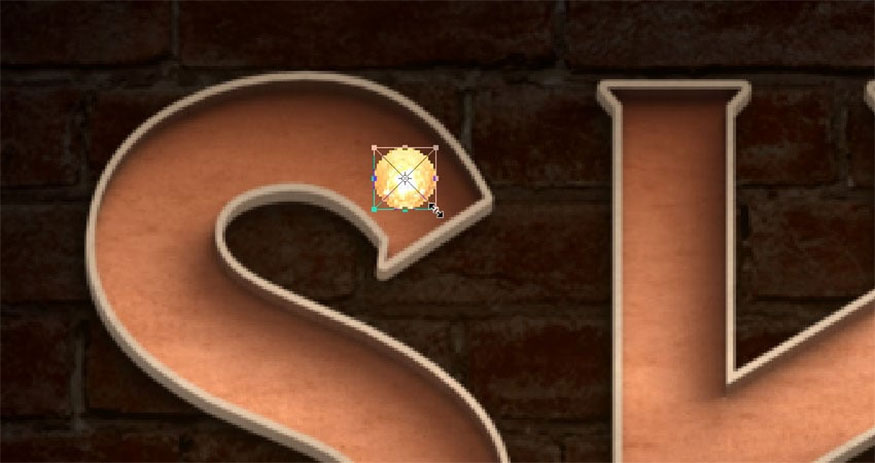
Step 1: Place the light bulb image inside the first letter you have, press Command-T to enter Free Transform Mode. Change bulb size if necessary.
Press the Return key when finishing.
Double-click the Bulb 01 Smart Object layer to apply the layer style:
Step 2: Add Outer Glow with the following settings:
- Blend Mode: Linear Light
- Opacity: 75%
- Color: #ffcb8d
- Size: 20

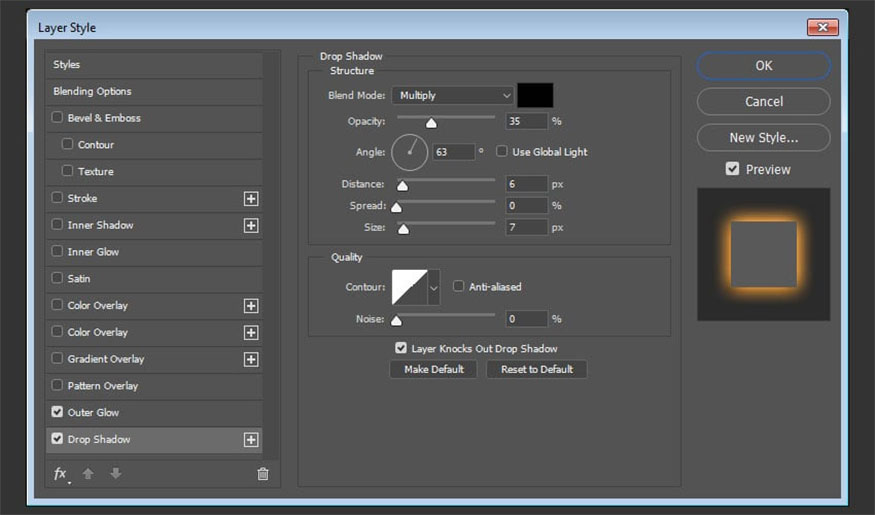
Step 3: Add Drop Shadow with the following settings:
- Opacity: 35%
- Uncheck the Use Global Light box
- Angle: 63
- Distance: 6
- Size: 7
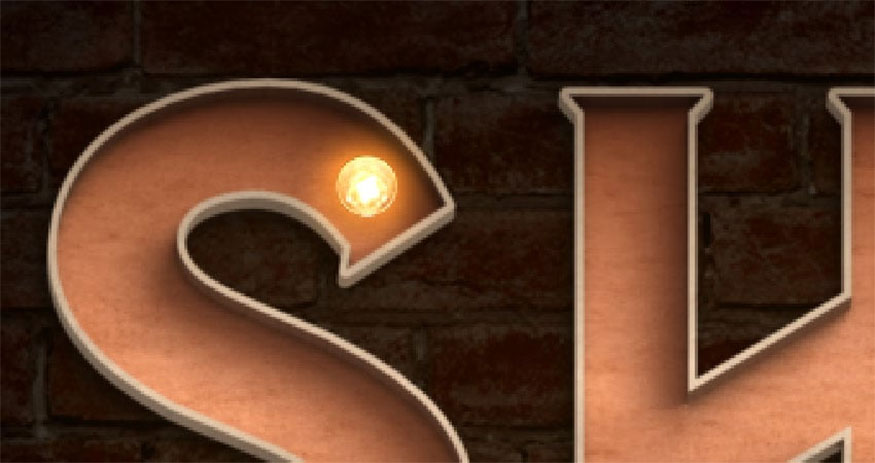
This will style the sign bulb.
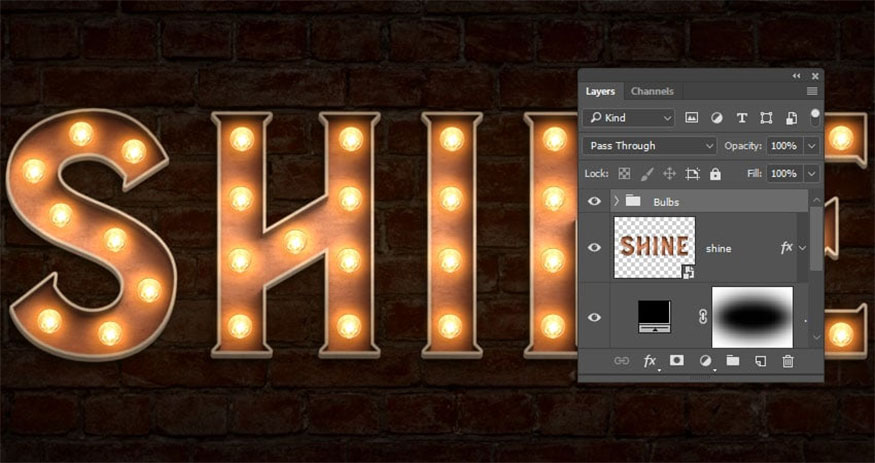
Step 4: Hold down the Option key and click and drag the light bulb to duplicate it.
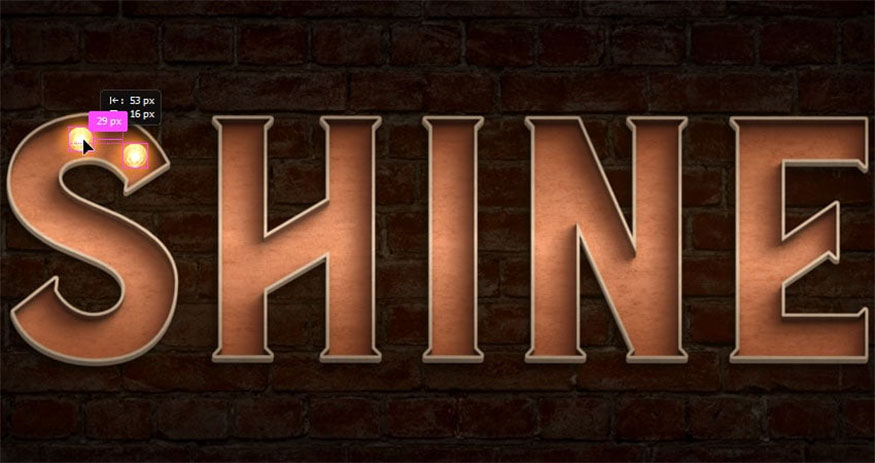
Step 5: Repeat this action to duplicate the selection light bulbs and fill the text. Once completed, install all the bulb layers into a group and name them “Bulbs”.
14. How to add a non-lit light bulb
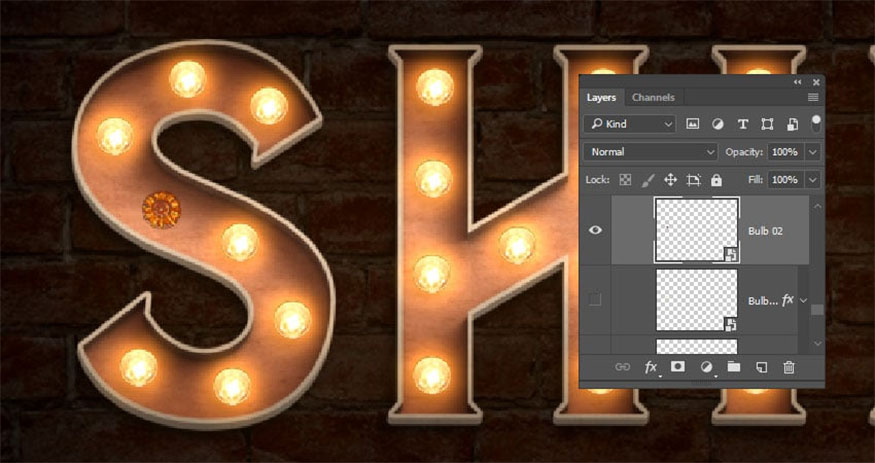
Step 1: Open the Light Bulb image and use the Elliptical Marquee Tool to select the part inside the light bulb and copy it.

Step 2: Paste the copied bulb into the original document, rename the layer “Bulb 02” and convert it to Smart Object.
Resize the Bulb 02 image to match the size of Bulb 01.
Hide any Bulb 01 layer and place Bulb 02 in its place.
Double click on the Bulb 02 image to apply the layer style:
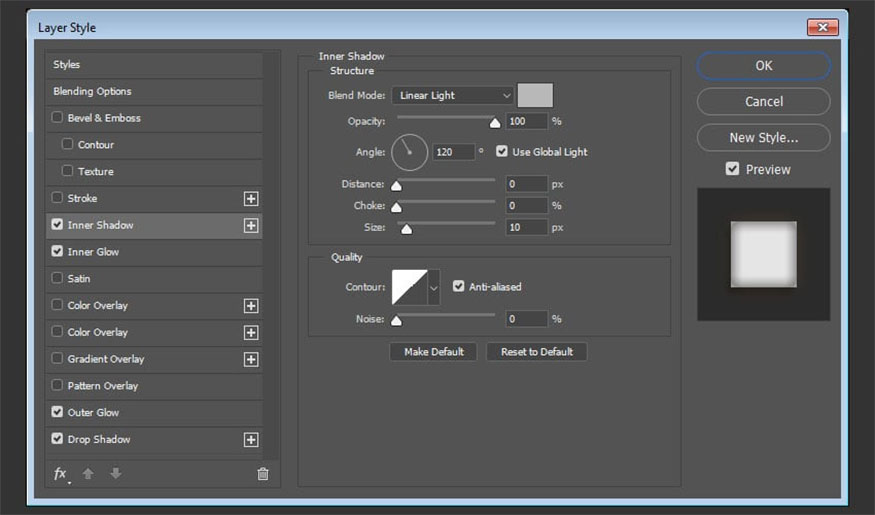
Step 3: Add Inner Shadow with the following settings:
- Blend Mode: Linear Light
- Color: #b8b8b8
- Opacity: 100%
- Distance: 0
- Size: 10
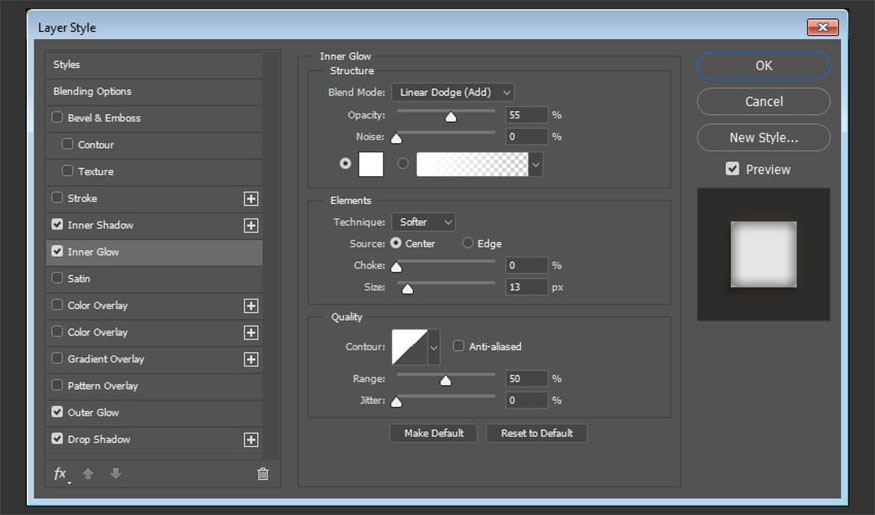
Step 4: Add Inner Glow with the following settings:
- Blend Mode: Linear Dodge (Add)
- Opacity: 55%
- Color: #ffffff
- Source: Center
- Size: 13
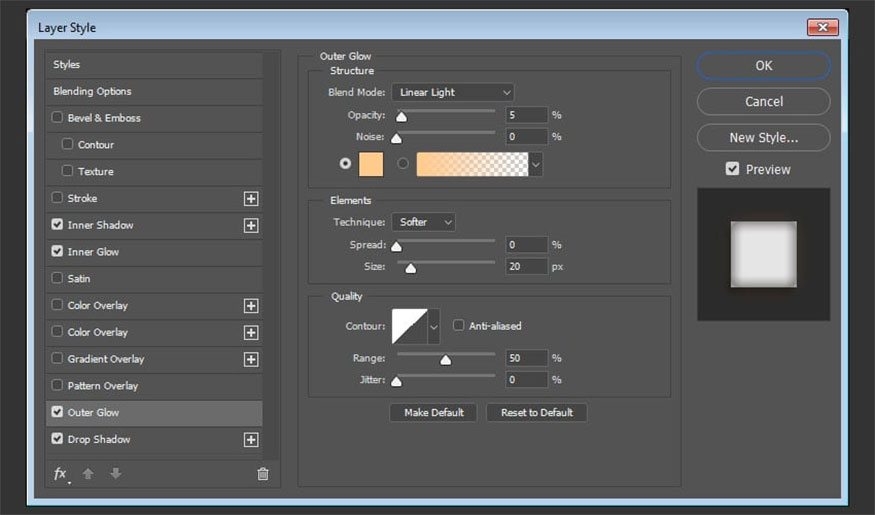
Step 5: Add Outer Glow with the following settings:
- Blend Mode: Linear Light
- Opacity: 5%
- Color: #ffcb8d
- Size: 20
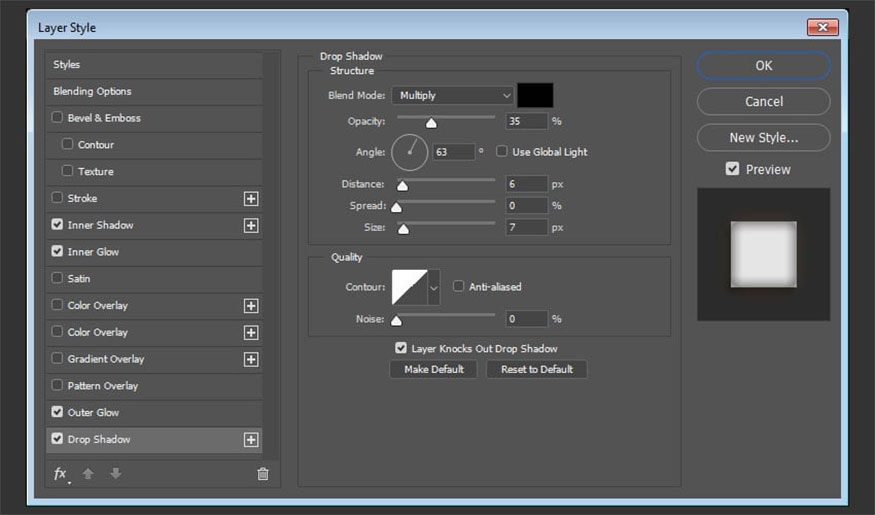
Step 6: Add Drop Shadow with the following settings:
- Opacity: 35%
- Uncheck the Use Global Light box
- Angle: 63
- Distance: 6
- Size: 7
This will create the style of the second light bulb, but we still need to remove the dark areas.

Step 7: Double click on the Bulb 02 layer to adjust the Blending Options. We make adjustments to the This Layer sliders in the Blend If section, which will protect the darker areas of the Bulb 02 layer from interacting with the remaining layers.
To do this, press and hold the Option key, then click and drag the left slider to split it.
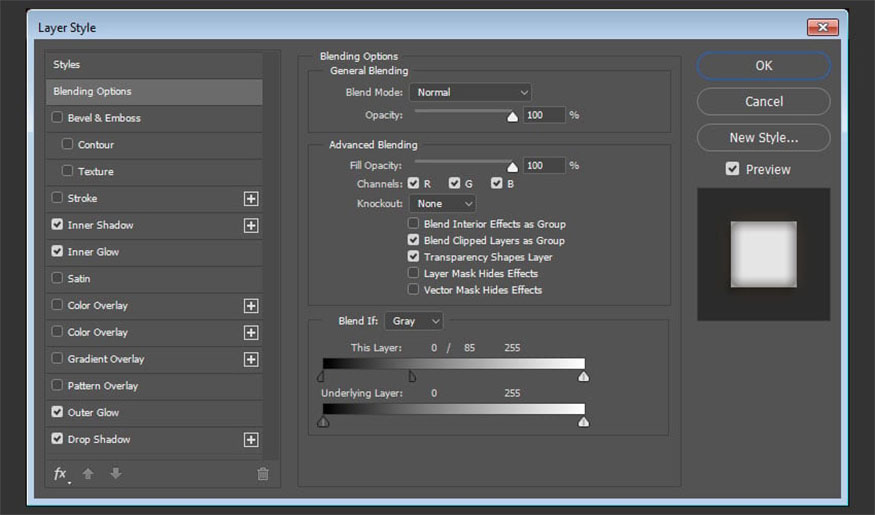
Then proceed to move both ends until no dark areas are visible. You'll end up with marquee letters like this:

15. How to add sparks
Step 1: Place any Fireworks0023 image on top of the Bulb 02 layer, change the layer's Blend Mode to Screen and transform them as desired.
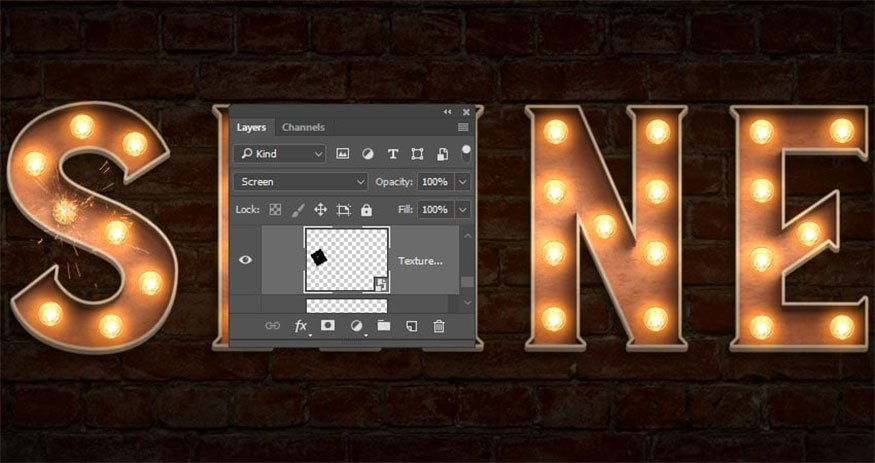
Step 2: Duplicate the Bulb 02 layer, add more spark layers to create a few more unlit sign bulbs above the text.

16. How to add general adjustments
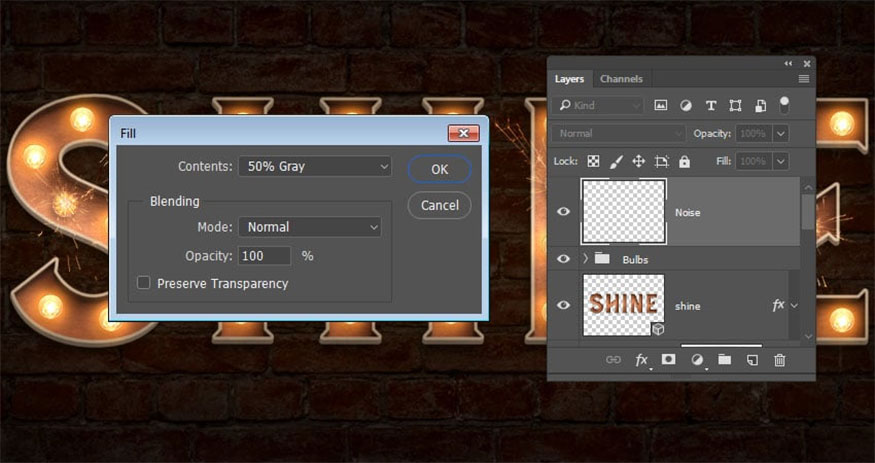
Step 1: Add a new layer on top of all the layers and name them “Noise”. Next go to Edit => Fill, change Contents to 50% Gray and click OK.
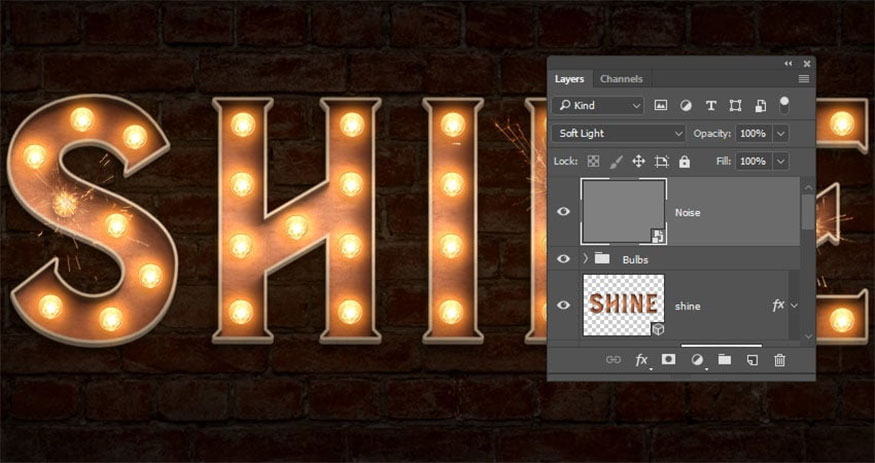
Step 2: Convert the Noise layer to Smart Object and change Blend Mode to Soft Light.
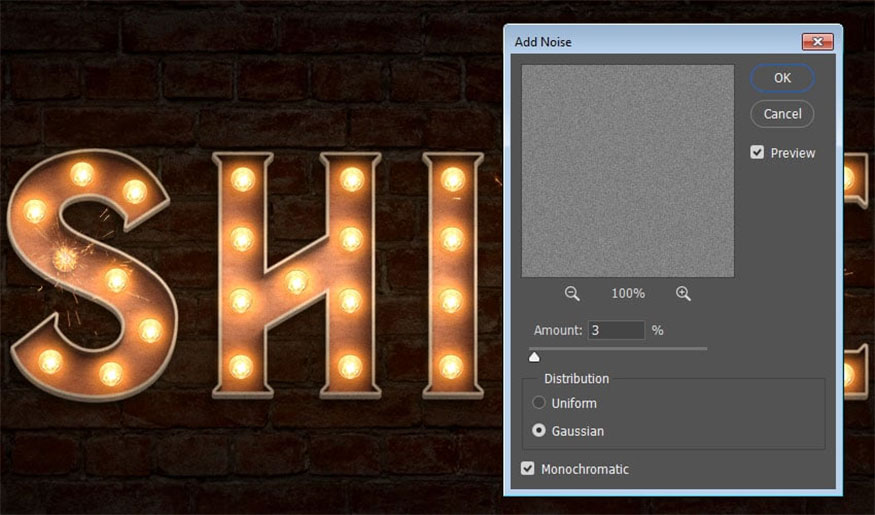
Step 3: Go to Filter => Noise => Add Noise. Change the Quantity to 3 and Distribution to Gaussian and check the Monochromatic box.
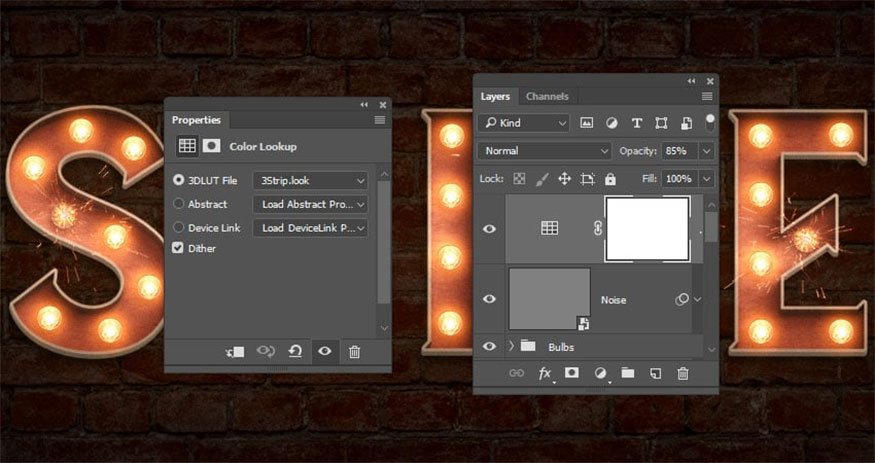
Step 4: Add a Color Lookup adjustment layer, select 3Strip.look panel from the 3DLUT File menu and change the layer's Opacity to 85%.
In the marquee letter tutorial above, we adapted a simple texture to create the background as well as create a 3D mesh from the text layer. Then, adjust the 3D mesh settings, create materials, adjust lighting, and make settings and render them.
Next, use several images, adjustments and layer styles to add light bulbs and signs to the text. Finally, add some general adjustments to complete the effect.
Above is all the information on how to create the 3D Marquee light bulb text effect in Photoshop quickly and simply. Hope they are really useful for those who are interested in this issue! Follow Sadesign to update yourself with more useful information!


VIP Products


Best Selling Products
Adobe Premiere Pro Account
99 USD
Freepik Premium Account
59 USD
Adobe Photoshop Copyright - Full App
120 USD
Plugin Retouch4me
69 USD
Genuine Adobe Illustrator account
99 USD
Windows 10 & 11 Pro Key
36 USD
Genuine Cheap Canva Pro
39 USD
Capcut Pro 1 Year
39 USD
Upgrade Genuine Office 365
49 USD
MidJourney Account
29 USD
Autodesk All App Account Copyright
120 USD
Upgrade Duolingo Super
29 USD
Upgrade genuine Capture One account
120 USD
Copyright Adobe Lightroom Account
59 USD
ChatGPT Plus Account (GPT-4)
16 USD