Best Selling Products

Upgrade Duolingo Super
29 USD

Autodesk All App Account Copyright
120 USD

Capcut Pro 1 Year
39 USD

Adobe Premiere Pro Account
99 USD

MidJourney Account
29 USD

Genuine Cheap Canva Pro
39 USD

Upgrade genuine Capture One account
120 USD

Adobe Photoshop Copyright - Full App
120 USD

ChatGPT Plus Account (GPT-4)
16 USD

Plugin Retouch4me
69 USD

Copyright Adobe Lightroom Account
59 USD

Genuine Adobe Illustrator account
99 USD

Windows 10 & 11 Pro Key
36 USD

Freepik Premium Account
59 USD

Upgrade Genuine Office 365
49 USD
How to create a realistic Chrome text effect in Photoshop
Nội dung
- 1. Instructions for determining a sample
- 2. Instructions on how to create a background
- 3. Instructions for creating text layers
- 4. Instructions for styling the original text layer
- 5. How to style the copied text layer
- 6. Instructions for adding an adjustment layer
- 7. Some other Chrome text effects
- 7.1. 3D Metal Photoshop Action
- 7.2. The Ultimate 1001 Text Effects
- 7.3. Metal Pro-Instant
- 7.4. Ultimate Metal Graphic Styles for Illustrator
- 7.5. Metallic Styles for Illustrator
How to create realistic Chrome text effects in Photoshop is not as complicated and time-consuming as many people think. The following article Sadesign will show you how to use some textures and layer styles to create extremely impressive chrome text effects!
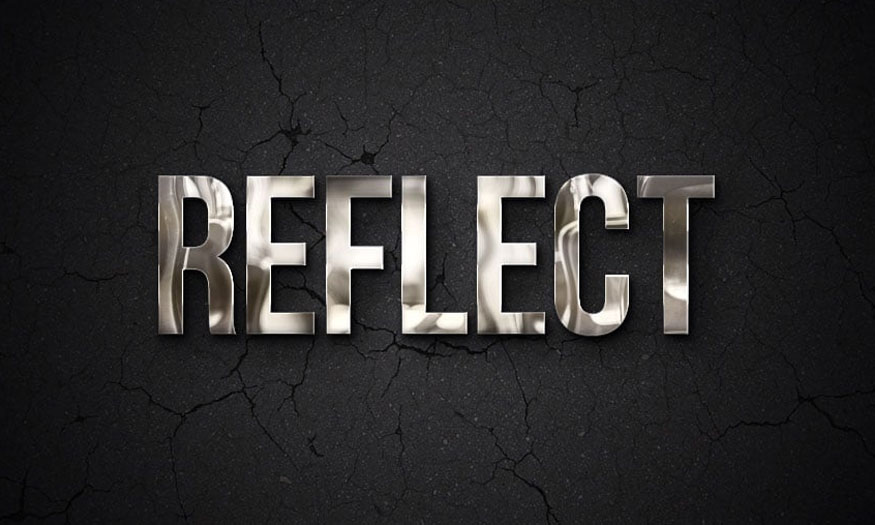
How to create realistic Chrome text effects in Photoshop is not as complicated and time-consuming as many people think. The following article Sadesign will show you how to use some textures and layer styles to create extremely impressive chrome text effects!

1. Instructions for determining a sample
To determine a sample, follow these steps:
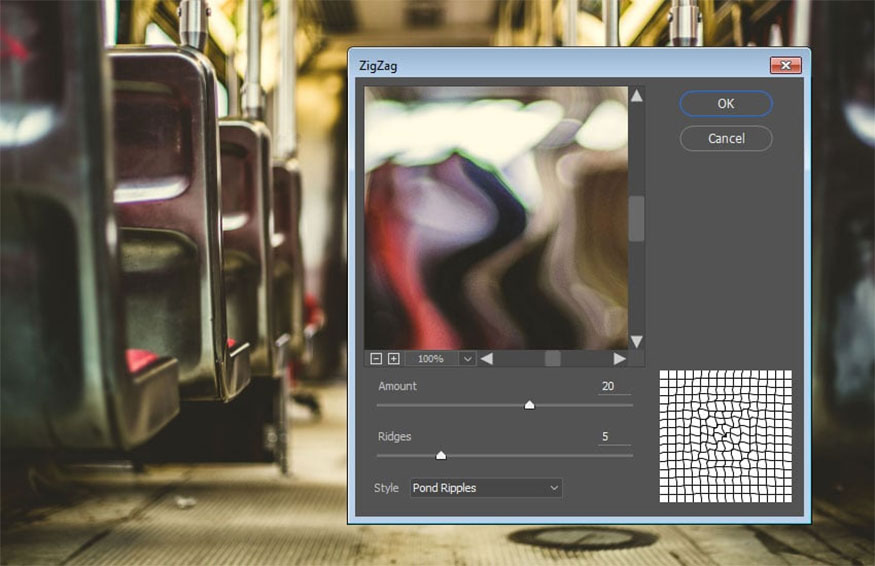
Step 1: Open the image you want to model, for example, I choose the image of a bus seat.
Next, go to Filter => Distort => ZigZag.
Change Amount to 20, Ridges to 5 and Style to Pond Ripple.
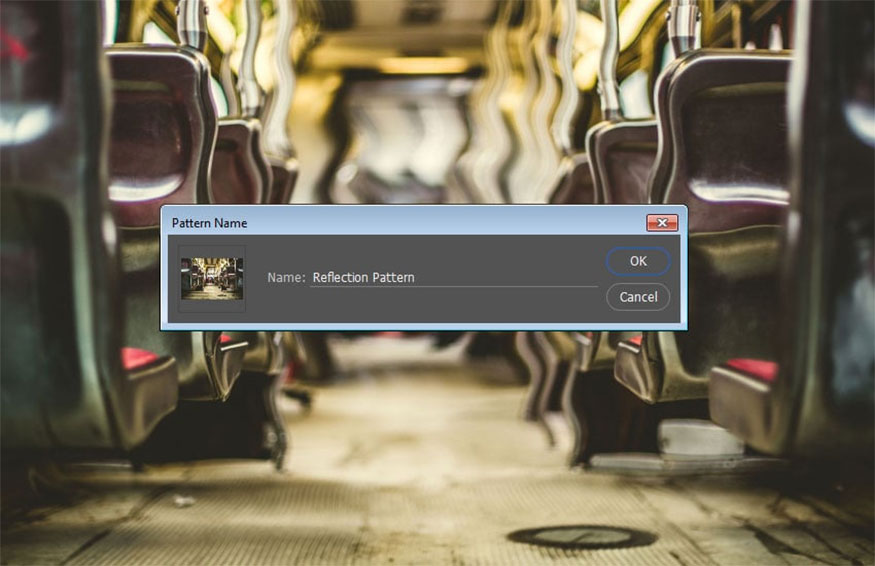
Step 2: Go to Edit => Define Pattern and enter Reflection Pattern in the Name field.
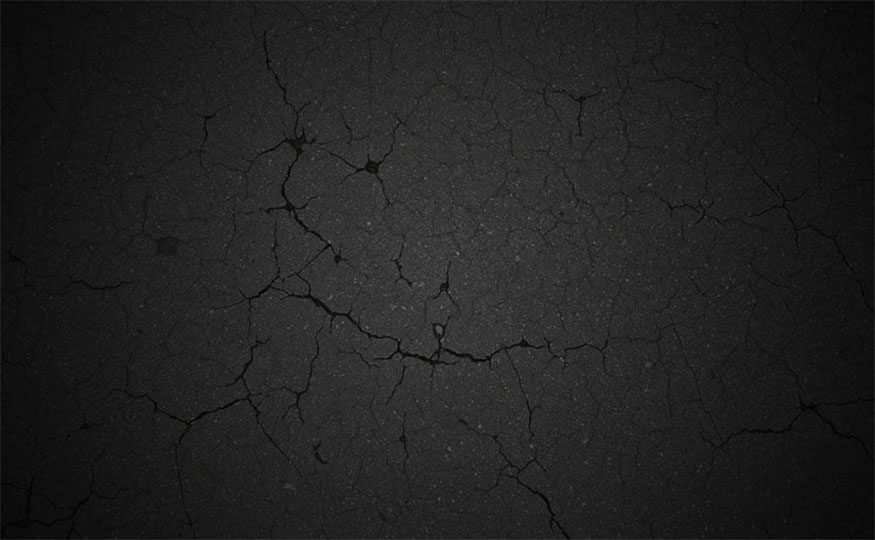
2. Instructions on how to create a background
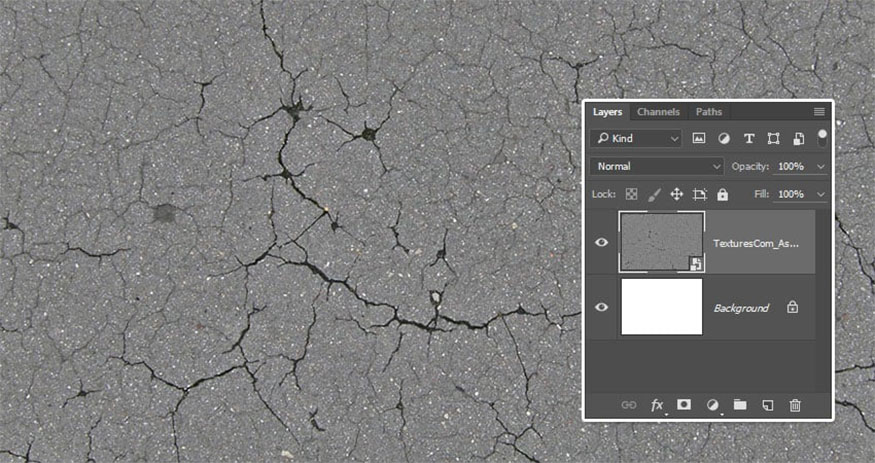
Step 1: Create a document with dimensions of 950 x 650 px, place the AsphaltDamaged0043 texture on top of the Background layer => change its size if necessary.
Step 2: Double-click the texture layer to apply the Gradient Overlay effect with the following settings:
- Blend Mode: Multiply
- Style: Radial
- Scale: 150%
Click Gradient to create colors by using the colors #757575 on the right and #0f0f0f on the left.
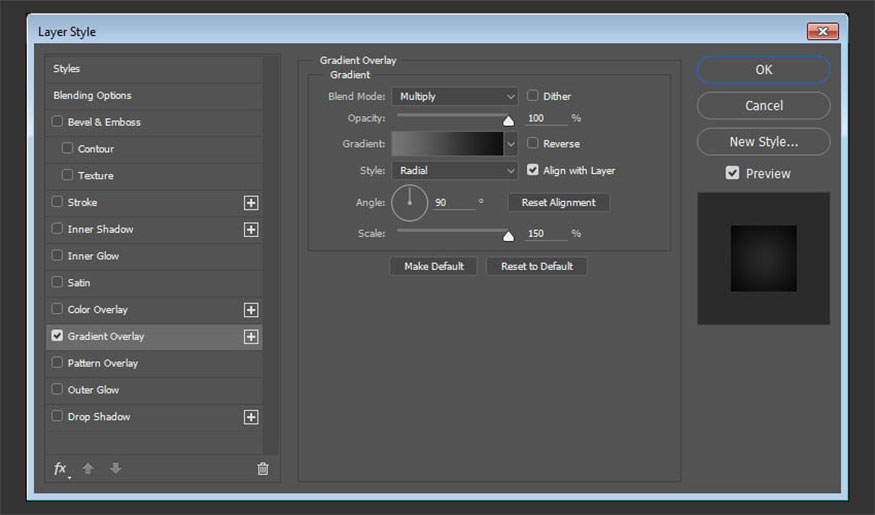
These steps help create a simple radial gradient.
3. Instructions for creating text layers
The process of creating text layers is carried out according to the following specific steps:
Step 1: You create Chrome text effects in Photoshop using the font Bebas Neue Bold => set Size to 220 pt and Kerning to Optical.
If you want to apply this effect to the logo, select Smart Object, then follow the instructions to apply this effect to the logo instead of the text.
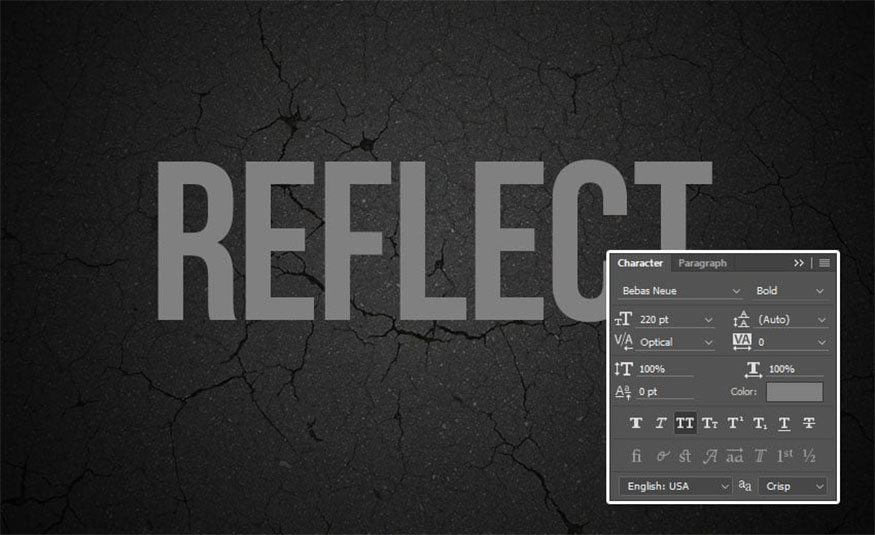
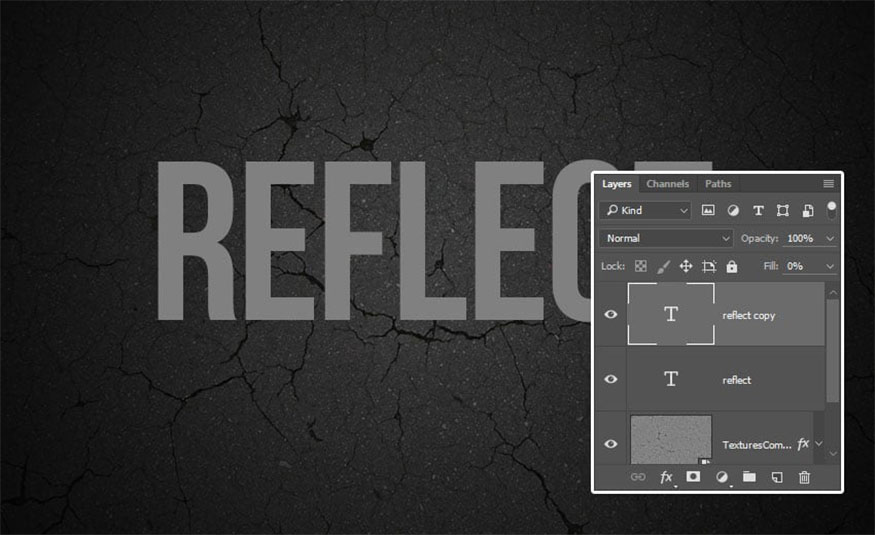
Step 2: Duplicate the text layer, change Fill value of the copy to 0.
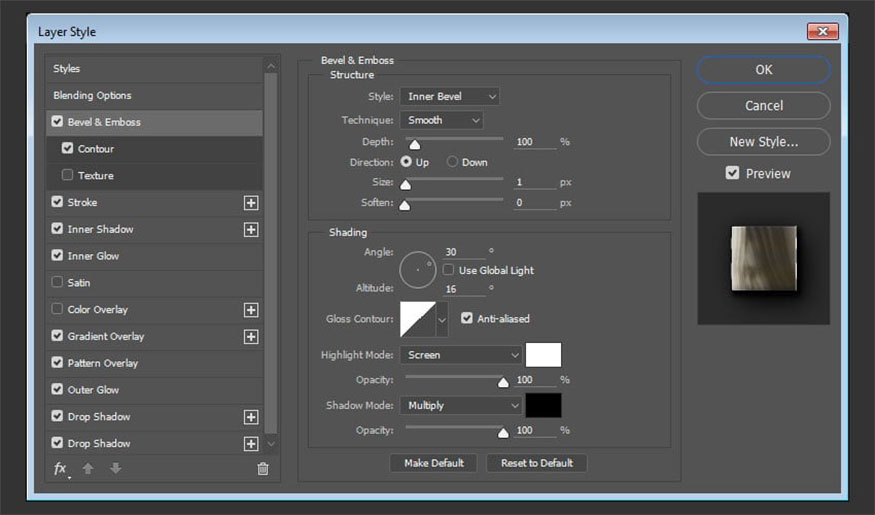
4. Instructions for styling the original text layer
Double-click on the original text layer to apply the following layer style:
Step 1: Add Bevel and Emboss and make the following settings:
- Size: 1
- Angle: 30
- Altitude: 16
- Select Anti-aliased
- Highlight Mode - Opacity: 100%
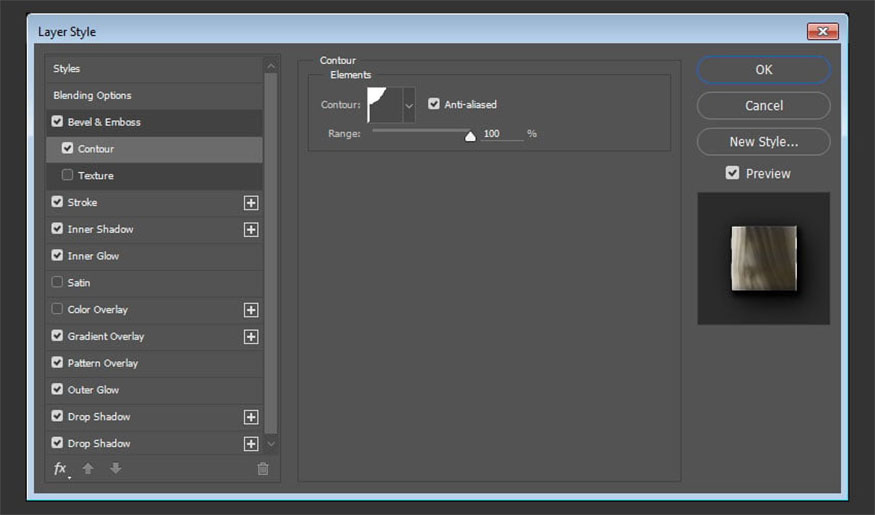
Step 2: Add Contour and make the following settings:
- Contour: Cove - Shallow
- Select Anti-aliased
- Range: 100%
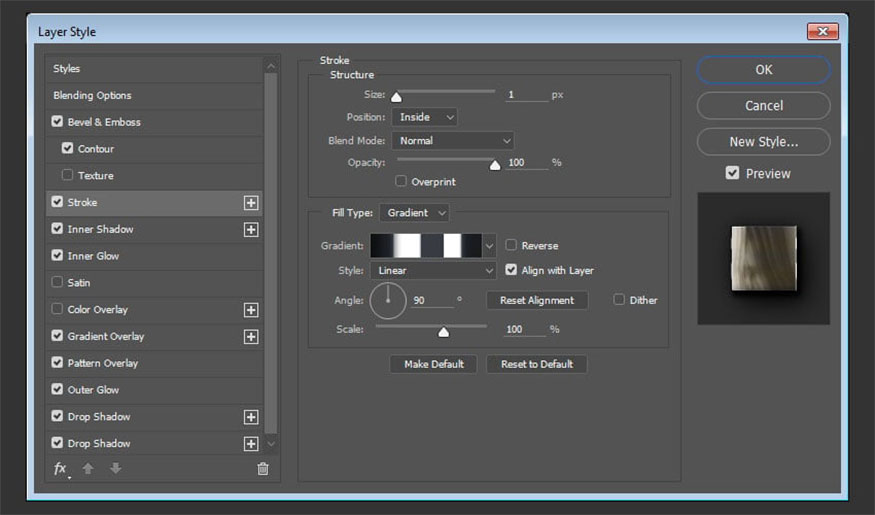
Step 3: Add Stroke, and make the following settings:
- Size: 1
- Position: Inside
- Fill Type: Gradient
- Use color gradient stainless steel xx
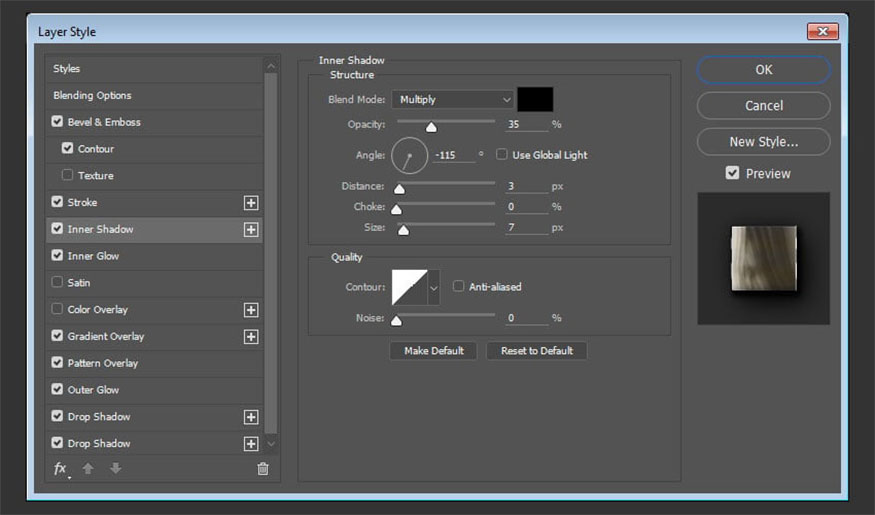
Step 4: Add Inner Shadow, and make the following settings:
- Opacity: 35%
- Angle: -115
- Distance: 3
- Size: 7
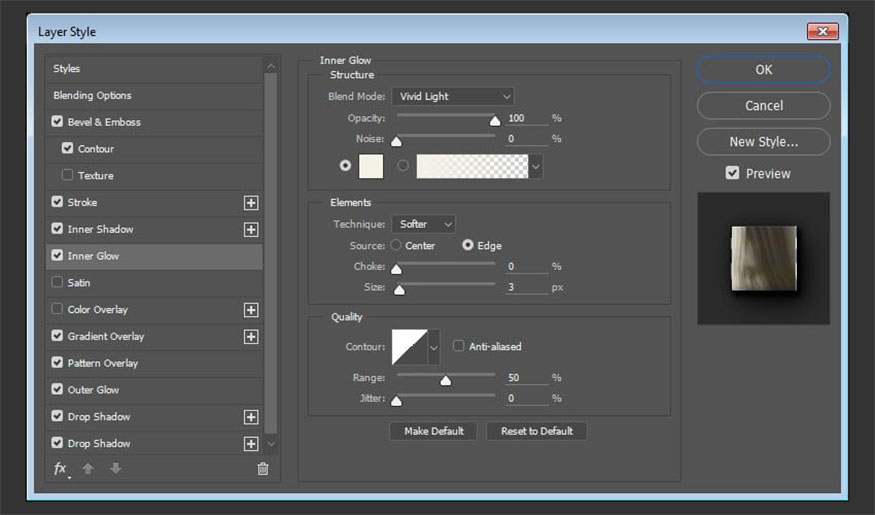
Step 5: Add Inner Glow, and make the following settings:
- Blend Mode: Vivid Light
- Opacity: 100%
- Color: #f4f2e7
- Choke: 0
- Size: 3
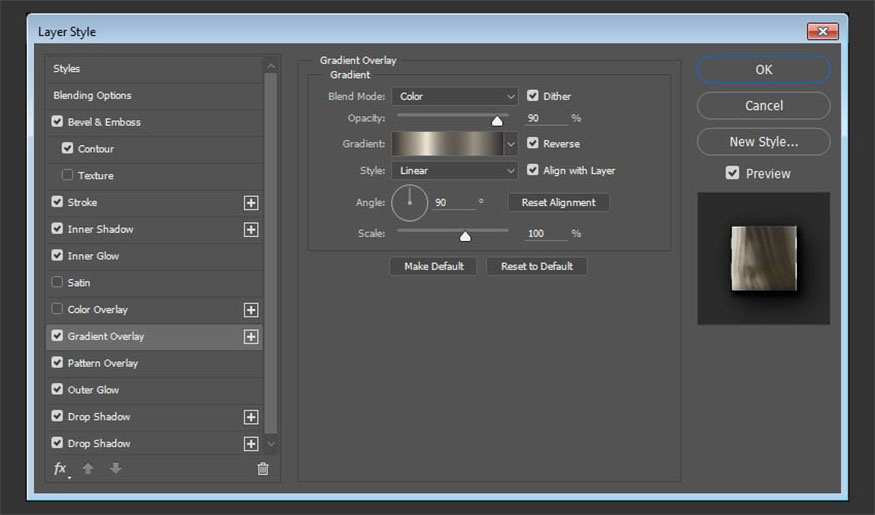
Step 6: Add Gradient Overlay, and make the following settings:
- Select Dither box
- Blend Mode: Color
- Opacity: 90%
- Select Reverse
- Select 70 gradient fill.
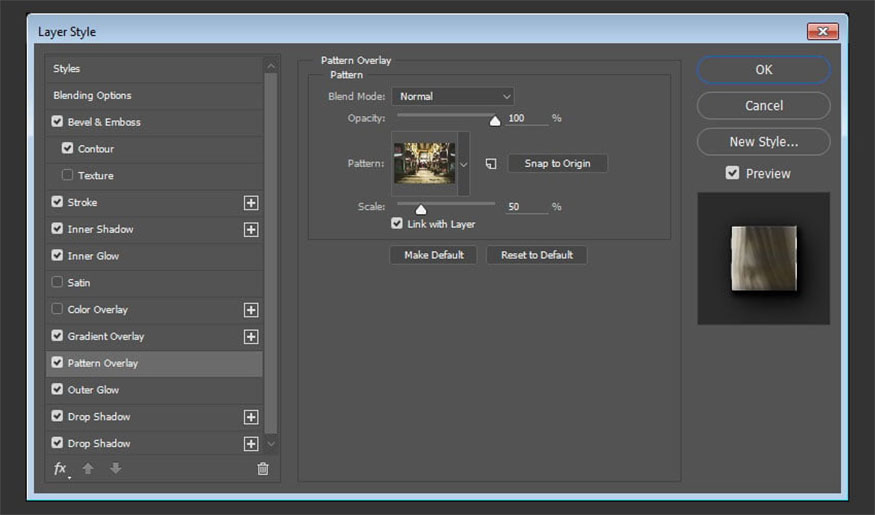
Step 7: Add Pattern Overla, and make the following settings:
- Pattern: Reflection Pattern
- Scale: 50%
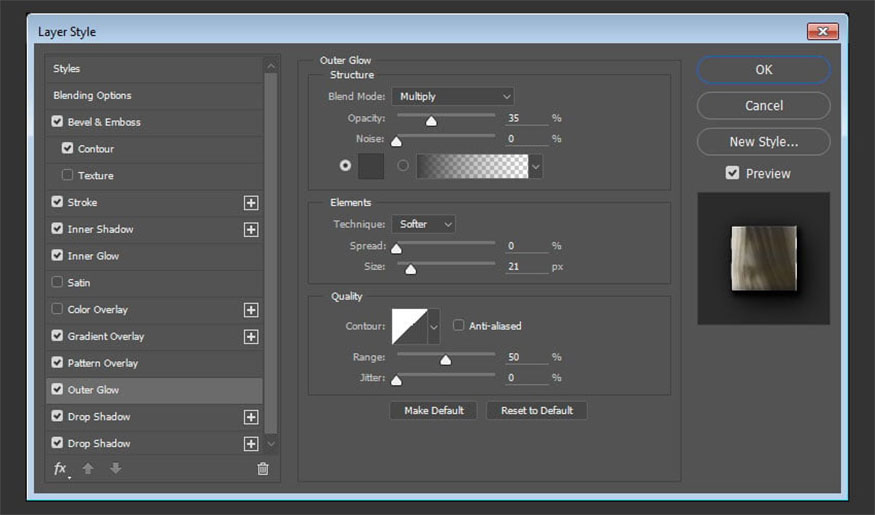
Step 8: Add Outer Glow, and make the following settings:
- Blend Mode: Multiply
- Opacity: 35%
- Color: #404040
- Size: 21
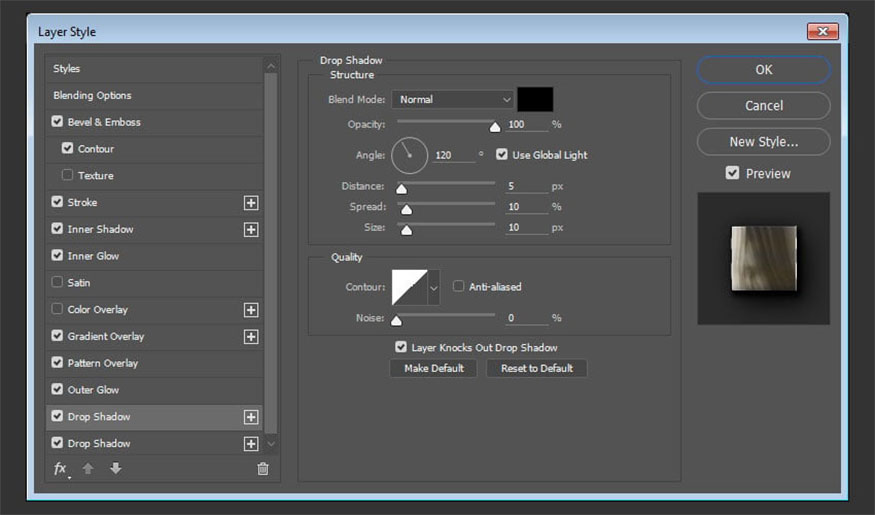
Step 9: Add Drop Shadow, and make the following settings:
- Opacity: 100%
- Distance: 5
- Spread: 10
- Size: 10
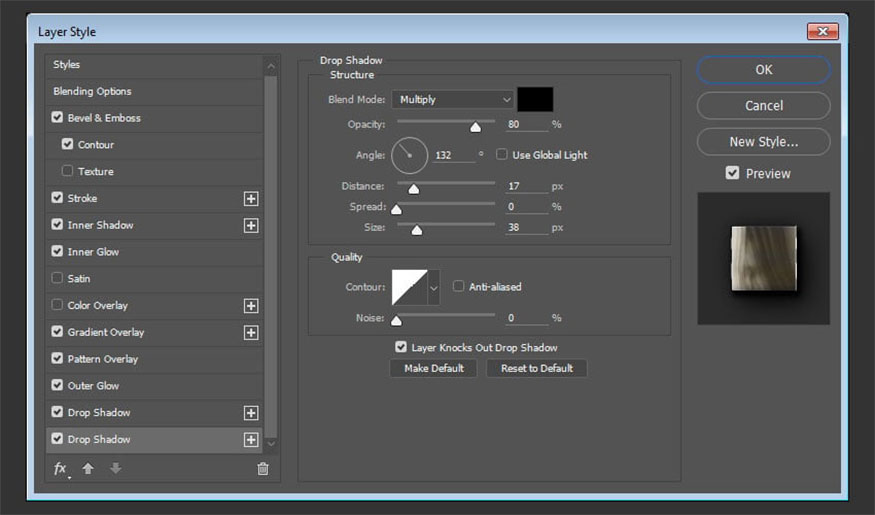
Step 10: Add another Drop Shadow, and make the following settings:
- Opacity: 80%
- Select Global Light
- Angle: 132
- Distance: 17
- Size: 38
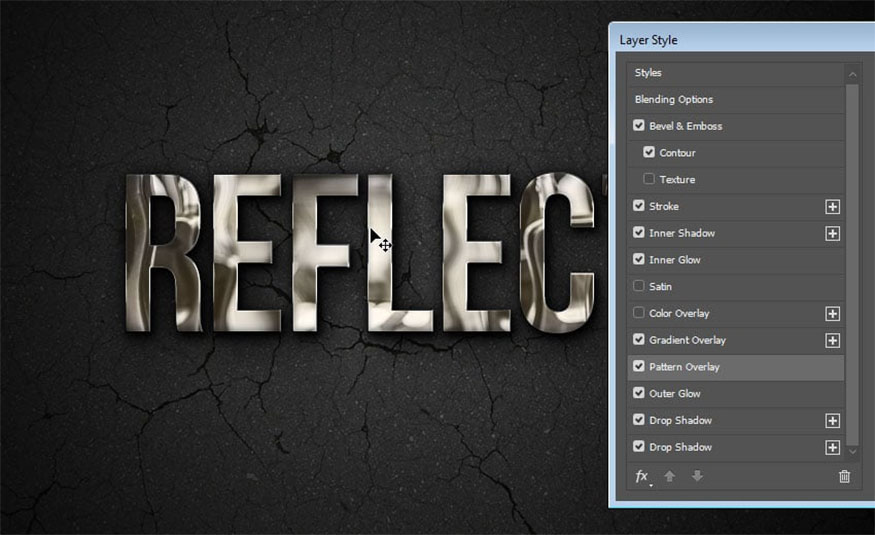
Step 11: You can go back to the Pattern Overlay effect, then click drag the pattern inside the text to move it around until you achieve the desired Chrome text effect in Photoshop.
5. How to style the copied text layer
Double-click the copied text layer to apply the layer style to the Chrome letters in Photoshop:
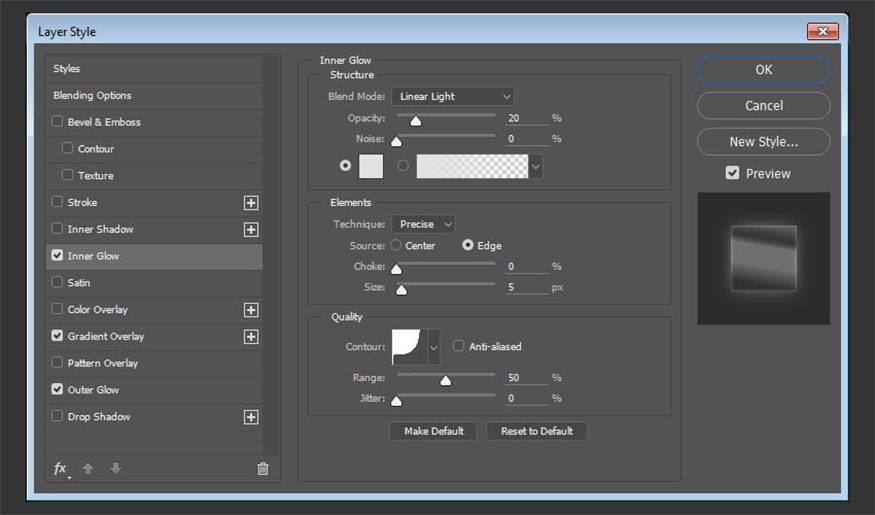
Step 1: Add Inner Glow with the following settings:
- Blend Mode: Linear Light
- Opacity: 20%
- Color: #e1e1e1
- Technique: Precise
- Size: 5
- Contour: Cove - Deep.
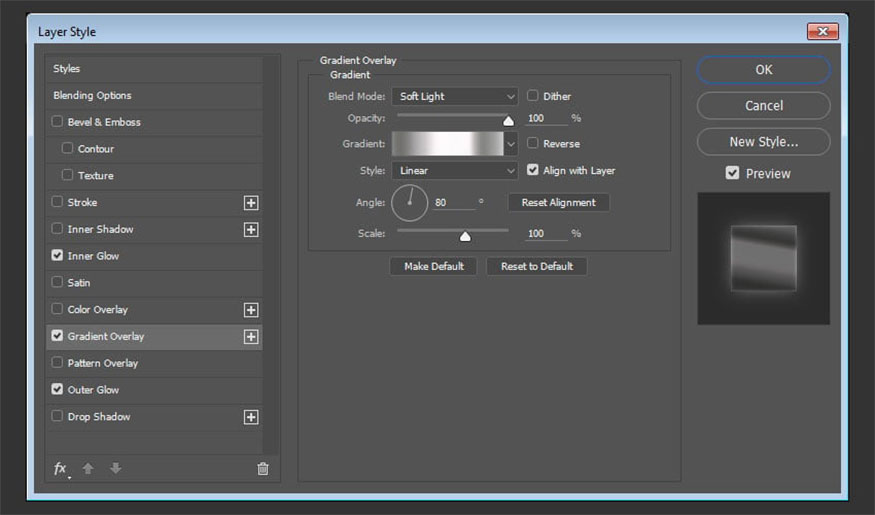
Step 2: Add Gradient Overlay with the following settings:
- Blend Mode: Soft Light
- Angle: 80
- Use steel pipe 10 gradient fill
Step 3: Select Outer Glow with the following settings:
- Blend Mode: Color Dodge
- Opacity: 50%
- Color: #ececec
- Size: 21
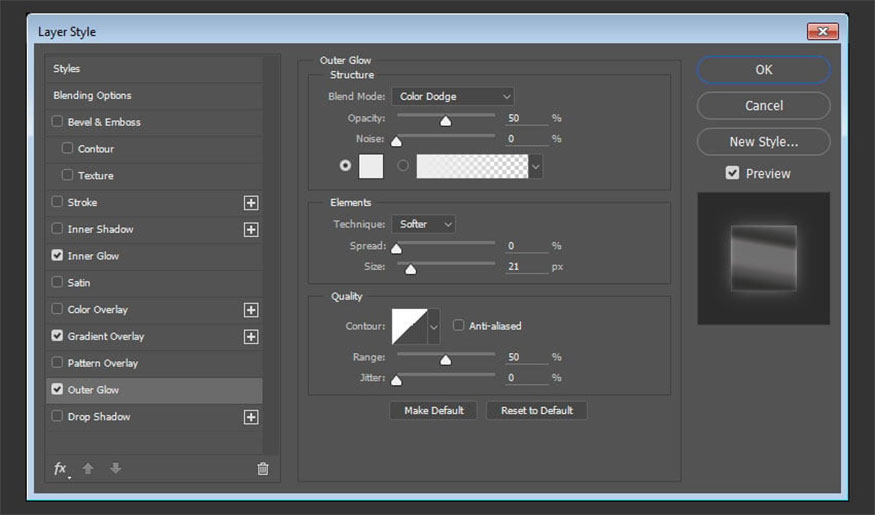
These steps are intended to style the second text layer and complete the Photoshop chrome effect.

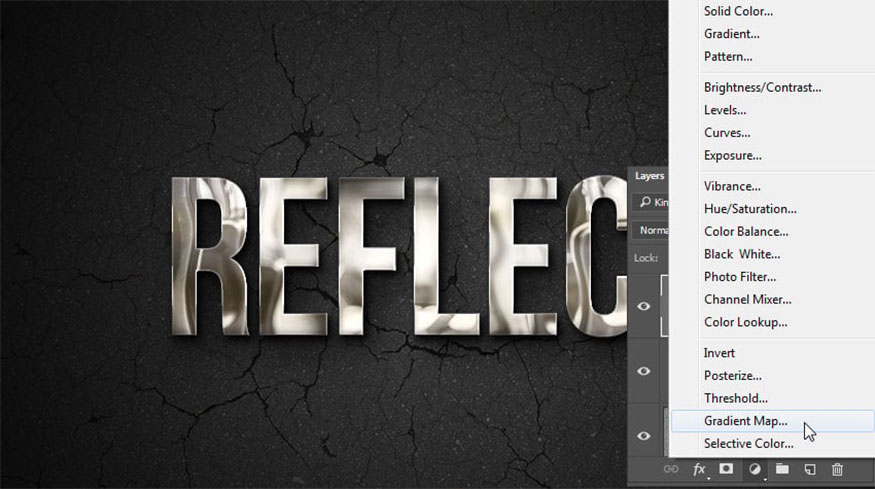
6. Instructions for adding an adjustment layer
To add an adjustment layer, do the following:
Step 1: Click the Create new fill or adjustment layer icon right at the bottom of the Layers panel, then select Gradient Map.
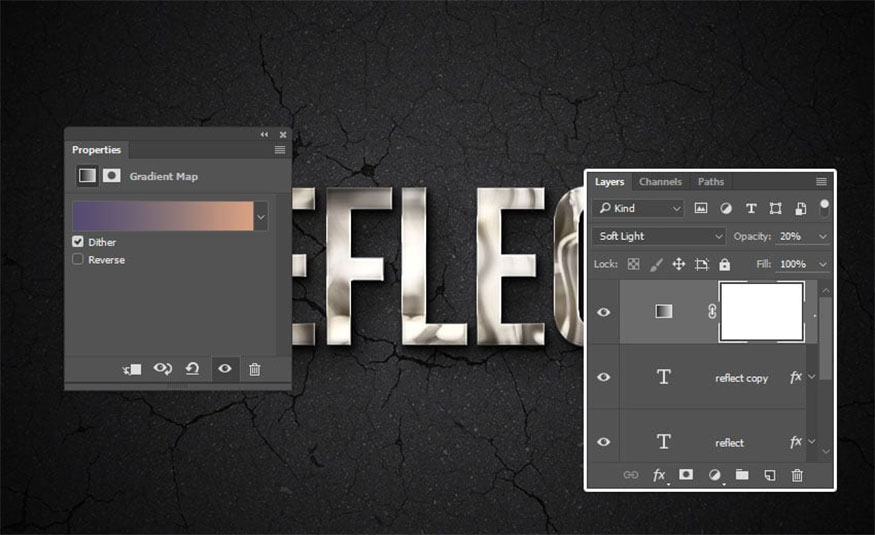
Step 2: Select Dither, then choose the color #554b70 on the left, #857177 in the middle and #d8a082 on the right. Then change Blend Mode of the adjustment layer to Soft Light and Opacity to 20%.
In this example, we use filters on images and define them as samples. Next, create a simple background using textures and gradient overlay effects. Finally, create two text layers and style them to create chrome text in Photoshop.
So we've completed everything by adding a color adjustment layer.
7. Some other Chrome text effects
If you want to create a chrome effect in Photoshop to save time, you can choose some of the following Chrome Illustrator or Photoshop effects:
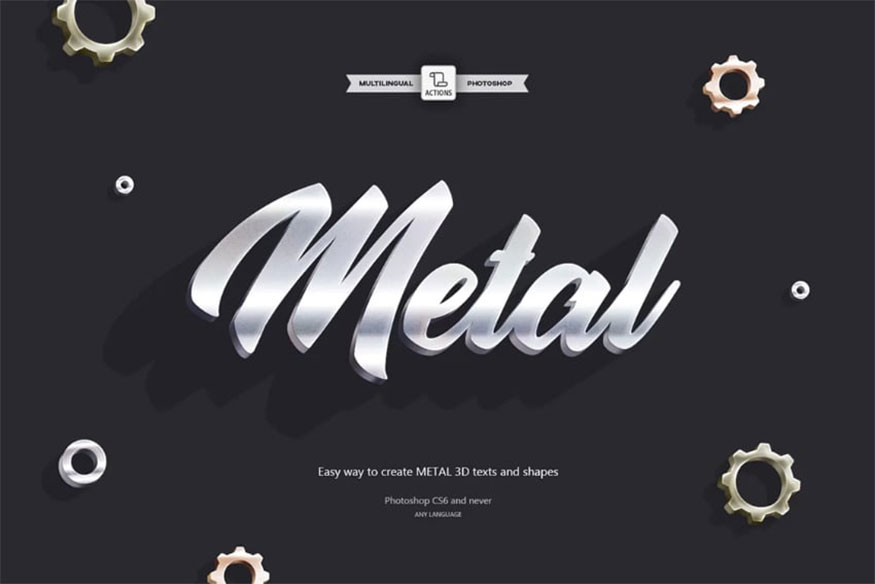
7.1. 3D Metal Photoshop Action
This is an ideal action to help you create chrome text effects for Photoshop quickly with a few clicks. They have the effect of creating text effects in steel and copper. You can fully customize the layers as you go.
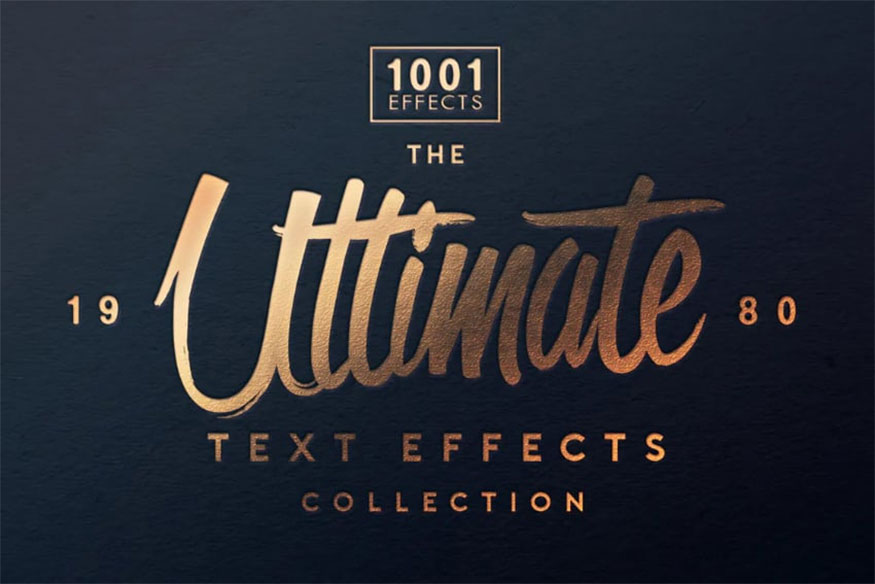
7.2. The Ultimate 1001 Text Effects
With this effect you can find gold and red leaves, chrome-plated metals, and even wood wrapped in a very convenient PSD file. This pack includes flat and 3D text effects, along with textures that you can mix and match in Photoshop.
7.3. Metal Pro-Instant
This effects pack includes 25 high-quality metallic text styles made for Adobe Illustrator. They even have pink-gold text effects!

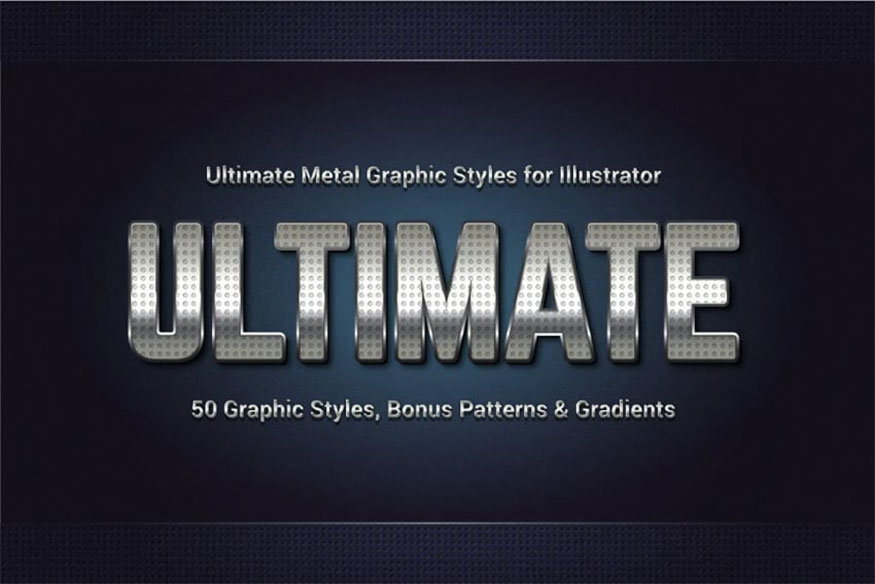
7.4. Ultimate Metal Graphic Styles for Illustrator
This text effect contains 50 metallic styles created for Adobe Illustrator. They are all easily customizable.
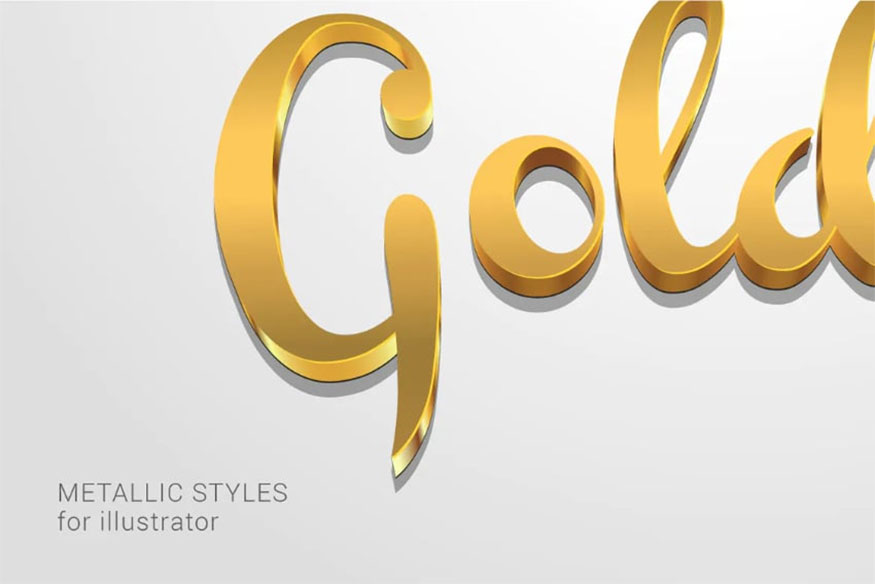
7.5. Metallic Styles for Illustrator
This is a set of metal layer styles created for Adobe Illustrator, users can use it with just 1 click. These include gold and pink – gold text effect.
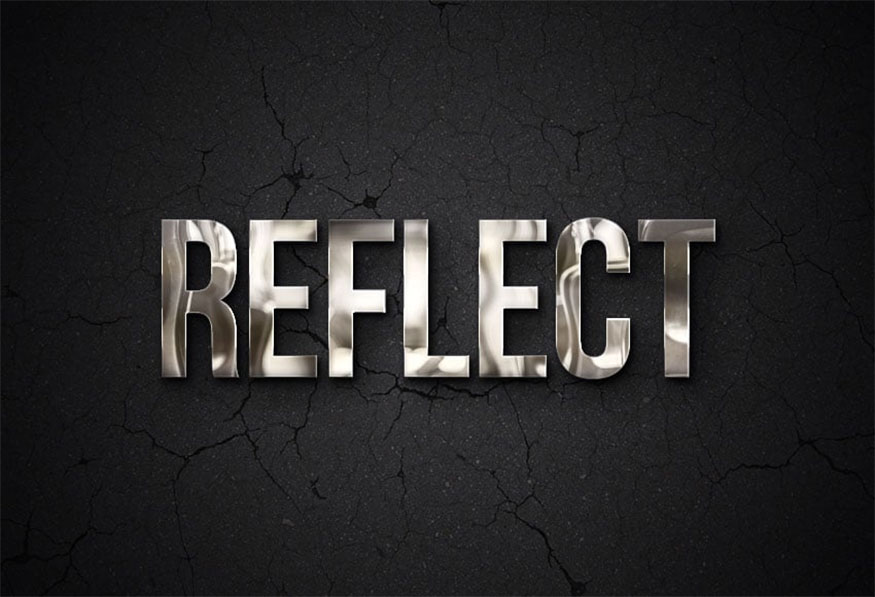
Hopefully the ways to create realistic Chrome text effects in Photoshop that we bring above will be really useful, helping you be successful with your designs.


VIP Products


Best Selling Products
Upgrade Duolingo Super
29 USD
Autodesk All App Account Copyright
120 USD
Capcut Pro 1 Year
39 USD
Adobe Premiere Pro Account
99 USD
MidJourney Account
29 USD
Genuine Cheap Canva Pro
39 USD
Upgrade genuine Capture One account
120 USD
Adobe Photoshop Copyright - Full App
120 USD
ChatGPT Plus Account (GPT-4)
16 USD
Plugin Retouch4me
69 USD
Copyright Adobe Lightroom Account
59 USD
Genuine Adobe Illustrator account
99 USD
Windows 10 & 11 Pro Key
36 USD
Freepik Premium Account
59 USD
Upgrade Genuine Office 365
49 USD