Best Selling Products

Copyright Adobe Lightroom Account
59 USD
Genuine Adobe Illustrator account
99 USD
Genuine Cheap Canva Pro
39 USD
Autodesk All App Account Copyright
120 USD
Plugin Retouch4me
69 USD

Adobe Premiere Pro Account
99 USD
Upgrade Genuine Office 365
49 USD
Upgrade Duolingo Super
29 USD

MidJourney Account
29 USD

Freepik Premium Account
59 USD

ChatGPT Plus Account (GPT-4)
16 USD

Capcut Pro 1 Year
39 USD

Windows 10 & 11 Pro Key
36 USD
Adobe Photoshop Copyright - Full App
120 USD

Upgrade genuine Capture One account
120 USD
A simple guide to grouping objects in Canva, from A to Z.
Nội dung
- 1. What is the Group feature in Canva?
- 2. Instructions on how to group objects in Canva
- 2.1. How to Group Objects in Canva on a Computer
- 2.2. How to Group Components in Canva Using the Layers Panel
- 2.3. How to Group Objects in Canva on a Mobile Phone
- 3. How to Remove Object Groups in Canva
- 4. Common errors when grouping in Canva and how to fix them.
- 5. Tips for using the Group feature in Canva more effectively
- 6. Conclusion
When designing posters, social media posts, or presentation slides in Canva, editing each individual detail can be time-consuming and unintentionally disrupt the layout. To solve this problem, the Group feature helps you link multiple elements into a unified whole, making it easier to move, copy, and arrange your design. In this article, let''s explore how to group objects in Canva on both computers and phones, and discover useful tips for faster and more professional design.
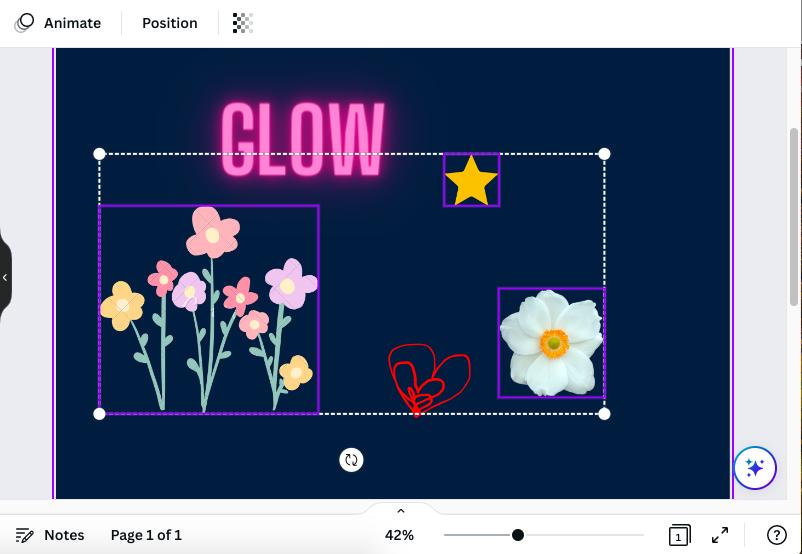
1. What is the Group feature in Canva?
Groups are a feature that allows you to link multiple elements within a design so they function as a single unified object. Instead of selecting each image, text, icon, or shape individually when editing, you simply select the created group to work with them simultaneously. This is a useful tool when designing with many details that need to maintain their relative positions.
Key benefits of the Group feature in Canva:
-
Scientific layout arrangement: Helps manage related elements by group, especially suitable for posters, advertising banners, and infographics.
-
Save editing time: You can move, copy, or resize entire groups without having to re-select each element.
-
Minimize misalignment: Grouped details can move together, helping to maintain the balance of the design.
-
Increased work efficiency: When you need to create multiple versions of a similar design, you can copy the group of elements and adjust the content faster.
-
Easier design management: Dividing details into logical groups helps you better control the layout when designing with multiple layers.
2. Instructions on how to group objects in Canva
Canva supports grouping elements on both computers and phones. Depending on the device you're using, you can select multiple objects with your mouse or manipulate them directly on the touchscreen.
2.1. How to Group Objects in Canva on a Computer
On a computer, you can group elements by dragging and selecting them, using keyboard shortcuts, or selecting each layer individually in the location management panel. Follow these steps:
Step 1: Open the design you want to edit.
Access Canva on your browser or desktop application, then open the design containing the elements you want to group. You can apply this method to many types of designs such as Facebook posts, posters, invitations, presentation slides, or banners.
Step 2: Select the components to group.
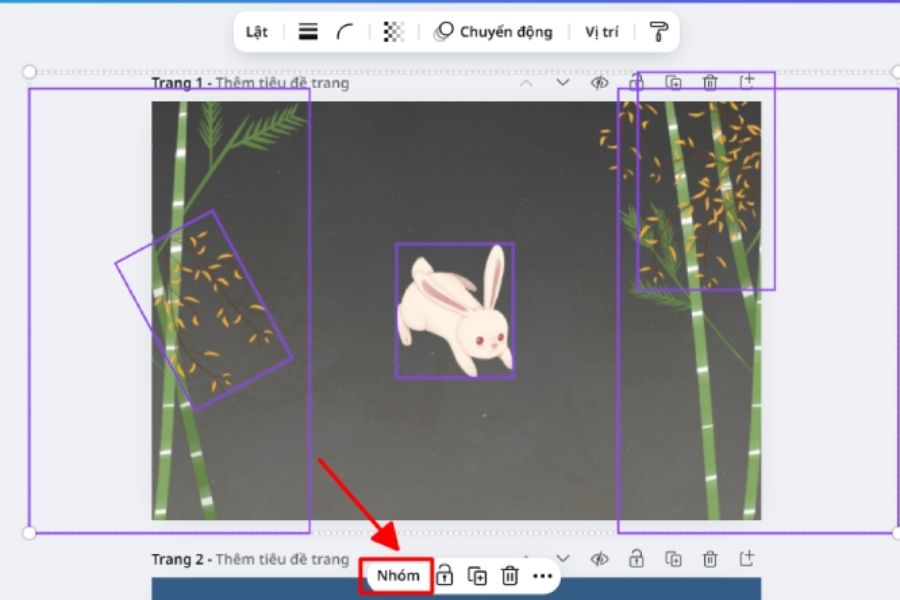
There are two common ways to select multiple objects within the same design:
-
Method 1: Press and hold the mouse button and drag the selection area around the elements you want to group. This method is suitable when the details are close together and not mixed with other objects.
-
Method 2: Hold down the Shift key and then click on each object you want to select one by one. This method is useful when the elements are far apart or you only want to group certain details.
Step 3: Click on Groups to complete.
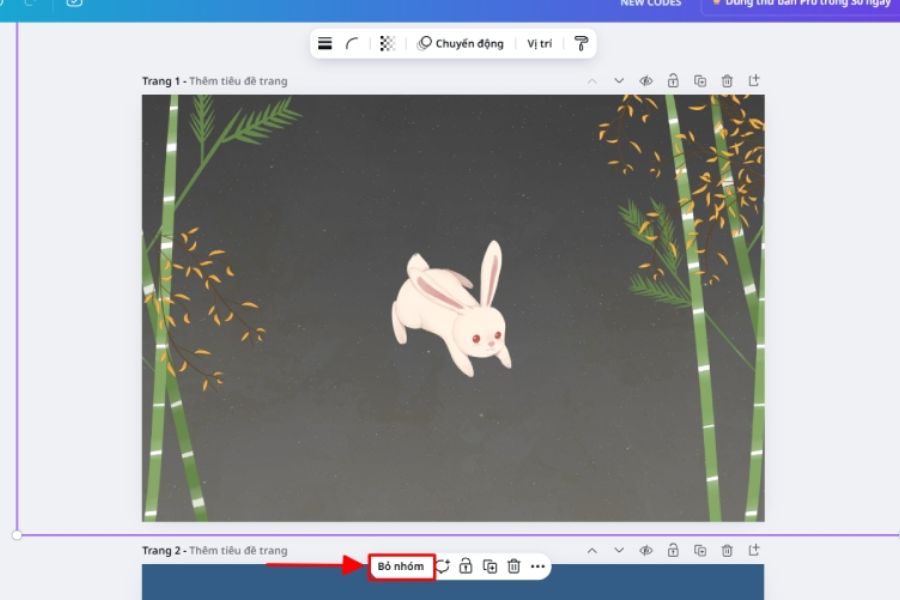
After selecting all the elements, find the Group button on the toolbar at the top or in the options menu that appears when you right-click. Click on it to group the selected objects together.
If you want to use keyboard shortcuts, you can try Ctrl + G on Windows or Command + G on Mac after selecting the elements. The shortcuts may vary depending on the interface or version of Canva.
Step 4: Check the newly created group.
Try clicking on the group and dragging it to a different location to check if the elements move together. You can also resize or copy the group to rearrange the design as needed.
2.2. How to Group Components in Canva Using the Layers Panel
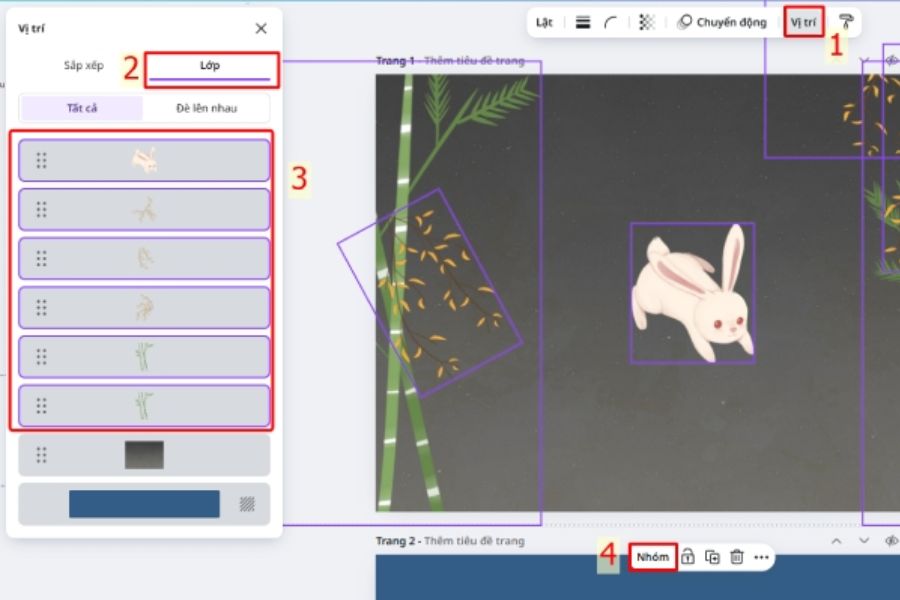
If your design has many overlapping details, dragging and selecting directly can sometimes lead to selecting the wrong object. In this case, the Layers panel in the Position area will help you work more accurately.
The steps are as follows:
-
Step 1: Open Canva Design and find the Position option on the toolbar.
-
Step 2: Go to the Layers section if this option is available in the interface you are using.
-
Step 3: Hold down the Ctrl key on Windows or the Command key on Mac, then select the layers you want to group one by one.
-
Step 4: Right-click or use the Group button on the toolbar to complete.
This method is especially useful when designing infographics, diagrams, or banners with multiple layers of images, text, and icons. Choosing the right layers helps prevent accidentally grouping backgrounds or unrelated details together.
2.3. How to Group Objects in Canva on a Mobile Phone
With Canva on your phone, you can still group multiple elements directly on the touchscreen without switching to a computer. However, the placement of the buttons may vary depending on the app version and operating system.
Step 1: Open the design in the Canva application.
Launch Canva on your phone, log in to your account, and select the design you want to edit. Zoom in on the area you need to work with if the details are close together, to help you select the precise object.
Step 2: Select the first object
Tap on an element in the design, such as an image, text, or icon. When the toolbar appears, look for the Select multiple option if the interface offers this feature.
Step 3: Select additional elements to group.
Tap on the objects you want to link one by one. Double-check the selected elements to avoid missing details or accidentally selecting an adjacent element.
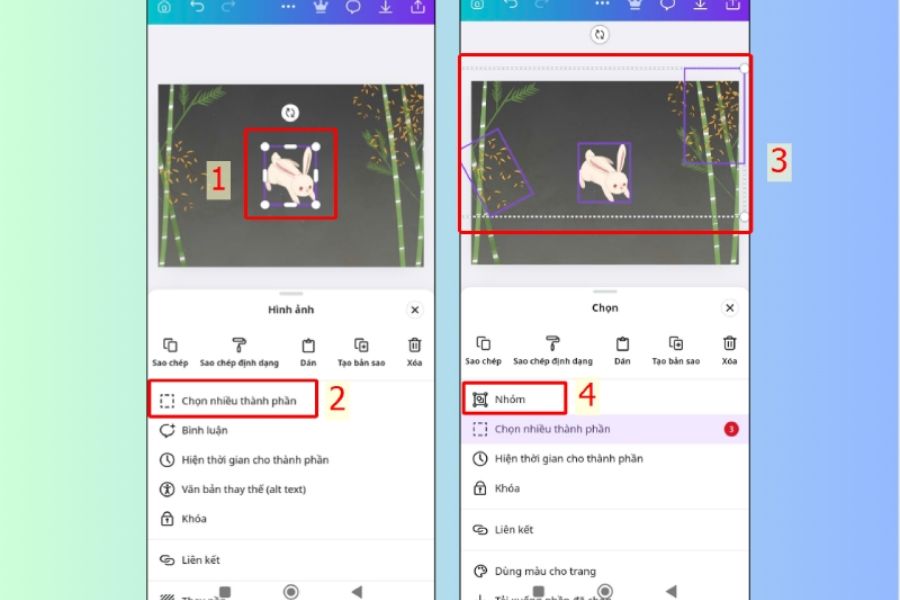
Step 4: Click Group
After making your selections, find the Group button on the toolbar or in the options menu. Tap it to group the elements together. If you don't see this button, check the three-dot menu or the additional toolbar.
Step 5: Check and adjust
Try dragging the group to a different location to check the result. If the elements move together, the operation is complete. When you want to edit a detail individually, you can open the group or use the Ungroup option if needed.
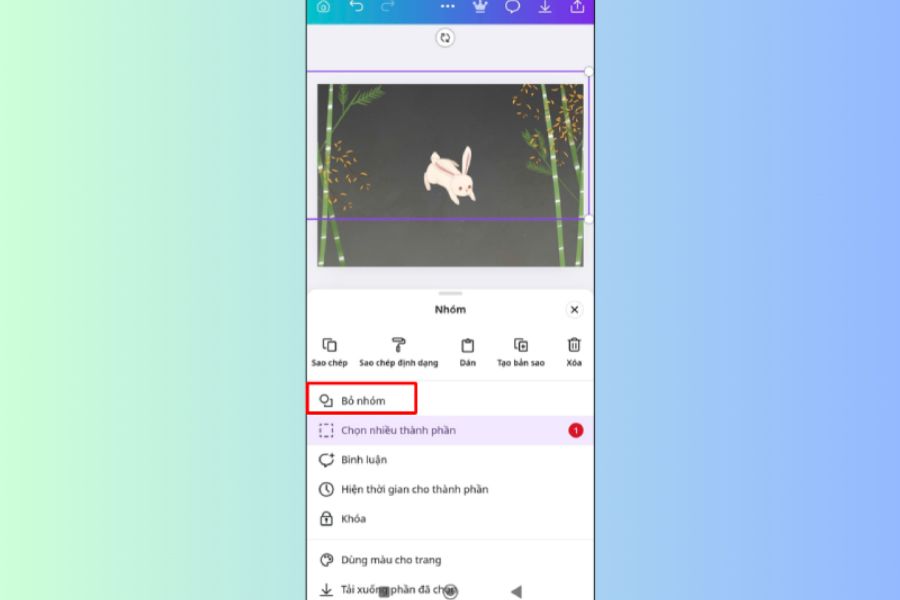
3. How to Remove Object Groups in Canva
During the design process, you might need to edit a single image, change text content, or move an icon without affecting other elements. In such cases, the Ungroup feature will help separate linked objects into individual states.
How to remove a group on a computer:
-
Step 1: Click on the group of objects you want to separate.
-
Step 2: Find the Ungroup button on the toolbar or in the right-click menu.
-
Step 3: Click "Ungroup" to separate the components.
-
Step 4: Select each object individually to edit as needed.
How to leave a group on your phone:
-
Step 1: Tap on the created group.
-
Step 2: Find the "Ungroup" option on the toolbar or in the expanded menu.
-
Step 3: Tap to confirm the action and edit each element.
Note that ungrouping does not mean deleting the object. The elements remain in the design, but you can move and edit them independently. If a group contains subgroups inside, you may need to ungroup again for deeper separation.
4. Common errors when grouping in Canva and how to fix them.
Although grouping is quite simple, you may sometimes encounter situations where you can't see the Group button or select the desired elements. Below are some common problems and how to resolve them.
-
The Group button is missing: Check if you have selected at least two compatible objects. If you only select one element, Canva usually won't display the group option.
-
Accidentally selecting multiple objects: Try selecting each element individually using the Shift key on your computer or use the Multiple Selection feature on your phone instead of dragging the selection area.
-
Unable to select an element: The object may be locked or in a different group. Please check the lock status and try unlocking the group before proceeding.
-
Details are misaligned after resizing: Recheck the position, proportions, and spacing between components. If a single detail needs adjustment, ungroup it and realign it.
-
Layers panel not found: Canva interface may vary depending on device and version. Please look for the Position section or options menu related to layer arrangement.
If you still can't work, you can try reloading the design, updating the Canva app, or opening the design in a computer browser to check.
5. Tips for using the Group feature in Canva more effectively
To effectively utilize grouping features, you should combine this with layout planning and element management from the outset. A few small habits can help make the design process faster and more streamlined.
-
Group related elements: For example, combine a title with a decorative icon or group images with a caption for easy navigation.
-
Pre-group alignment: Check the spacing, size, and position of the details before grouping to ensure a balanced composition.
-
Name the groups if the interface supports it: With complex designs, clear group names help you identify each area more quickly.
-
Duplicate the group for reuse: When you need to create multiple banners with a similar layout, you can duplicate the group and then change the images or content.
-
Avoid grouping entire designs arbitrarily: Only link the elements that need to be moved or edited together. This gives you more flexibility when you need to change the layout.
-
Combined with the Lock feature: If you've completed a group and don't want to accidentally move it, you can lock the group when this option is supported.
6. Conclusion
Canva's Group feature is a useful tool for managing design elements neatly, making quick edits, and minimizing unwanted layout errors. With just a few taps to select objects and click Group, you can work on multiple details simultaneously on both your computer and phone. Apply this feature when designing posters, banners, social media posts, or presentation slides to optimize your workflow and create more polished products.















VIP Products




Best Selling Products
Copyright Adobe Lightroom Account
59 USD
Genuine Adobe Illustrator account
99 USD
Genuine Cheap Canva Pro
39 USD
Autodesk All App Account Copyright
120 USD
Plugin Retouch4me
69 USD
Adobe Premiere Pro Account
99 USD
Upgrade Genuine Office 365
49 USD
Upgrade Duolingo Super
29 USD
MidJourney Account
29 USD
Freepik Premium Account
59 USD
ChatGPT Plus Account (GPT-4)
16 USD
Capcut Pro 1 Year
39 USD
Windows 10 & 11 Pro Key
36 USD
Adobe Photoshop Copyright - Full App
120 USD
Upgrade genuine Capture One account
120 USD