Best Selling Products

Adobe Premiere Pro Account
99 USD

Copyright Adobe Lightroom Account
59 USD
Upgrade Duolingo Super
29 USD
ChatGPT Plus Account (GPT-4)
16 USD
Genuine Adobe Illustrator account
99 USD
Freepik Premium Account
59 USD
Windows 10 & 11 Pro Key
36 USD
Plugin Retouch4me
69 USD
Upgrade Genuine Office 365
49 USD
Upgrade genuine Capture One account
120 USD

Capcut Pro 1 Year
39 USD
Adobe Photoshop Copyright - Full App
120 USD
Autodesk All App Account Copyright
120 USD

MidJourney Account
29 USD
Genuine Cheap Canva Pro
39 USD
A step-by-step guide on how to integrate ChatGPT into your website.
Nội dung
- 1. What are the benefits of integrating ChatGPT into a website?
- 2. Preparation before integrating ChatGPT into your website
- 3. Three detailed ways to integrate ChatGPT into your website.
- 3.1. Rapid integration with Chatbase using no-code tools.
- 3.2. Integrating ChatGPT into a WordPress website using a plugin
- 3.3. Direct integration using OpenAI API
- 4. Important considerations when integrating ChatGPT into a website
- 5. Conclusion
ChatGPT is becoming a useful tool to help businesses improve customer service and optimize website operations. Instead of letting visitors search for information themselves or wait for staff assistance, you can integrate an AI chatbot to automatically answer questions, introduce products, and support customers at any time. Especially with the support of no-code platforms, integrating ChatGPT into your website has become simpler, even if you don''t have in-depth programming knowledge. In this article, let''s explore with Sadesign how to integrate ChatGPT into your website in detail from A to Z, helping you easily implement and use it effectively.
1. What are the benefits of integrating ChatGPT into a website?
Integrating ChatGPT into a website is a solution that applies artificial intelligence to build a chatbot system capable of interacting with and responding to user questions. Instead of just providing information in static text format, the website can chat directly with visitors, helping them find content and resolve common issues. This is a suitable option for businesses that want to improve service quality without significantly increasing staff. Some notable benefits of integrating ChatGPT into a website include:
-
Automated customer consultation: Chatbots can answer questions about products, services, pricing, and company policies based on provided data.
-
24/7 Customer Support: Users can ask questions and receive responses even outside of business hours, on weekends, or holidays.
-
Saves operational time: Employees reduce the workload of answering repetitive questions, allowing them to focus on more important tasks.
-
Improved user experience: Visitors can easily find the information they need without spending a lot of time searching the website.
-
Support for increased conversion rates: Chatbots can introduce products, advise on choices, and answer questions before customers make a purchase decision.
2. Preparation before integrating ChatGPT into your website
Before deploying an AI chatbot to your website, you need to define its purpose and prepare the appropriate tools. This will ensure a smooth installation process, minimize errors, and avoid wasting budget on unnecessary features. Below are some important factors you should prepare:
-
Live website: Identify the platform your website is using, such as WordPress, Shopify, or a custom-designed website. Also, ensure you have administrator privileges to install plugins or edit the source code when needed.
-
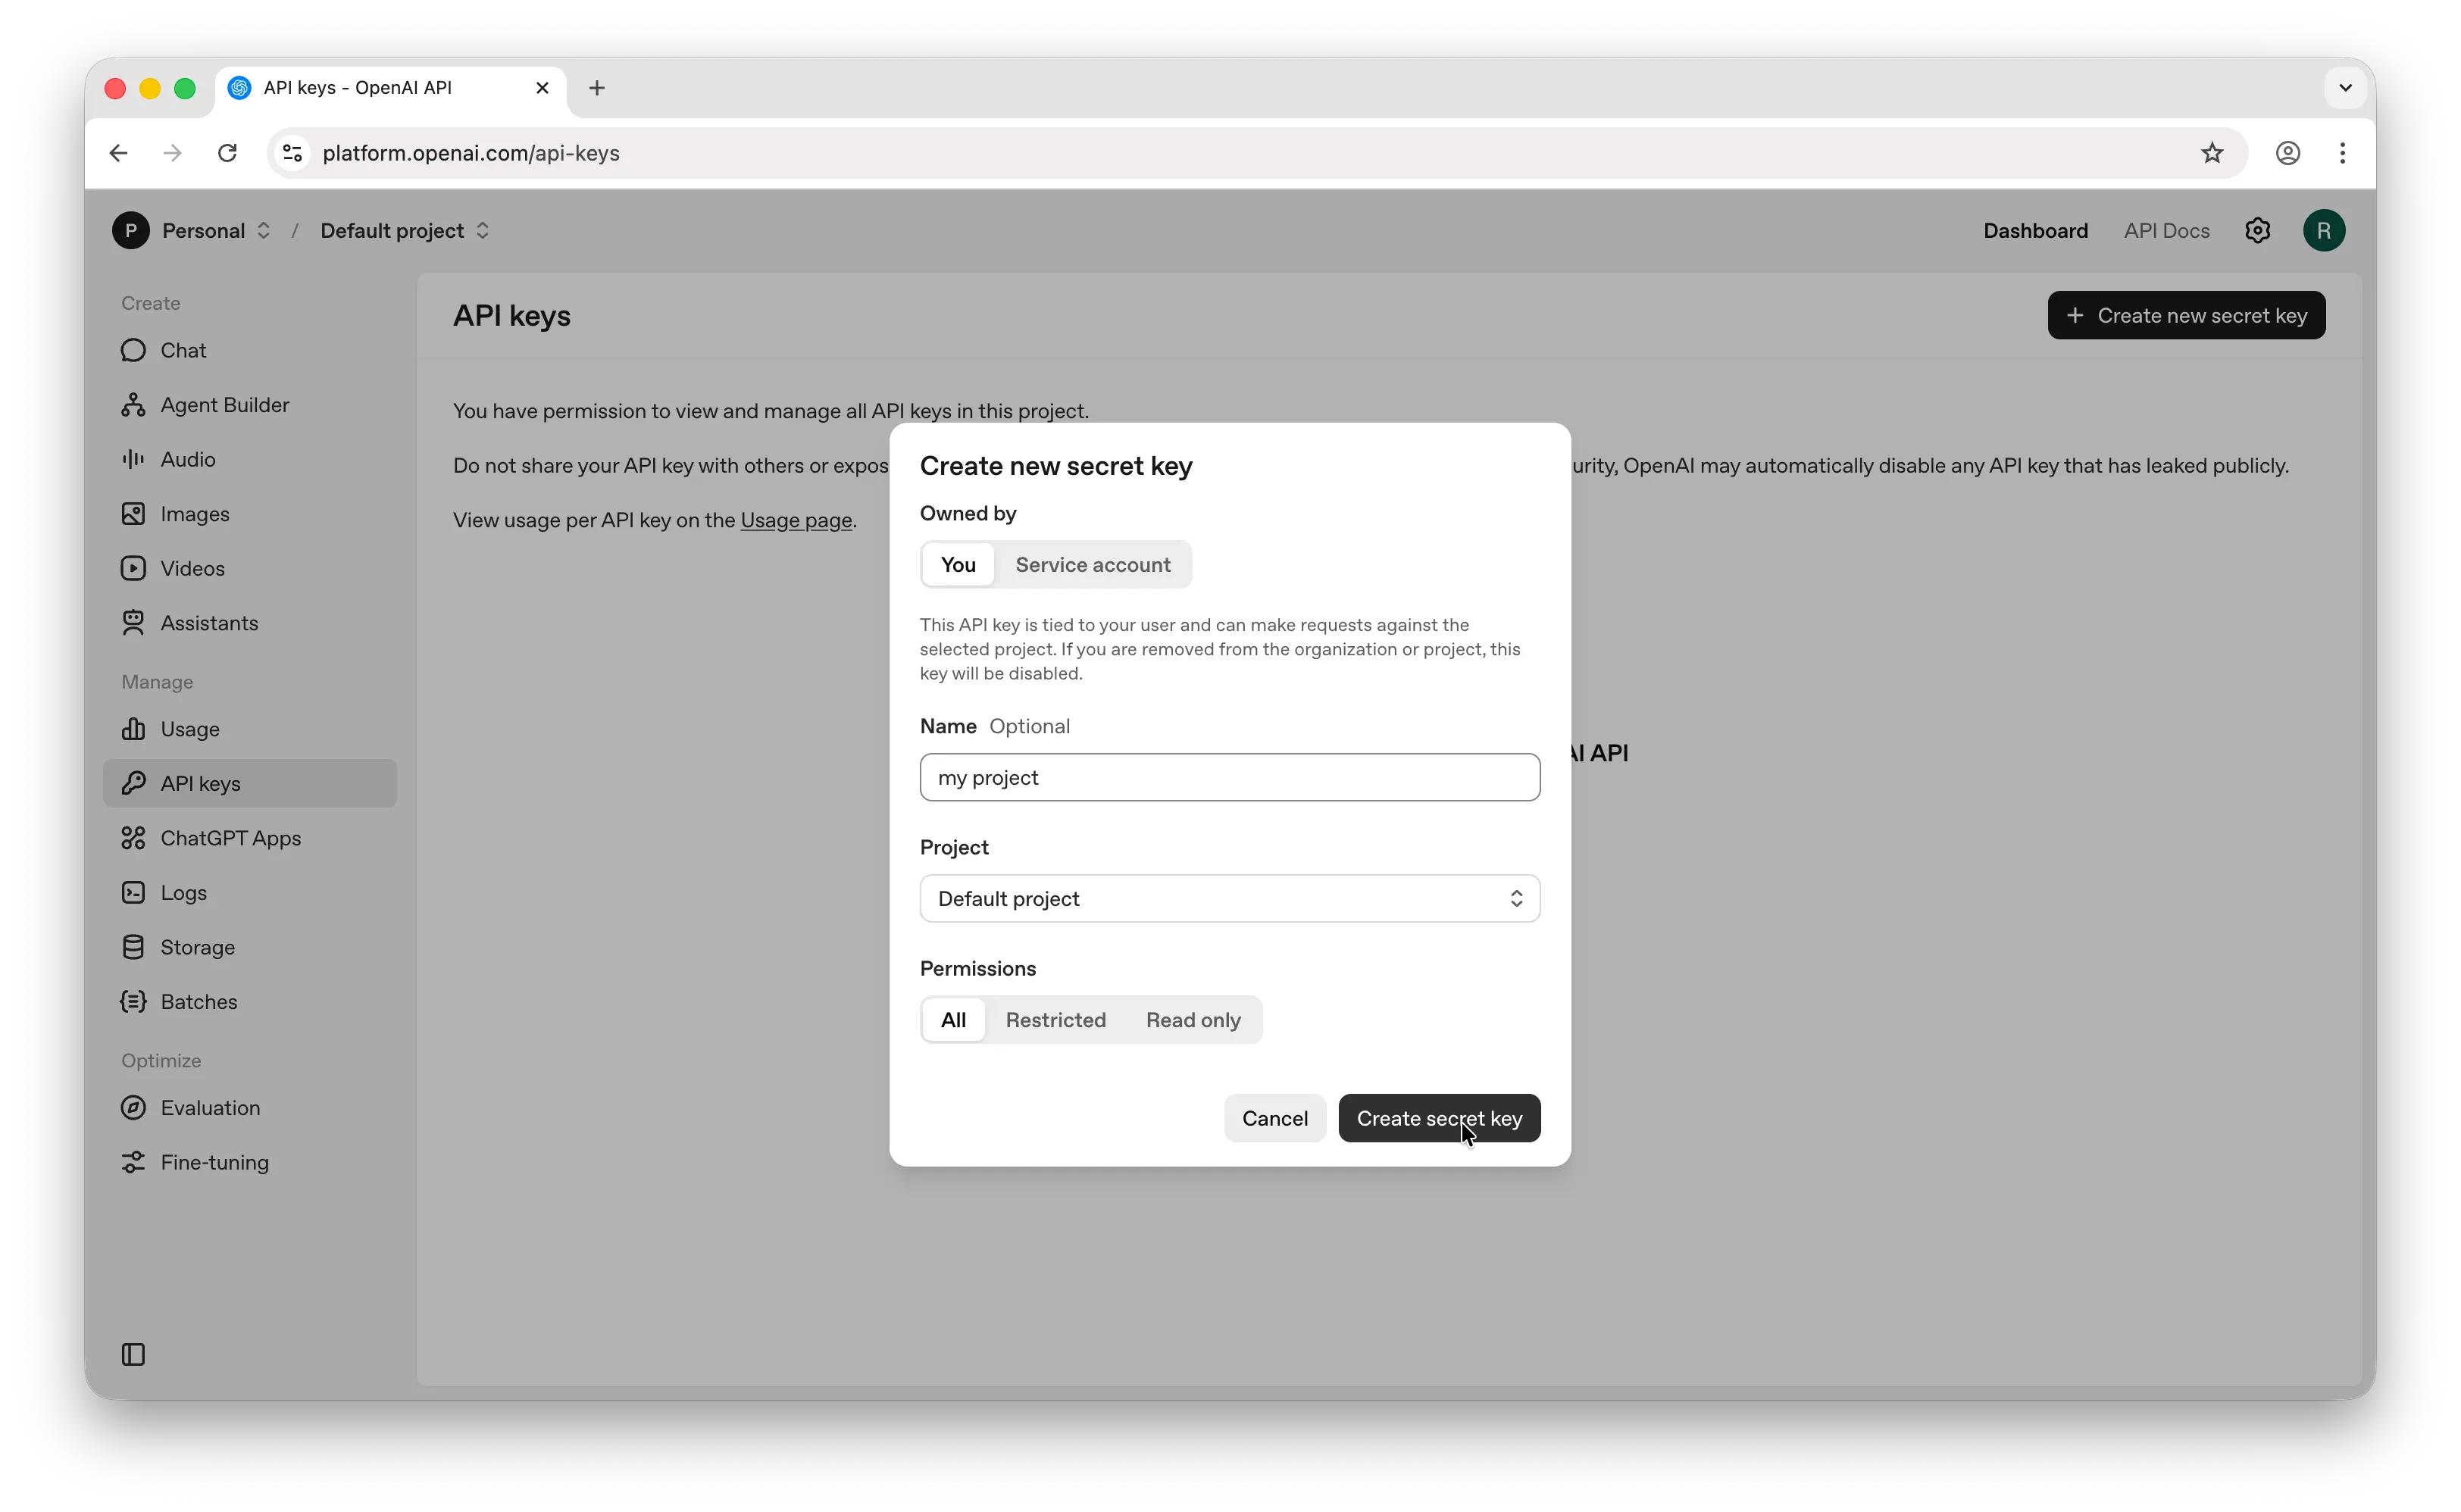
OpenAI Account: Register for an account on the OpenAI Platform if you want to connect directly to AI models via API.
-
API Key: Creates an access key that allows the website to send requests to the OpenAI API. This is important information that needs to be stored securely and not shared publicly.
-
Budget: Estimate the costs of using APIs, hosting, chatbot services, or additional features during operation.
-
Consultation content: Prepare product and service information, price lists, sales policies, and frequently asked questions to provide the chatbot with reference data.
3. Three detailed ways to integrate ChatGPT into your website.
3.1. Rapid integration with Chatbase using no-code tools.
Step 1: Access the Chatbase
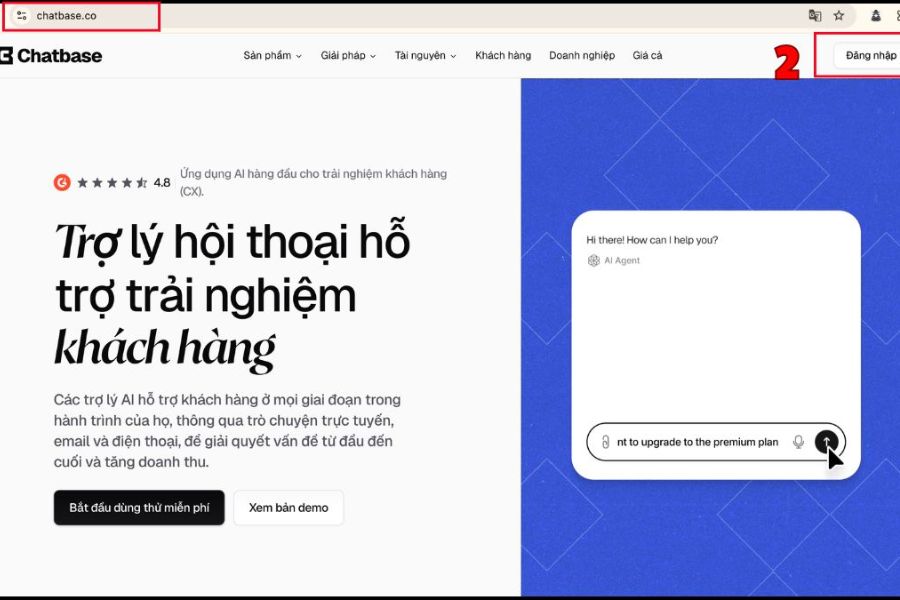
First, open your browser and access the official Chatbase website at https://www.chatbase.co/ . On the homepage, find and click Log in if you already have an account or Sign up to register a new account. After completion, the system will take you to the management area to start creating an AI chatbot for your website.
Step 2: Log in to your Chatbase account
After selecting login, Chatbase will display the supported authentication methods. Choose the appropriate method and follow the on-screen instructions to access your account. Once successfully logged in, the system will take you to the main working interface, where you can manage chatbots, monitor activity, and configure necessary features.
Step 3: Create a new AI chatbot
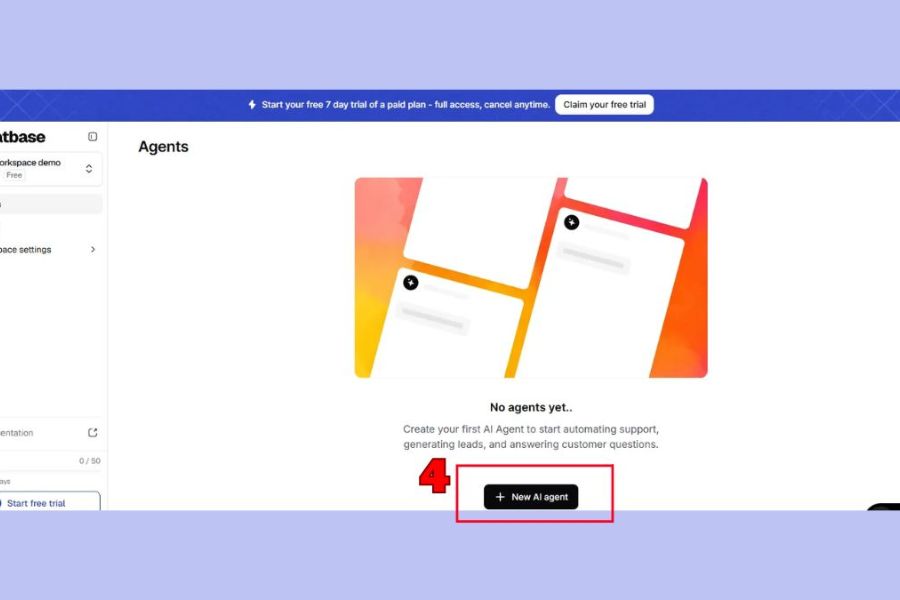
In the Agents dashboard, find and click on New AI Agent to begin creating a new chatbot. This is the initial step in setting up the AI assistant that will be used on your website. Choose a chatbot name that suits its purpose, such as product consultation, customer support, or service information answering, for easier management later.
Step 4: Choose the data source for the chatbot.
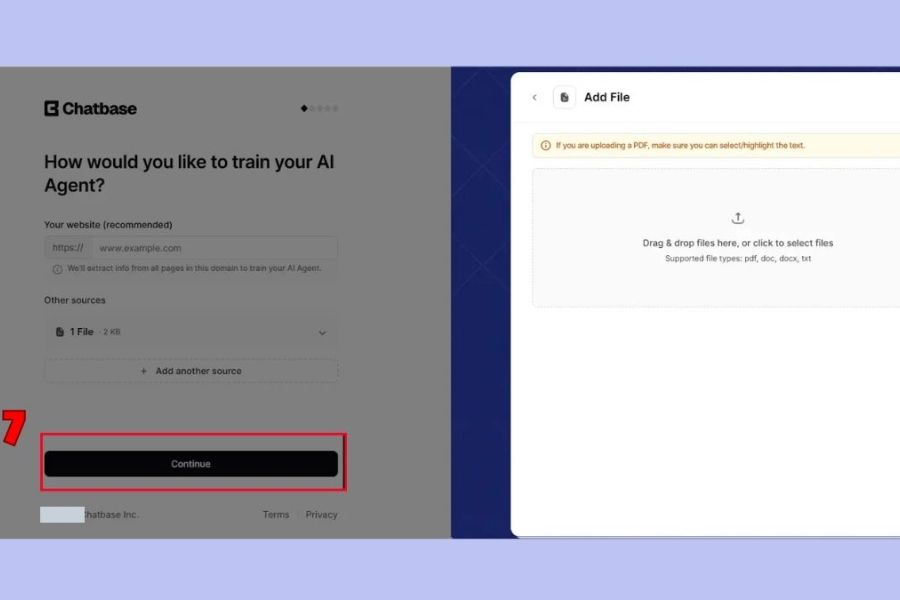
After creating the AI agent, you need to provide data so the chatbot has a basis for reference and can provide appropriate answers. The chatbot supports retrieving information directly from websites or uploading documents through the "Other Sources" section, then selecting "File". You can use formats such as PDF, DOC, DOCX, or TXT to add content about your business, products, price list, and sales policies. Prioritize documents with clear and accurate information to improve the quality of the AI's responses.
Step 5: Confirm uploaded data
Once you've added the website link or uploaded the document, double-check the data source to ensure the system has recorded all the necessary information. Then, click Continue to move to the next setup step. You should carefully review the content before proceeding to avoid situations where the chatbot lacks information or provides inaccurate answers when customers ask questions.
Step 6: Choose the Chat Bubble display format.
In the next step, Chatbase will ask you to choose how you want to deploy the chatbot on your website. Choose Chat Bubble if you want the AI assistant to appear as a floating chat icon in the corner of the screen. This is a fairly common display style, making it easy for visitors to recognize and open the chat window when they need support without significantly affecting the website layout. Then, click Continue to proceed.
Step 7: Choose a suitable package.
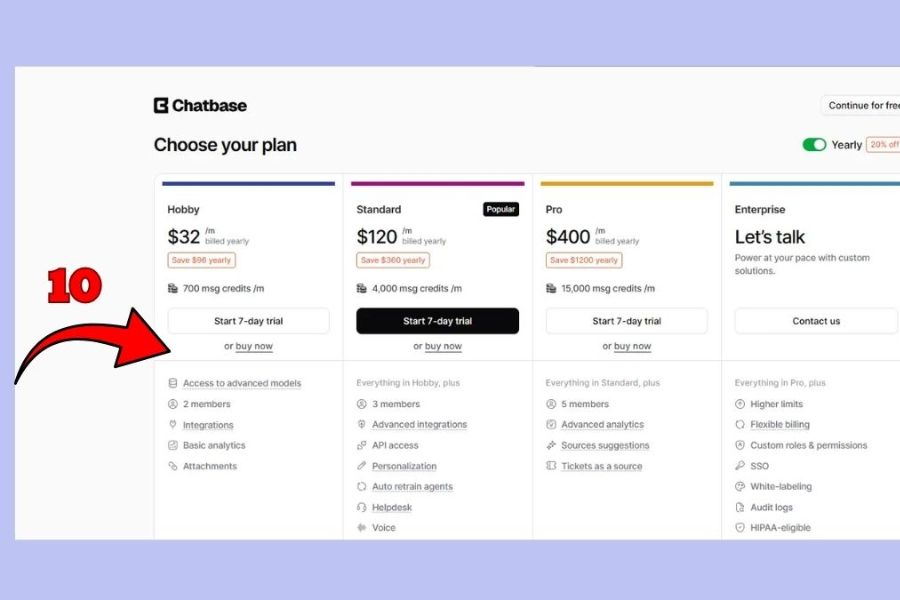
Next, the system will display service packages for you to choose from. Each package may come with different limitations and features regarding the number of messages, data capacity, or chatbot customization options. Consider your actual usage needs and available budget to choose the right option. If you're just starting out, you can prioritize the basic package to experience it before deciding to upgrade.
Step 8: Test and customize the chatbot
After completing the setup steps, access Playground to test the chatbot's functionality. Confirm that the training status is complete (Trained), then try asking questions related to the website content to assess its responsiveness. Here, you can also adjust the AI's role, tone, language, and responses to match your brand style and customer needs.
Step 9: Deploy the chatbot to your website.
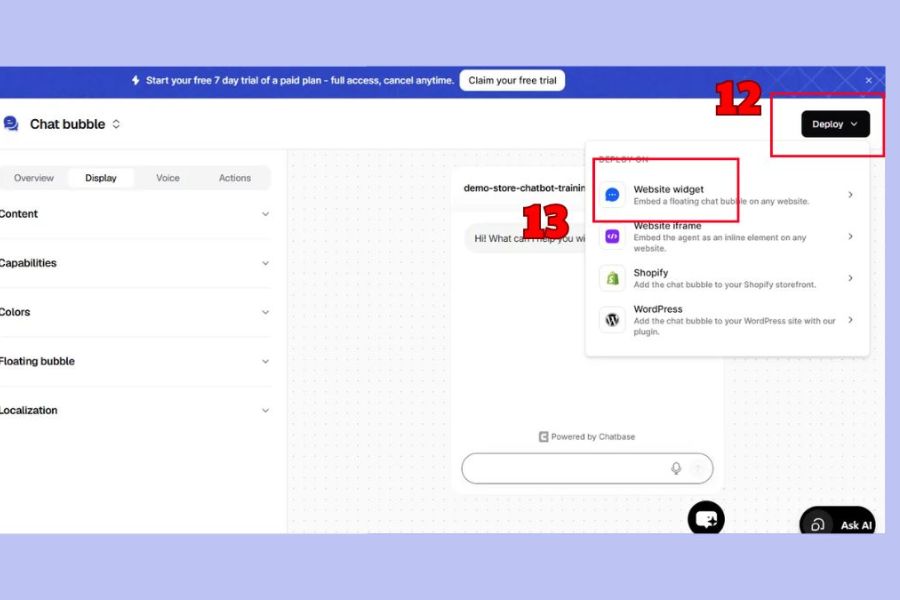
Once you've tested and confirmed the chatbot is working properly, click Deploy to begin deployment. Next, access the Website Widget section to set up the chat widget on your website. On this interface, check the Chat Bubble display option and enable it if it's currently disabled. You can also customize elements such as colors, icons, and greetings to ensure the chatbot's appearance harmonizes with your website's overall design.
Step 10: Copy the embed code and complete the integration.
Finally, in the Widget Setup section, find and copy the embed code provided by Chatbase. Next, access your website's admin page, open the area that allows you to edit HTML or add JavaScript code, and paste the code into the appropriate location as instructed by the platform. After saving the changes, revisit the website to check if the chatbot icon has appeared. You should send a few test messages to confirm that the system can receive and answer questions normally before officially launching the chatbot.
3.2. Integrating ChatGPT into a WordPress website using a plugin
If your website is built on WordPress, using an AI chatbot plugin is a convenient way to save setup time. Instead of building a chat system from scratch, you can leverage existing tools to connect with AI and customize the interface directly in the admin panel. This method is suitable for beginners or website owners with limited programming experience. The basic steps include:
-
Step 1: Log in to your WordPress admin panel using an account that has permission to install plugins.
-
Step 2: Select Plugins, then click Add New Plugin to find the AI chatbot add-on.
-
Step 3: Enter the keywords AI Chatbot or ChatGPT into the search bar to find a suitable plugin.
-
Step 4: Check the plugin's reviews, compatibility, and update schedule before clicking Install Now.
-
Step 5: Select Activate to enable the extension after the installation is complete.
-
Step 6: Access the plugin settings and enter the API Key if the tool requires an OpenAI API connection.
-
Step 7: Customize the chatbot name, greeting, language, interface, and consultation content according to your needs.
-
Step 8: Save the settings, access the website, and submit a test question to check its functionality.
3.3. Direct integration using OpenAI API
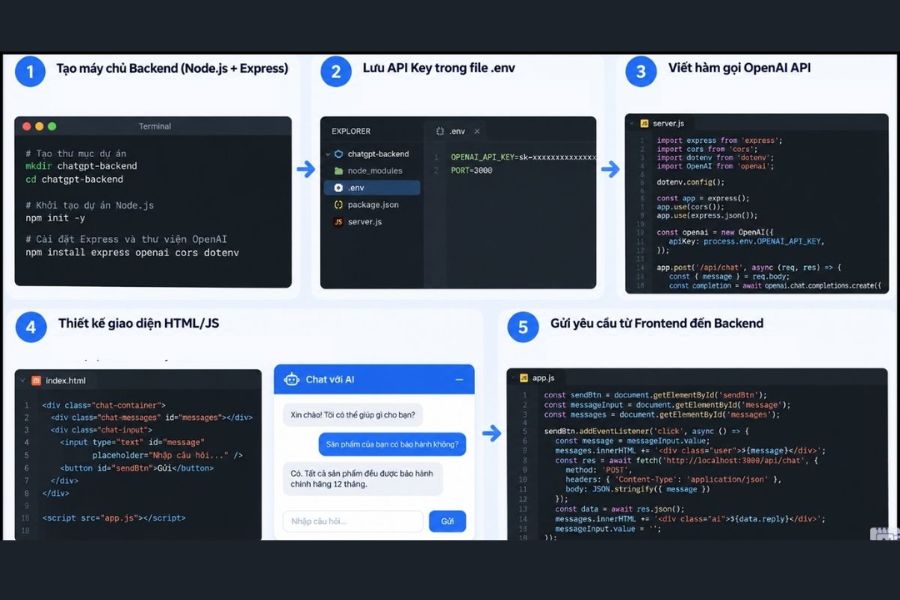
For custom-designed websites or those with a team of developers, connecting directly via the OpenAI API offers flexible customization options. This allows businesses to proactively build chatbot interfaces, configure question handling, and connect the AI to internal data systems. However, this method requires programming knowledge and better security management capabilities. The basic integration process includes:
-
Step 1: Access the OpenAI Platform, log in to your account, and set up API payment information if needed.
-
Step 2: Create the API Key in the access key management area and store it securely.
-
Step 3: Build the chatbot interface using HTML, CSS, and JavaScript so that users can enter questions and see responses.
-
Step 4: Set up the backend using a suitable programming language such as Python, PHP, or Node.js to receive requests from the website.
-
Step 5: From the backend, send a request to the OpenAI API via the API Key and select the appropriate AI model.
-
Step 6: Receive the returned results, process the content, and display the answer in the website's chat window.
-
Step 7: Test responsiveness, handle errors, limit the number of requests, and implement security mechanisms before deployment.
4. Important considerations when integrating ChatGPT into a website
After completing the installation process, you shouldn't rush to deploy the chatbot without thorough testing. An effective AI system requires accurate data, stable responsiveness, and mechanisms to protect user information. Below are some tips to help you operate your chatbot more effectively:
-
Regularly update data: When your business changes prices, policies, or product catalogs, update the data source so the chatbot doesn't provide outdated information.
-
Check for accuracy: Regularly ask test questions to detect instances where the chatbot answers incorrectly, provides incomplete information, or misunderstands the request.
-
Information security: We do not share API keys publicly and limit the collection of unnecessary personal data from customers.
-
Set usage limits: Monitor API requests, set budgets, and limit access accordingly to control costs.
-
Add a direct support option: For complex questions or when the chatbot cannot resolve the issue, provide contact information so customers can connect with a staff member.
-
Optimize the mobile experience: Check the chat box size, display position, and usability on mobile devices to avoid obscuring website content.
5. Conclusion
Integrating ChatGPT into your website is a useful solution that helps businesses automate customer service, enhance customer experience, and save operational time. Depending on your needs, you can choose a no-code platform like Chatbase, use a WordPress plugin, or connect directly via the OpenAI API. If you're just starting out, prioritize a simple method, prepare sufficient data, and thoroughly test before official deployment. Hopefully, with the above guide, you can easily integrate ChatGPT into your website and effectively leverage the power of AI in your business operations.











VIP Products




Best Selling Products
Adobe Premiere Pro Account
99 USD
Copyright Adobe Lightroom Account
59 USD
Upgrade Duolingo Super
29 USD
ChatGPT Plus Account (GPT-4)
16 USD
Genuine Adobe Illustrator account
99 USD
Freepik Premium Account
59 USD
Windows 10 & 11 Pro Key
36 USD
Plugin Retouch4me
69 USD
Upgrade Genuine Office 365
49 USD
Upgrade genuine Capture One account
120 USD
Capcut Pro 1 Year
39 USD
Adobe Photoshop Copyright - Full App
120 USD
Autodesk All App Account Copyright
120 USD
MidJourney Account
29 USD
Genuine Cheap Canva Pro
39 USD