Best Selling Products

Copyright Adobe Lightroom Account
59 USD

Plugin Retouch4me
69 USD

Upgrade Genuine Office 365
49 USD

Genuine Adobe Illustrator account
99 USD

Capcut Pro 1 Year
39 USD

ChatGPT Plus Account (GPT-4)
16 USD

Freepik Premium Account
59 USD

Adobe Premiere Pro Account
99 USD

Autodesk All App Account Copyright
120 USD

Genuine Cheap Canva Pro
39 USD

Adobe Photoshop Copyright - Full App
120 USD

MidJourney Account
29 USD

Windows 10 & 11 Pro Key
36 USD

Upgrade Duolingo Super
29 USD

Upgrade genuine Capture One account
120 USD
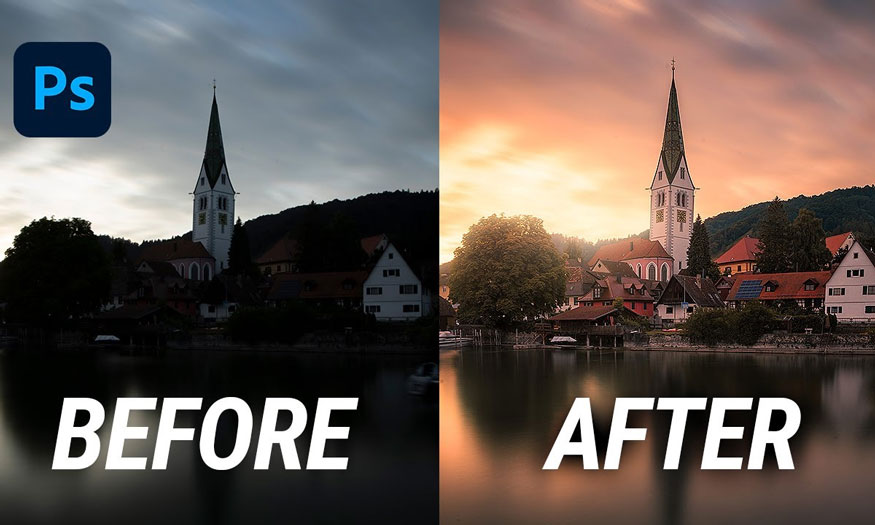
How to adjust sunset color in Photoshop
You want a sunset photo with bright sunlight but your phone or camera can't capture the scene? Don't worry, just a few Photoshop operations can help you get a beautiful warm sunset-tinged photo. Let's see how to adjust sunset color in Photoshop with Sadesign right below.

You want a sunset photo with bright sunlight but your phone or camera can't capture the scene? Don't worry, just a few Photoshop operations can help you get a beautiful warm sunset-tinged photo. Let's see how to adjust sunset color in Photoshop with Sadesign right below.
1. How to color correct sunsets in Photoshop
There are many ways to adjust sunset color in Photoshop, but the most popular and simple is probably using Color Balance in Adjustment Layer. Adjustment Layer is often used to adjust the color and tone of an image, allowing users to easily modify, mask or delete. Color Balance is the balance of color tones in an image. Therefore, using Color Balance in Adjustment Layer to adjust sunset color in Photoshop is used by many people.
The steps to color adjust the sunset in Photoshop can be done as follows:
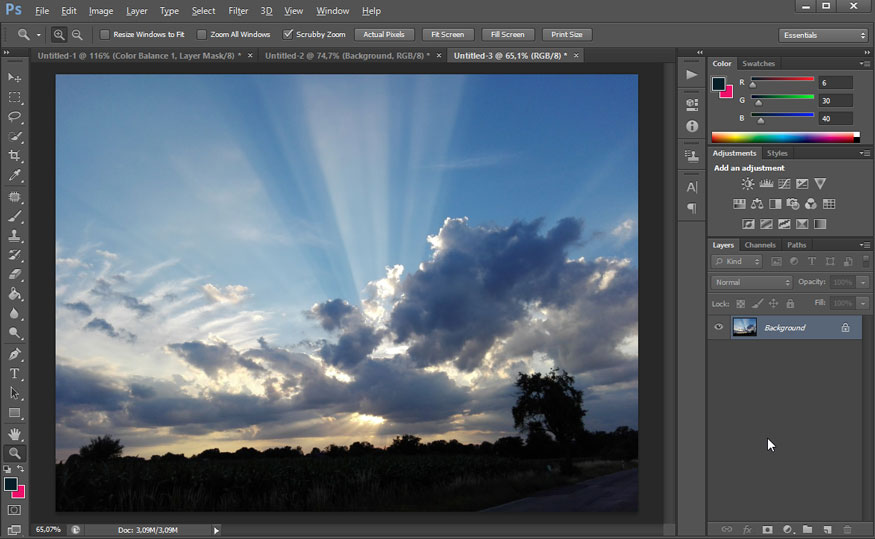
Step 1: First we need to upload the photo we want to color adjust the sunset in Photoshop. On the menu bar, select File => Open => select the photo you want to color correct => Open.
Or you can press the keyboard shortcut Ctrl+O then select the photo and press Open.
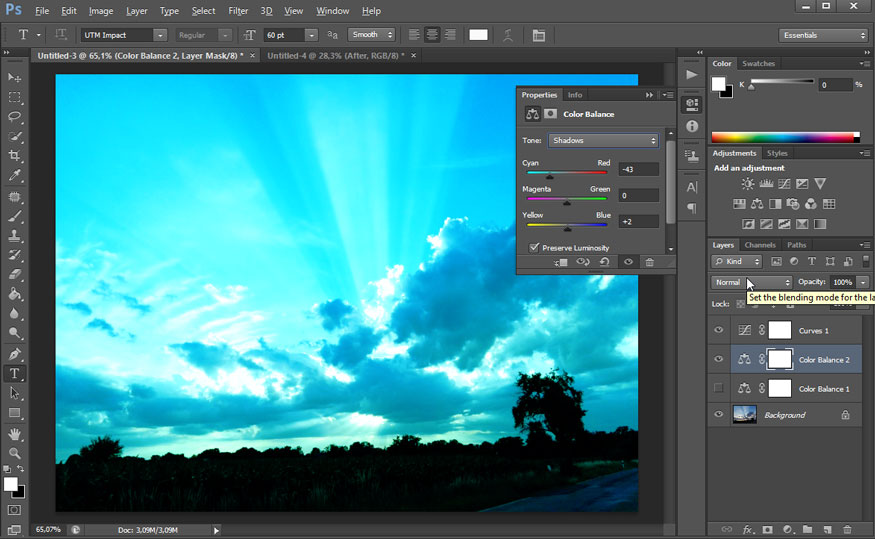
Step 2: Now we need to create an Adjustment Layer. At the circle icon in the bottom right corner of the screen, click and select Color Balance. Color Balance will help us change the color mixture in the image, helping to increase or decrease the color channels in the image.
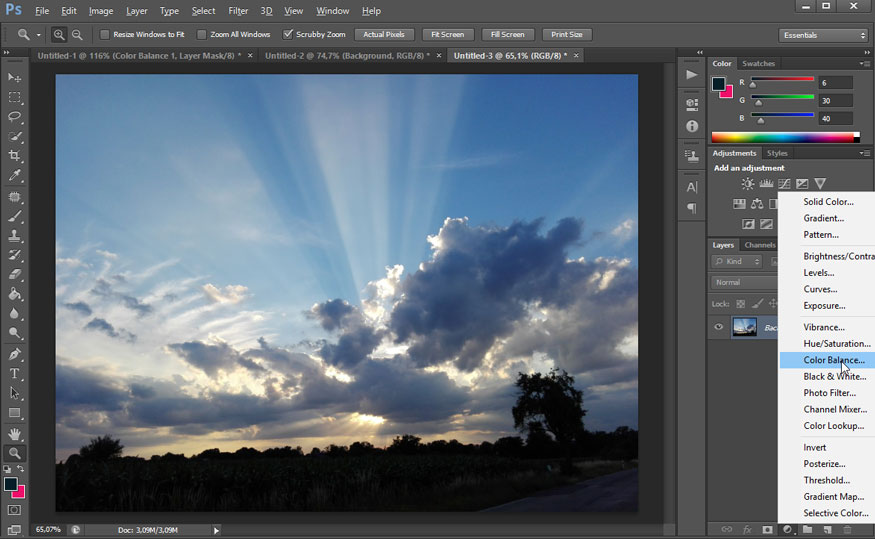
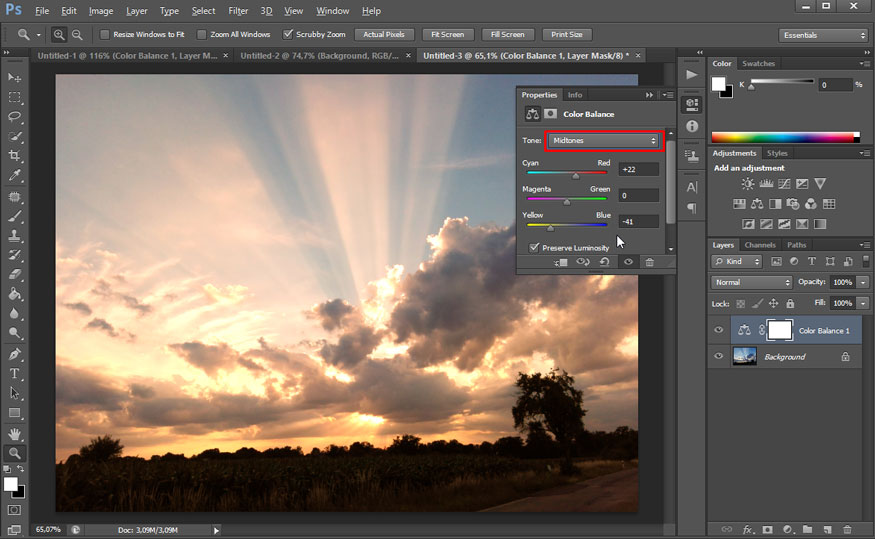
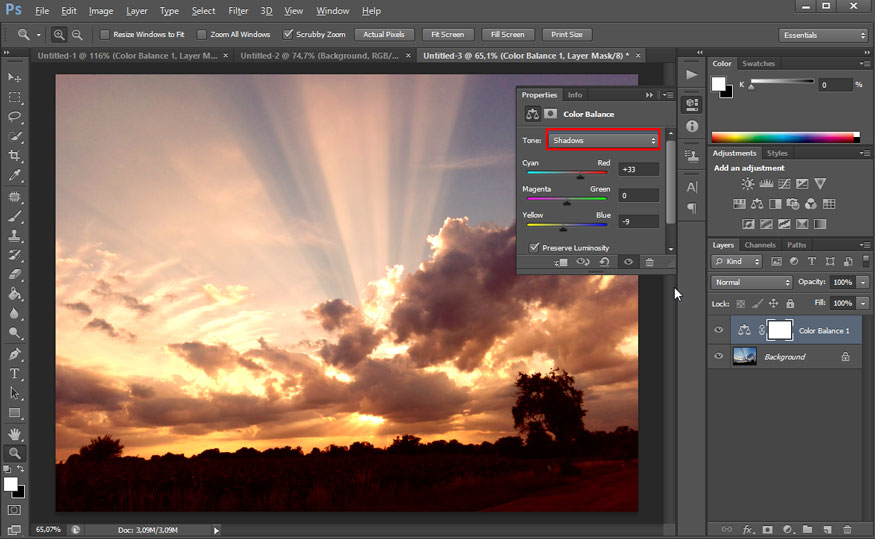
Step 3: In Color Balance, there are 3 tones available for us: Shadows, Midtones and Highlights. We will adjust the parameters of each region in turn. Note, adjust and observe to get the most suitable image color.
- Highlights are bright areas: Sunset colors tend to be warm tones, so we need to adjust the reds and tone down the yellows a bit. Usually we will only need to care about the first and last two parameters, and the middle parameter does not affect the image color much, so there is no need to adjust.
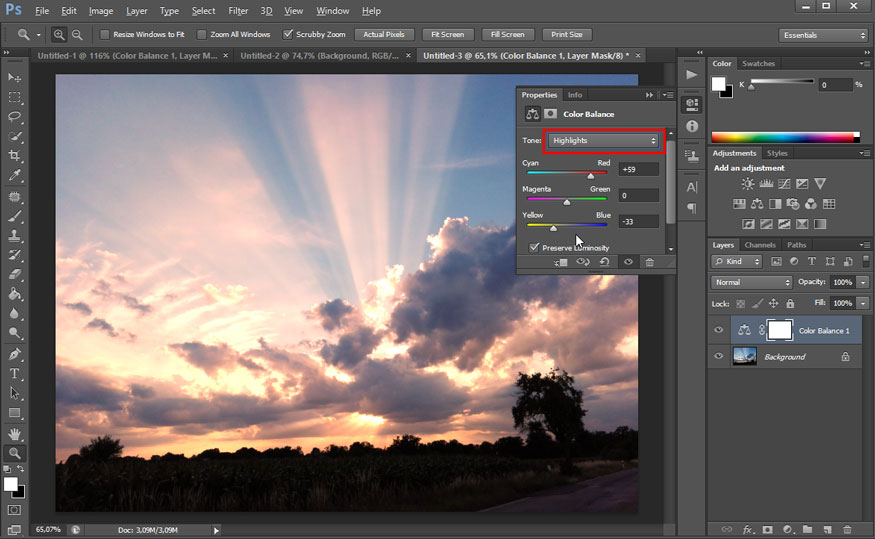
- Midtones are neutral areas: Similar to adjusting highlights, adjust the parameters to lean towards warm tones.
- Shadows are dark areas: Depending on whether you want the image's contrast to be high or low, you will increase or decrease it until you get the right color.
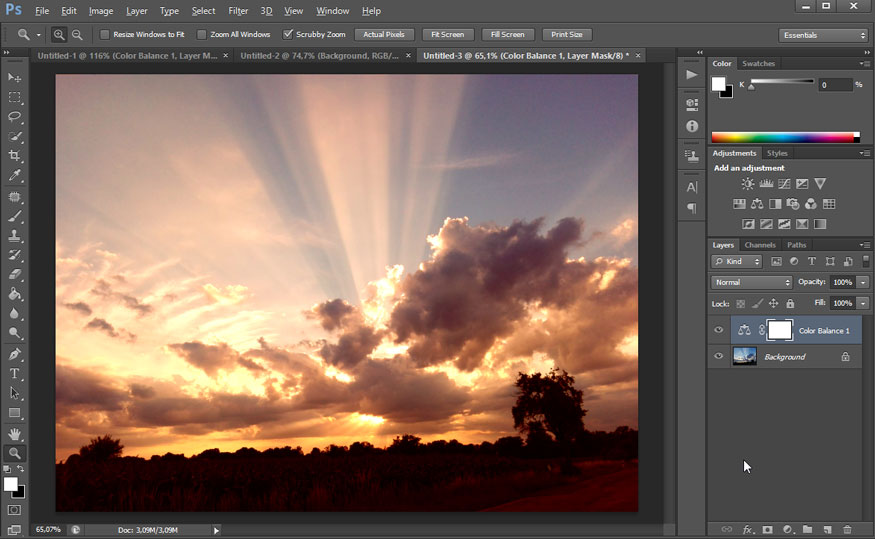
After adjusting the 3 color systems, we will get the photo as shown:
Step 4: So you have basically completed the sunset color correction in Photoshop. If you want your photo to look a little brighter, add other Adjustment Layers to increase the brightness of the photo. You can perform brightening with many different tools such as Curves, Level,... Here we use the Curves tool. At the circle icon in the bottom right corner of the screen, click and select Curves.
.jpg)
Step 5: Let's proceed with brightness adjustment by adjusting the graph line up or down to brighten the photo. Adjust and observe the photo to get the most satisfactory photo adjustment. Note, the changes on the graph and on the photo to get the most satisfactory color, don't overdo it.

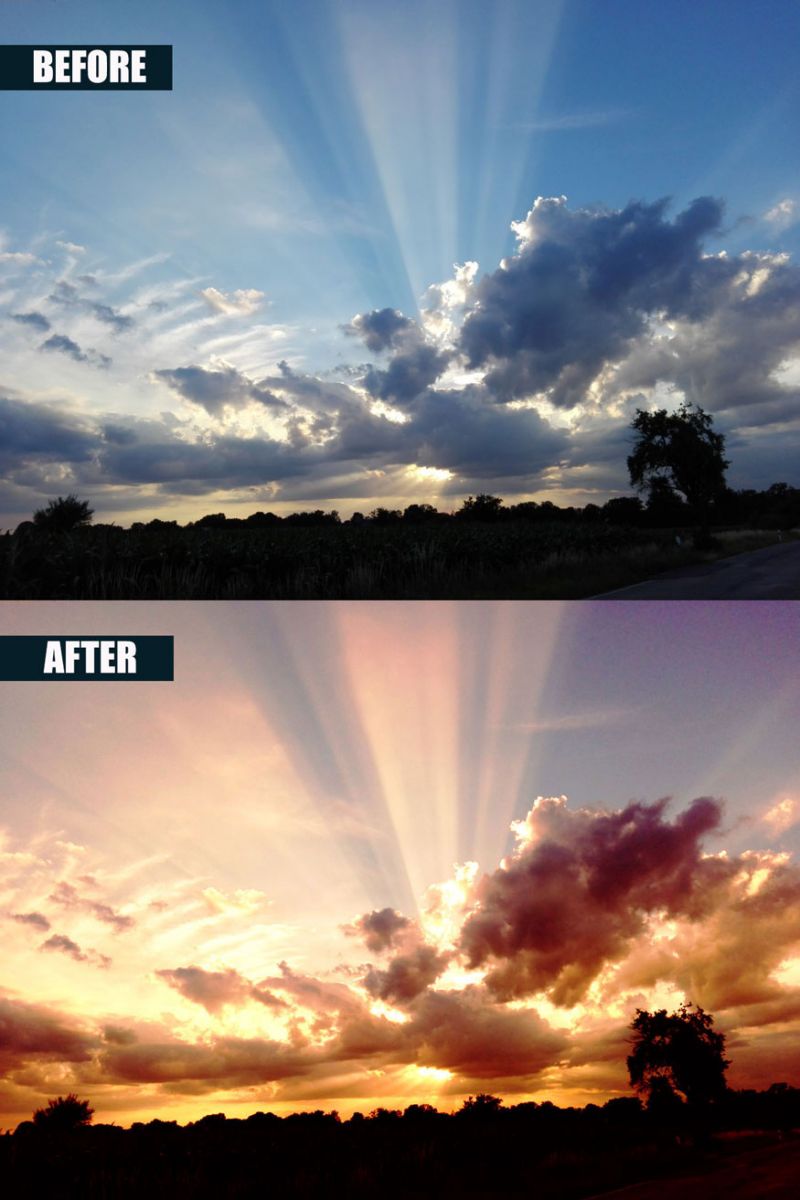
So we have completed the sunset color correction steps in Photoshop. You can clearly see the difference between the sky color before adjustment and after adjustment. The photo seems more beautiful, more suitable for the content you intend to convey.
In addition to adjusting the sunset color in Photoshop, you can also apply Color Balance in Adjustment Layer to adjust other sky colors by changing 3 color tones: Shadows (dark areas), Midtones (neutral areas) and Highlights (highlight areas) appropriately. Below is another sky color correction image in Color Balance.
Above is general information on how to adjust sunset color in Photoshop very simply. With just a few steps, you can manually adjust the sunset color to make your photos more sparkling. Hopefully our sharing can help you create extremely sparkling photos.


VIP Products


Best Selling Products
Copyright Adobe Lightroom Account
59 USD
Plugin Retouch4me
69 USD
Upgrade Genuine Office 365
49 USD
Genuine Adobe Illustrator account
99 USD
Capcut Pro 1 Year
39 USD
ChatGPT Plus Account (GPT-4)
16 USD
Freepik Premium Account
59 USD
Adobe Premiere Pro Account
99 USD
Autodesk All App Account Copyright
120 USD
Genuine Cheap Canva Pro
39 USD
Adobe Photoshop Copyright - Full App
120 USD
MidJourney Account
29 USD
Windows 10 & 11 Pro Key
36 USD
Upgrade Duolingo Super
29 USD
Upgrade genuine Capture One account
120 USD