Best Selling Products

MidJourney Account
29 USD

Upgrade Duolingo Super
29 USD

Freepik Premium Account
59 USD

ChatGPT Plus Account (GPT-4)
16 USD

Upgrade Genuine Office 365
49 USD

Adobe Photoshop Copyright - Full App
120 USD

Upgrade genuine Capture One account
120 USD

Genuine Cheap Canva Pro
39 USD

Adobe Premiere Pro Account
99 USD

Autodesk All App Account Copyright
120 USD

Copyright Adobe Lightroom Account
59 USD

Genuine Adobe Illustrator account
99 USD

Capcut Pro 1 Year
39 USD

Plugin Retouch4me
69 USD

Windows 10 & 11 Pro Key
36 USD
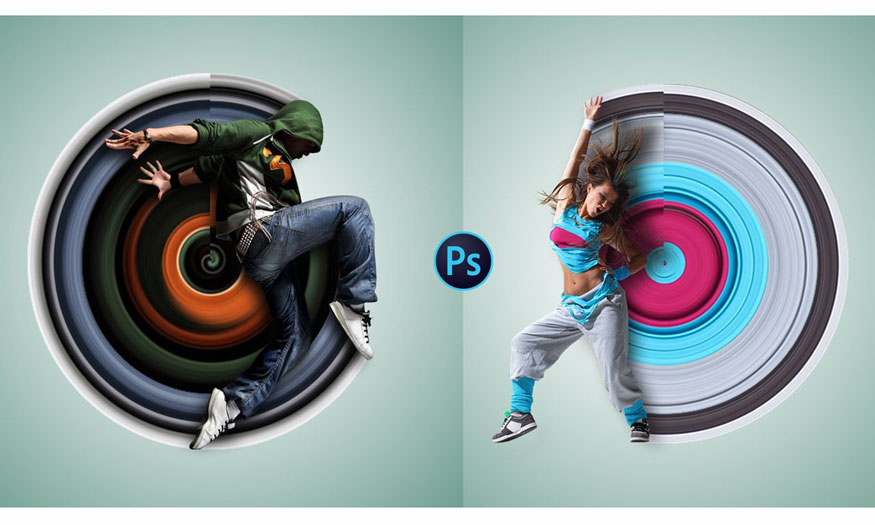
How to creating a pixel stretch effect in Photoshop
Have you ever seen photos of objects in moving poses with pixels stretch behind them? Do you want to create photos with such a pixel stretch effect but don't know how to do it? Don't worry, let's see how to create a very simple pixel stretch effect in Photoshop below.
Have you ever seen photos of objects in moving poses with pixels stretch behind them? Do you want to create photos with such a pixel stretch effect but don't know how to do it? Don't worry, let's see how to create a very simple pixel stretch effect in Photoshop below.
![]()
How to create a pixel stretch effect in Photoshop
How to create a pixel stretching effect in Photoshop is often used with subjects in moving positions such as running, dancing,... to create an impression.
To create a pixel stretching effect in Photoshop, please refer to the following basic steps.
Step 1: First we need to upload the photo we want to create the pixel stretch effect in Photoshop. You can click File on the menu bar => select Open => select the appropriate image => Open.
Or press the keyboard shortcut Ctrl+O and select the appropriate photo. In this article, I chose a photo with the subject being a girl jumping up and spreading her arms.
![]()
Step 2: Then we will create a new working file to create the pixel stretch effect in Photoshop on it. Select File on the menu bar => select New… => set the appropriate size parameters. Or press the keyboard shortcut Ctrl+N then set the parameters and click OK.
![]()
Step 3: In the working file with the girl, use the Quick Selection Tool to select the girl's selection. Then press Ctrl + J to separate the selected object into a separate layer.
![]()
Step 4: On the toolbar, select Move Tool to drag the layer containing the separated girl to the initially created file. You just need to select the layer with the separated girl, hold the mouse and drag to the original file.
![]()
Step 5: Select Create new layer in the bottom corner of the screen to create a new layer (layer 2).
![]()
Step 6: Next, select the newly created layer 2, use the Rectangular Marquee Tool to draw a small rectangle from the head to the foot of the subject. You should choose areas with many different colors to create a unique color gradient.
![]()
Return to the first layer (layers including the separated objects), press Ctrl+C to copy the objects, then go to the second layer, and then press Ctrl+V to paste the objects.
Step 7: On the second layer, press Ctrl+T to select the new area to paste into, then hold down Shift and drag to both sides.
![]()
So you have finished creating the pixel stretch effect in Photoshop. The pixels on the image have been stretched.
However, to make the photo more impressive, you can transform this pixel range.
Step 8: You can see that in the photo there is also a pink color that our pulled pixel area has not shown. Please do as with steps 5,6,7 in the pink area. Then combine layer 2 and layer 3 using the key combination Ctrl_E.
![]()
Step 9: On the menu bar, select Filter => select Distort => select Polar Coordinates.
![]()
In the Polar Coordinates window, you will adjust it down to about 12.5% to fit the object (depending on the object, you will have different sizes), check the Rectangular to polar box.
![]()
Step 10: Adjust the size of the new pixel circle and the object to fit your idea.
![]()
Step 11: Use the Eraser Tool on the toolbar to erase the pixel lines extending above the subject's head to create a unique effect.
![]()
Step 12: You can add shadow to the combination you just created to give the photo impressive depth. Let's create a new layer to show the shadow of the effect under the subject and the layer containing the stretched pixels. Switch to black and white mode and then use the Brush tool to create shadows. Use the key combination Ctrl+T to adjust the appropriate shadow size. The results you get will be:
![]()
Above is information on how to create a pixel stretch effect in Photoshop. This method is not at all complicated. Hopefully Sadesign's sharing can help you create unique effects for your photos.


VIP Products


Best Selling Products
MidJourney Account
29 USD
Upgrade Duolingo Super
29 USD
Freepik Premium Account
59 USD
ChatGPT Plus Account (GPT-4)
16 USD
Upgrade Genuine Office 365
49 USD
Adobe Photoshop Copyright - Full App
120 USD
Upgrade genuine Capture One account
120 USD
Genuine Cheap Canva Pro
39 USD
Adobe Premiere Pro Account
99 USD
Autodesk All App Account Copyright
120 USD
Copyright Adobe Lightroom Account
59 USD
Genuine Adobe Illustrator account
99 USD
Capcut Pro 1 Year
39 USD
Plugin Retouch4me
69 USD
Windows 10 & 11 Pro Key
36 USD