Best Selling Products

Adobe Premiere Pro Account
99 USD

Genuine Cheap Canva Pro
39 USD

Upgrade genuine Capture One account
120 USD

Plugin Retouch4me
69 USD

MidJourney Account
29 USD

Copyright Adobe Lightroom Account
59 USD

Genuine Adobe Illustrator account
99 USD

Autodesk All App Account Copyright
120 USD

Upgrade Genuine Office 365
49 USD

Windows 10 & 11 Pro Key
36 USD

ChatGPT Plus Account (GPT-4)
16 USD

Capcut Pro 1 Year
39 USD

Freepik Premium Account
59 USD

Upgrade Duolingo Super
29 USD

Adobe Photoshop Copyright - Full App
120 USD
Automating Google Sheets with ChatGPT: A detailed guide from A to Z
Nội dung
- 1. Why should you automate Google Sheets with ChatGPT?
- 2. How to add ChatGPT to Google Sheets from A to Z
- Step 1: Create a Google Sheets spreadsheet.
- Step 2: Open the add-on store.
- Step 3: Search for the ChatGPT extension
- Step 4: Install the appropriate extension.
- Step 5: Activate the tool in Google Sheets
- Step 6: Test with a simple request.
- 3. How to use ChatGPT directly in Google Sheets
- Step 1: Select the cell where you want to display the results.
- Step 2: Enter the formula or request.
- Step 3: Press Enter and check the result.
- 4. How to combine data from multiple cells to create automated content.
- Step 1: Prepare the data in the table.
- Step 2: Combine the data using formulas
- 5. Tips for using ChatGPT in Google Sheets more effectively
- 6. Conclusion
Google Sheets is already very convenient for data entry, list management, and plan tracking. However, manually processing each data row, writing content, summarizing information, or creating review questions can still be quite time-consuming. The combination of Google Sheets and ChatGPT opens up a more flexible way of working, allowing many operations to be performed directly within the spreadsheet. Instead of constantly switching back and forth between the browser, AI tools, and data files, you can install the ChatGPT extension into Google Sheets. From there, tasks such as summarizing lessons, creating content, processing data, or building questions can be done directly on the spreadsheet. Let''s explore how to integrate and utilize this tool from A to Z with Sadesign below.
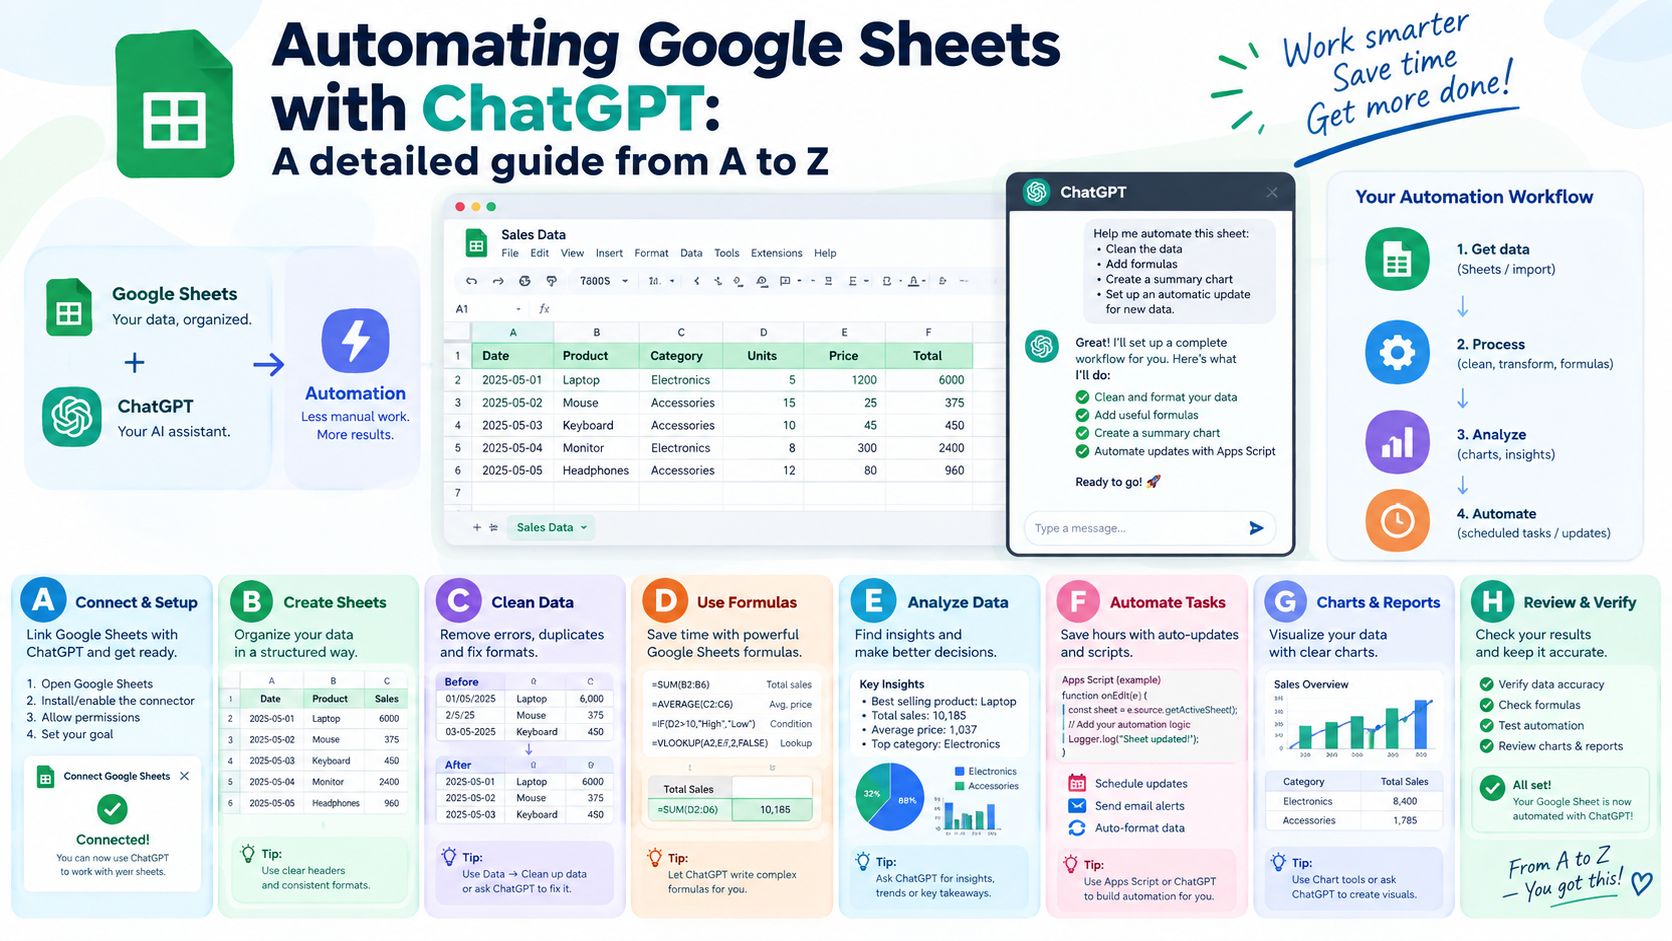
1. Why should you automate Google Sheets with ChatGPT?
The most appealing aspect of integrating ChatGPT into Google Sheets lies in its ability to combine AI with existing data. Instead of copying each piece of content to a separate ChatGPT window, you can use the data in the cells as input for your requests. This is especially useful when dealing with multiple rows of similarly structured information. For students or those who frequently work with spreadsheets, this combination can significantly save time. You can use AI to summarize knowledge, build outlines, create practice questions, or explain complex concepts. With data organized in rows and columns, tracking, editing, and managing results becomes more intuitive.
Some notable benefits include:
-
Increase processing speed: Repetitive requests can be processed faster instead of being manually entered each time.
-
Create content directly in your spreadsheet: You can create descriptions, summaries, questions, or notes directly from your existing data.
-
Learning support: ChatGPT can transform lengthy content into concise, easy-to-follow main points.
-
Scientific data management: Results are placed right next to the original data, making it convenient for checking and editing.
-
Handling multiple rows of data: When a table contains many similar topics or content, AI formulas can support processing row by row.
2. How to add ChatGPT to Google Sheets from A to Z
Step 1: Create a Google Sheets spreadsheet.
First, log in to your Google account and access Google Drive. On the main interface, select New in the left-hand area of the screen. Then, select Google Sheets to create a new spreadsheet. You can also directly open an existing Sheets file if you want to integrate AI into the existing data.
When you open the spreadsheet, you should first create a simple data structure to easily check the results. For example, if you're using Google Sheets to study for an exam, you could create columns for Subject , Topic , Key Points , and AI Results . This arrangement will help you easily visualize where ChatGPT can be used in the spreadsheet.
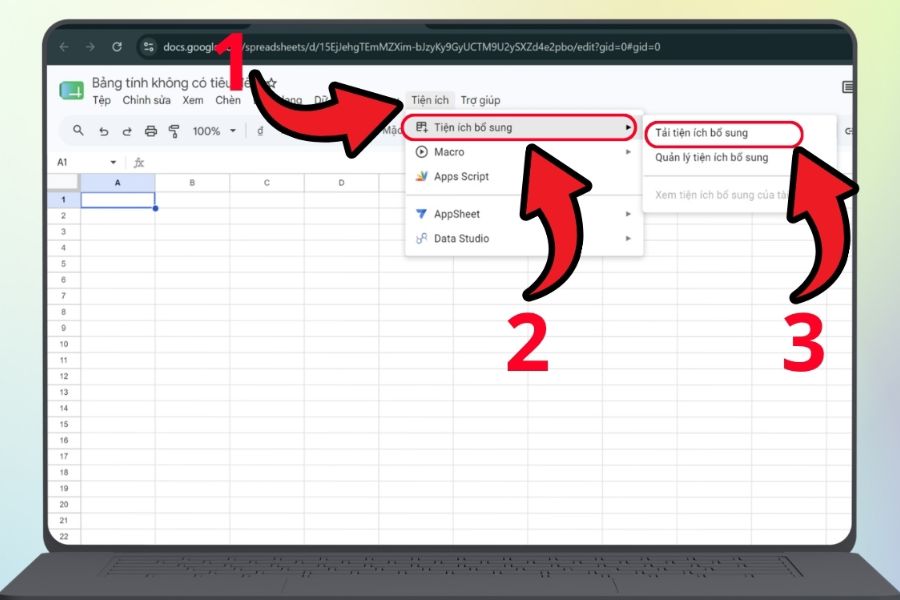
Step 2: Open the add-on store.
On the Google Sheets menu bar, find and select Extensions . Next, select Add-ons or the Google Workspace Marketplace option, depending on your account's interface. This is where you can find and install extensions that work with Google Sheets.
When the Marketplace window appears, use the search bar to find the right AI tool. You can enter the keyword " ChatGPT" to see related utilities. Note that menu names may vary slightly depending on the language or version of the Google Sheets interface, so prioritize searching in the correct add-on section if you don't see the exact name as instructed.
Step 3: Search for the ChatGPT extension
In the Google Workspace Marketplace search bar, type ChatGPT and press Enter. The results list will show various utilities designed to support AI in spreadsheets. Some tools can provide AI functions directly in cells, while others work through a sidebar.
At this stage, don't rush to choose the first utility that appears. Open each tool's information page to check the description, developer, reviews, and access permissions. If your goal is to process educational data or personal content, reviewing the permissions the utility requests is even more important.
Step 4: Install the appropriate extension.
After selecting a tool, tap Install . Google may ask you to sign in or verify your account before proceeding. Follow the on-screen instructions carefully to proceed to the permission granting step.
A new window will appear showing what permissions the extension needs to function. You should read the content carefully before selecting Continue . Only grant permissions if you feel it is appropriate for your needs. Once the process is complete, the extension will be linked to your Google account and can be used in Google Sheets.

Step 5: Activate the tool in Google Sheets
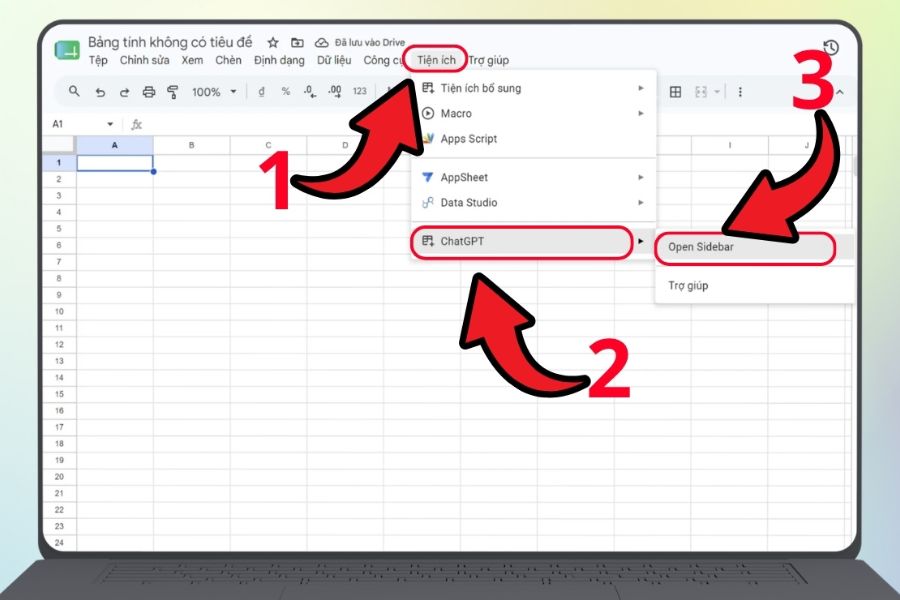
Return to the spreadsheet and open the Extensions menu . If the installation was successful, the name of the newly added extension will appear in the list. Click on the tool's name to see its accompanying options.
Depending on the utility, you might see options such as open the sidebar, launch the tool, or enable the AI dashboard. Select the corresponding option, such as Open Sidebar , to open the support interface on the right side of the screen. Once the toolbar appears, you can start by trying a simple request to test its functionality.
Step 6: Test with a simple request.
Don't start with a very large data table right away. You should create a short request to test if the utility is working correctly. For example, if the tool supports GPT functions , you could try a formula like this:
=GPT("Summary of the lesson on photosynthesis in 3 short sentences")
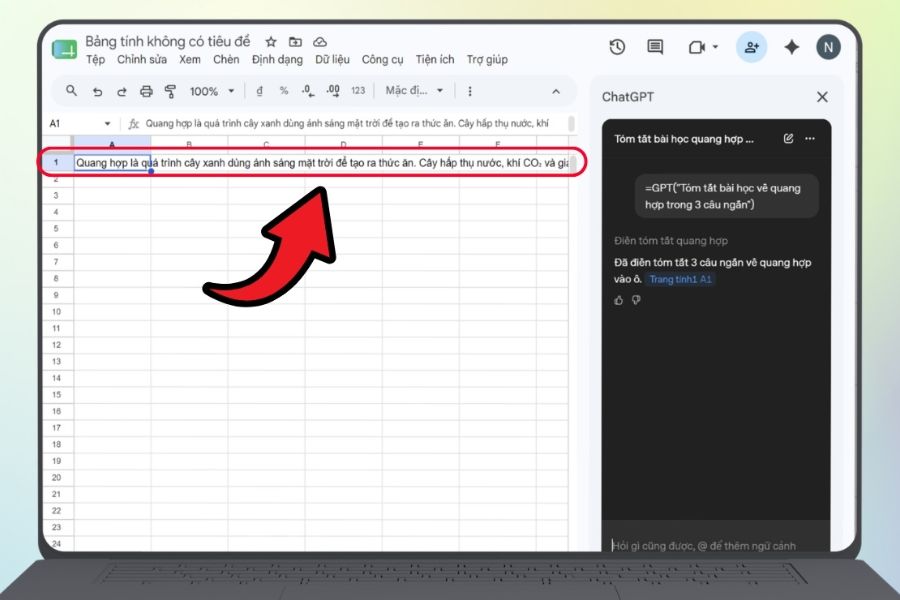
After entering the formula and pressing Enter, the system will process the request and display the result in the corresponding cell. The exact syntax may vary depending on the utility, so prioritize consulting the documentation of the tool you have installed if the above formula doesn't work.
3. How to use ChatGPT directly in Google Sheets
After installation, the easiest way to get started is to enter a specific request into a cell. You can ask the AI to summarize, explain, rewrite, or generate content based on a given topic. This is quite similar to chatting with ChatGPT, but the results are delivered directly to the spreadsheet.
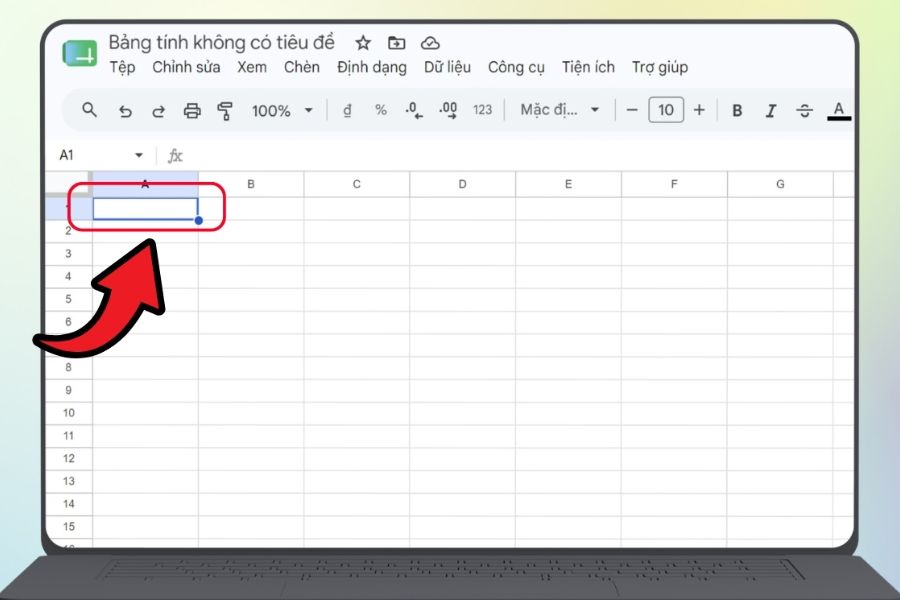
Step 1: Select the cell where you want to display the results.
Choose an empty cell in Google Sheets, for example cell C2. This is where the AI-generated results will be displayed. If the spreadsheet already contains data, you should place the results column next to the original data for easy comparison.
Next, clearly define what task you want the AI to perform. The more specific the request, the easier the results will usually be to use. Instead of just writing "summary," you could request "summarize the content in 3 key points, using short sentences, suitable for exam preparation."
Step 2: Enter the formula or request.
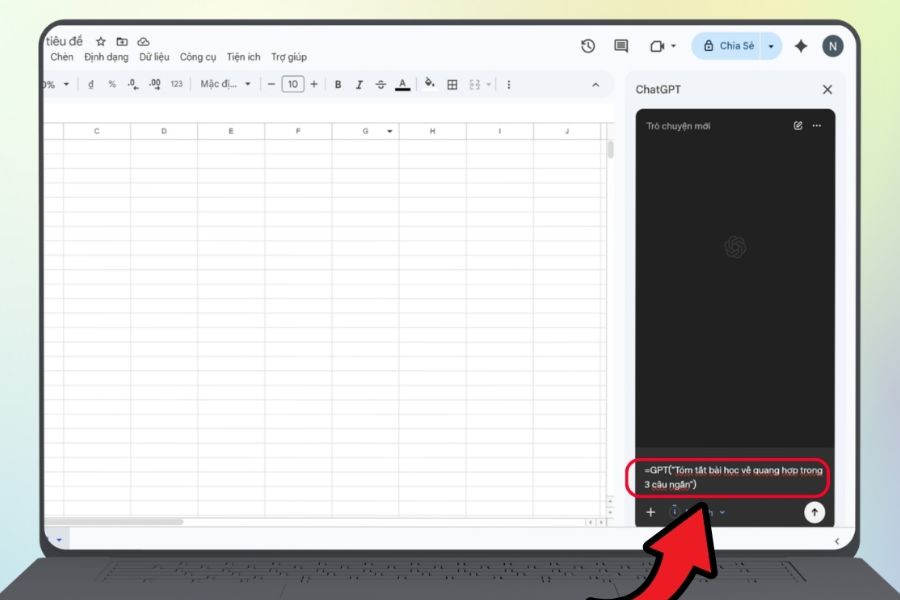
If the installed extension supports GPT functions , you can enter the request directly using a formula. For example:
=GPT("Explain the concept of photosynthesis in easy-to-understand language")
You can also change the commands depending on your purpose. For example, you could request the creation of 5 multiple-choice questions, the creation of a chapter outline, or the shortening of a paragraph. Think of the commands as instructions for the AI, clearly stating the content to be processed, the desired length, and the target audience.
Step 3: Press Enter and check the result.
After entering the formula, press Enter and wait for the system to process. The result will be returned to the selected cell if the utility and formula work correctly. For longer requests or large data tables, processing time may be longer.
Don't forget to double-check the results before using them. AI may generate inaccurate or inappropriate content for learning purposes. For important knowledge, especially data, formulas, or information requiring high accuracy, you should still compare it with the original source material.
4. How to combine data from multiple cells to create automated content.
One of the most interesting aspects of integrating AI with Google Sheets is that you don't need to re-enter data into each statement. The content in the cells can become input for the formula. This allows the same formula to be applied to multiple rows.
Step 1: Prepare the data in the table.
For example, in cell A2 you enter "Chemistry" , and in cell B2 you enter "Semester Exam Review ". Column C can be reserved for results generated by AI. In this case, Google Sheets already has the data to build the request.
You can expand the table into multiple rows, for example, A3 for Biology , B3 for Final Exam Review . Dividing the data into columns helps the AI receive information clearly and makes it easier to drag formulas down to the next rows.
Step 2: Combine the data using formulas
In cell C2, you can use the syntax supported by the utility, for example:
=GPT(A2&" "&B2)
In this case, the content from A2 and B2 is combined into a single request and sent to the AI. If the data in A2 or B2 changes, the result may be recreated depending on how the utility handles the formula.
For more specific results, you should add requirements to the formula. For example, you could instruct the AI to create a short outline based on the subject and study goals. Once the formula is working properly, you can apply it to multiple rows to significantly reduce manual data entry.
5. Tips for using ChatGPT in Google Sheets more effectively
To ensure AI produces results that closely match your needs, the most important factor remains how you write your request. The more specific your command, the easier it will be to get structured content. Tell the AI what you want to do, what data you need, how long it should be, and how the results should be presented.
For example, instead of entering "Summary of Chemistry," you could request "Summarize the topic of redox reactions into 5 main points, each with a maximum of 15 words, using language that is easy for students to remember." The difference lies in the level of detail of the request, and this is also a way to reduce the time spent editing the results after the AI returns them.
Here are some tips you should apply:
-
Name the columns clearly so the data is easy to understand.
-
Separate the source data and the AI results into distinct columns.
-
Use structured requests instead of overly short statements.
-
Check the results before using them for important lessons or documents.
-
Do not include sensitive information in the utility unless absolutely necessary.
-
When working with multiple rows, it's advisable to test with a few rows first before applying the changes to the entire table.
-
If the formula returns an error, check the syntax and documentation of the utility you are using.
6. Conclusion
Automating Google Sheets with ChatGPT is a convenient way to combine the power of spreadsheets and AI in a single process. From creating tables and installing utilities to entering requirements and using data from multiple cells, the operations can be relatively simple if you follow each step correctly. Especially for studying and exam preparation, Google Sheets can become a place to store knowledge, plan, and create AI-assisted practice materials. Start with a small spreadsheet, try a few simple commands, and gradually expand the process. Once you get used to it, you'll find that many tasks previously done manually can be significantly streamlined within the spreadsheet.





















VIP Products








Best Selling Products
Adobe Premiere Pro Account
99 USD
Genuine Cheap Canva Pro
39 USD
Upgrade genuine Capture One account
120 USD
Plugin Retouch4me
69 USD
MidJourney Account
29 USD
Copyright Adobe Lightroom Account
59 USD
Genuine Adobe Illustrator account
99 USD
Autodesk All App Account Copyright
120 USD
Upgrade Genuine Office 365
49 USD
Windows 10 & 11 Pro Key
36 USD
ChatGPT Plus Account (GPT-4)
16 USD
Capcut Pro 1 Year
39 USD
Freepik Premium Account
59 USD
Upgrade Duolingo Super
29 USD
Adobe Photoshop Copyright - Full App
120 USD