Best Selling Products
Share ways to edit backlit photos in photoshop
Nội dung
If you are having problems with backlit photos, try applying the following simple ways to edit backlit photos in Photoshop from Sadesign. With just a few simple steps, your photo will be effectively balanced in brightness, you will be surprised by this great feature of Photoshop.
If you are having problems with backlit photos, try applying the following simple ways to edit backlit photos in Photoshop from Sadesign. With just a few simple steps, your photo will be effectively balanced in brightness, you will be surprised by this great feature of Photoshop.
.jpg)
1. How to edit backlit photos in Photoshop using Camera Raw
There are many reasons why photos are backlit, to avoid this situation you need to choose a good time to take photos, pay attention to the brightness of the background and the model not being too different, or use the reflector tool to balance the brightness.
In case the photo you took is backlit, you can rebalance it by using Camera Raw in Photoshop in the following ways:
First, you need to select the photo to edit, then right-click => Open with Photoshop, note that you should use RAW images to achieve the best results. RAW images have more information than JPG, which helps to balance the brightness better without color distortion or noise.
.jpg)
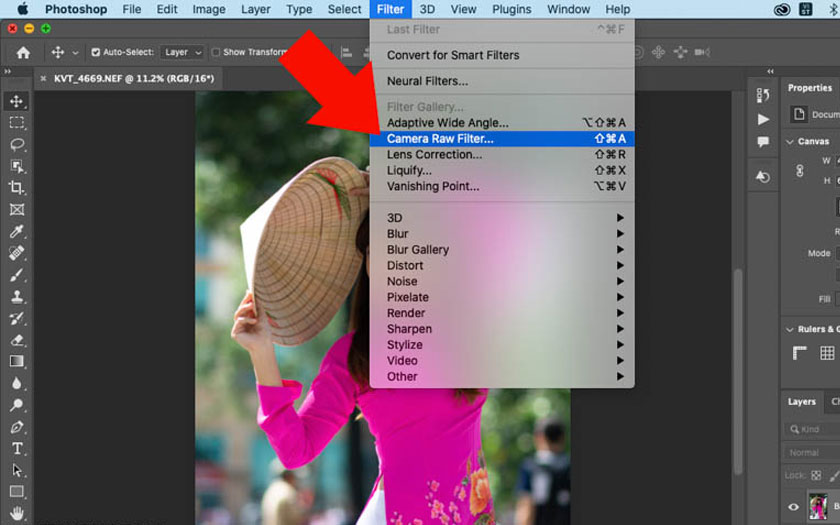
Next, click Filter => select Camera Raw Filter or use the shortcut Ctrl+Shift+A. In this tutorial, we are using Photoshop 2023 and Camera Raw 15, you can do the same for Photoshop 2022.
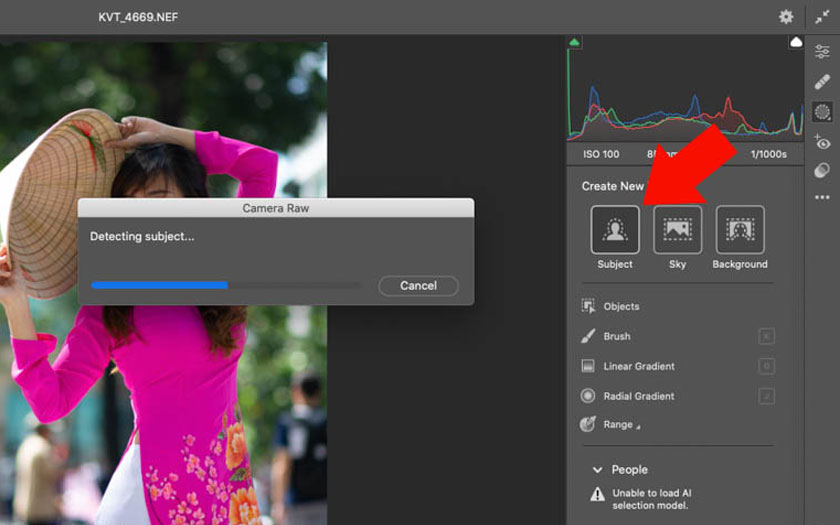
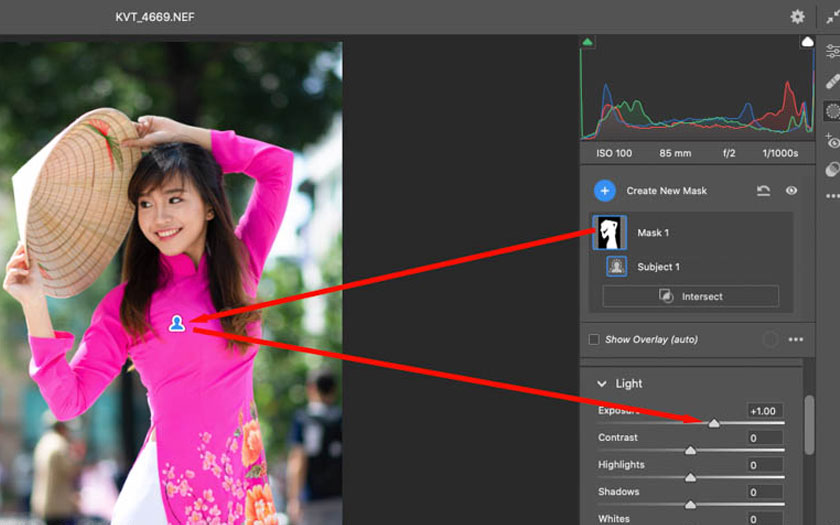
Click Masking or use the shortcut M, then click Subject to create a selection around the model. In addition to people, this feature can work well with subjects such as animals and objects. The subject can create very precise selections, you can do the same in Lightroom 2023.
Photoshop creates a precise selection, click on Mask to surround the model, and check Show Overlay to see the selection of the Mask. Next, select Light => increase Exposure, you will see the model is brighter. Because you use RAW images, you will only need to increase the brightness until it is balanced with the background. Note that you should not increase too much, instead reduce the brightness of the background.
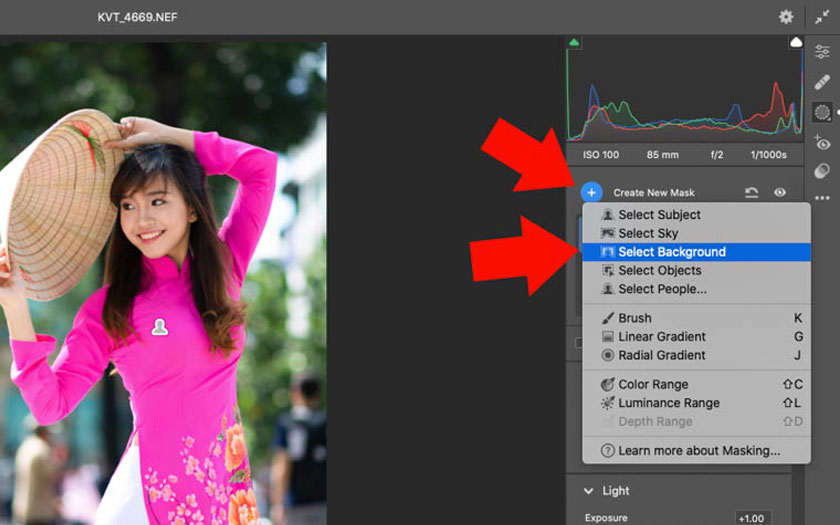
Click Create New Mask => Select Select Background for Photoshop to create a selection on the background. Photoshop has the ability to create very precise selections.
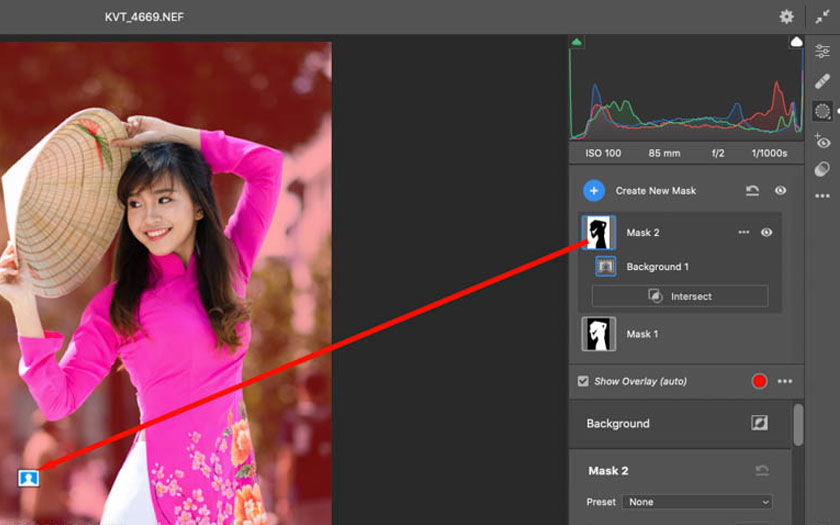
Photoshop creates a background selection area and marks them in red, if you don't see this marked area, just check Show Overlay and you're done.
Next, click on the background selection area icon, corresponding to Mask 2 => Light => reduce Exposure, you will see a darker background, helping the model stand out more.
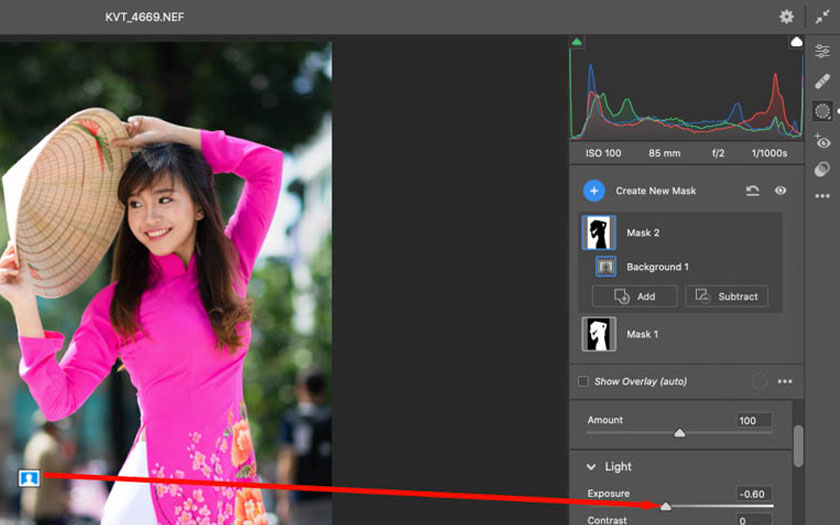
Thus, we have completed the way to correct backlit photos in Photoshop. To control other details, we perform the following steps.
When taking portrait photos with white clothes, you will see that the white area is often too bright, leading to a loss of detail. For example, around the model's waist, details are lost because of too much brightness. To control this area, you need to click on Mask 1 corresponding to the selected area of the model => select Subtract => select Brush.
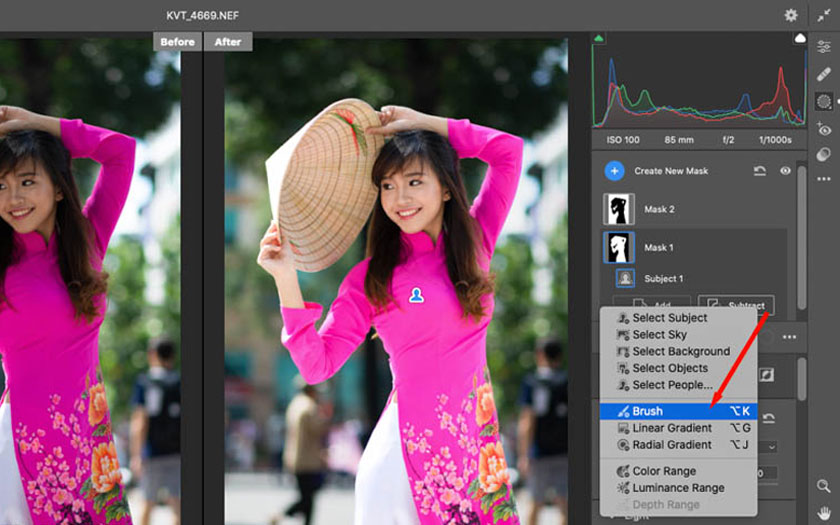
Next, select Size and change the Brush size to suit the area you want to adjust. You can also change Feather and Flow to bring the best effect. Paint the Brush on the white area, you will see these areas darker, specifically how dark it is depending on how you adjust the parameters of Flow and Feather.
.jpg)
In the previous section, we selected the model with Mask 1, so Photoshop created a selection of the entire model and clothes. Increasing the brightness will make the pants too bright, use Brush and Subtract to control Mask 1. The areas the Brush passes through will help reduce the impact of Mask 1.
Leave the Brush parameter to 100% to remove the impact of Mask 1, you can reduce the parameter to achieve the desired result.
2. Adjust backlit photos with Mask All Objects
To adjust backlit photos with the Mask All Objects tool, you should use Photoshop 2023. First, you need to open the Raw photo taken with backlit photos => right-click to select Mask All Objects, Photoshop will find and create a selection of subjects in the photo to adjust the brightness of the model independently of the background. You can adjust color, skin and many other things on each Layer.
.jpg)
You can see that Photoshop automatically creates a subject selection area and divides it into groups, so you just need to select the group corresponding to the model. For example, to make the model brighter, right-click on the corresponding group, and select Brightness and Contrast.
.jpg)
Next, drag the Brightness slider to the right to make the model brighter. This is an effective way to balance the brightness between the model and the background without using a flash or a reflector.
.jpg)
In addition to the ability to create a selection around the model, Photoshop also creates a selection of the background and objects in the photo. You can use the group corresponding to the background, then select Brightness and Contrast to reduce the brightness of the background.
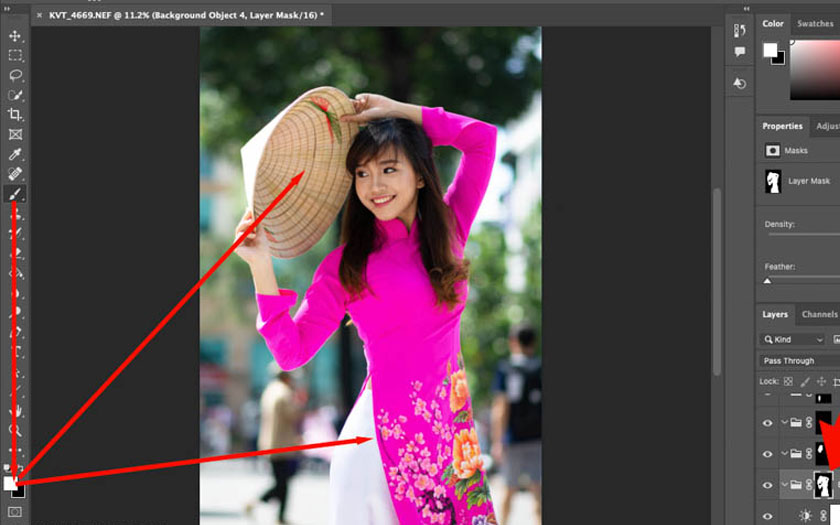
Although Mask All Objects is quite smart, there will be times when it selects the selection area that is not very accurate. You will see that there are dark areas on the model's pants and hat, this is a limitation when using Mask All Objects. To fix this, you need to select the Layer Mask corresponding to the model => select Brush or use the shortcut B => press the white Brush to paint on these areas.
Wherever the white Brush goes, it will brighten that area. If you accidentally make a mistake, just use the black brush to adjust it.
3. Frequently asked questions
1. Can you edit backlit JPG photos?
Yes, but the effect will not be as good as using RAW photos.
2. Which version of Photoshop should you use to edit backlit photos?
You should use the latest Photoshop to edit backlit photos because Photoshop can create quick and accurate selections. Thanks to that, balancing the brightness of areas on the photo is effective, as well as saving more time.
Currently, this is the simplest way to edit backlit photos in Photoshop with the ability to create quick selections without requiring too much experience.
Try and apply the ways to edit backlit photos in Photoshop to your photos and evaluate the results. Don't forget to practice many times to help the editing become more beautiful and natural.

Installation and support contact information:
🏡 SADESIGN Software Company Limited
📨 Email: phamvansa@gmail.com
🌍 Website: https://sadesign.ai


.png)


