Best Selling Products

Upgrade genuine Capture One account
120 USD

Autodesk All App Account Copyright
120 USD

Copyright Adobe Lightroom Account
59 USD

Capcut Pro 1 Year
39 USD

Plugin Retouch4me
69 USD

Genuine Cheap Canva Pro
39 USD

MidJourney Account
29 USD

Genuine Adobe Illustrator account
99 USD

Upgrade Genuine Office 365
49 USD

Upgrade Duolingo Super
29 USD

ChatGPT Plus Account (GPT-4)
16 USD

Windows 10 & 11 Pro Key
36 USD

Freepik Premium Account
59 USD

Adobe Premiere Pro Account
99 USD

Adobe Photoshop Copyright - Full App
120 USD
Basic Photography Concepts Everyone Should Master
Nội dung
- 1. An overview of the exposure triangle in photography.
- 1.1. Aperture
- 1.2. Shutter Speed
- 1.3. ISO
- 2. Understand the camera modes.
- 2.1. Understanding Metering Modes
- 2.2. Understanding histograms
- 2.3. Understanding the shooting modes
- 2.4. Understanding the depth of field
- 2.5. Understanding White Balance
- 2.6. Understanding Focal Length
- 2.7. Understanding the crop factor
- 2.8. Knowing through a polarizing filter
- 3. Master the basic layout.
- 3.1. The Rule of Thirds
- 3.2. The Rule of Focused Vision
- 3.3. Path Rules
- 3.4. The Rule of Balance
- 3.5. The Eye-lines Rule
This book summarizes the most important concepts when you begin your journey into photography. From lighting and composition to camera control, everything is explained in an easy-to-understand way. Suitable for beginners who want to build a solid foundation.
With just a basic camera or even a smartphone, it's entirely possible to create impressive photos if you understand the fundamental principles of photography. However, to enter this vast world without feeling overwhelmed, beginners need to master the basics of lighting, composition, equipment, and camera operation. This article will help you not only understand these important concepts but also how to apply them in practice to gradually improve your photography skills.
1. An overview of the exposure triangle in photography.
In photography, light is the soul of a photograph. How you control light determines the brightness, contrast, and even the emotion the photograph conveys. The exposure triangle is the most important model for understanding light. It includes three main elements: aperture, shutter speed, and ISO. These three elements are closely linked; changing one element will directly affect the other two and alter the overall exposure result.
1.1. Aperture
Aperture is the size of the lens opening, denoted by the F-number (such as f/1.8, f/4, f/11...). When the aperture is large (i.e., a small F-number), more light enters the camera, resulting in brighter images and a shallower depth of field, creating a slightly blurred background and an attractive bokeh effect. Conversely, a small aperture (large F-number) allows less light in, resulting in darker images but a greater depth of field, with sharp details in both the foreground and background. Understanding aperture helps you control the degree of bokeh and create depth in your images, especially useful when shooting portraits or landscapes.

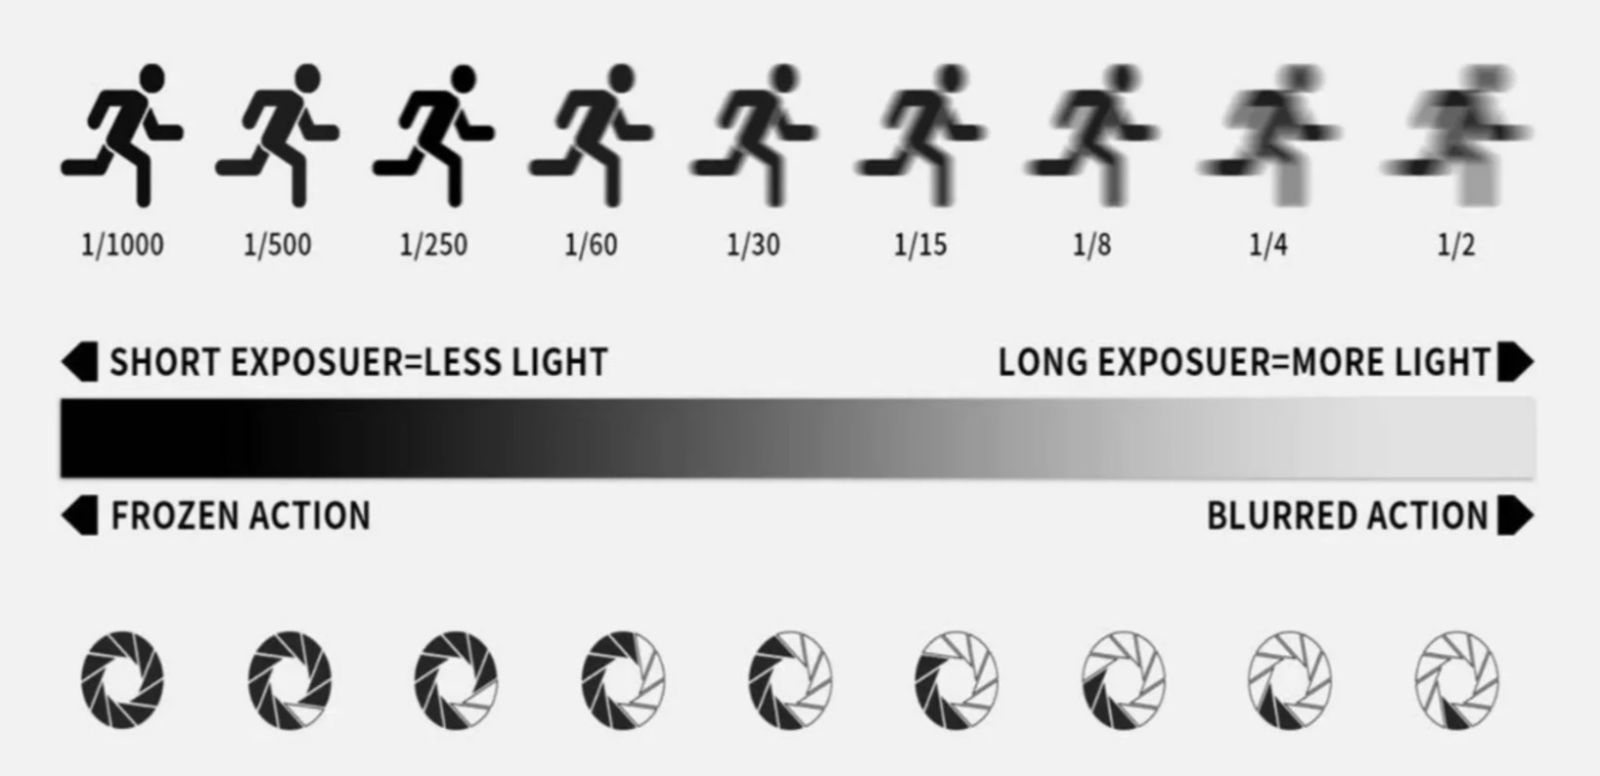
1.2. Shutter Speed
Shutter speed refers to the length of time the shutter remains open, allowing light to enter the sensor. A fast shutter speed "freezes" motion, preventing blur, making it suitable for sports, action photography, or when you're not yet comfortable holding the camera steady. A slow shutter speed, on the other hand, allows you to capture motion, creating an artistic motion blur effect. However, excessively slow shutter speeds can easily cause hand shake, so beginners need to practice holding the camera steady or use a tripod. Shutter speed is the key to capturing unique moments that are difficult for the naked eye to see, such as the smooth flow of water, the bright headlights of a car at night, or emotionally charged scenes of movement.
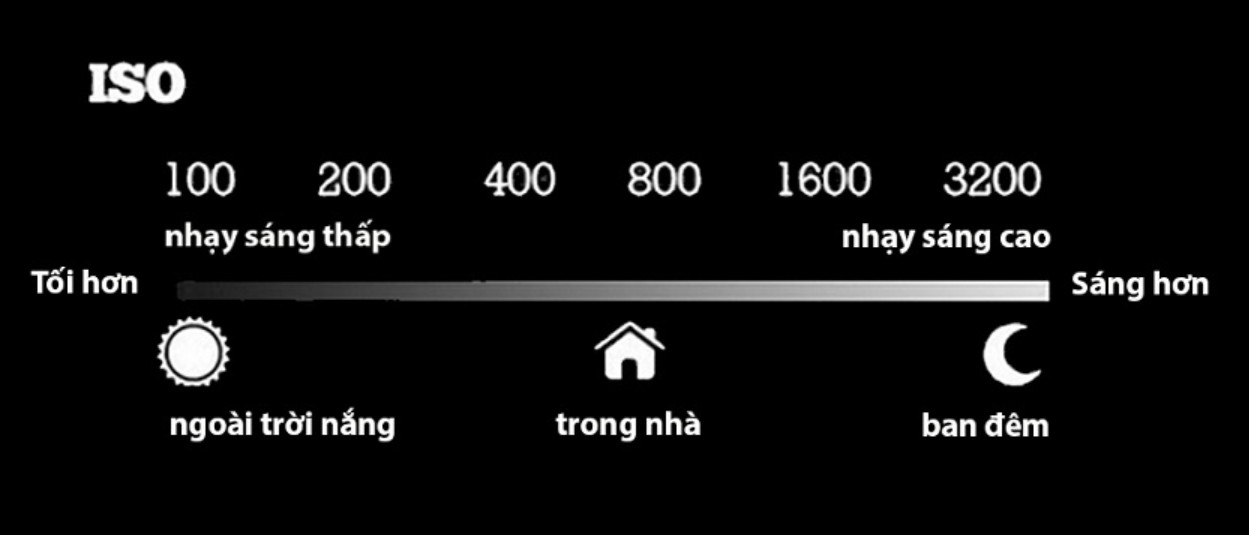
1.3. ISO
ISO indicates the light sensitivity of the sensor. Low ISO produces clean images with less noise but requires more light. High ISO helps with low-light shooting, but images are more prone to noise. When you're just starting out, you should prioritize keeping the ISO as low as possible to ensure optimal image quality. Increasing the ISO should only be a last resort when you can't open the aperture or reduce the shutter speed any further. Understanding ISO helps you balance exposure better and reduce image noise, which is especially important when shooting indoors or at night.
The exposure triangle allows photographers to actively control light according to their creative intentions. Once you understand these three elements, you will be able to turn challenging lighting conditions into advantages to create photographs with a strong personal touch.
2. Understand the camera modes.
When first picking up a camera, the most confusing thing for beginners is the multitude of shooting modes and settings. Each mode has its own meaning and is suitable for different situations. Mastering these modes will help you make the most of your camera's capabilities, thereby significantly improving image quality.
2.1. Understanding Metering Modes
The metering mode helps the camera determine the appropriate amount of light for the photo. The camera can use wide-angle, spot metering, or center-weighted metering depending on the mode. For beginners, multi-spot metering is the safest option because the camera automatically calculates the light across the entire frame. Once you're more familiar with it, you can try spot metering to photograph subjects in challenging lighting conditions, such as when shooting against the light.
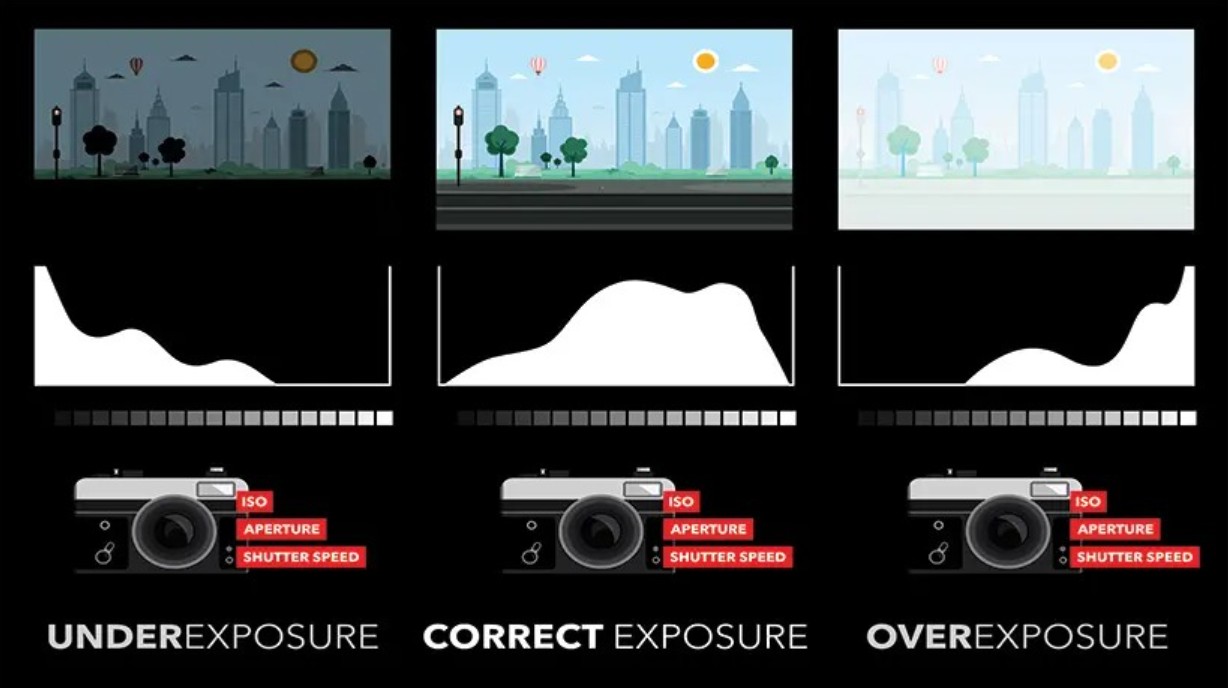
2.2. Understanding histograms
A histogram is a graph that shows the brightness and darkness levels in an image. If the histogram leans to the left, the image is underexposed; if it leans to the right, the image may be overexposed. For beginners, a histogram is an extremely useful tool that helps you objectively assess an image more effectively than just looking at the screen. Understanding the histogram allows you to quickly adjust parameters to achieve the correct exposure.
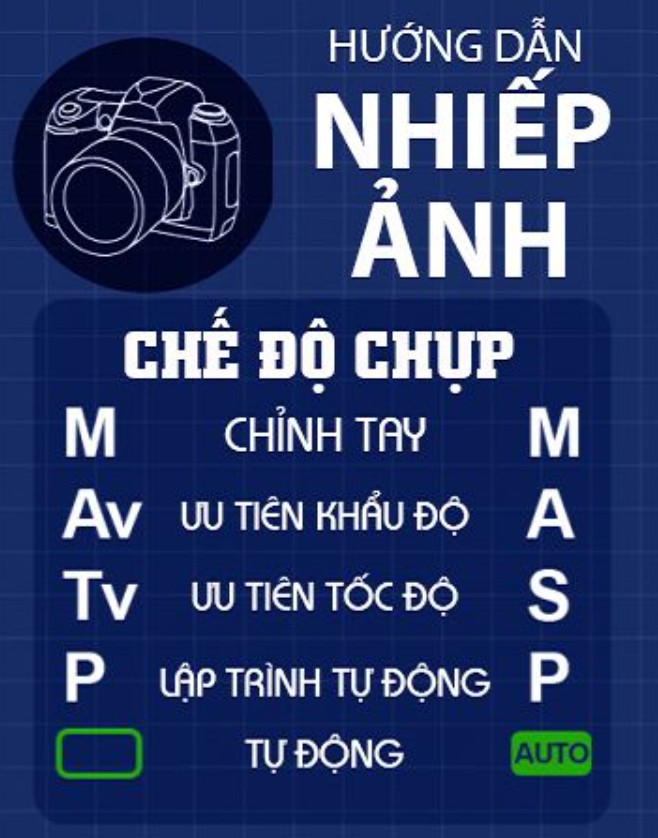
2.3. Understanding the shooting modes
Cameras typically have three important modes: manual (M), aperture priority (A), and shutter speed priority (S). M mode is for those who want complete control over all parameters, suitable once you've mastered the exposure triangle. For beginners, A mode is a good choice because you only need to adjust the aperture, and the camera will automatically balance the other parameters. S mode is suitable when you want to control the subject's movement. Regularly practicing between modes will help you better understand how the camera operates.
2.4. Understanding the depth of field
Depth of field is the determining factor in the sharp area of an image. Understanding this concept helps you know when to blur the background to create focus and when to keep the entire scene sharp to create depth. Aperture is the biggest factor affecting depth of field, but focal length and shooting distance also play an important role. The closer you get to the subject, the shallower the depth of field, making it more effective at separating the subject from the background.
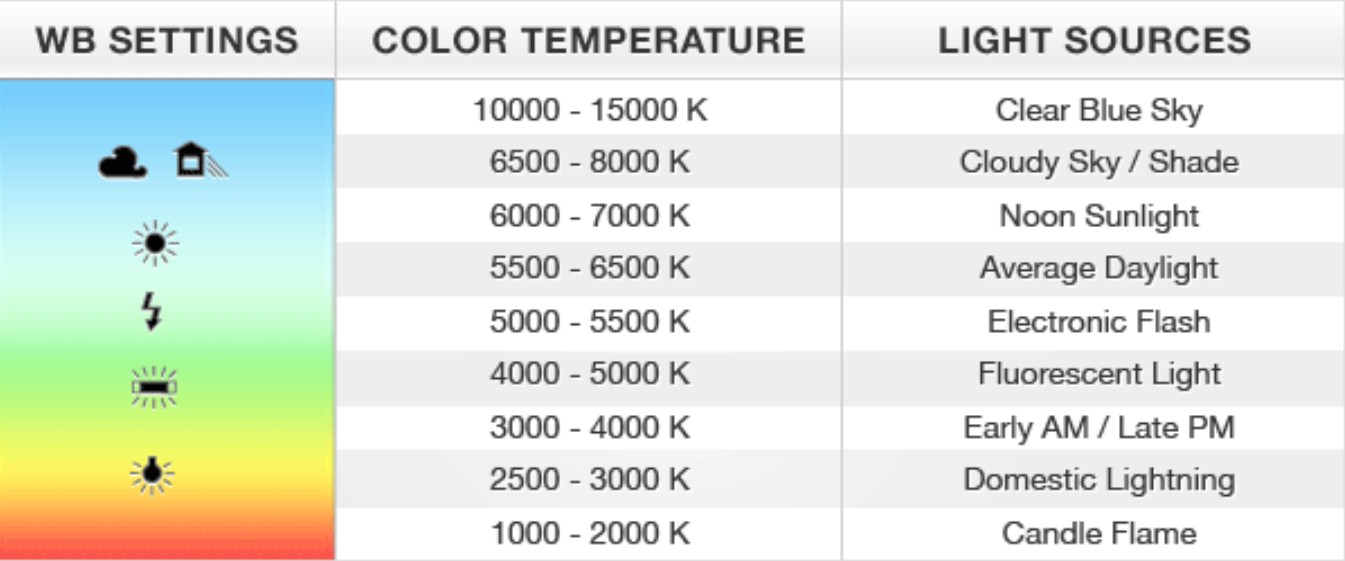
2.5. Understanding White Balance
White balance allows you to adjust the color of your photos according to the ambient light source. If you shoot under yellow lights, your photos may have a yellow tint; shooting outdoors in overcast skies may result in a blue tint. White balance helps correct this, ensuring true and accurate colors. Beginners can use automatic mode, but once you're familiar with it, you can manually adjust the white balance to achieve your desired color.
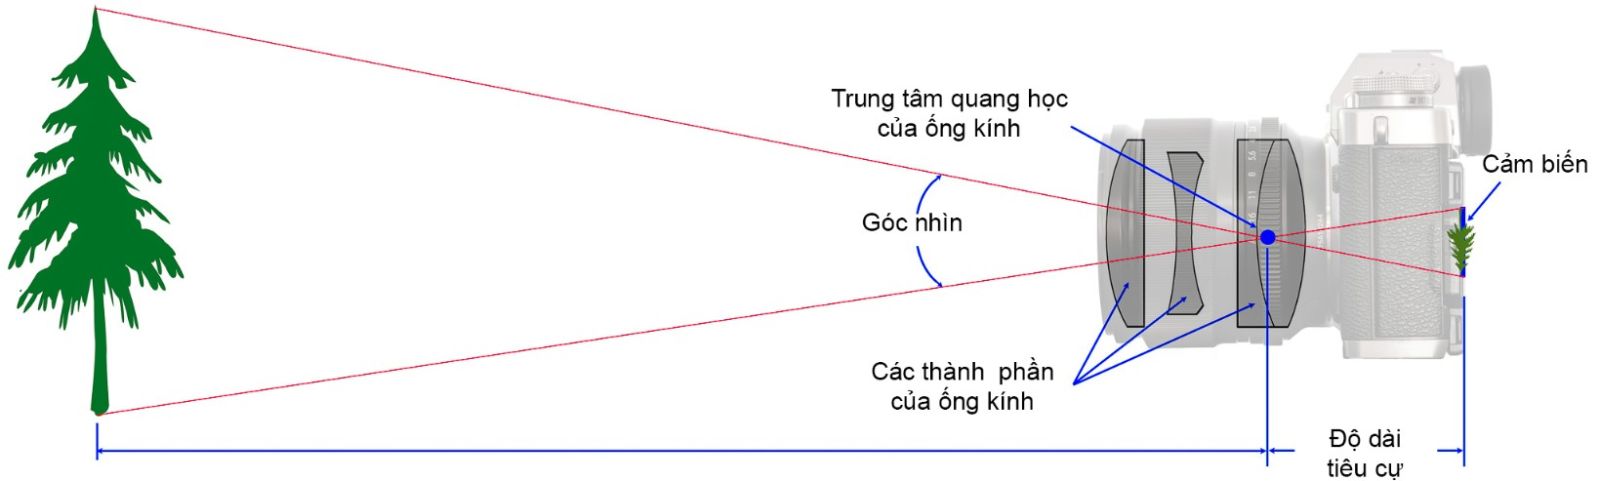
2.6. Understanding Focal Length
The focal length of a lens affects the shooting angle and zoom capability. Each focal length offers a different shooting style. Wide focal lengths create an open space, suitable for landscape photography; long focal lengths compress the space, suitable for portrait photography. Understanding focal length will help you choose the right lens for each purpose.
2.7. Understanding the crop factor
Crop and full-frame sensors differ in size, leading to differences in field of view. A 50mm lens on a full-frame camera remains 50mm, but on a 1.5x crop sensor camera it becomes 75mm. Beginners should be aware of this to avoid "false expectations" when choosing lenses.
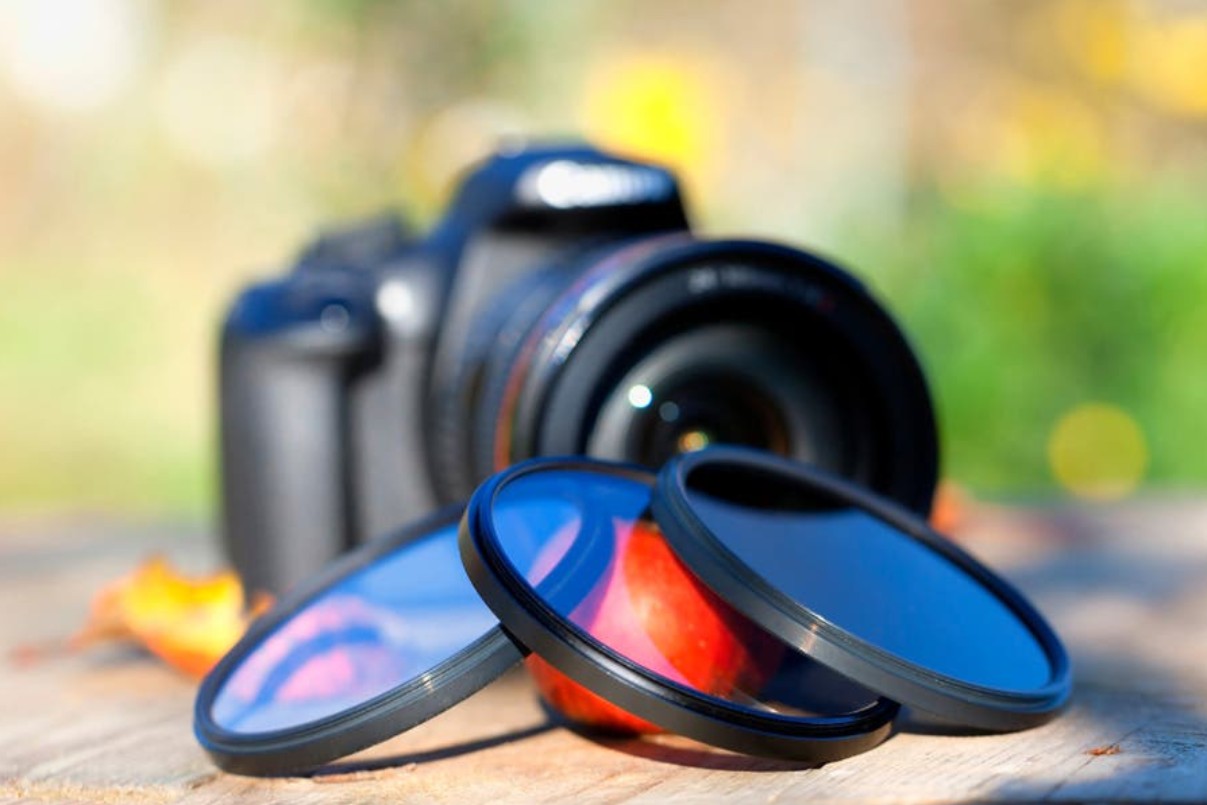
2.8. Knowing through a polarizing filter
Polarizing filters reduce unwanted reflections and increase contrast, especially useful when shooting water, the sky, or glass surfaces. For beginners, it's not a mandatory accessory, but if you're experienced and want to improve image quality, a CPL filter is a worthwhile investment.
3. Master the basic layout.
Lighting and technique only help you take bright, clear photos, but composition is what makes a photograph artistic and appealing. Composition is how you arrange elements in the frame, guiding the viewer to your intended message. Below are some composition rules that beginners absolutely must know.
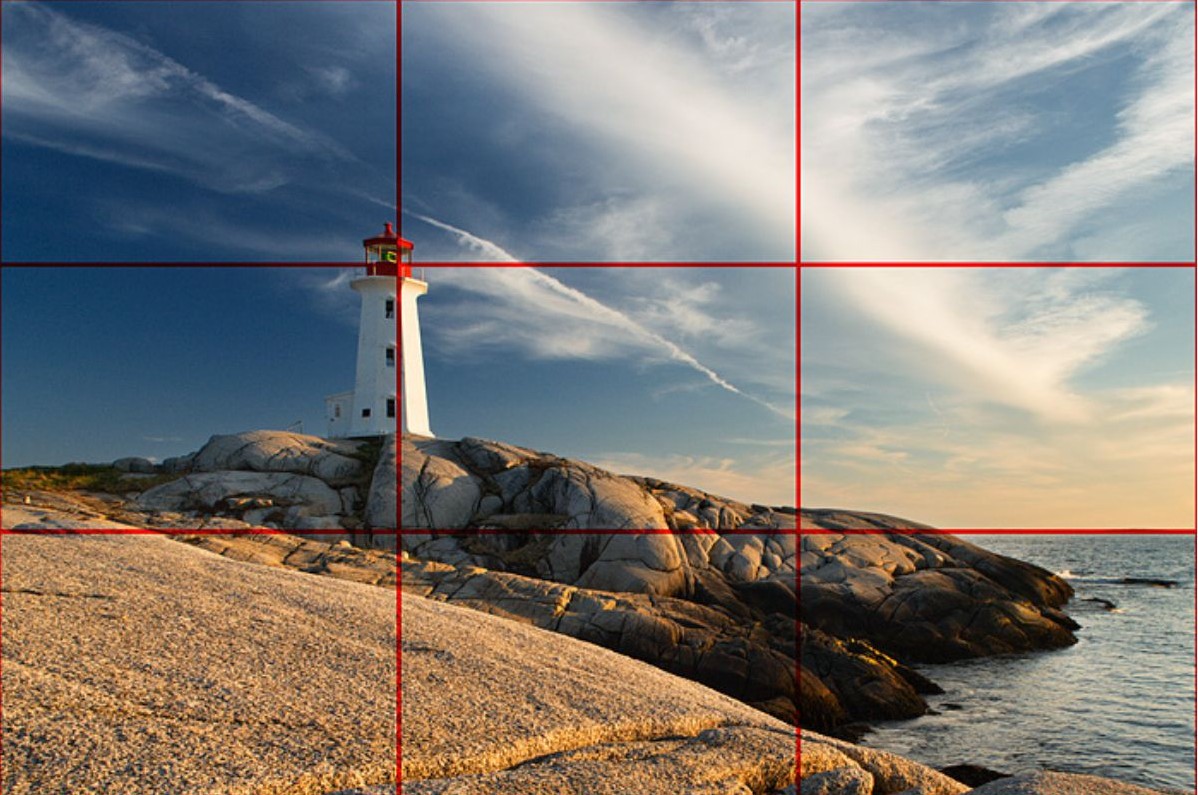
3.1. The Rule of Thirds
The rule of thirds is the simplest way to create a harmonious frame. Placing the subject at the intersections of the rule of thirds makes the image more natural, balanced, and visually appealing. This rule is applicable to almost all types of photography, from portraits and landscapes to street photography.
3.2. The Rule of Focused Vision
This rule directs the viewer's attention to the most striking feature of the image. When you understand how to organize light, color, and subject placement, you'll know how to guide the viewer's gaze to the exact point you want them to focus on.
3.3. Path Rules
The leading line is an element that guides the viewer's eye into the frame. This leading line can be a road, a river, a railing, or even light. Knowing how to utilize leading lines gives the image depth and makes it more captivating.

3.4. The Rule of Balance
A well-balanced photograph makes the viewer feel comfortable. Balance isn't just about symmetry; it also includes a balance of light, color, and visual elements. When shooting, you should pay attention to the overall composition to create this harmony.

3.5. The Eye-lines Rule
The subject's gaze has the power to guide the viewer's attention. When the subject in a photograph looks in a certain direction, the viewer will naturally be interested in that direction. Understanding the Eye-lines rule helps you tell a better story through your photos, especially in portrait or animal photography.
Once you master the exposure triangle, understand how to operate your camera, know how to exploit light, and apply composition effectively, you've laid a solid foundation for your photography journey. Even as a beginner, you can create emotionally rich and unique photographs if you combine technique with aesthetic sense. The most important thing is to constantly practice, experiment, and discover your personal style.


VIP Products


Best Selling Products
Upgrade genuine Capture One account
120 USD
Autodesk All App Account Copyright
120 USD
Copyright Adobe Lightroom Account
59 USD
Capcut Pro 1 Year
39 USD
Plugin Retouch4me
69 USD
Genuine Cheap Canva Pro
39 USD
MidJourney Account
29 USD
Genuine Adobe Illustrator account
99 USD
Upgrade Genuine Office 365
49 USD
Upgrade Duolingo Super
29 USD
ChatGPT Plus Account (GPT-4)
16 USD
Windows 10 & 11 Pro Key
36 USD
Freepik Premium Account
59 USD
Adobe Premiere Pro Account
99 USD
Adobe Photoshop Copyright - Full App
120 USD