Best Selling Products

Upgrade Duolingo Super
29 USD

ChatGPT Plus Account (GPT-4)
16 USD

Genuine Cheap Canva Pro
39 USD

Freepik Premium Account
59 USD

Adobe Photoshop Copyright - Full App
120 USD

Adobe Premiere Pro Account
99 USD

Autodesk All App Account Copyright
120 USD

Genuine Adobe Illustrator account
99 USD

Plugin Retouch4me
69 USD

Upgrade Genuine Office 365
49 USD

Windows 10 & 11 Pro Key
36 USD

Copyright Adobe Lightroom Account
59 USD

Upgrade genuine Capture One account
120 USD

Capcut Pro 1 Year
39 USD

MidJourney Account
29 USD
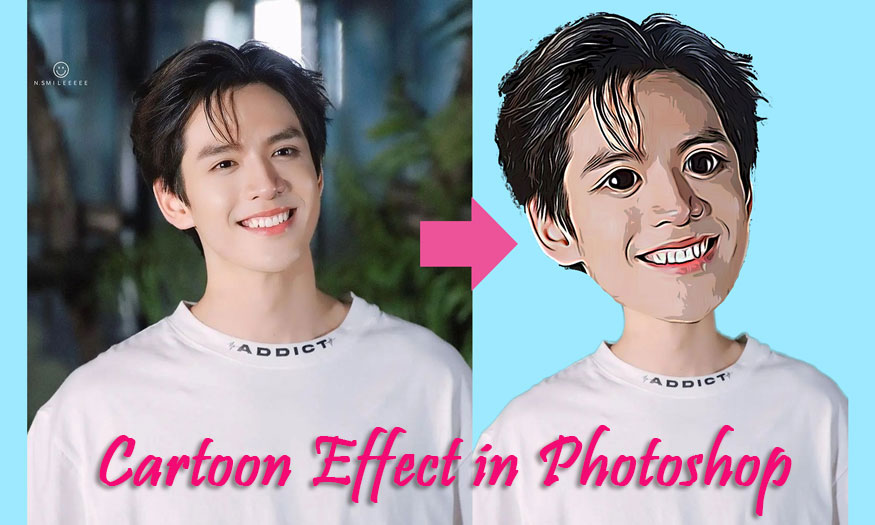
How to creat cartoon photo effects in Photoshop
Nội dung
Cartoon photo effects in Photoshop with scribbled drawings will help make your design more unique and interesting. With the combination of many different tools in this software, you will create photos with extremely vivid animated subjects. Please follow the article below, SaDesign will guide you step by step.
Cartoon photo effects in Photoshop with scribbled drawings will help make your design more unique and interesting. With the combination of many different tools in this software, you will create photos with extremely vivid animated subjects. Please follow the article below, SaDesign will guide you step by step.
.jpg)
1. Steps to perform cartoon photo effects in Photoshop
- Step 1: First you need to upload the photo you want to create a cartoon photo effect in Photoshop.
On the menu bar, select File => Open, then select the appropriate photo and click OK.
You can use the keyboard shortcut Ctrl+O => select the appropriate photo and then click OK.
.jpg)
- Step 2: On the toolbar, select Quick Selection Tool and then drag and select the selection as the object. You can zoom in to adjust the image area. If you want to deselect a certain area, hold down Alt and move the mouse. Create a selection that matches the subject as closely as possible.
.jpg)
- Step 3: On the menu bar, select Select => Select and Mask. Older versions of Photoshop do not have Select and Mask, so you choose Refige Edge...
.jpg)
In the dialog box that appears, set View Mode to Overlay. Then select the Refine Edge Brush, adjust it to a medium size and make sure the brush is soft.
.jpg)
- Step 4: Brush the edges of your hair in the lighter areas. This will gradually remove the background. Then enter -10 in the Shift Edge section to diminish the selection. From Output, select Layer Mask and click OK.
.jpg)
At this point we will get the results as shown. The subject has been separated from the background, making it easier to create effects.
.jpg)
- Step 5: Next, we need a new background. Create a new layer below the object layer, click on the new Solid Color adjustment layer icon (the small circle at the bottom corner of the layers panel) and select Solid Color.
.jpg)
Choose a blue background color (#9de9ff). It will help highlight the subject and make the cartoon photo effect in Photoshop more realistic.
.jpg)
- Step 6: One of the recognizable characteristics of cartoon characters is their "oversized" head. It will make the character more lively, adorable and more cartoon-like.
To make the object's head larger, let's do the following steps.
Click once on the object's white layer mask while holding Ctrl to load the selection, then choose the Polygonal Lasso Tool. Start deselecting areas by holding down the Alt key, then trace the contour of the subject's chin in small segments.
.jpg)
At the end of this step, you should only select the head because we're only setting the animation for the character's head.
.jpg)
- Step 7: Press Ctrl+J to create a copy of the head layer on a new layer, you can optionally rename it to "Head".
.jpg)
- Step 8 : Select the Move Tool then press Ctrl+T and make his head bigger by dragging one of the corners. If you hold down Shift+Alt, the head will be resized at all four corners.
.jpg)
- Step 9: To have an animated object, you need to modify the object's facial features. Right click on the Head layer => Convert to Smart Object. This will allow you to add different smart Photoshop animation filters on the same layer and re-adjust them without destruction.
.jpg)
- Step 10: On the menu bar, select Filter => Liquify.
.jpg)
Then use the Bload Tool (B) in the left corner of the menu, click on the eye area to make the eye bigger. Any area you want to make larger, click on it. We can also combine other tools to make points on the subject's face larger or smaller.
.jpg)
You will now receive the results displayed as shown in the image. The results show that the eyes are larger and look more cartoonish.
.jpg)
- Step 11: On the menu bar, select Filter => Sharpen => Smart Sharpen.
.jpg)
In the window that appears, set the following parameters:
-
Amount: 300
-
Radius: 3
-
Select Gaussian Blur.
-
Click OK.
.jpg)
- Step 12: On the menu bar, select Filter => Oil Paint.
.jpg)
In the window that appears, set the following parameters:
-
Stylization: 4
-
Cleanliness: 4
-
Scale: 0.1
-
Bristle Detail: 0
-
Lighting: disabled
.jpg)
- Step 13: On the menu bar, select Filter => Filter Gallery, and from the list of effects, click Artistic, then select Poster Edges.
In the window that appears, enter the following values:
-
Edge Thickness: 0
-
Intensity: 0
-
Posterization: 2
-
Click OK
.jpg)
- Step 14: As you can see, the boy is really starting to look like a cartoon character. The details become softer and larger eyes.
.jpg)
- Step 15: Add sharpness to the character by going to Filter => Sharpen => Unsharp Mask. Set Amount to 130, Amount to 7 and Threshold to 20.
.jpg)
So you have created a cartoon photo effect in Photoshop for the character in the photo.
.jpg)
2. How to create a simple cartoon photo effect in Photoshop with Action
You can see that creating your own cartoon photo effect in Photoshop as above involves many steps and will be quite time-consuming, especially for those who are not fluent in Photoshop. Instead of spending a lot of time performing the above steps, you can use the available cartoon photo effect action set in Photoshop. What you need to do is download this action set to your device. After downloading this action set to your computer, you can launch it by following these steps:
- Open the Actions panel in Photoshop by going to Window => Actions.
- Load the action file from the folder you saved it.
- Select the action you want to apply for the cartoon photo effect in Photoshop.
- Press the Play button and let it run.
.jpg)
.jpg)
And below is the result obtained by using one of four actions from cartoon photo effects pack. Depending on your needs, you can refer to different animation effects.
.jpg)
With this action set, creating cartoon photo effects in Photoshop now becomes extremely simple, with just a few clicks you will have extremely unique pictures.
Above is a summary of information on how to create cartoon photo effects in Photoshop. In fact, doing it manually is quite complicated and time-consuming, but it will train you to operate Photoshop, help you become more familiar with this software.
However, using the animated photo effect action set in Photoshop makes the time faster and easier. But it makes you dependent on available applications, the photo will not have much variation or personality. Depending on your needs, choose the appropriate method.


VIP Products


Best Selling Products
Upgrade Duolingo Super
29 USD
ChatGPT Plus Account (GPT-4)
16 USD
Genuine Cheap Canva Pro
39 USD
Freepik Premium Account
59 USD
Adobe Photoshop Copyright - Full App
120 USD
Adobe Premiere Pro Account
99 USD
Autodesk All App Account Copyright
120 USD
Genuine Adobe Illustrator account
99 USD
Plugin Retouch4me
69 USD
Upgrade Genuine Office 365
49 USD
Windows 10 & 11 Pro Key
36 USD
Copyright Adobe Lightroom Account
59 USD
Upgrade genuine Capture One account
120 USD
Capcut Pro 1 Year
39 USD
MidJourney Account
29 USD