Best Selling Products

Adobe Premiere Pro Account
99 USD

Windows 10 & 11 Pro Key
36 USD

Upgrade Duolingo Super
29 USD

Capcut Pro 1 Year
39 USD

Upgrade Genuine Office 365
49 USD

Copyright Adobe Lightroom Account
59 USD

Plugin Retouch4me
69 USD

Genuine Cheap Canva Pro
39 USD

MidJourney Account
29 USD

ChatGPT Plus Account (GPT-4)
16 USD

Autodesk All App Account Copyright
120 USD

Genuine Adobe Illustrator account
99 USD

Upgrade genuine Capture One account
120 USD

Freepik Premium Account
59 USD

Adobe Photoshop Copyright - Full App
120 USD
ChatGPT Images 2.5 Guide: Secrets to Creating Beautiful AI Images for Beginners
Nội dung
- 1. What is ChatGPT Images 2.5? What are its outstanding features?
- 2. What do I need to prepare before using ChatGPT Images 2.5?
- 3. Instructions on using ChatGPT Images 2.5 to create AI images
- 3.1. Step 1: Access ChatGPT and enable the image creation feature.
- 3.2. Step 2: Write the command to describe the image.
- 3.3. Step 3: Upload reference images for better AI understanding.
- 3.4. Step 4: Wait for the image to be created and check the results.
- 3.5. Step 5: Edit the image using additional requirements.
- 3.6. Step 6: Save the image to your device
- 4. Secrets to writing prompts that create beautiful and effective AI images.
- 5. Important notes when using ChatGPT Images 2.5
- 6. Conclusion
AI technology is opening up many creative ways to quickly generate images without requiring users to be proficient in professional design software. With just a few lines of description, you can transform your ideas into visual images for work, study, or social media. Among the tools currently attracting attention, ChatGPT Images 2.5 stands out thanks to its ability to create images on demand and support editing based on natural language instructions. So how do you use this tool to get beautiful images that perfectly match your ideas, even if you''re a beginner? Let''s explore the details in the article below.

1. What is ChatGPT Images 2.5? What are its outstanding features?
ChatGPT Images 2.5 is touted as an AI-powered image creation and editing version aimed at helping users realize their ideas more easily. Instead of manually designing every detail, you can describe the subject, colors, lighting, composition, and desired style for the AI to process. A notable feature of this modern image creation technology is its ability to combine multiple requests into a single command, and to continue editing the image after the initial result is obtained.
Some of the highlights of AI image creation tools that users might be interested in include:
-
Create images from text descriptions: Transform simple ideas into illustrations, product photos, posters, or wallpapers in your desired style.
-
Flexible editing support: You can request color changes, background replacements, detail additions, or layout adjustments without necessarily having to recreate the entire image.
-
Increased control over the image: Specific descriptions of lighting, shooting angles, and materials help the results adhere more closely to the original design direction.
-
Supporting creative idea development: A suitable tool for content creators, online sellers, students, and anyone who wants to experiment with different visual styles.
-
Interacting in natural language: You don't need to memorize too many technical terms. Just clearly express what changes you want, and the system will try to implement them according to your instructions.
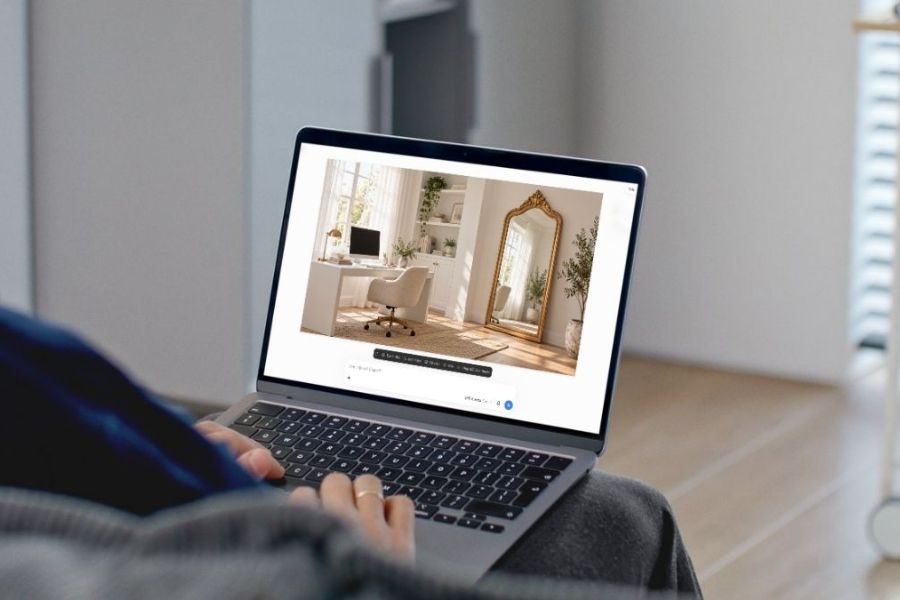
2. What do I need to prepare before using ChatGPT Images 2.5?
Before you start creating images, you should prepare your ChatGPT account, determine the purpose of use, and have a rough idea of the desired result. This preparation doesn't take much time but helps you avoid having to revise too many times. Especially if you're designing images to sell products or create content for social media, determining the correct size and style from the start will help create a more consistent and professional final product.
Things to prepare include:
-
ChatGPT Account: Access ChatGPT using your browser or the official app. Image creation capabilities and usage limits may vary depending on your account plan, region, and current policies.
-
Image concept: Clearly define whether you want to create a portrait, landscape, product, advertising poster, or illustration.
-
Specific details: Prepare information such as the subject, background, dominant colors, style, and aspect ratio.
-
Reference images if needed: Having existing images will help you better showcase the product design, character appearance, or desired layout.
-
Review time: After the AI creates the image, take time to review the details, especially the text, logos, faces, and other important elements.
You don't need a complete design to get started. For beginners, a simple idea and a few clear requirements are enough to experiment.
3. Instructions on using ChatGPT Images 2.5 to create AI images
If you've never used an AI-powered image creation tool before, you can start right from the ChatGPT interface. The basic process involves opening the tool, entering a command, adding a reference image if needed, checking the results, and downloading the image to your device. The names of some buttons or function locations may vary depending on the interface, but the general operating principle is similar.
3.1. Step 1: Access ChatGPT and enable the image creation feature.
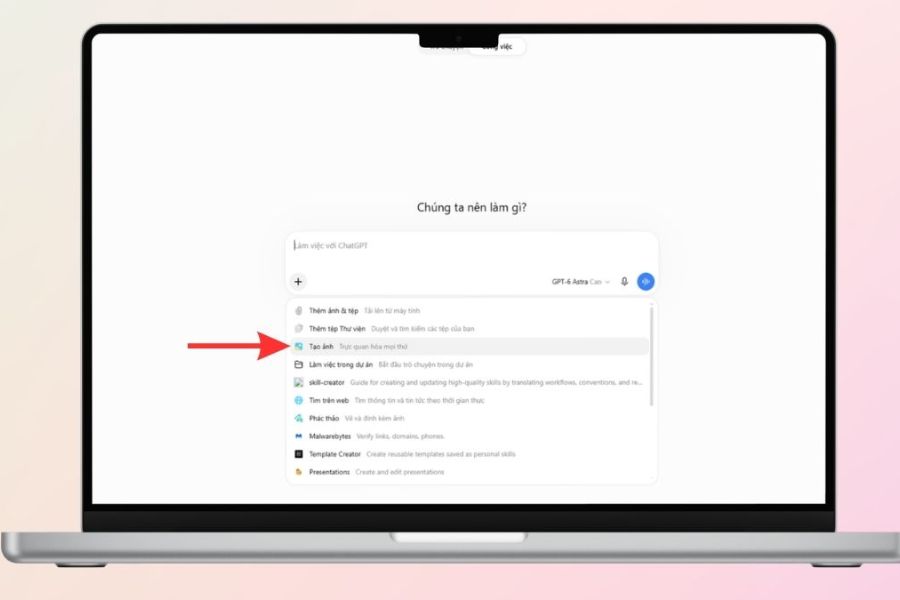
First, open the ChatGPT page on your browser or mobile app and log in to your account. In the chat interface, check the input area to find the image creation feature if your account supports it. On some interfaces, this option may be located in the plus menu or the tools area.
Once you've enabled the correct function, you can directly enter your request to start creating. If you don't see the image creation option, check your app version, account support, or try accessing ChatGPT via your browser.
3.2. Step 2: Write the command to describe the image.
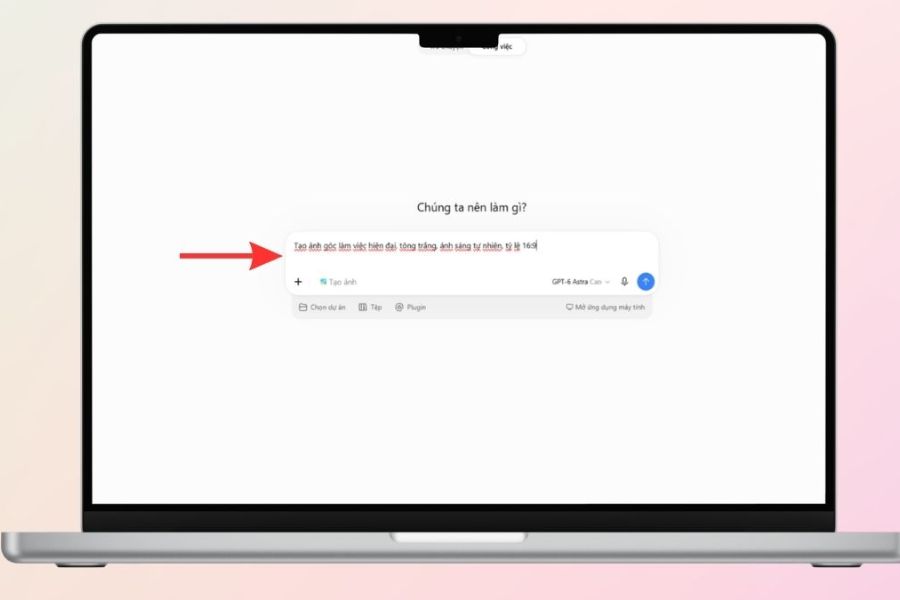
The prompt, or command, is a crucial element in determining whether the resulting image closely matches your vision. Instead of simply writing a short sentence like "create a beautiful workspace image," you should provide more information about style, lighting, color, and object arrangement. The clearer your goal, the easier it will be to evaluate and adjust the result.
For example, you can use the following statement:
"Creating an image of a modern workspace in a minimalist room, a light-colored wooden desk, a laptop in the center, a small potted plant nearby, natural light streaming through the window, white and beige tones, a realistic photography style, a clean composition, and a 16:9 aspect ratio."
When writing prompts, keep the following in mind:
-
Subject: Clearly state the main subject that should appear in the photograph.
-
Context: Describes the location, space, and surrounding objects.
-
Style: Choose realistic photos, cartoons, illustrations, 3D, or any style that suits the purpose.
-
Color and lighting: Determine the dominant color tone, natural light, or studio lighting.
-
Composition and Proportion: Specify the subject's position, the amount of empty space to maintain, and whether to use horizontal, vertical, or square formatting.
You don't need to write an overly long prompt right from the start. Begin with the most important requirements, then add details based on actual results.
3.3. Step 3: Upload reference images for better AI understanding.
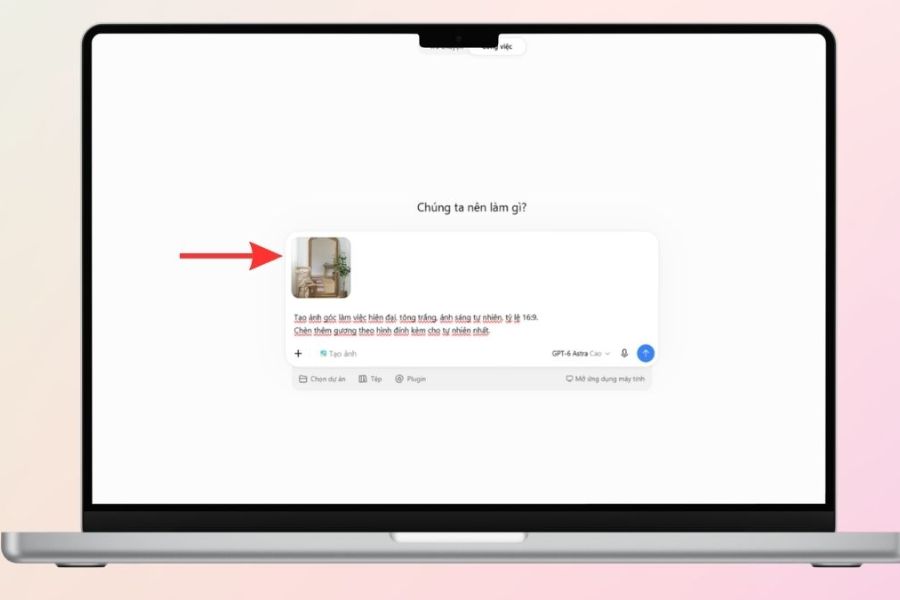
If you want to create an image based on an existing product, character, or design, you can upload a reference image to the chat if the interface supports it. Image input helps you convey ideas more visually than using only text, especially when you need to retain specific features like color, style, or arrangement.
After uploading the image, clearly describe which parts should remain unchanged and which parts can be modified. For example, if you want to create an advertisement for a handbag, you could request that the style, color, and details of the strap be kept the same, while changing the background to a cafe with natural light.
Some things to keep in mind when using reference images:
-
Choose images that are clear enough so that important details are easily identifiable.
-
Specify the features that must be retained.
-
Specify the parts that need to be changed, such as the background, lighting, or camera angle.
-
Use images that you have the rights to, especially when designing commercial content.
3.4. Step 4: Wait for the image to be created and check the results.
After completing the command, submit the request and wait for the system to process it. Image creation time may vary depending on the complexity of the prompt, system load, and account limits. When the image appears, don't download it immediately; instead, check if the finished product meets your description.
You should pay attention to the main subject, colors, composition, small details, and suitability for the intended purpose. For example, if you're creating product images for sale, check if the style is distorted, if any decorative details are added incorrectly, and if the colors are too different from the actual product. If the image isn't satisfactory, you can continue the discussion to make adjustments. This approach helps you refine the product step by step instead of having to start from scratch.
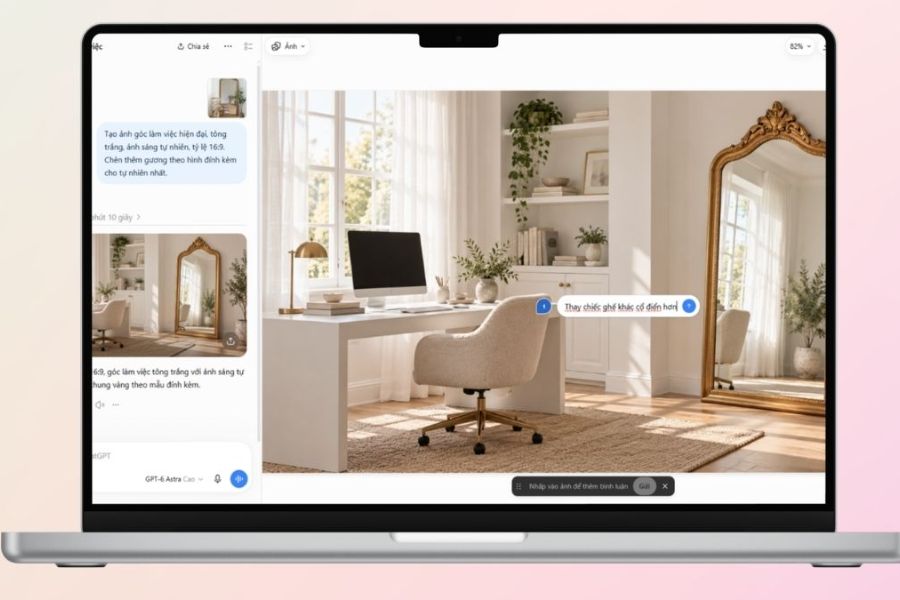
3.5. Step 5: Edit the image using additional requirements.
One advantage of creating images through conversation is that you can use natural language to request changes to individual details. You don't need to re-describe the entire image in each turn. Instead, state exactly what's wrong and the desired outcome.
For example, if the original image is too dark, you could request: “Increase overall brightness, use softer natural lighting, keep the subject and current composition.” If you want to change the background, try the command: “Change the background to a light cream color, keep the product, shooting angle, and aspect ratio the same.”
To make the editing process more efficient, you should:
-
Change only one or two elements at a time.
-
Clearly state which sections are not allowed to be edited.
-
Use specific language instead of general comments like "makes you look better".
-
Review all images after each edit to detect any new errors.
Setting requirements step-by-step will help you better control the results and prevent unintentional changes to details that were already beautiful.
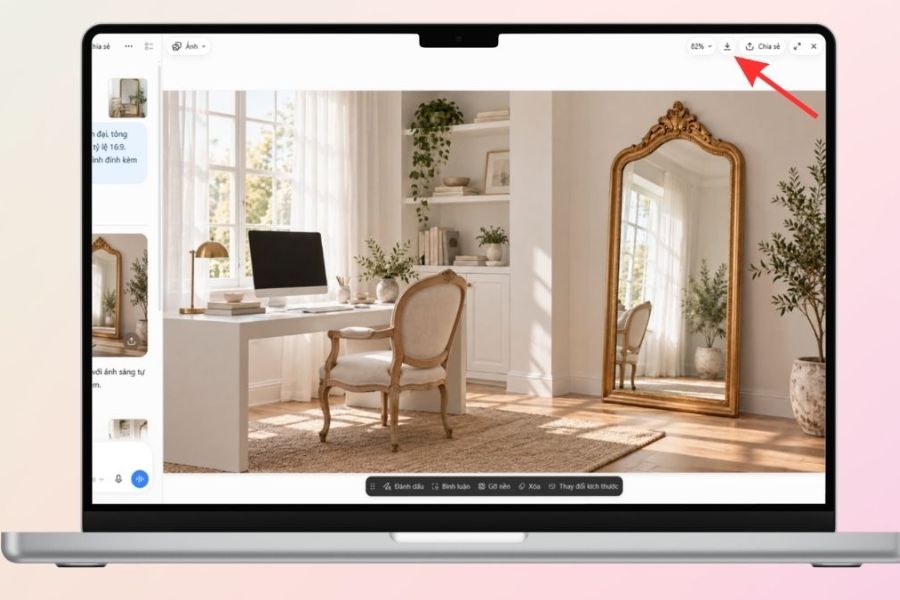
3.6. Step 6: Save the image to your device
Once you're satisfied with the result, open the image and find the download or save option on the interface. Depending on your device and app version, the location of the save button may vary. After downloading, you should open the file to check its quality, size, and format before uploading it or incorporating it into other designs.
Before using the image, please check a few important points:
-
Does the image have sufficient resolution for its intended use?
-
Are the lettering, logo, and other important details accurate?
-
Is the layout suitable for the publishing platform?
-
Does the image contain any extraneous details or easily noticeable generative errors?
4. Secrets to writing prompts that create beautiful and effective AI images.
Knowing how to open a new tool is just the first step. To create aesthetically pleasing and purposeful images, you need to practice describing your requirements. An effective prompt doesn't necessarily have to be long, but it needs to be specific and free of contradictory instructions. Especially when creating images for work, prioritize clarity and consistency over excessive decorative details.
Here are some helpful tips for beginners:
-
Describe the subject first: Tell the AI which object needs the most attention in the image.
-
Choose a dominant style: If you want authentic photos, focus on lighting, textures, and camera angles instead of combining too many different styles.
-
Clearly state the purpose of use: Social media photos, commercial product photos, and article illustrations have different layout requirements.
-
Use specific language: Instead of writing "beautiful color," describe it as "pale pink and cream tones, soft light, subtle contrast."
-
Preserve important details: When editing an existing image, clearly indicate which features should not be altered.
-
Create multiple versions as needed: You can try different options for color, lighting, or layout and then choose the best result.
5. Important notes when using ChatGPT Images 2.5
Even though AI image creation tools are becoming increasingly intelligent, the results may still contain errors or differ from the original description. Therefore, you shouldn't assume that every generated image is perfect for immediate use. Carefully checking the final product is especially important when the image is used in advertising, professional documents, or content requiring a high degree of accuracy.
Here are some things you should keep in mind:
-
Check the text in the image: AI can create misspelled text, missing characters, or poorly arranged content. For posters with a lot of information, you should carefully check and consider adding text using design software.
-
Don't assume product photos are completely accurate: If using photos for sales purposes, compare them to the actual product, especially the color, shape, material, and other details.
-
Image usage rights notice: Please exercise caution when using images of other people, copyrighted characters, trademarks, or materials that you do not own.
-
Do not upload sensitive data: Avoid including personal information, identification documents, or internal documents in reference images unless absolutely necessary.
-
Platform policy compliance: Image creation requests must comply with the service's terms of use and safety limitations.
-
Verify the source of the image: If the image is used in media or advertising, ensure transparency regarding AI-generated content when applicable.
-
Understand the current terms of use: If you intend to use the images for commercial purposes, check the terms of service and relevant legal regulations.
6. Conclusion
ChatGPT Images 2.5 opens up a more intuitive approach for those who want to create images using AI without much design experience. With just a clearly written command, images can be created to serve a variety of needs, from illustrating articles and designing posters to building online sales content. By knowing how to combine prompts, reference images, and specific editing requirements, you will have more control over the results. If you are just starting out, try creating simple images first, then gradually add details about lighting, color, and composition.





















VIP Products








Best Selling Products
Adobe Premiere Pro Account
99 USD
Windows 10 & 11 Pro Key
36 USD
Upgrade Duolingo Super
29 USD
Capcut Pro 1 Year
39 USD
Upgrade Genuine Office 365
49 USD
Copyright Adobe Lightroom Account
59 USD
Plugin Retouch4me
69 USD
Genuine Cheap Canva Pro
39 USD
MidJourney Account
29 USD
ChatGPT Plus Account (GPT-4)
16 USD
Autodesk All App Account Copyright
120 USD
Genuine Adobe Illustrator account
99 USD
Upgrade genuine Capture One account
120 USD
Freepik Premium Account
59 USD
Adobe Photoshop Copyright - Full App
120 USD