Best Selling Products

Genuine Adobe Illustrator account
99 USD

Windows 10 & 11 Pro Key
36 USD

Adobe Photoshop Copyright - Full App
120 USD

Copyright Adobe Lightroom Account
59 USD

Plugin Retouch4me
69 USD

Autodesk All App Account Copyright
120 USD

Upgrade Genuine Office 365
49 USD

Genuine Cheap Canva Pro
39 USD

Upgrade genuine Capture One account
120 USD

Adobe Premiere Pro Account
99 USD

Freepik Premium Account
59 USD

Upgrade Duolingo Super
29 USD

ChatGPT Plus Account (GPT-4)
16 USD

Capcut Pro 1 Year
39 USD

MidJourney Account
29 USD
Creating a 3D tilted image in Canva is extremely simple; even beginners can do it.
Nội dung
- 1. What is 3D tilting in Canva?
- 2. Benefits of creating 3D tilted images in Canva
- 2.1. Increase visual depth in design
- 2.2. Helps make the design stand out and less boring.
- 2.3. Easy to do, even for beginners.
- 3. How to create a 3D tilted image in Canva on a computer
- 3.1. Step 1: Open your design and upload images to Canva
- 3.2. Step 2: Open the Applications section in Canva
- 3.3. Step 3: Find the Skew Image tool
- 3.4. Step 4: Select the image you want to apply the effect to.
- 3.5. Step 5: Adjust the tilt angle accordingly.
- 3.6. Step 6: Add the edited image to the design
- 4. Tips for creating better 3D tilted photos in Canva
- 4.1. Combining tilted images with shadows
- 4.2. Choose a simple background.
- 4.3. Adjust the tilt angle appropriately.
- 5. Common mistakes when creating 3D tilted images in Canva
- 5.1. Tilting the image too sharply causes distortion.
- 5.2. The image is out of proportion with the text.
- 5.3. Overuse of effects
- 6. Applications of 3D tilted images in design
- 6.1. Designing thumbnails and social media posts
- 6.2. Designing banners and promoting products
- 6.3. Designing presentation slides and posters
- 7. Note that tilting 3D images in Canva looks more professional.
- 8. Conclusion
A neatly placed image isn''t always enough to make a design stand out. If you want your image to look more striking, have depth, and feel more modern, you can try the 3D tilt effect in Canva. With just a few simple steps, a regular flat image can appear to be placed in space, making the overall design more vibrant and appealing. The great thing is you don''t need to be proficient in Photoshop or other professional graphic design software to create this effect. Canva offers many intuitive editing tools, and Skew Image is a useful option if you want to transform an image at an angle. With the right steps, even beginners can create a beautiful effect. Let''s explore it with Sadesign!
1. What is 3D tilting in Canva?
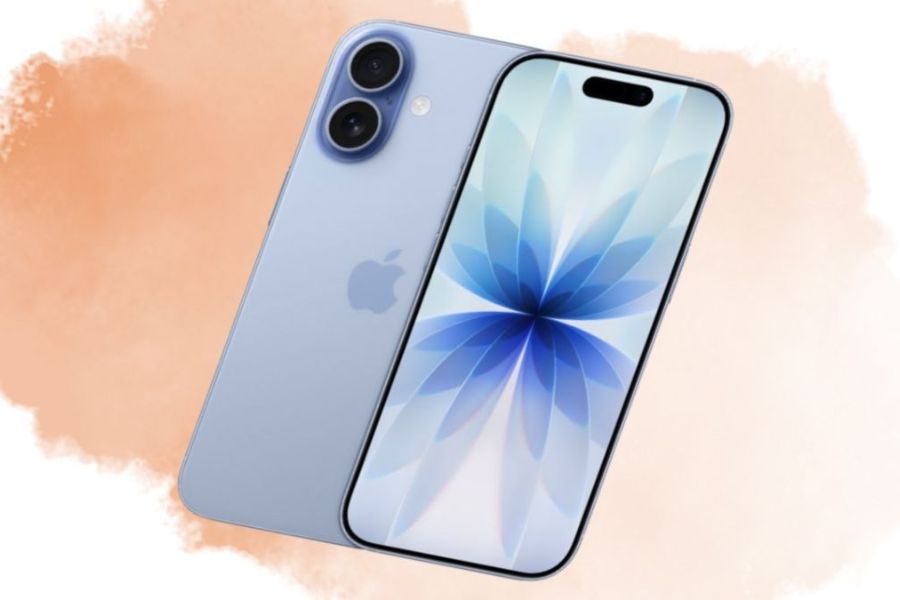
Simply put, a 3D tilted image is an image that is transformed at a certain angle to create the illusion that the object is in space instead of appearing flat on the screen. When adjusted properly, this effect creates a sense of depth, adds emphasis to the image, and makes the composition more flexible.
The tilt effect is particularly suitable for designs that need to grab attention at first glance. You can use this technique when designing thumbnails, banners, posters, social media posts, presentation slides, or product images. However, it's important to choose the right tilt angle so the image still looks natural.
2. Benefits of creating 3D tilted images in Canva
3D tilted images are more than just a decorative effect. When used correctly, they can add depth to a composition, highlight the subject, and make a design less monotonous. This is why this effect often appears in advertising, technology, social media, and creative content.
In particular, Canva makes the process more accessible. You don't need to learn complex transformation techniques; you can perform them directly through the tool's support. As a result, beginners can still experiment with many different layout styles without spending too much time.
2.1. Increase visual depth in design
When an image is tilted in a certain direction, the viewer's eye perceives the image as being in a three-dimensional space. Compared to placing the image completely flat, this effect gives the design depth and a more modern feel. Even a small change in viewing angle can make the layout significantly more interesting.
You can enhance this effect by combining tilted images with shadows, gradient backgrounds, or a few decorative shapes. However, secondary elements should be used sparingly so that the main image remains the focal point. A composition with depth doesn't necessarily need to contain too many effects.
2.2. Helps make the design stand out and less boring.
Images placed in straight lines and at the same spacing can sometimes make a design look quite rigid. A slightly tilted image can make a difference, guiding the viewer's gaze to the area you want to emphasize.
This effect is especially useful for thumbnails, social media posts, or advertising banners, where the image needs to grab attention quickly. You can tilt the image to the left, to the right, or combine multiple images at different angles to create a layout that gives the impression of movement.
2.3. Easy to do, even for beginners.
One of Canva's biggest advantages is its intuitive interface and relatively easy-to-learn editing operations. You don't need in-depth graphic design knowledge to try out 3D tilt effects on photos.
Simply prepare the image, open the appropriate tool, and adjust the parameters as needed, and you can create a new version of the image. This is a suitable option for content creators, shop owners, students, or anyone who frequently needs to design images themselves.

3. How to create a 3D tilted image in Canva on a computer
Before you begin, you should prepare the image you want to use. A high-resolution image will help maintain clarity after transformation. If the image is too small or of low quality, changing the angle and zooming in may cause the image to become pixelated.
Additionally, you should also visualize the image's placement within the design. For example, if the text is on the left, you can tilt the image to the right to create balance. Determining the layout from the start will make the editing process faster and easier.
3.1. Step 1: Open your design and upload images to Canva
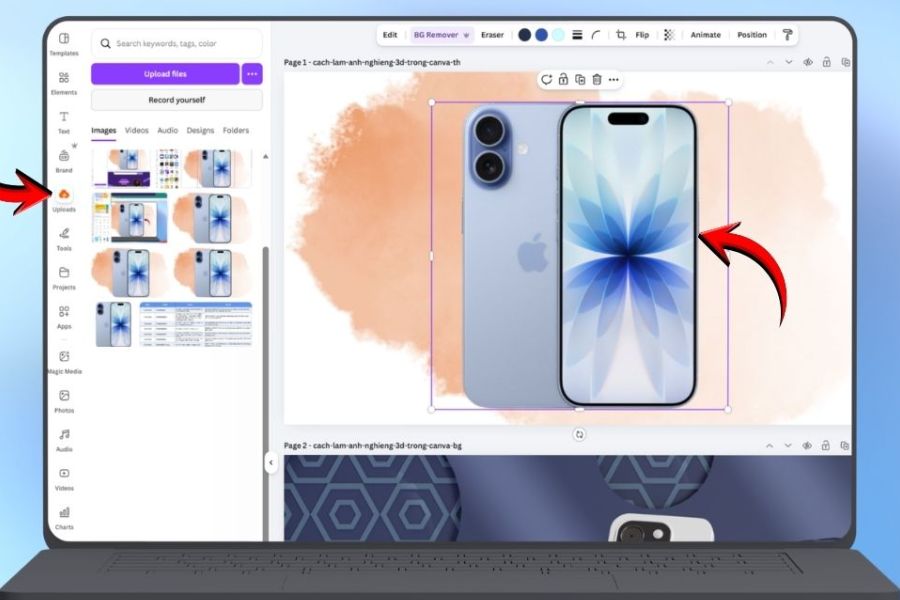
First, go to Canva and open a new design or one you're currently editing. You can choose the size according to your needs, such as a social media post design, thumbnail, poster, or banner. Then, find the upload section to bring the image you want to edit into Canva.
Once the image has been uploaded, drag and drop it onto the design page. You can adjust the initial size and position, but there's no need to apply the tilt effect immediately. Make sure there's enough space around the image so that it can still easily fit into the layout after the transformation.
3.2. Step 2: Open the Applications section in Canva
After importing the image into your design, select it and then find the " Applications" section on the Canva toolbar. This is where you'll find a variety of tools that can expand your image editing and effects capabilities.
Click on the "Applications" section to open the search interface. Depending on your Canva version or current interface, the location of this section may vary slightly. If you don't see it immediately, simply look at the toolbar and find the area containing the applications that support editing.
3.3. Step 3: Find the Skew Image tool
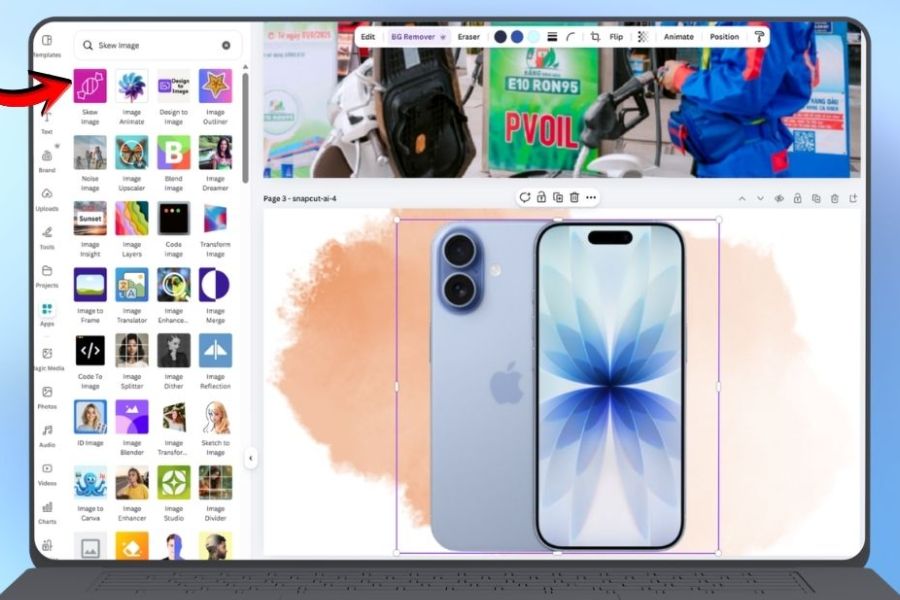
In the search box of the Applications section, enter the keyword "Skew Image" . This is a tool that helps transform images based on their angle, creating the illusion that the image is placed in space.
When the results appear, select Skew Image to open the tool. You should observe the interface and experiment with each option before making drastic adjustments. Familiarizing yourself with the tool from the beginning will help you better control the effect.
3.4. Step 4: Select the image you want to apply the effect to.
After opening Skew Image, select the image you want to transform. If the image is already in your design, the tool will allow you to use it to begin editing.
At this step, double-check the image before tilting it. If the image is already the correct size and the subject is in the right position, the editing process will be easier. For product photos or images with many straight lines, you should adjust slowly to minimize distortion.
3.5. Step 5: Adjust the tilt angle accordingly.
Next, use the Skew Image sliders to change the tilt angle. You can try tilting the image to the left, right, or adjusting the top and bottom sections to achieve your desired layout.
Don't try to create a very sharp tilt right from the start. A slight tilt usually feels more natural and blends easily with other elements. If the image is stretched or distorted too much, reduce the intensity and re-check until you achieve a pleasing result.
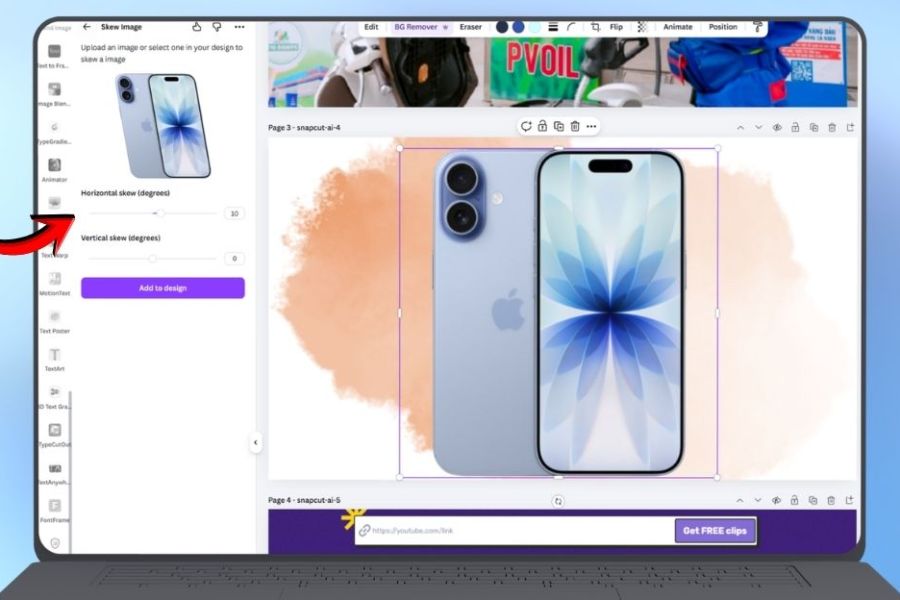
3.6. Step 6: Add the edited image to the design
After you've finished adjusting the tilt angle, select " Add to design" to bring the transformed image back to your design page. Now you can use the image just like a regular element in Canva.
Try changing the position, size, and spacing of the image to find the best composition. If needed, you can also add shadows or some subtle decorative elements to enhance the sense of depth in the image.
4. Tips for creating better 3D tilted photos in Canva
Creating a tilt effect is only part of the design process. For an image to truly stand out, you need to pay attention to the balance between the image, text, colors, and background. A beautiful effect, if placed incorrectly, can still make the overall design look cluttered.
Therefore, after creating a tilted image, take extra time to adjust the entire layout. Sometimes, simply slightly reducing the tilt or moving the image to a different position can make a noticeable difference to the design.
4.1. Combining tilted images with shadows
Shadows are one of the simplest ways to make a slanted photo look more three-dimensional. A subtle shadow behind the subject can create the illusion that the image is rising from the background instead of just being distorted in shape.
However, you shouldn't use shadows that are too dark or too large. Shadows should blend into the background and support the image, rather than becoming a detail that draws more attention than the subject.
4.2. Choose a simple background.
A simple background will help the tilted image become a clearer focal point. You can use a solid color, a subtle gradient, or a background with a pattern but not too much detail.
If the main image already has a lot of color, the background should be even more restrained. When both the image and the background are too striking, viewers may have difficulty determining what is most important.
4.3. Adjust the tilt angle appropriately.
The angle of tilt is a crucial factor in determining whether the effect looks natural. If tilted too little, viewers may find it difficult to notice the difference. Conversely, if tilted too much, the image is likely to appear distorted and unbalanced.
For beginners, the safest approach is to start with a slight tilt and gradually increase it if needed. Always observe the subject in the photo and the overall composition instead of focusing solely on the degree of tilt.
5. Common mistakes when creating 3D tilted images in Canva
During the process, some minor errors can result in the effect not looking as good as desired. Most of these stem from adjusting the angle too drastically or not balancing the image with the rest of the design elements.
By simply reviewing the layout after each revision, you can quickly spot and fix these problems. In particular, don't hesitate to try several different versions before choosing the final design.
5.1. Tilting the image too sharply causes distortion.
This is a fairly common mistake when first getting acquainted with Skew Image. When trying to create a clear 3D effect, many people tend to drag the slider too far, causing significant image distortion.
The simplest solution is to reduce the tilt and re-examine the subject's shape. For portraits, product photos, or images with straight lines, a moderate tilt angle is especially important to maintain a natural look.
5.2. The image is out of proportion with the text.
A beautiful image, if misplaced, can still unbalance a design. If the image is tilted, takes up too much space, or obscures the text, viewers will have difficulty grasping the information.
You should try different arrangements and create space between the image and the content. If the text is on the left, the image can be placed slightly to the right, and vice versa, to create a balanced layout.
5.3. Overuse of effects
The 3D tilted image already creates a focal point, so it doesn't necessarily need to be combined with too many other effects. Adding too many shadows, lights, gradients, or shapes can make the design look heavy and cluttered.
Identify a central element and let the rest play a supporting role. A beautiful design doesn't usually need too many effects; what's important is that the elements are arranged correctly and have a connection.
6. Applications of 3D tilted images in design
Once you understand how to create a tilted image, you can apply this effect to many different types of content. Depending on the situation, simply changing the tilt angle and layout can create a completely new design.
This effect is particularly suitable for content that needs to make a visual impression right from the start. You can begin with simple designs and then gradually experiment with more complex layouts.
6.1. Designing thumbnails and social media posts
Thumbnails are where 3D tilted images can be quite effective. You can tilt a character, product, or screenshot to create emphasis and make the layout more distinctive.
For social media posts, angled images can be combined with large headlines and simple backgrounds. This gives the design a modern feel while creating space for content without making the image look boring.
6.2. Designing banners and promoting products
If you're creating a product banner, you can position the product at a slight angle to make it stand out. Combining this with appropriate shadows and a suitable background will help the product appear to separate from the background.
This approach is also suitable for designs showcasing phones, laptops, apps, or other technology products. An angled image can create a more dynamic and modern feel compared to presenting the product completely upright.
6.3. Designing presentation slides and posters
In presentation slides, tilted images can be used to break up overly rigid layouts. You can place a tilted image on one side and the content on the other, creating a clear separation.
With posters, this effect helps the main image become the focal point. However, the text and other details should be kept relatively concise to avoid the design becoming overly informational.
7. Note that tilting 3D images in Canva looks more professional.
A beautiful effect isn't about using a lot of tools, but about controlling every detail. When designing 3D tilted images, always prioritize balance, readability, and consistency with the subject.
Before downloading the design, you can quickly check a few elements such as:
-
Is the image distorted or out of proportion?
-
Is the angle appropriate for the composition?
-
Is the main subject still clear?
-
Is the text easy to read?
-
Is the background too prominent?
-
Do the shadows look natural?
-
Are the components overlapping?
-
Do 3D effects really make designs look better?
If all elements are balanced, you can export the design in a format suitable for your intended use. It's also a good idea to keep the original design in Canva for easy editing when needed.
8. Conclusion
Creating 3D slanted images in Canva isn't as complicated as many people think. With just a pre-existing image, the Skew Image tool, and a few adjustments, you can transform a flat image into one with a sense of depth and more impact. For beginners, start with subtle slant angles and a simple layout. Once you're familiar with the adjustments, you can combine shadows, gradient backgrounds, shapes, or typography to create more impressive designs. The most important thing is balance: the effect should only support the image and message, not clutter the design. With a few practice sessions, you'll easily master this effect and apply it to thumbnails, banners, posters, social media posts, or presentation slides. This is a small trick, but it can significantly improve the modern and attractive look of familiar Canva designs.





















VIP Products








Best Selling Products
Genuine Adobe Illustrator account
99 USD
Windows 10 & 11 Pro Key
36 USD
Adobe Photoshop Copyright - Full App
120 USD
Copyright Adobe Lightroom Account
59 USD
Plugin Retouch4me
69 USD
Autodesk All App Account Copyright
120 USD
Upgrade Genuine Office 365
49 USD
Genuine Cheap Canva Pro
39 USD
Upgrade genuine Capture One account
120 USD
Adobe Premiere Pro Account
99 USD
Freepik Premium Account
59 USD
Upgrade Duolingo Super
29 USD
ChatGPT Plus Account (GPT-4)
16 USD
Capcut Pro 1 Year
39 USD
MidJourney Account
29 USD