Best Selling Products
Create animated text effects in Photoshop SIMPLY with SaDesign
Nội dung
If you already have designs in a funny, cute style, the cartoon-style text will help your design look more unique and suitable for the context. This type of text is unique in its soft curves, eye-catching 3D effects,... Let's refer to SaDesign on how to create animated text effects in Photoshop through the following shares.

1. Create a Background for Animated Text Effect in Photoshop
First, we need a background to highlight the cartoon-style text. Since we will create the animated text effect in Photoshop, we should also choose a background in this style. Download a cartoon background of your choice and open it in Photoshop.
(1).jpg)
2. Create and curve the text
To get an animated text effect in Photo we first need to have the text and then edit it.
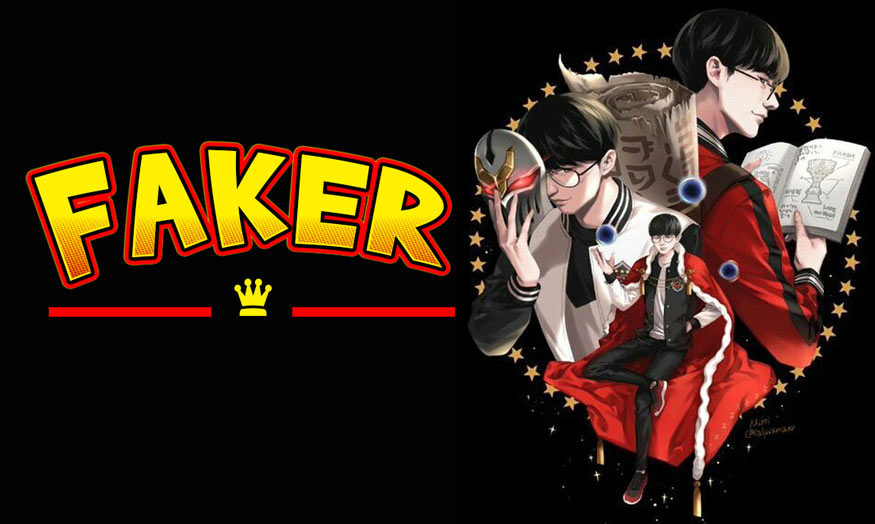
Step 1: Select the Horizontal Type Tool and choose the Brady Bunch Remastered cartoon text font. Set the size to whatever you want so that it is proportional to your background. Write whatever text you want. Leave it in capital letters to make it stand out, and set the color to whatever you want. Here I will write “FAKER” - the name of the character in the background I have chosen.
(1).jpg)
Step 2: Now we need to space the letters. Select the text layer, then go to the Character panel and change the Tracking to 50. If you can't see the Character panel icon, go to Window => Character.
(3).jpg)
Step 3: Next, right-click on the text layer and select Warp Text from the menu. Set the Style to Arc, select Horizontal, and set the Bend to 20% and Horizontal Distortion to -20%. Now click OK to apply the changes. You can also set the parameters as you like to best suit your design.
(4).jpg)
(3).jpg)
Now we get the result as shown below:
.jpg)
3. Create animated text effects in Photoshop
Once we have the text, let's animate it.
Step 1: Select the Faker text layer and double-click on it to open the Layer Style dialog box. Add a Stroke with the following settings:
Size: 10 px
Position: Outside
Blend Mode: Normal
Opacity: 100%
Fill Type: Gradient
Style: Shape Burst
Angle: 0°
Tick Dither
Set Gradient with 2 color points:
The first color stop has color code #f80000 and Location set to 45%
The second color stop has the color code #000000 and the Location is 59%
Select the Faker text layer and double click on this layer
.jpg)
Add Stroke with the following settings:
.jpg)
Step 2: Still in the Layer Style panel, add an Inner Shadow with the following settings:
Blend Mode: Normal with color code #fff000
Opacity: 100%
Uncheck Use Global Light before setting Angle: 180°
Distance: 3 px
Choke: 100%
Size: 0 px
Tick Anti-aliased
.jpg)
Step 3: Add a Satin style with the following settings:
Blend Mode: Normal with color code #fff000
Opacity: 100%
Angle: 90°
Distance: 2 px
Size: 0 px
Tick Anti-aliased
Uncheck Invert
.jpg)
Step 4: Add a Color Overlay with the following settings:
Blend Mode: Multiply
Select color code #fff000
Opacity: 100%
.jpg)
Step 5: Now we need to add a pattern to the text. Download the Red Dots pattern. Create the Layer Style panel earlier, add a Pattern Overlay with the following settings:
Select Pattern and choose to upload the Red Dots pattern
Opacity: 100%
Scale: 73%
add texture to text
.jpg)
Step 6: Add an Outer Glow with the following settings:
Blend Mode: Normal
Opacity: 100%
Select Color of glow as color code #fff000
Technique: Softer
Spread: 94%
Size: 11 px
Tick Anti-aliased
.jpg)
Finally, click OK. We get the image with the text effect as shown in the picture.
.jpg)
You can add some textures to make the design more unique. So we have completed how to create animated text effects in Photoshop.
.jpg)
Above are the steps to create animated text effects in Photoshop. In fact, the implementation is not too difficult, you just need to carefully combine many tools. Try many times to get the best results. Hopefully, the above sharing can help you.


