Best Selling Products
Create coffee cup mockup in Photoshop SUPER EASY with SaDesign
Nội dung
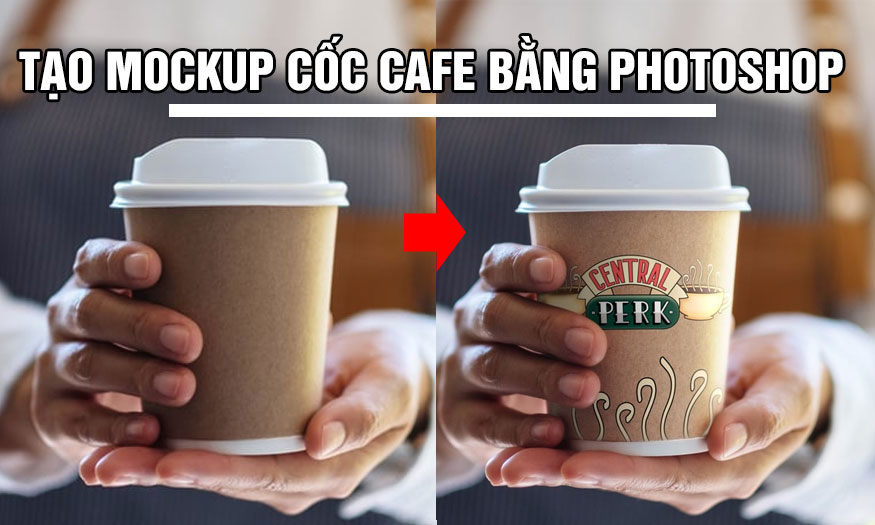
Do you want to design an impressive coffee cup? Try different patterns by creating mockups to choose the most suitable style. Just combine a few tools, you already have a super cool coffee cup model. Let's refer to SaDesign how to create a coffee cup mockup in Photoshop through the following shares.
1. Create a Smart Object for the coffee cup
First, we need to have a photo of the coffee cup model that you want to create a coffee cup mockup with Photoshop.
Step 1: Open the photo of the coffee cup you want to mockup. Select Adjustment in the control panel on the right corner of the screen. Then select Brightness/Contrast and change Brightness to 30 to add brightness. Or you can also adjust it according to your photo.

Step 2: Add another Brightness/Contrast adjustment layer. Use the Pen Tool (P) to create a selection around the coffee cup. Create a selection and apply a mask so that the effect is only applied to the paper cup. Change the Brightness to 55.
.jpg)
Step 3: On the toolbar, use the Rectangle Tool (U) and create a rectangle with the size of 1243 px x 1390 px to cover the surface of the cup model. Name this layer Coffee Logo Design.
.jpg)
Step 4: Right-click on the Coffee Logo Design layer in the Layers panel and select Convert to Smart Object. On the menu bar, select Edit => Transform Path => Warp to adjust your Smart Object layer to fit the coffee cup model.
Drag the anchor point on the image to fit the coffee cup image as shown below. The trick to making it fit the cup image is to reduce the Opacity of this layer to see the cup behind.
Convert to Smart Object.
.jpg)
2. Add texture to the coffee cup using Photoshop
Now is the time to add some custom designs to make your coffee cup more unique.
Step 1: Activate the cup selection from the second Brightness/Contrast mask layer (press Ctrl+Click on the mask thumbnail) and create a mask on the Coffee Logo Design Smart Object layer.
.jpg)
Step 2: Double click on the Coffee Logo Design layer thumbnail. This will open a new file window, which is where we will work for now.
We'll be using the Central Perk logo that's already there. Open it up, press Ctrl+A, then press Ctrl+C to copy. Then press Ctrl+V to paste the image, aligning it accordingly.
Go to File => Save and the Smart Object will automatically update. You can now close this new window.
.jpg)
Step 3: On the menu bar, go to Filter => Blur => Gaussian Blur and change the Radius to 13.4.
.jpg)
Step 4: On the Smart Filters mask, use the soft tip Brush (B) to cover the filter from the center of the coffee cup. To show the logo most clearly.
.jpg)
Step 5: Create a new layer above the Coffee Logo Design layer. Change the foreground color to #d6cdbb. Select the Brush tool (B) and use a soft brush to highlight the right side of the 3D cup model to create a light-bright effect. Right-click on this highlight layer in the Layers panel and select Create Clipping Mask. Change the Blend Mode to Screen.
.jpg)
Step 6: Group the Coffee Logo Design layer and the Highlight layer into a group by selecting both layers at the same time and then pressing ctrl+G. Then double-click on this newly created group layer to display the Layer Styles dialog box.
Select Gradient Overlay and use the following settings:
Blend Mode: Color Dodge
Opacity: 53%
Style: Linear
Angle: 0
Color #1: #d1c7ae, Opacity 0%
Color #2: #faf6ea, Opacity 100%
.jpg)
Step 7: Let's continue to add another Gradient Overlay Layer Style to this group by clicking the plus sign to the right of Gradient Overlay. Use the following settings:
Blend Mode: Hard Light
Opacity: 63%
Style: Linear
Angle: 0
Color #1: #111111, Opacity 100%
Color #2: #5c5c5c, Opacity 100%
Color #3: #5c5c5c, Opacity 0%
Color #4: #000000, Opacity 0%
.jpg)
So we have completed the steps to create a coffee cup mockup using Photoshop. You have a completely new coffee cup with your own logo.
.jpg)
Above is the summary information on how to create a coffee cup mockup using Photoshop. Customize the settings and patterns to have the most unique design.


