Best Selling Products
Create watercolor text effect in Photoshop with SaDesign
Nội dung
- 1. Create a background for watercolor text effect in Photoshop
- 2. Create a Smart Object Layer for the watercolor text effect in Photoshop
- 3. Create a watercolor text effect in Photoshop using Filter
- 4. Create the text for the watercolor text effect in Photoshop
- 5. Create Stroke Brush
- 6. Create and paint a Stroke Brush for the Work Path
- 7. How to create watercolor brushes
- 8. How to create realistic watercolor effects
- 9. Add some textures to make the watercolor text effect in Photoshop more beautiful
- 10. How to color a watercolor text effect in Photoshop
- 11. Apply additional filters to the watercolor text effect in Photoshop
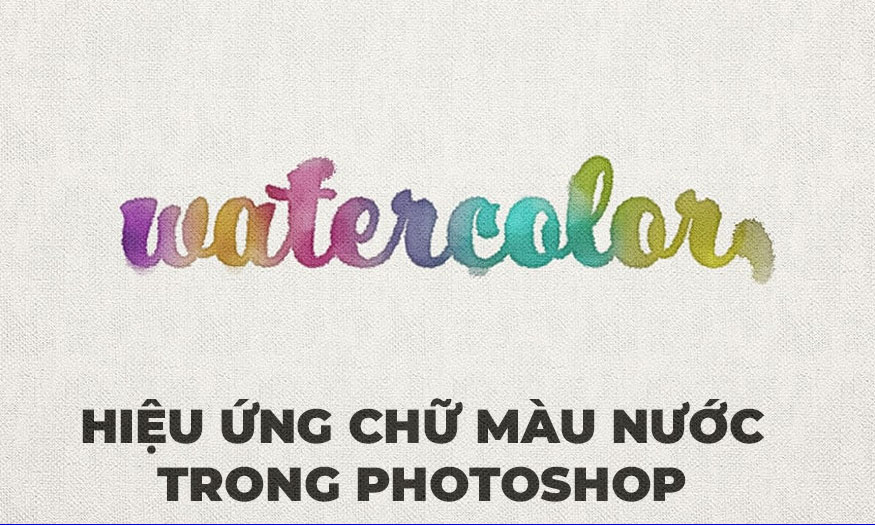
Watercolor-style letters will help your design look more artistic. Without color, we can create watercolor text effects in Photoshop just by combining some tools. Let's refer to the detailed implementation with SaDesign right below.

1. Create a background for watercolor text effect in Photoshop
Before getting the watercolor text effect in Photoshop, the first thing we need to do is create the background. We need a fabric-style background layer to design it like a painting on fabric.
Step 1: Create a new document in Photoshop with the size of 1250 x 850 px. Then place the Canvas _15.jpg image in the newly uploaded fabric texture file on the Background layer and resize it to fit the document.
.jpg)
Step 2: Click the Create new fill or Adjustment Layer icon at the bottom of the Layers panel and select Hue/Saturation.
.jpg)
Step 3: Clip the Hue/Saturation layer to the canvas_15 texture layer and change the Saturation value to -25.
.jpg)
2. Create a Smart Object Layer for the watercolor text effect in Photoshop
Smart Object layers will help you edit later without destroying your design.
Step 1: Create a new layer on top of all layers and name it Watercolor Texture.
Set the Foreground Color to whatever color you like and paint that color onto the Watercolor Texture layer. The color used here is #d63965.
.jpg)
Step 2: Right click on the Watercolor Texture layer, select Convert to Smart Object, then make sure to set the Background Color to white.
.jpg)
Step 3: On the menu bar, go to Filter => Render => Clouds.
.jpg)
3. Create a watercolor text effect in Photoshop using Filter
On the menu bar, go to Filter => Filter Gallery to apply the following filters:
Step 1: Brush Strokes => Sprayed Strokes, then set the following parameters:
Stroke Length: 12
Spray Radius: 7
Stroke Direction: Right Diagonal
.jpg)
Step 2: For each filter we add next, you first need to click on the New Effect Layer icon in the lower right corner of the Filter Gallery window.
.jpg)
Step 3: Brush Strokes => Spatter then set the following parameters:
Spray Radius: 10
Smoothness: 5
.jpg)
Step 4: Artistic => Dry Brush then set the following parameters:
Brush Size: 2
Brush Detail: 8
Texture: 1
.jpg)
Step 5: Artistic > Underpainting then set the following parameters:
Brush Size: 40
Texture Coverage: 40
Texture: Canvas
Scaling: 100
Relief: 0
Light: Top
.jpg)
Step 6: Artistic > Dry Brush and set the following parameters:
Brush Size: 10
Brush Detail: 10
Texture: 1
.jpg)
Step 7: Click OK to close Filter Gallery, then go to Filter => Sharpen => Unsharp Mask.
Change Amount to 55, Radius to 5 and Threshold to 0.
.jpg)
4. Create the text for the watercolor text effect in Photoshop
Once you have a background you like, let's create the text.
Step 1: Create some custom text using the HucklebuckJF font and set the Size to 200 pt. Here we are using the watercolor text.
.jpg)
Step 2: Hold down the Ctrl key and click on the text layer thumbnail to create a selection.
.jpg)
Step 3: Hide the text layer by clicking the eye icon next to it.
Then, select the Watercolor Texture layer and click the Add Layer Mask icon at the bottom of the Layers panel.
.jpg)
5. Create Stroke Brush
We will create a Stroke Brush for a watercolor text effect in Photoshop.
Select the Brush Tool (B) and open the Brush panel (Window => Brush). Select the Chalk 23 pixels tip and change the settings as shown below:
Brush Tip Shape
.jpg)
Shape Dynamics
.jpg)
Scattering
.jpg)
Transfer
.jpg)
6. Create and paint a Stroke Brush for the Work Path
Step 1: Right click on the text layer and select Create Work Path.
(1).jpg)
Step 2: Select the Direct Selection Tool (A), then click the Path operations icon on the options bar and click the Merge Shape Components command.
Select the Watercolor Texture layer's mask thumbnail to stroke the path.
.jpg)
Step 3: Select the Brush Tool again, set the Foreground Color to white and press Enter to draw the path.
.jpg)
7. How to create watercolor brushes
Now we need a watercolor brush to paint over the text. Let's create a watercolor brush following the steps below.
Step 1: Select the Brush Tool and open the Brush panel, then choose a hard round tip and modify its settings as shown below:
Brush Tip Shape
.jpg)
Shape Dynamics
.jpg)
Texture
.jpg)
Dual Brush
Use 23 pixel Chalk head
.jpg)
Transfer
Check the Noise and Wet Edges boxes.
.jpg)
Step 2: With the Watercolor Texture layer mask thumbnail selected, click and drag lightly to add some random spots or smudged areas.
(1).jpg)
8. How to create realistic watercolor effects
Make your watercolor text effect in Photoshop more realistic with the following steps.
Step 1: Change the Blend Mode of the Watercolor Texture layer to Linear Burn.
.jpg)
Step 2: Double-click the Watercolor Texture layer to open the Layer Style, then apply the Inner Glow effect with the following settings:
Blend Mode: Linear Burn
Opacity: 90%
Color: #cccccc
Size: 5
.jpg)
This will create more realistic-looking text borders.
.jpg)
9. Add some textures to make the watercolor text effect in Photoshop more beautiful
We have basically created a watercolor text effect in Photoshop. However, let’s finish it with some more details.
Step 1: Add a Gradient fill layer below the Watercolor Texture layer.
Create a Transparent to Fill Color gradient fill layer using the colors #d8d8d8 on the left and #929292 on the right, then change the Style to Radial and the Scale to 250%.
.jpg)
Step 2: Change the Blend Mode of the Gradient layer to Color Burn.
.jpg)
10. How to color a watercolor text effect in Photoshop
Make your watercolor text effect in Photoshop more unique with different watercolor colors.
Step 1: Add a Hue/Saturation adjustment layer, clip it to the Watercolor Texture layer and change the Saturation value to -100.
.jpg)
Step 2: Add a new layer above the Hue/Saturation layer, name it Colors and change the Blend Mode to Color Burn.
(1).jpg)
Step 3: Clip the Colors layer to the Watercolor Texture layer, then select a large soft round brush tip.
What you need to do next is pick different colors and paint over random areas of the pattern.
You can change the Opacity value of the Colors layer if needed.
.jpg)
11. Apply additional filters to the watercolor text effect in Photoshop
These are the final steps in your design.
Step 1: Create a new layer on top of all layers, then press Alt+Ctrl+Shift+E to create a new merged layer.
Rename this layer to High Pass and convert it to a smart object.
.jpg)
Step 2: Go to Filter => Other => High Pass and change Radius to 1.
.jpg)
Step 3: Change the Blend Mode of the High Pass layer to Soft Light and the Opacity to 50%.
.jpg)
Step 3: Create another merged layer from all the layers you have, called PC Filter and convert it to a smart object.
.jpg)
Step 4: Go to Filter => Filter Gallery and make sure to delete all the additional effect layers you have by clicking the Delete effect layer icon in the bottom right corner of the Filter Gallery window.
Select the Photocopy filter in Sketch and use the following settings:
Detail: 7
Darkness: 8
.jpg)
Step 6: Change the Blend Mode of the PC Filter layer to Soft Light and the Opacity to 10%
.jpg)
So we have completed the watercolor text effect in Photoshop. The text looks like it was drawn with watercolor, very realistic.
.jpg)
Above is a summary of the steps to create a watercolor text effect in Photoshop. Try following the steps to see surprising results.


