Best Selling Products

Windows 10 & 11 Pro Key
36 USD

MidJourney Account
29 USD

Upgrade Genuine Office 365
49 USD

Autodesk All App Account Copyright
120 USD

ChatGPT Plus Account (GPT-4)
16 USD

Genuine Cheap Canva Pro
39 USD

Genuine Adobe Illustrator account
99 USD

Upgrade Duolingo Super
29 USD

Capcut Pro 1 Year
39 USD

Upgrade genuine Capture One account
120 USD

Freepik Premium Account
59 USD

Adobe Premiere Pro Account
99 USD

Adobe Photoshop Copyright - Full App
120 USD

Plugin Retouch4me
69 USD

Copyright Adobe Lightroom Account
59 USD
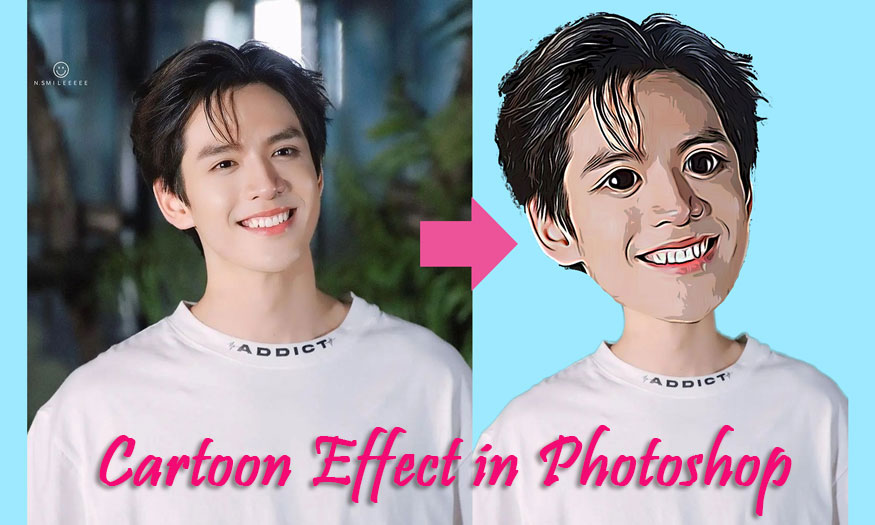
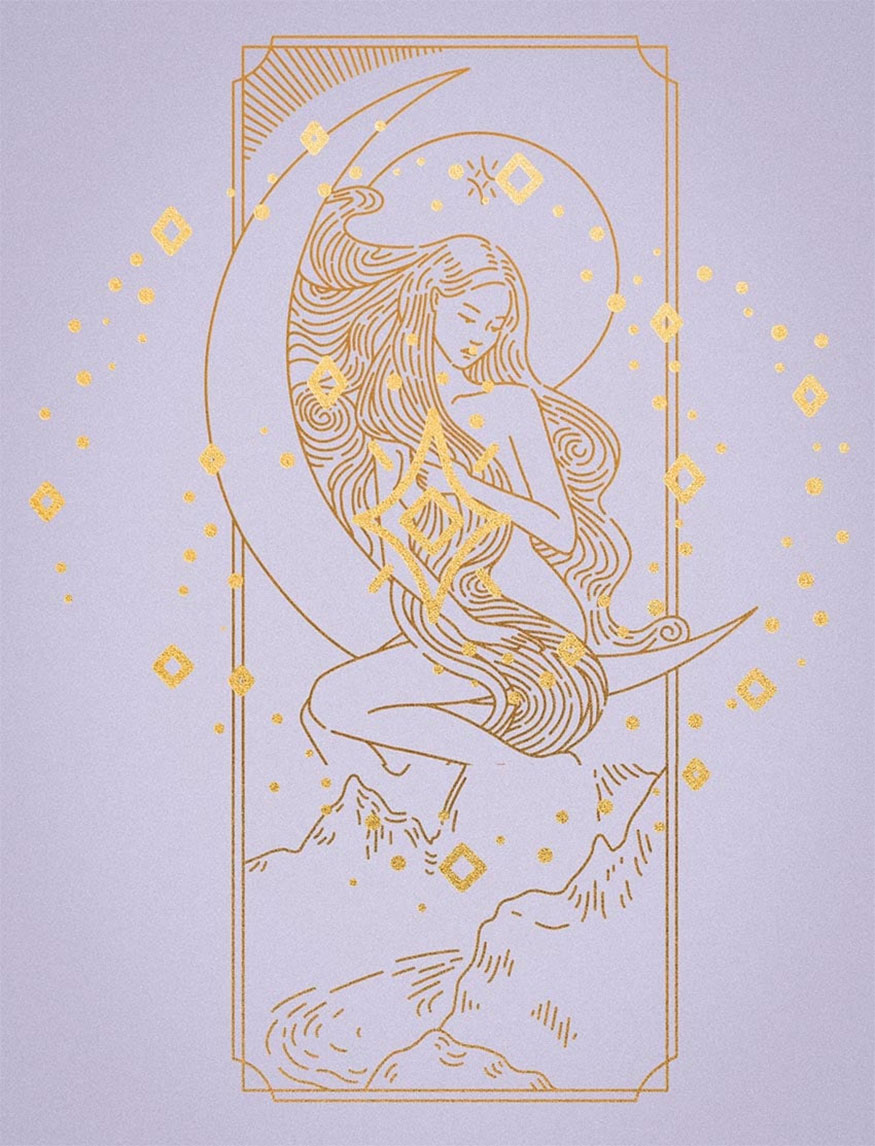
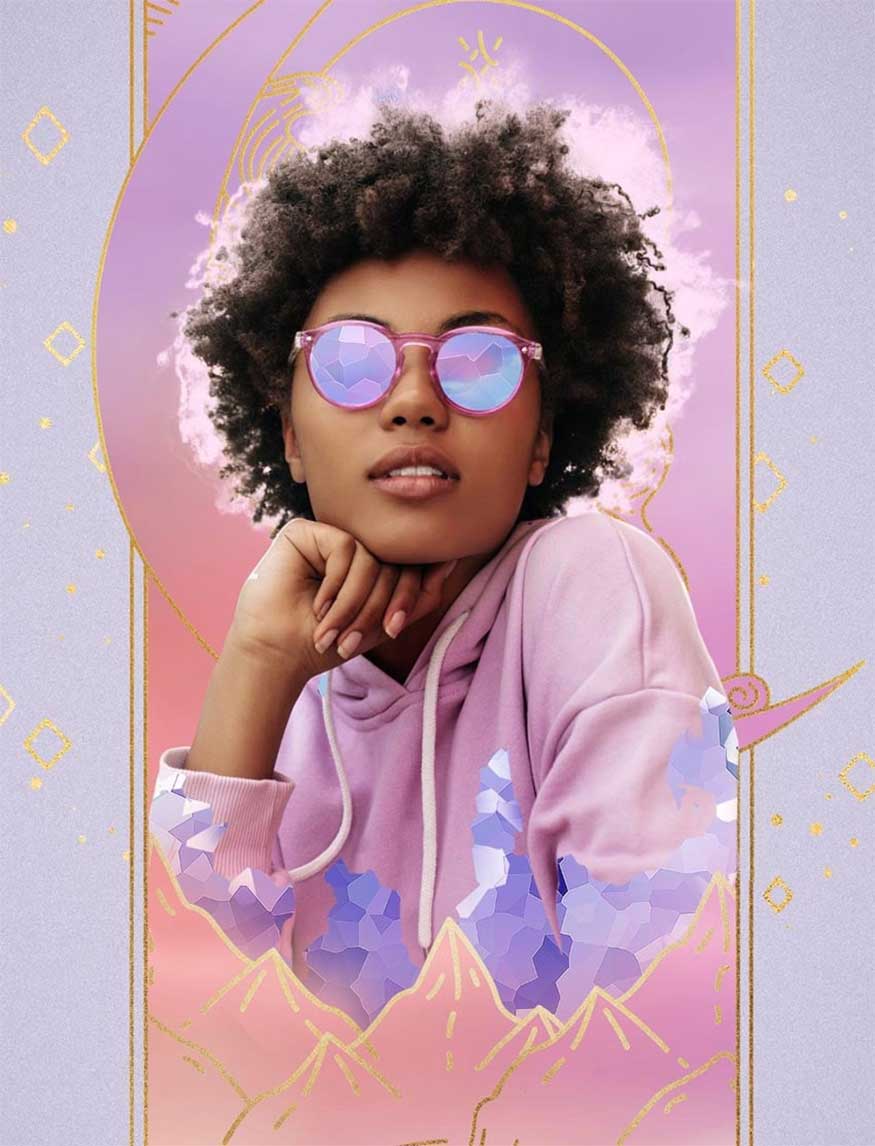
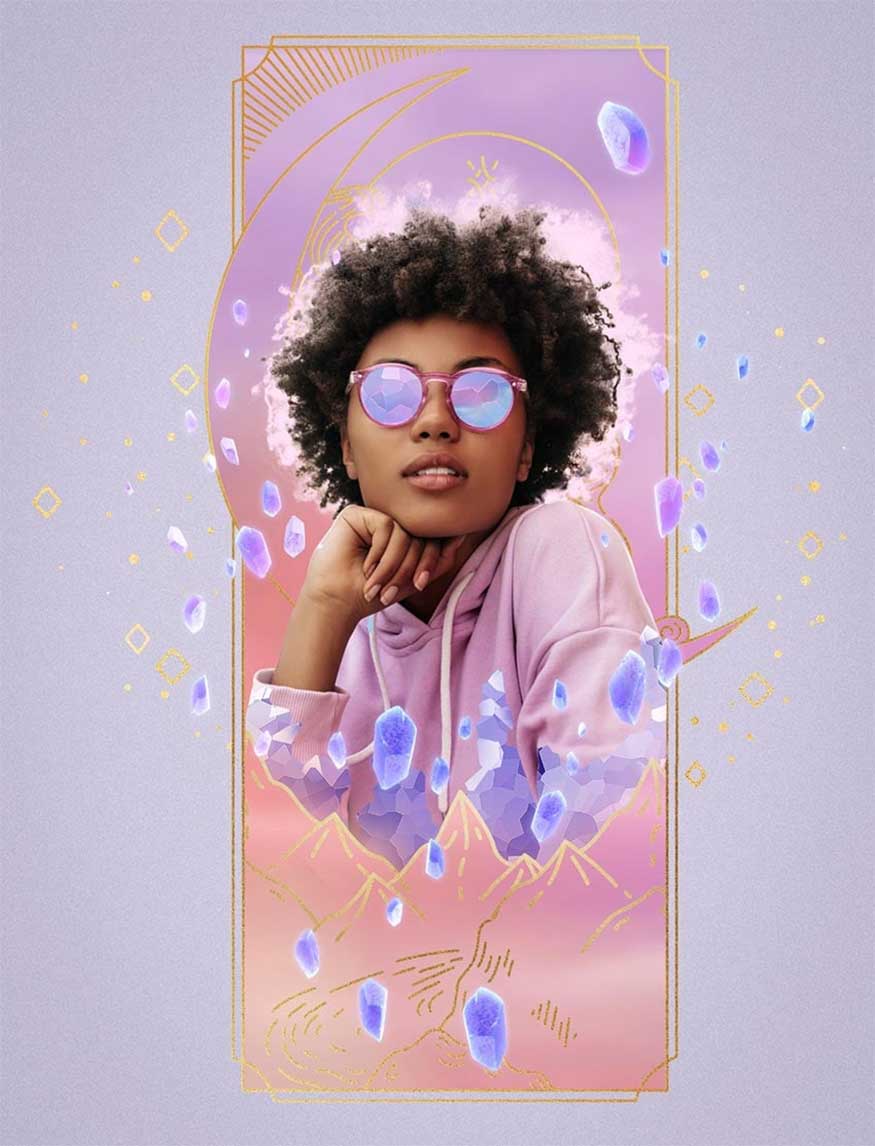
How to create a simple crystal effect in Photoshop with SaDesign
Nội dung
Creating a crystal effect in Photoshop is not as difficult and complicated as many people think. In fact, we can completely create this impressive effect with Photoshop with just some smart filters. Specifically, how to do this will be fully informed by Sadesign soon!

Creating a crystal effect in Photoshop is not as difficult and complicated as many people think. In fact, we can completely create this impressive effect with Photoshop with just some smart filters. Specifically, how to do this will be fully informed by SaDesign soon!

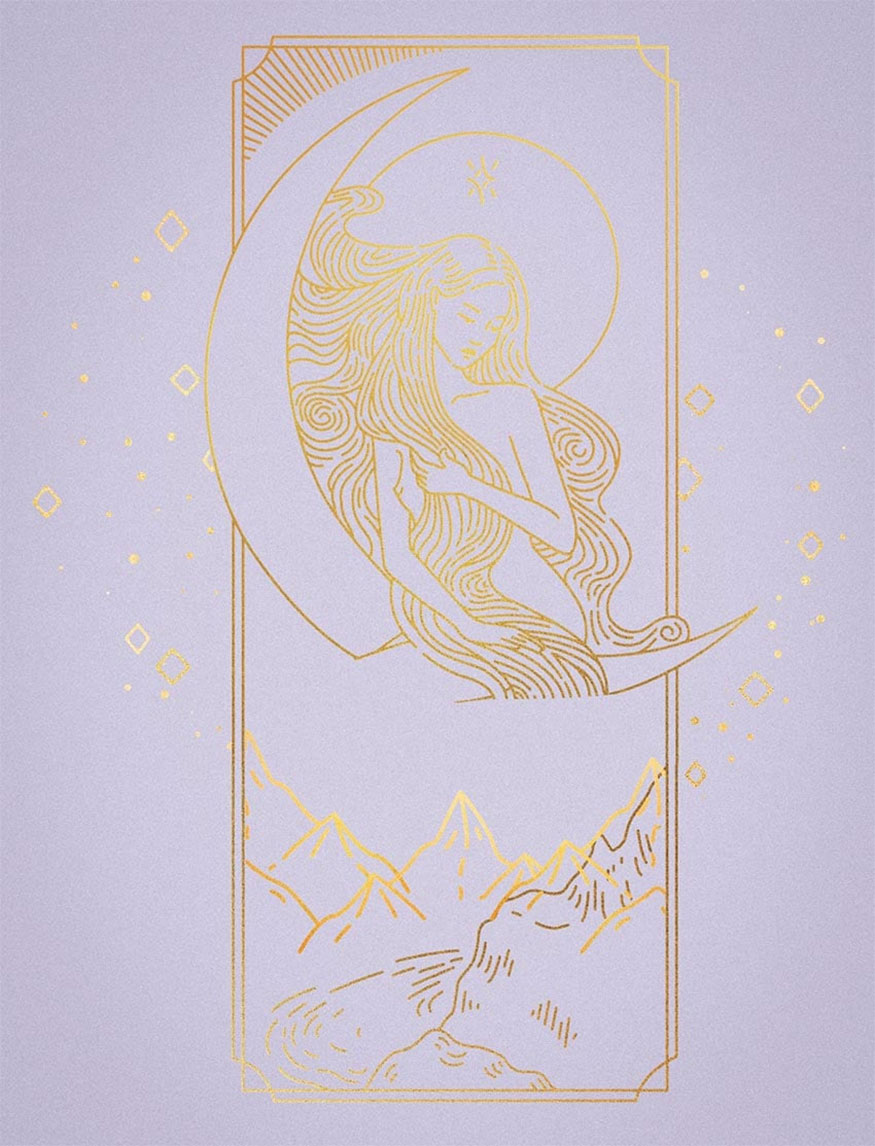
1. Instructions for creating background in Photoshop
- Step 1: First we will start with a new canvas with a light purple color (color code #ddd9e8) using the Color layer. Turn this fill layer into a smart object by selecting the layer => Right click => Convert to Smart Object.
- Step 2: Next, click Filter => Camera Raw => Effects, add Grain to 40-50, and Vignetting to -10
- Step 3: Next, you adjust the color by going to Image => Adjustments => Brightness/Contrast. Set contrast to 100 and brightness to 40.
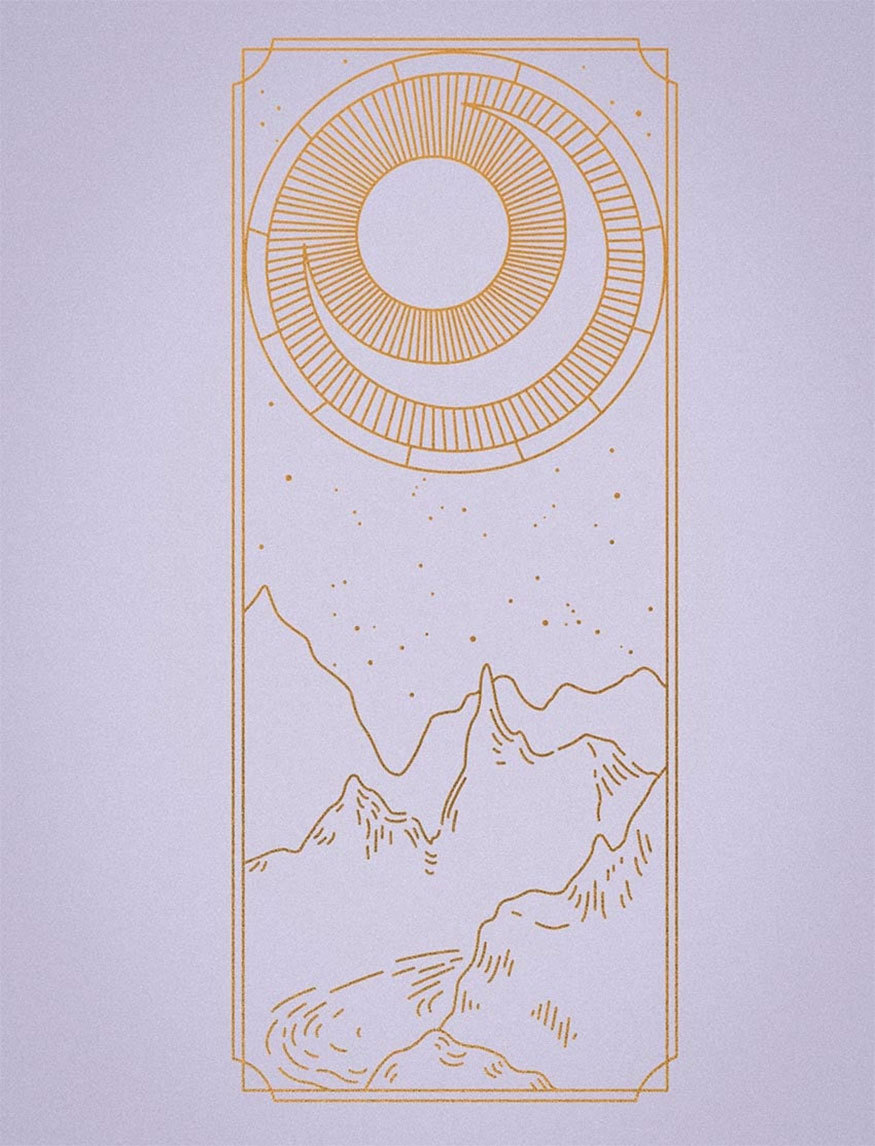
2. Instructions for creating a pastel yellow leaf design
- Step 1: With the golden frame we will cut it, then combine four different assets from the Zodiac graphics toolkit, the first content is Element 1.
Drag, drop and center Element 1 on the canvas. If they are not Smart Objects, right-click then go to Convert to Smart Object.
Go to Layer => Adjustments => Brightness/Contrast, set -60 brightness and 45 contrast.
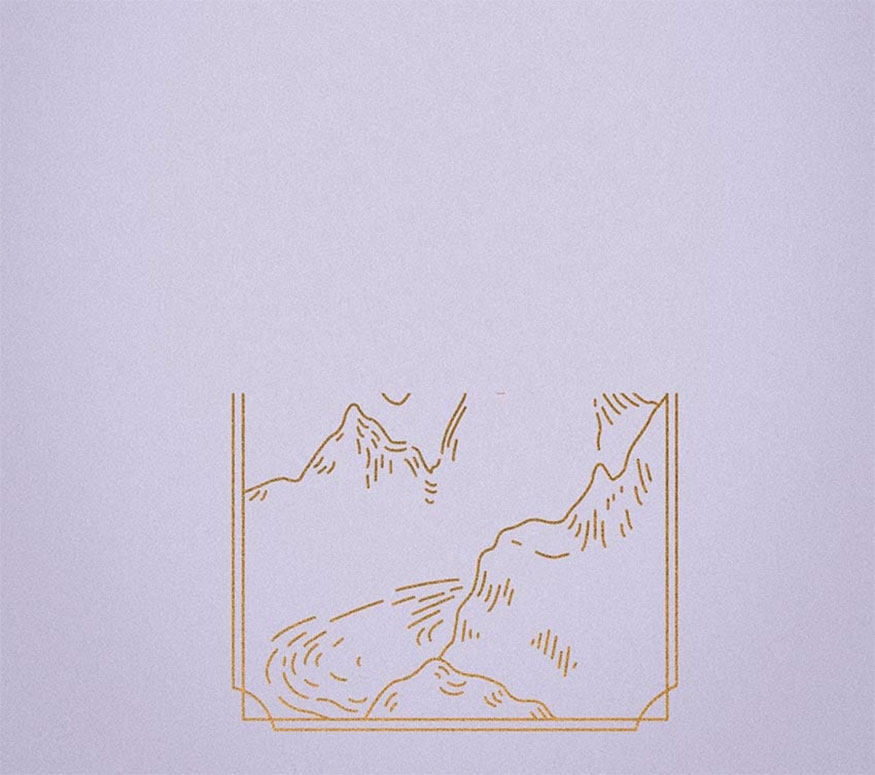
- Step 2: Using the Rectangular Marquee tool, select everything above the mountains in the front of the illustration.
Add Layer Mask => select Control-I to invert the Layer Mask.
- Step 3: Drag and drop the Virgo content directly onto the first element. Hold Alt then drag and drop the Brightness/Contrast Smart Filter from Element 1 onto the Virgo content.
Then, hold down the Alt key again and drag and drop the Layer Mask from Element 1 onto the Virgo content.
Press Control I to invert the Layer Mask so that the two frames look like one.

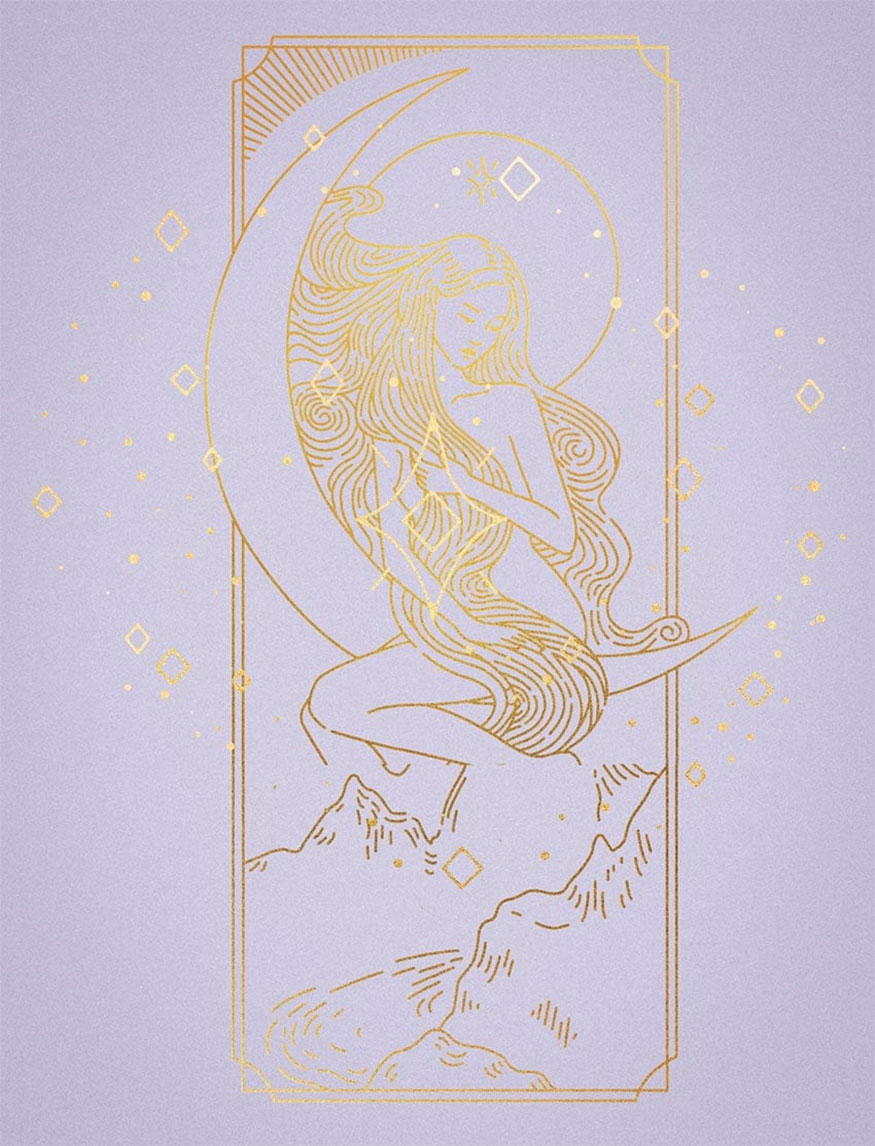
- Step 4: Drag and drop Element 17 onto the canvas, zoom in so that the stars can fill the space around the yellow frame.
- Step 5: Hold Ctrl and click on the layer icon to create a star-shaped selection. Then select Select => Modify => Contract by 15.
Add a Layer Mask with the purpose of thinning the outline of the stars.
- Step 6: Duplicate Element 17 to add more stars, flip and rotate them to keep them from overlapping.
- Step 7: Group the current gold components together and name them “Gold Foil”. Then add a New Layer to the group, set Overlay and Opacity to 50%. Use a large white soft round brush to paint some highlights on the corners of the frame to create "yellow leaf" effect.
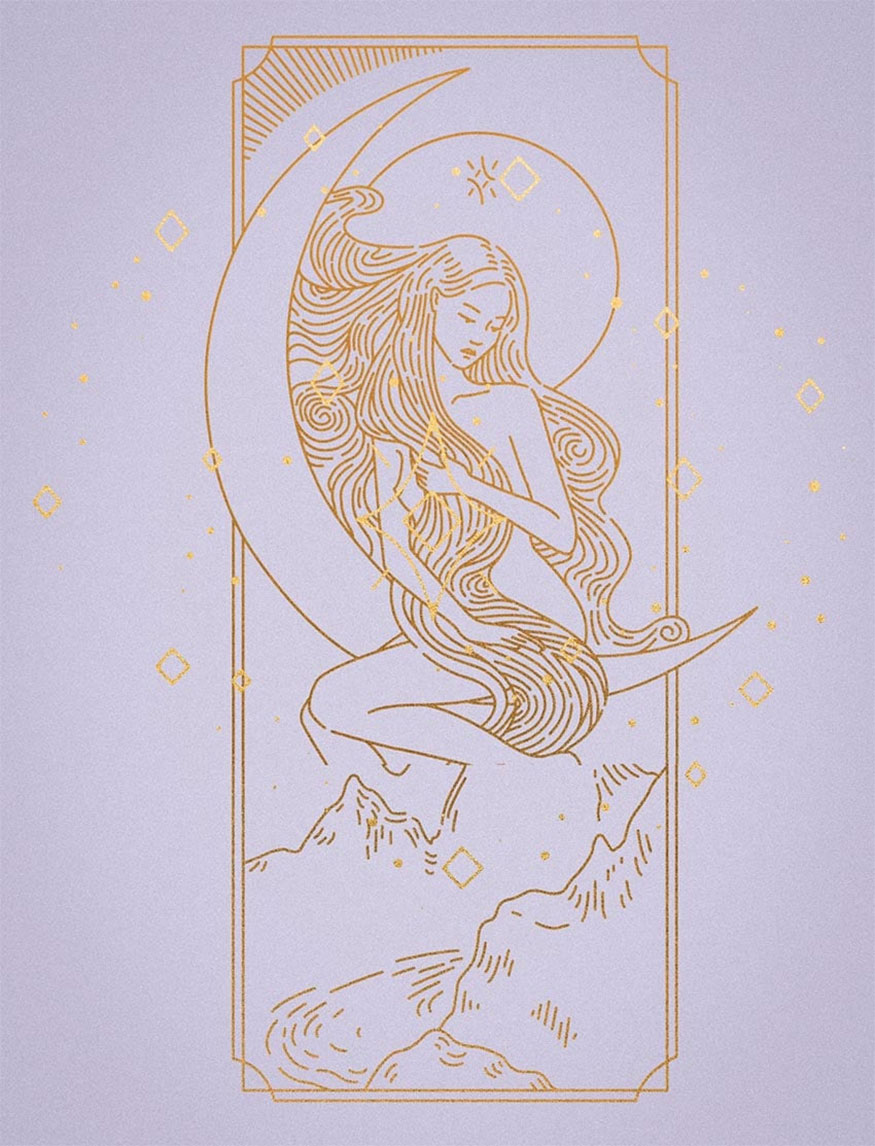
- Step 8: To help make the design neater and more beautiful, cover up unnecessary details such as: The woman's legs, the stars inside and parts of the mountain.
You can put the subject first, then go back and hide it if you don't know what elements to keep or hide.
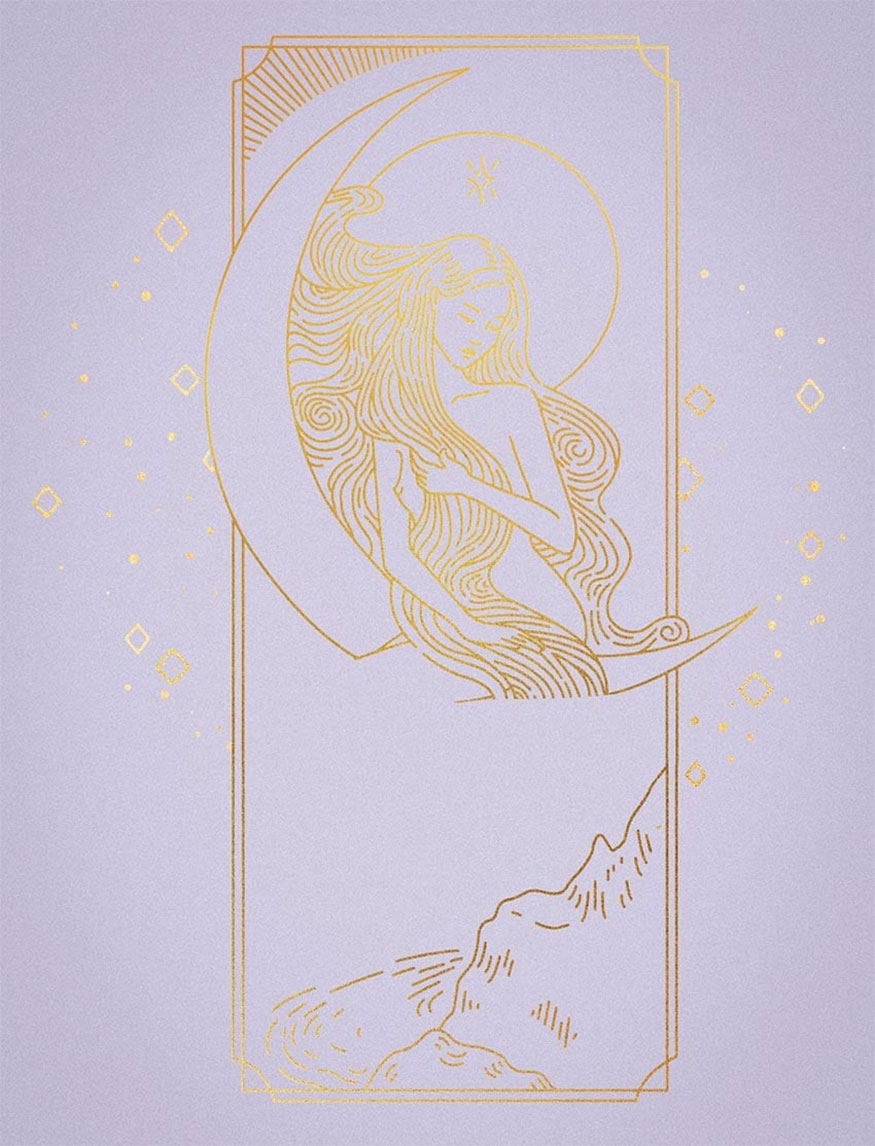
- Step 9: In the new group above the Yellow Leaf group, you drag and drop the content of Element 16, which is the yellow leaf mountains. Use these mountains to create a new mountain range above the yellow leaf design.
Repeat the same steps with the previous yellow elements, including adding highlights and adjusting Brightness/Contrast.
- Step 10: Add another round of shading to ensure the mountains, as well as the yellow leaf design match each other. Also create and cut a Hue/Saturation adjustment layer into the yellow mountain group, reducing the Saturation so it fits better with the rest of the design.
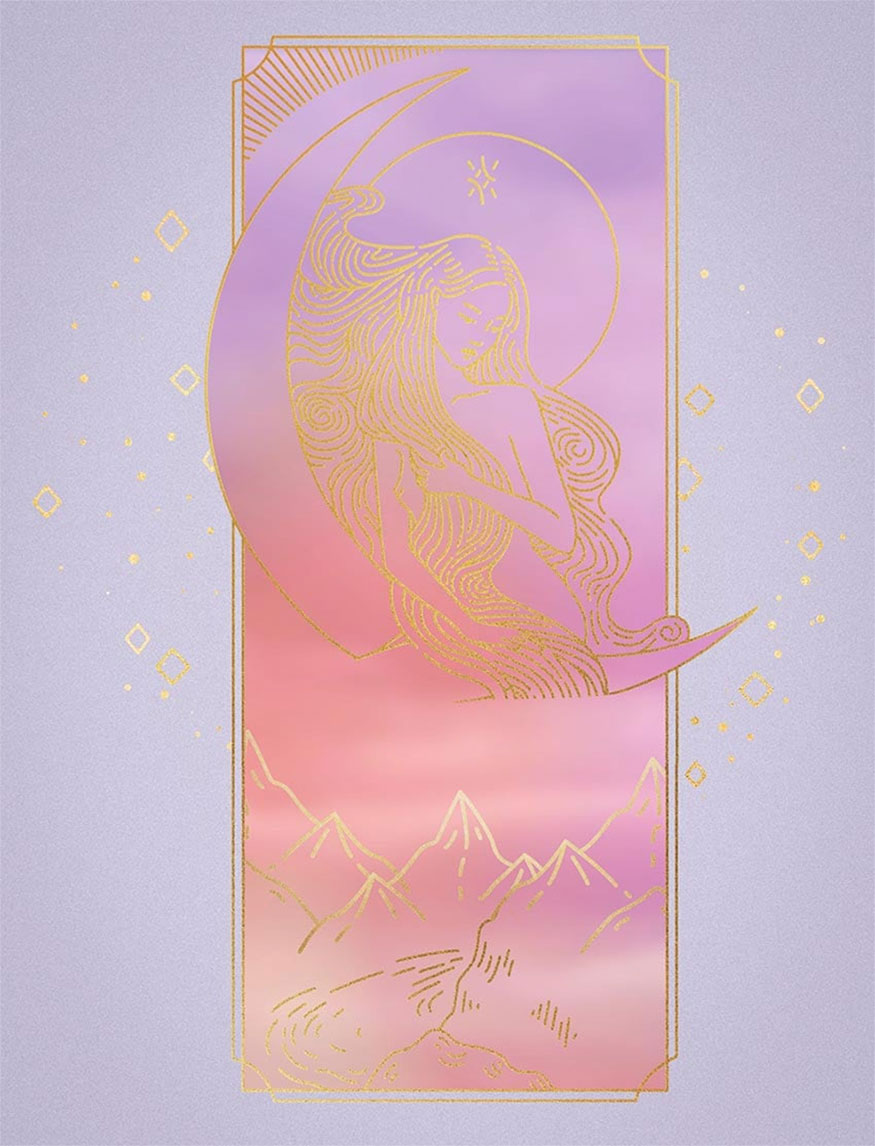
- Step 11: Complete the yellow design by dragging and dropping the two images onto the canvas. First, add a pastel sky image, then zoom it in and add a Blur Gallery blur of 67.
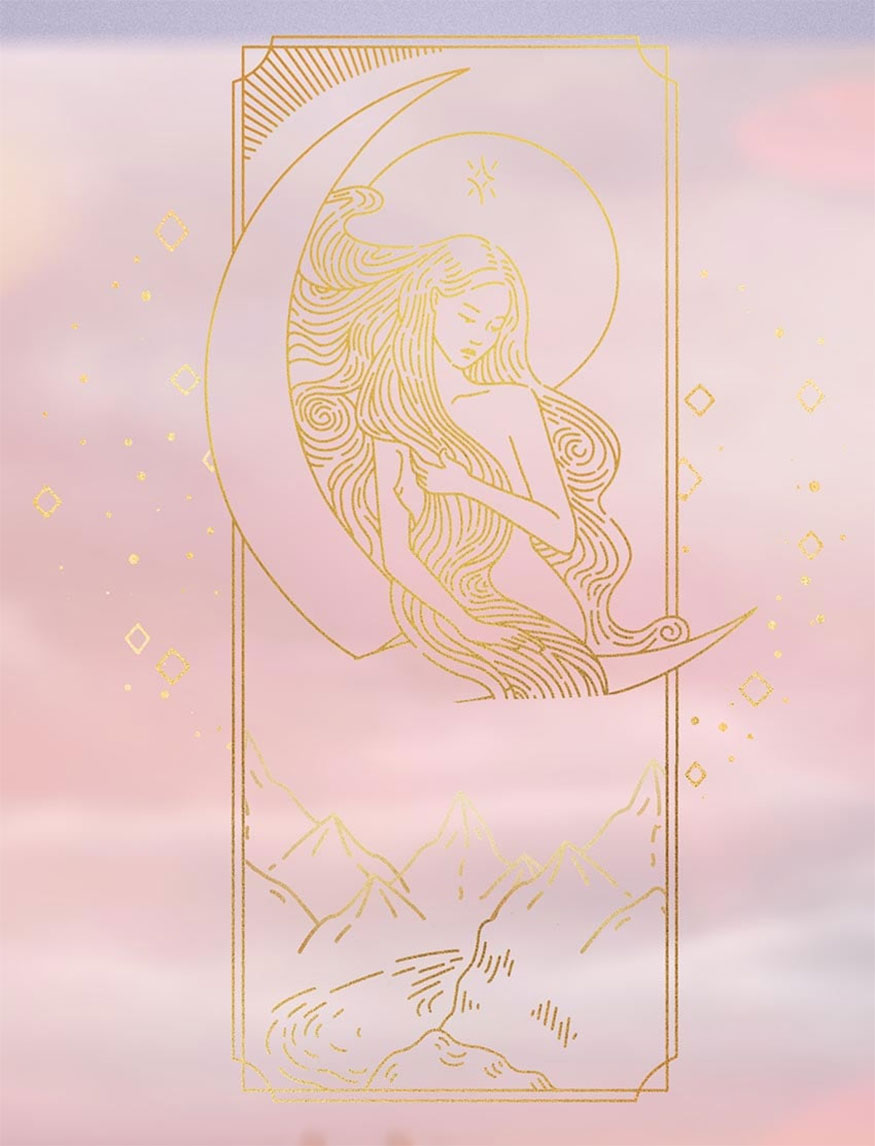
- Step 12: Add color 23 from "Pastel Blend - gradient Backgrounds". Make sure they fill the entire canvas and set the Layer Mode to Lighten at 48% Opacity.
- Step 13: Create Brightness/Contrast and set brightness to -66 and contrast to 100.
- Step 14: Group these three layers together and mask them to confine them to the shape of the yellow design.
3. Instructions for creating a crystal effect in Photoshop
- Step 1: You place and extract the subject between the yellow leaf design group and the yellow mountains group to create an effect like the subject is behind the mountains.
Select Select Subject => Layer Mask => Select and Mask, then press Refine Hair for quick selection.
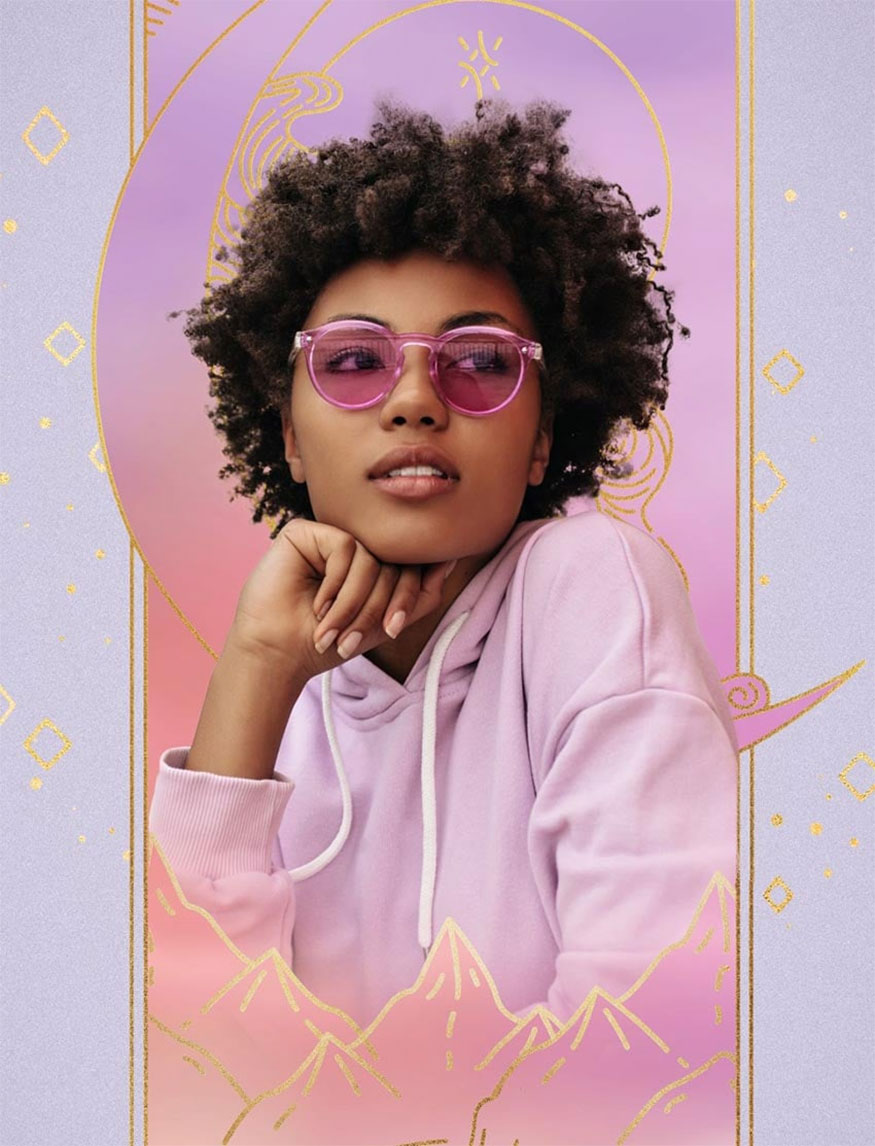
- Step 2: After duplicating the object, bring the copy below the original => zoom in and flip the copy.
- Step 3: Now we can create and cut the light pink fill layer #ffe2f6 onto the duplicated object to hide the rest of the girl’s body.

- Step 4: Next, add some highlights and shadows using a mixture of Softlight and Overlay cut into the object.
Use soft round and hard brushes to add white highlights to the hair, shoulders, and hands.
Also add some shadow to the inside of the subject's hoodie.
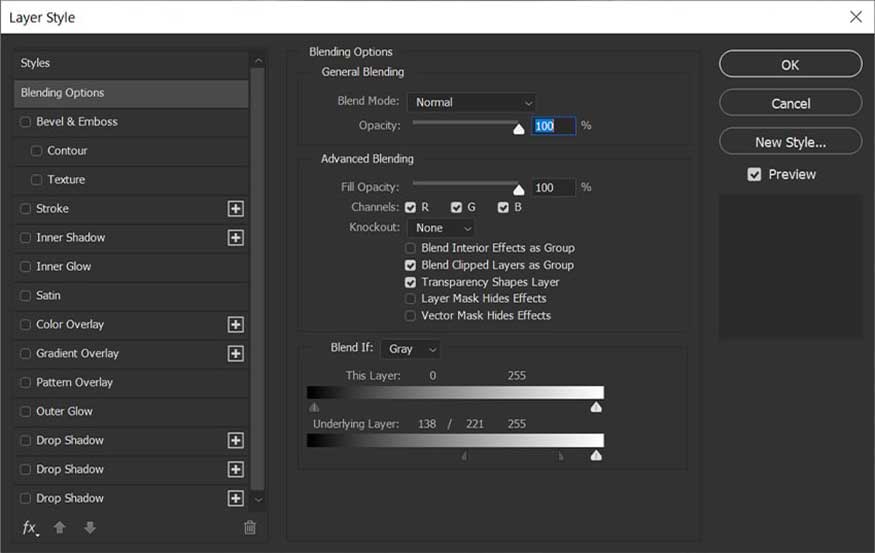
- Step 5: Once the theme is finished, we can make the crystal effect in Photoshop. If not, make sure your object is a Smart Object.
For example, we bring will use a total of four filters and adjustments, all added as Smart Filters.
Start with Filter => Pixelate => Crystalize, this will be the basis for crystal effect => choose size 106.
You can go back and change the size because all Smart Filters are adjustable.
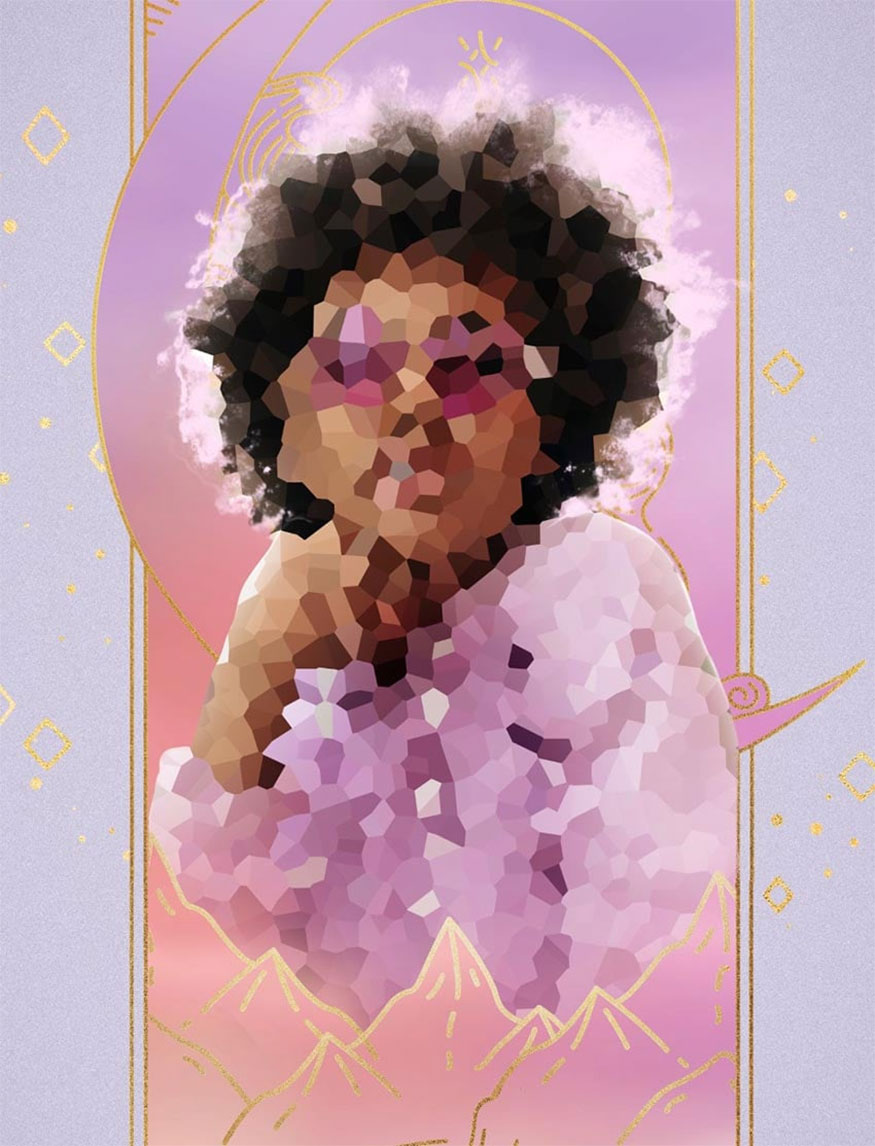
- Step 6: Select Filter => Sharpen => Smart Sharpen and set it to quantity 500 and radius 5.4 to make the edges sharper.
- Step 7: Click Image => Adjustments => Color Balance and set the color to -100, 0 and +100, turning the crystal shapes blue.
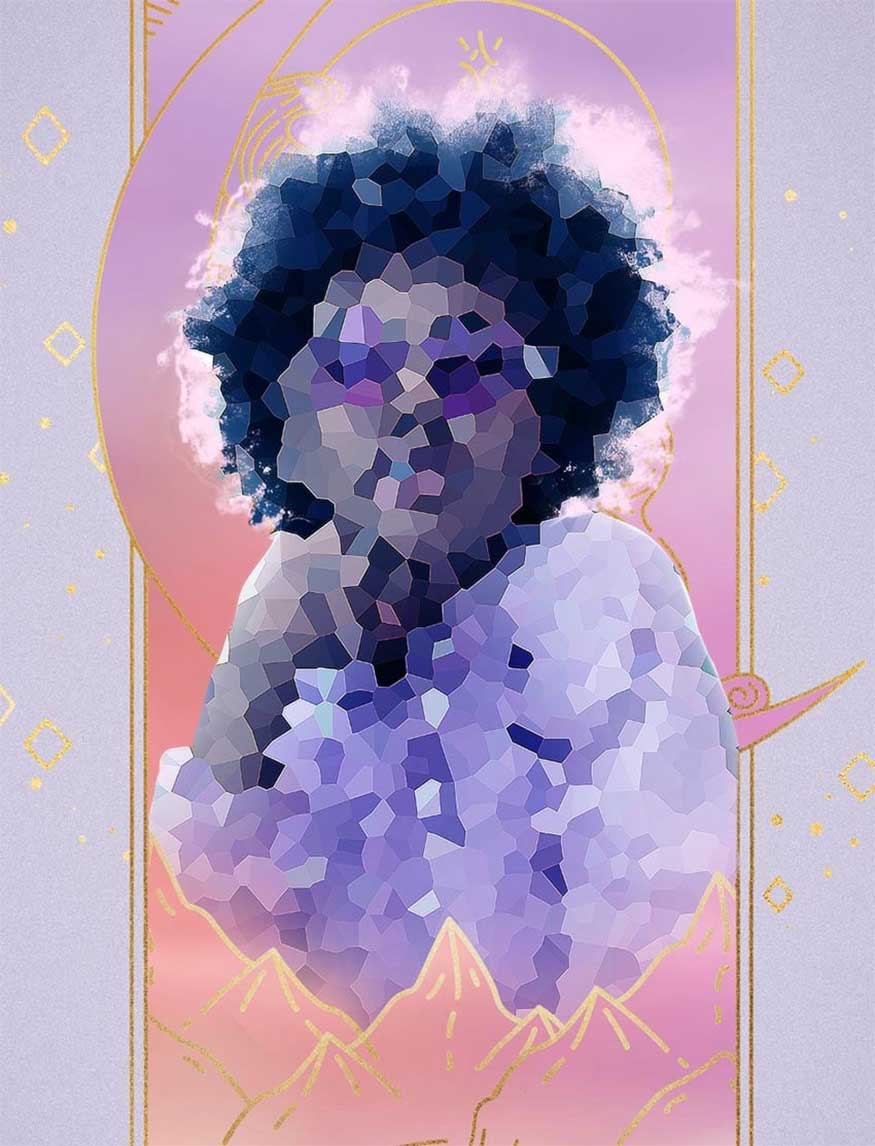
- Step 8: Select Image => Adjustments => Brightness/Contrast and set brightness to -20 and contrast to 100.
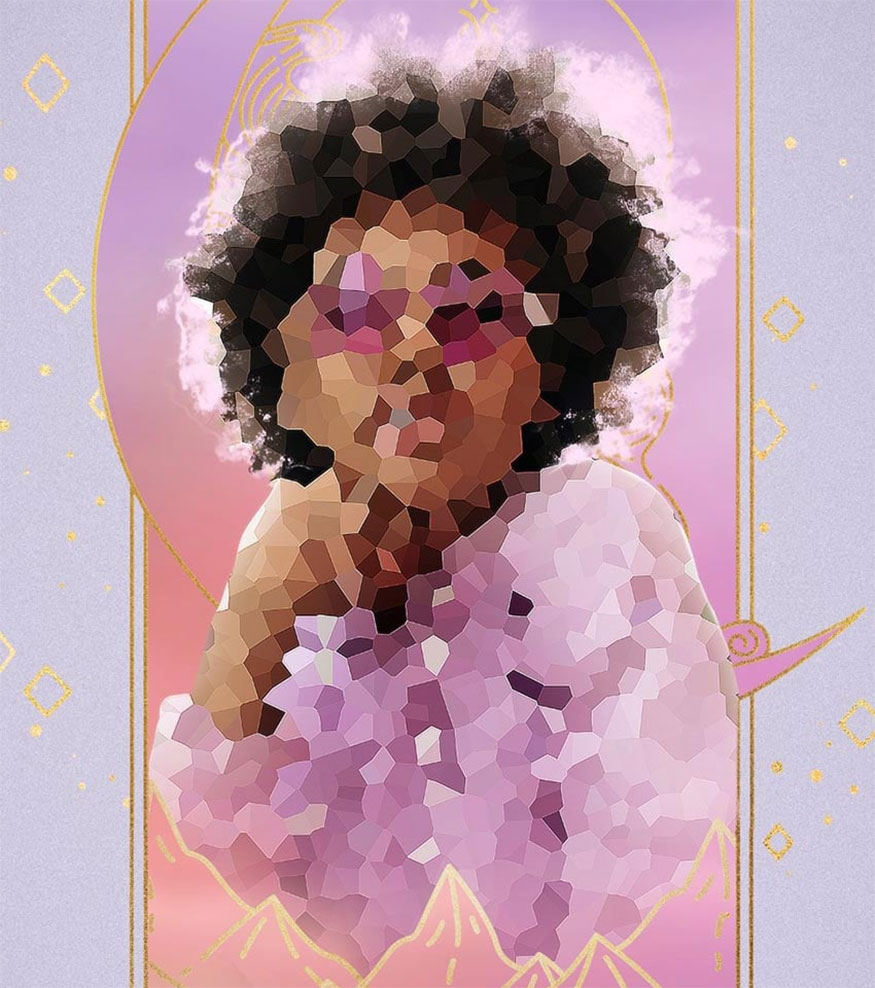
- Step 9: Now, select the Smart Filters layer mask => select Ctrl + I to invert it , then re-etch some crystal shapes.
In this step we use the hard round Brush tool because it is faster, but the Pen tool or Polygonal Lasso tool will help create sharper edges.
- Step 10: After completing the mask, we will perfect the crystals by adding some highlights.
Create a new layer set to the right layer and cut them into the subject.
Use the Polygonal Lasso tool or hard round Brush to paint white highlights on the edges of some of the crystals. Focus on surfaces that catch and reflect light.
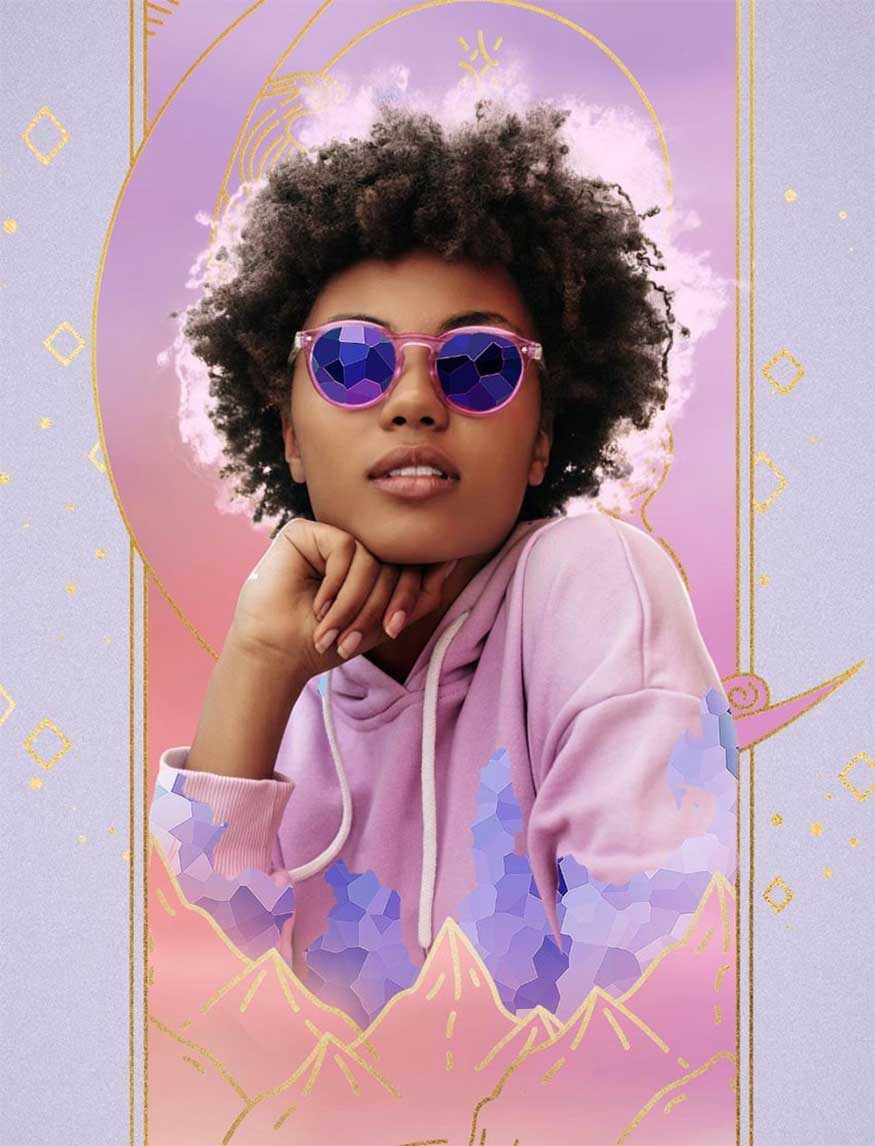
- Step 11: Brighten up the crystal sunglasses by dragging and dropping another photo of a pastel sky onto the canvas and placing them over the subject's glasses and placing it on screen.
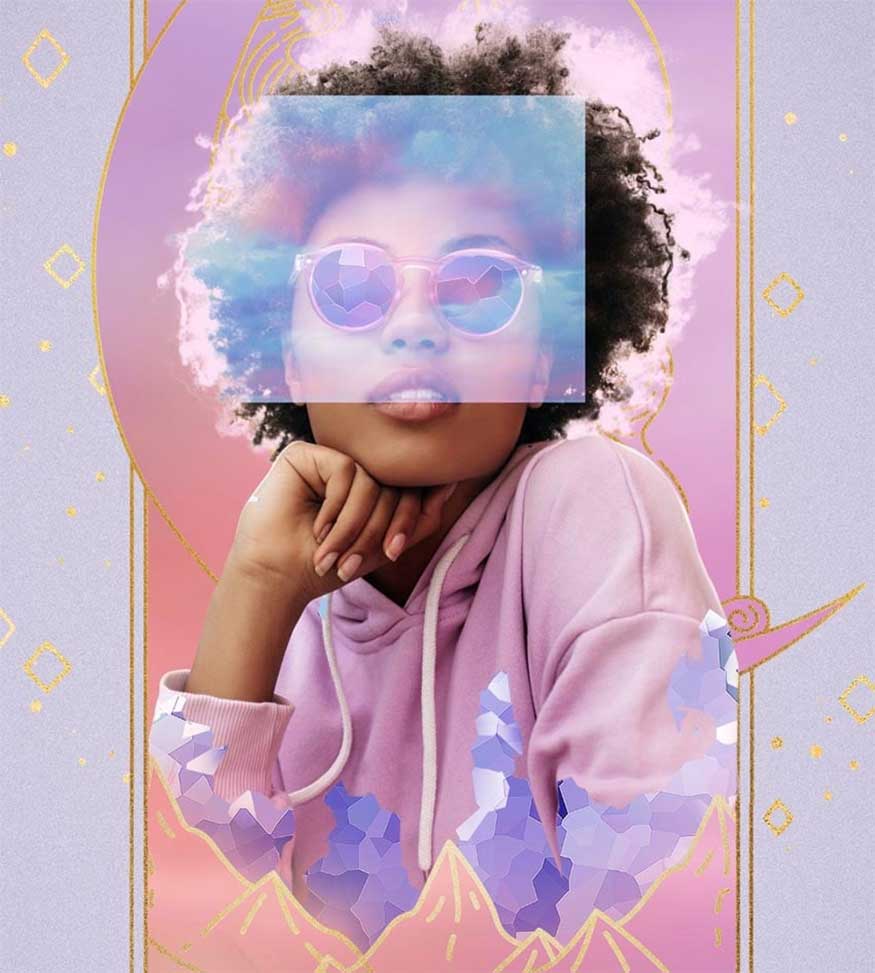
- Step 12: Add a layer mask to the sky image, fill it black with Ctrl + I, then mask it so that the sky only appears inside the lens.
4. How to use 3D objects in Photoshop
- Step 1: Next, let's add a series of smaller crystal pieces floating around the object using a Blue Crystal 3D content.
We can do this by choosing to view the 3D rendering. Next, rotate and download the same crystal at different angles, download them as layered PSD so that we can easily turn off the shadow layer.
Try and do at least 5 different angles for variety, let’s make as many angles as possible if you can.
- Step 2: With your downloaded crystals, scatter them around the topic in different sizes. Remember the flow of the image and point the brighter surface of the crystal towards the light source.
Once you're satisfied with the crystals, group them all together and name the group "Crystal Shards".
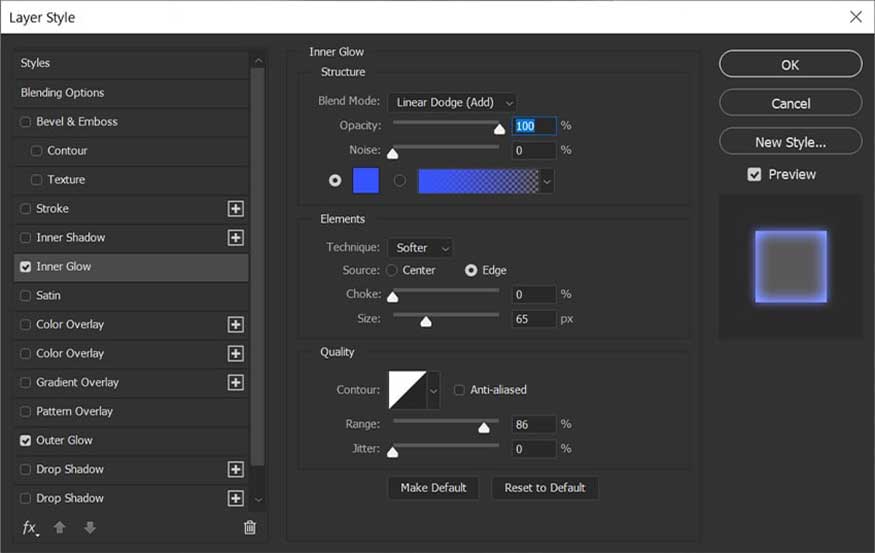
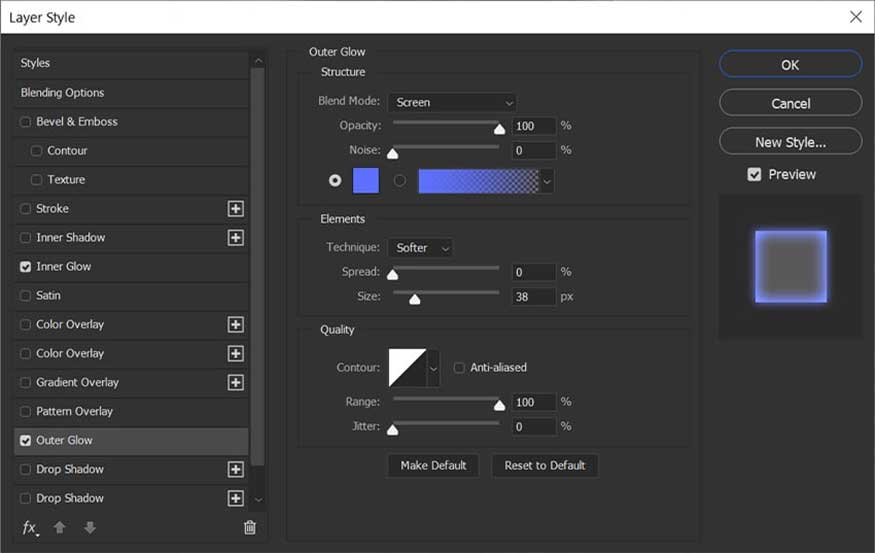
- Step 3: Let's add a little glow by using the Inner Glow and Outer Glow layer styles.
- Step 4: Cut the Brightness/Contrast adjustment layer into the Crystal Shard group. Set its brightness to 99.
- Step 5: Finish the crystals by cutting both the Lighten and Screen layers into the fragment group.
Then use a large soft round Brush to set it to a light pink color with code dd64b5 and select Flow Rate, paint iridescent light onto the crystal pieces to create soft pink flowers inside the crystals.
The Screen layer will light up, while the Lighten layer will give you an internal glow effect.
5. How to create pastel highlights in Photoshop
- Step 1: Let's add the final glow by duplicating the Pastel Background group, bringing it above all the current layers, deleting the current layer mask and setting the Lighten and Opacity to 60%.

- Step 2: Add a Layer Mask, Invert it with Ctrl + I, then mask out some pale lights around the subject's hair and body.
Use a soft round Brush, set to a low Flow Rate so you can gradually build up the brightness.
- Step 3: Finally, create a Curves layer and show the highlight. Double-click the Curves layer and adjust the Blend If settings so that the layer only affects the highlights.
Set the toggles, but this setting will vary depending on the subject's skin tone and the overall brightness of the image.
- Step 4: Now we can enhance the highlights of the image by masking areas with the soft white round Brush tool. Set Blend If to keep the light shadow-free, only highlight the areas such as the face, hair, and body, or any areas of the subject that you want to lighten.
6. How to create a Pastel color layer
- Step 1: Perform a final light blue fill for the entire image, starting with the Color Lookup layer set to HorrorBlue, layer color mode and opacity set to
25 %.
- Step 2: Add a Selective Color layer with the following settings:
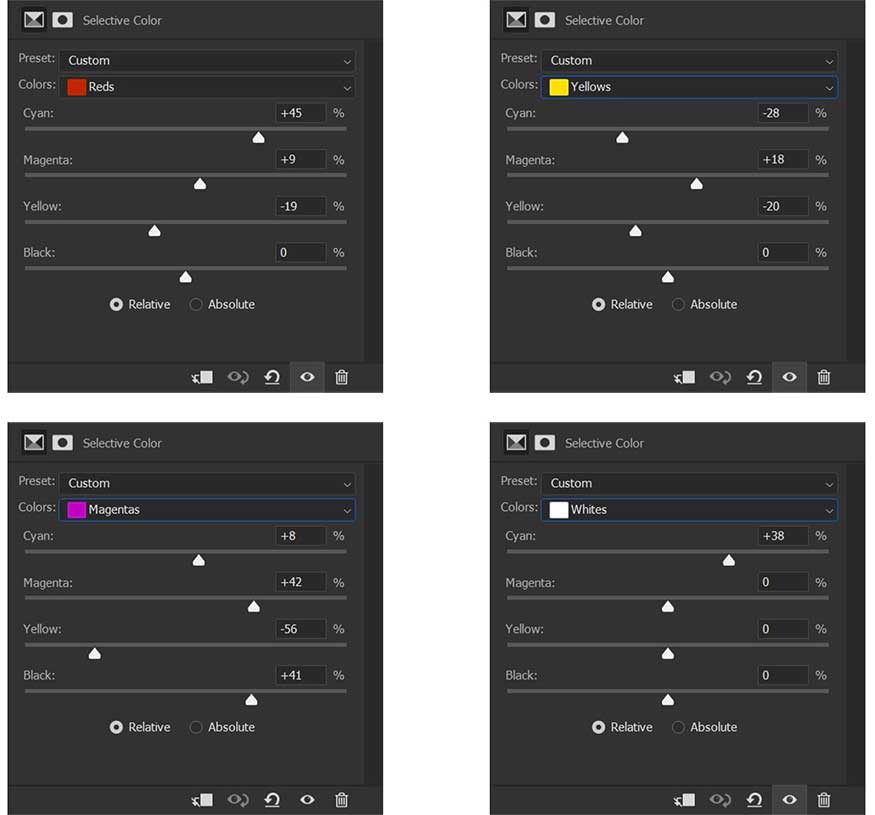
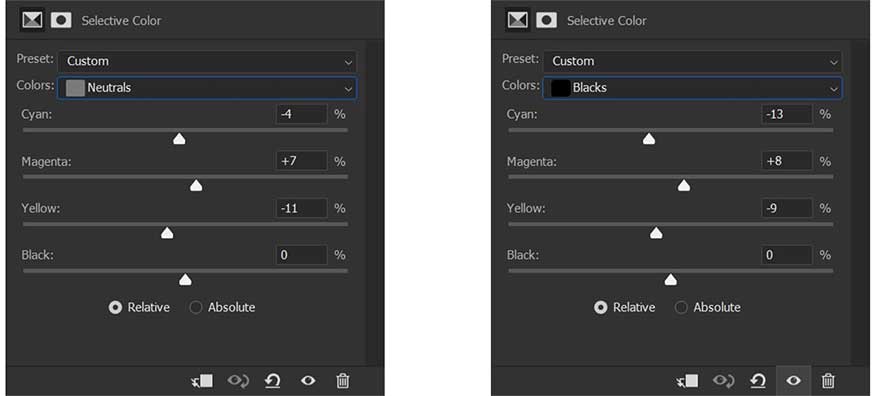
- Step 3: Finally, set the Vibrance layer to +57.

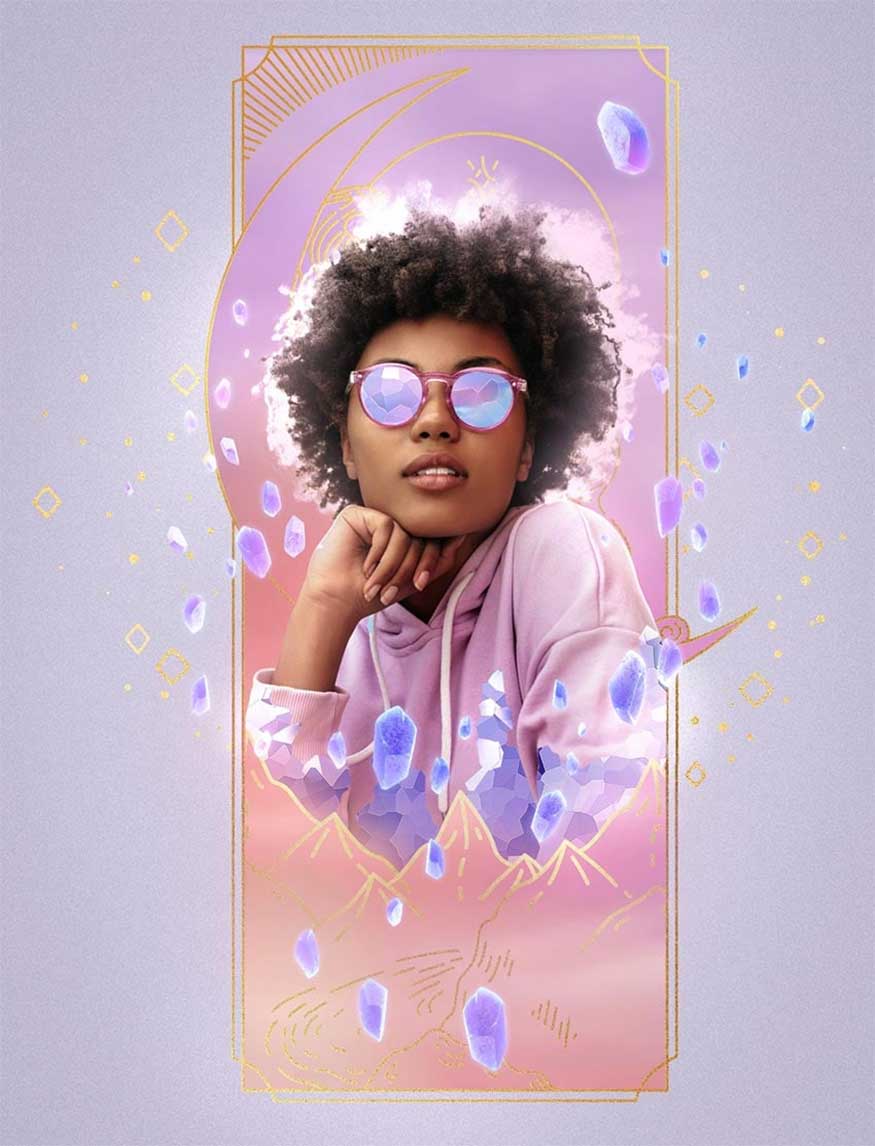
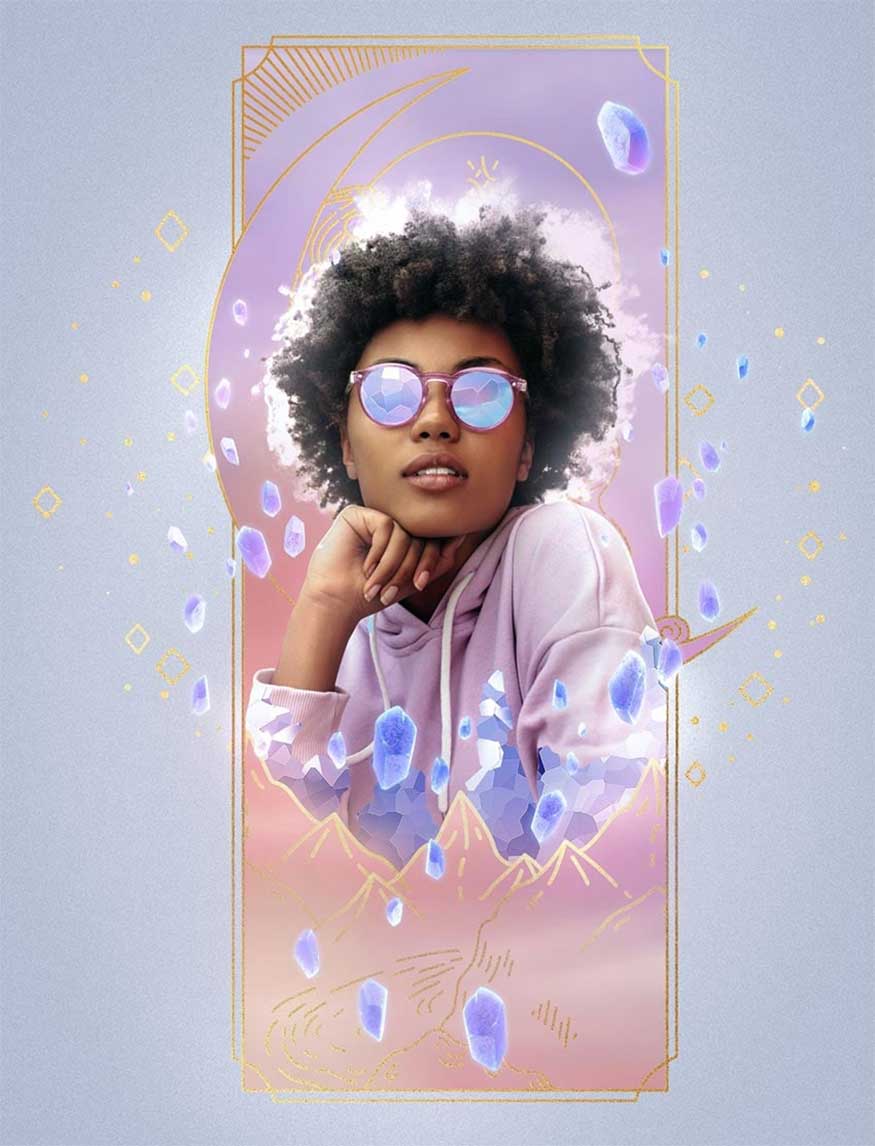
So, we have completed how to create a crystal effect in Photoshop. Wishing you success!


VIP Products


Best Selling Products
Windows 10 & 11 Pro Key
36 USD
MidJourney Account
29 USD
Upgrade Genuine Office 365
49 USD
Autodesk All App Account Copyright
120 USD
ChatGPT Plus Account (GPT-4)
16 USD
Genuine Cheap Canva Pro
39 USD
Genuine Adobe Illustrator account
99 USD
Upgrade Duolingo Super
29 USD
Capcut Pro 1 Year
39 USD
Upgrade genuine Capture One account
120 USD
Freepik Premium Account
59 USD
Adobe Premiere Pro Account
99 USD
Adobe Photoshop Copyright - Full App
120 USD
Plugin Retouch4me
69 USD
Copyright Adobe Lightroom Account
59 USD