Best Selling Products
How to display hidden Photoshop toolbars
Nội dung
- 1. Use keyboard shortcuts instead of toolbars
- 2. Change command to show hidden Photoshop toolbar
- 3. Customize the toolbar to display the hidden Photoshop toolbar
- 4. Create a new Workspace to display the hidden Photoshop toolbar
- 4. Use workspace tools to show hidden Photoshop toolbars
- 5. Reset the Essentials workspace to display the hidden Photoshop toolbar
There are many useful tools in Photoshop, but sometimes you cannot find certain tools. This could mean you accidentally touched a certain shortcut combination, causing them to be hidden. For the most convenient usage, let's learn about how to display hidden Photoshop toolbars through the shares below.
There are many useful tools in Photoshop, but sometimes you cannot find certain tools. This could mean you accidentally touched a certain shortcut combination, causing them to be hidden. For the most convenient usage, let's learn about how to display hidden Photoshop toolbars through the shares below.
1. Use keyboard shortcuts instead of toolbars
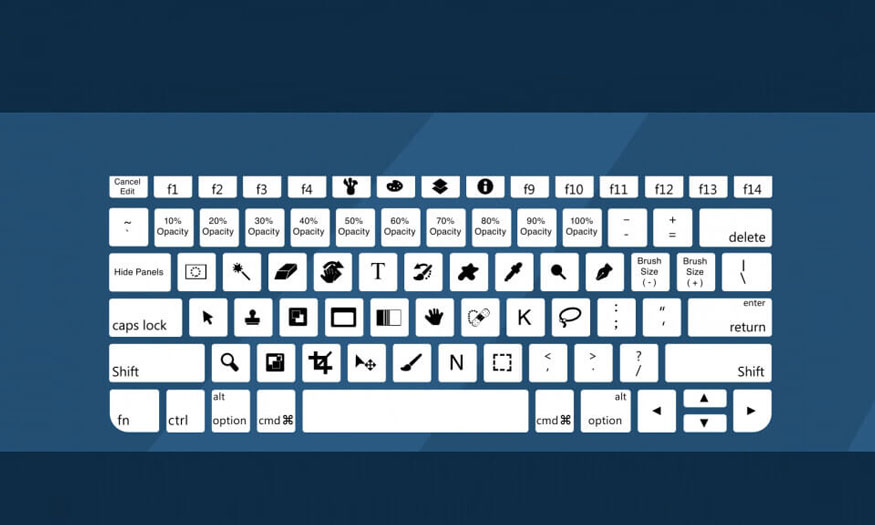
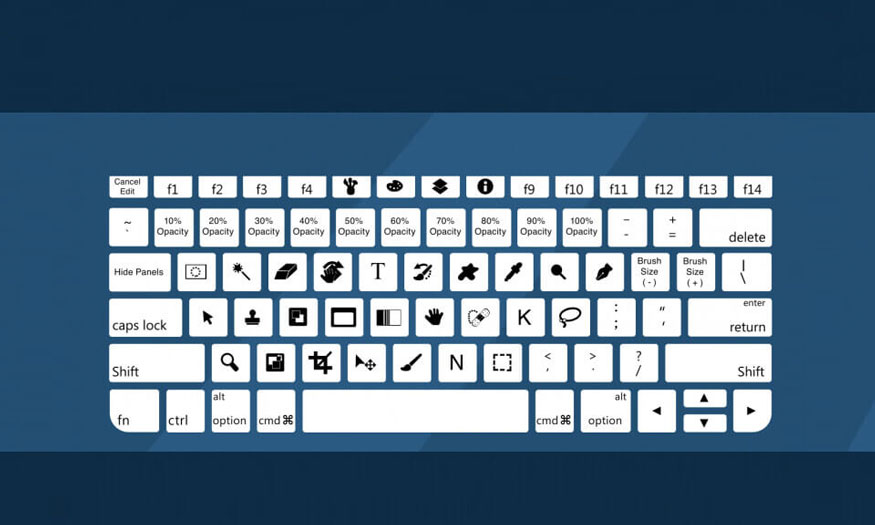
If you can't find a tool on the toolbar, don't worry. You can absolutely use alternative keyboard shortcuts to bring up these tools. This is the fastest way to show hidden Photoshop toolbars. Each feature on Photoshop is assigned a shortcut. You can use the following shortcuts to open the desired feature, specifically as follows:
| Phím tắt | Tên phím | Chức năng |
| v | Pointer (Move Tool) | Move objects. |
| w | Magic Wand | Create a selection by color. |
| m | Rectangular Marquee | Create a selection by shape. |
| l | Lasso | Tool for creating selections by drawing. |
| i | Eyedropper | Choose any color. |
| c | Crop | Crop photo. |
| e | Eraser | Delete selected area. |
| u | Rectangle | Draw shapes like square, circle, triangle,... |
| t | Horizontal Typetext | Create text. |
| b | Brush | Paintbrush. |
| y | History Brush | Retrieve image details. |
| j | Spot Healing Brush | Tools for grading, editing, and deleting photos. |
| g | Gradient | Gradient coloring. |
| a | Path Selection | Select paths. |
| h | Hand | Drag the photo in hidden areas. |
| r | Rotate | Rotate images. |
| p | Pen | Draw paths. |
| s | Clone Stamp | Take part of the photo. |
| o | Dodge | Brighten image areas. Press Alt to darken the image area. |
| z | Zoom | Enlarge image. Press Alt to zoom out the image. |
| d | Default Foreground and Background Colors | Check the default background color box. |
| x | Switch Foreground and Background Colors | Change the color in the background color box. |
In addition, some tools are assigned to different keyboard shortcuts. For example, if you want to select Brushes, press the F5 key. Or if you want to make color adjustments, press the F6 key on the keyboard. Similarly, you can also note some shortcuts as follows:
- Layers: select F7 key
- Info: select key F8
- Action: shortcut key combination of ALT + F9.
Note, the shortcut keys may be different depending on the user's setting and assignment of functions to it.
2. Change command to show hidden Photoshop toolbar
If some tools in Photoshop are hidden, you can show hidden Photoshop toolbar by changing the command according to the following steps:
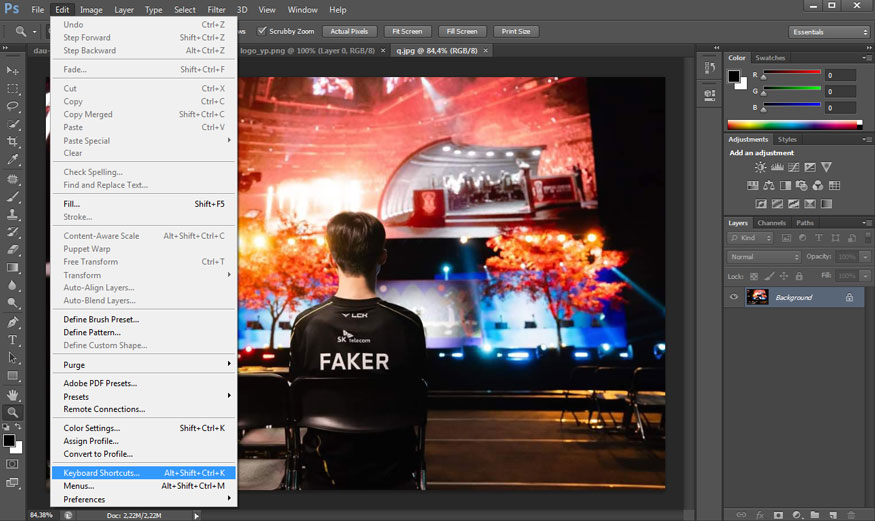
Step 1: On the menu bar of Photoshop, you put the mouse cursor and click Edit => select Keyboard Shortcuts or you can press the shortcut key combination ALT + SHIFT + CTRL + K.
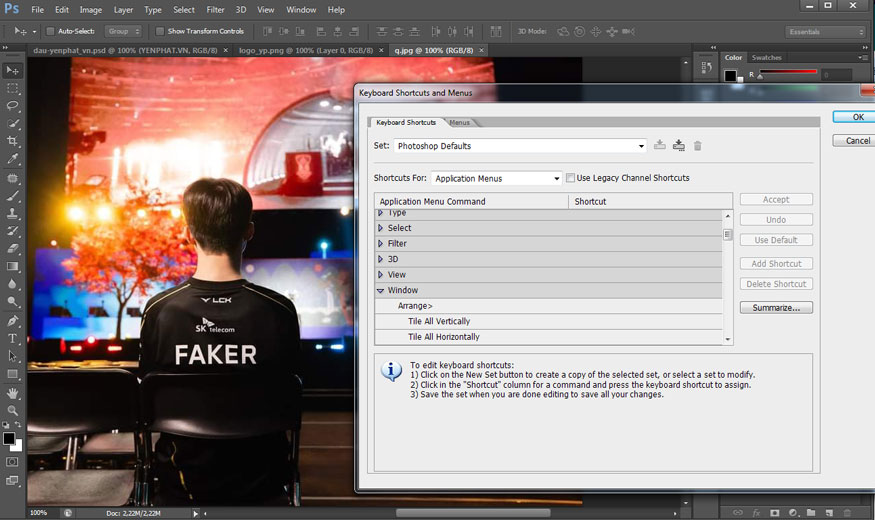
Step 2: In the Keyboard Shortcuts and Menus dialog box, in the Application Menu Command section, select Window, then select Tools to open a shortcut field.
Step 3: Press the shortcut you want to use to assign the selected function. The keys you press will appear in the “Shortcut” box next to the selected function. If Photoshop is already using the shortcut you selected for another feature (the shortcut is duplicated), an error message will appear at the bottom of the window. If you want, you can completely ignore the error message, remove the duplicate shortcut from the existing function, and assign it to a new function of your choice. To do this, click “Accept” on the right side of the window. Finally, click OK to save.
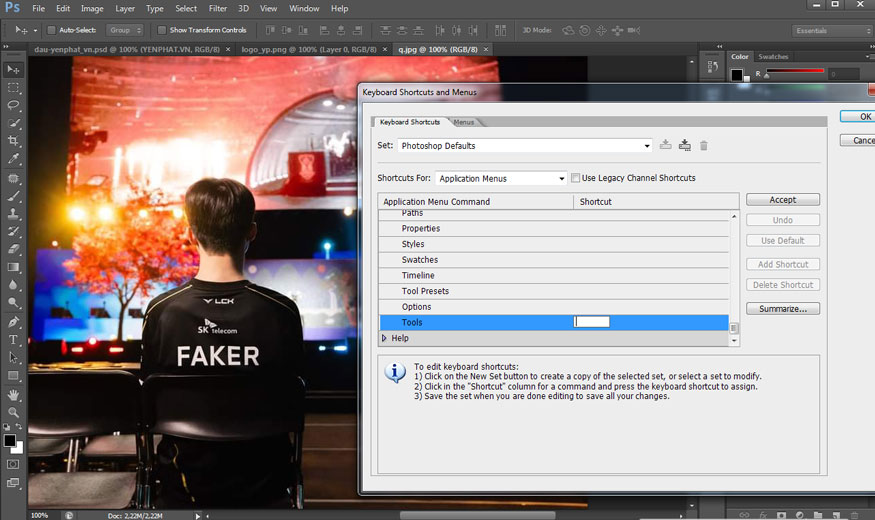
Now with the new keyboard shortcut, you can show hidden Photoshop toolbars easily. Show hidden Photoshop toolbars using the Windows menu If some of the features on your toolbar are hidden and cannot be found, you can completely reopen it using the Windows feature on the menu bar.
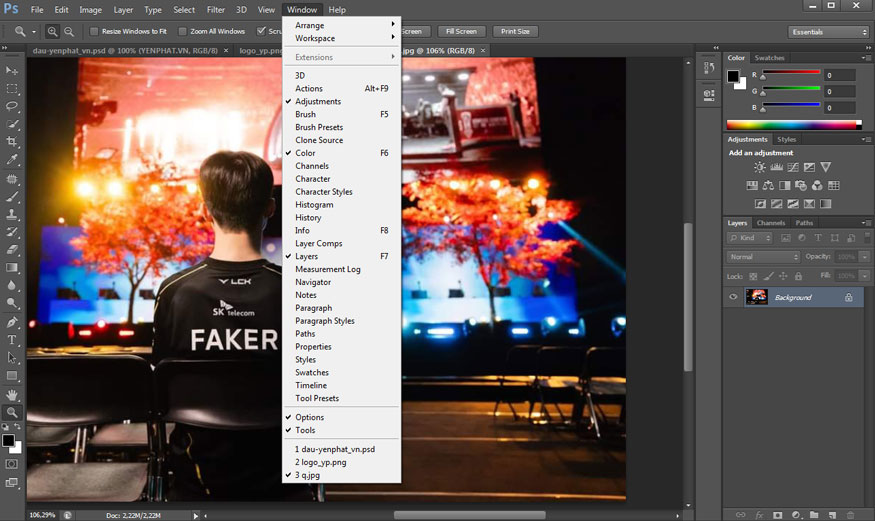
In Photoshop's menu bar (top horizontal bar), select Windows. At this point, Photoshop will return many options such as Actions, Brushes, Character, Channels, Character Styles, Color,...
If you want to display any tool, just tick that tool. You can also use the Shift Tab keyboard shortcut to turn all panels on and off.
3. Customize the toolbar to display the hidden Photoshop toolbar
To fix the hidden Photoshop toolbar, we can customize the toolbar right with the following simple steps:
Step 1: On the menu bar, move the mouse to the Edit section => select Toolbar => select Customize Toolbar.
Step 2: Click the three-dot icon (Edit Toolbar) on the toolbar on the left.
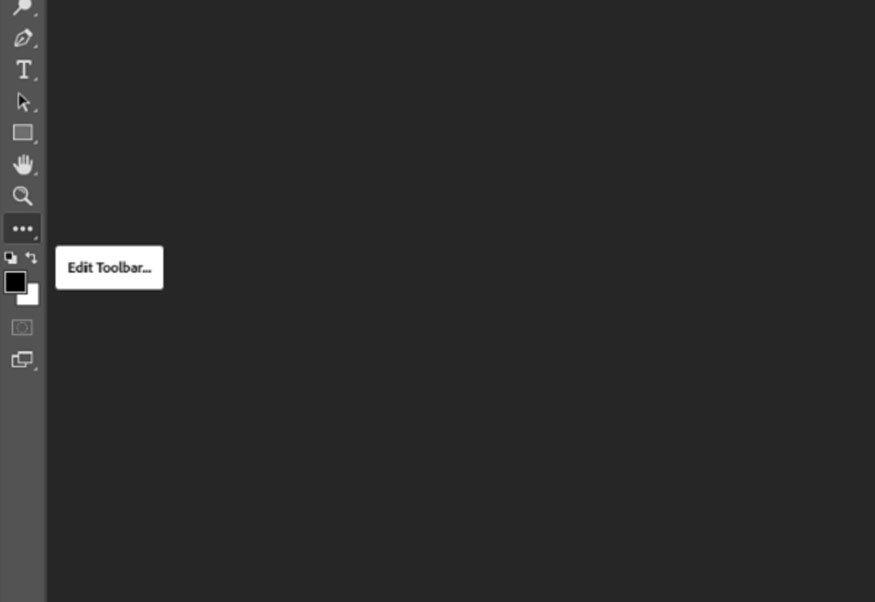
Step 3: Find the missing tools in the list at Extra Tools in the right section.
Step 4: Drag the tool to the toolbar list (Toolbar), then click Done.
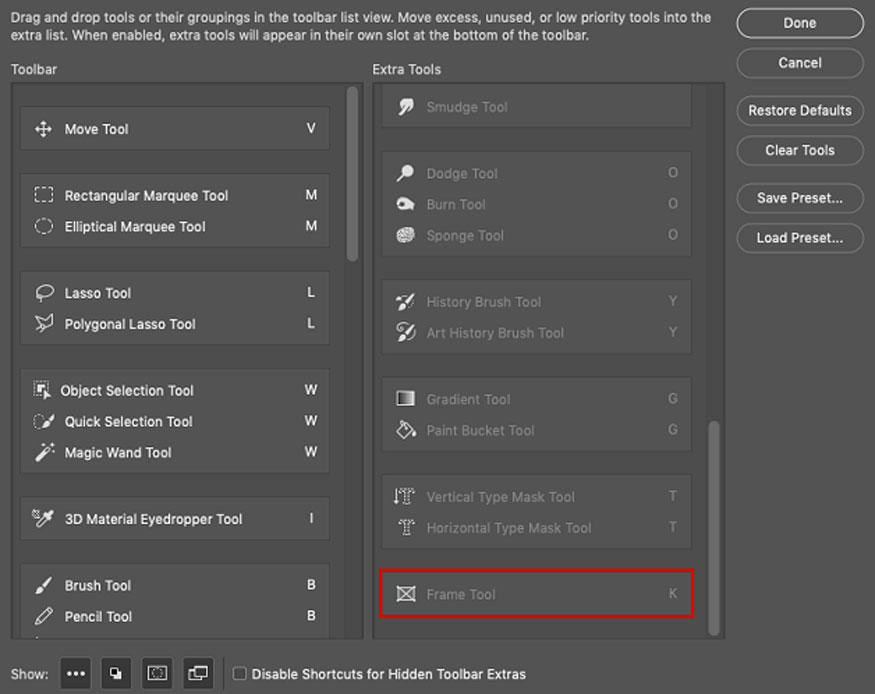
4. Create a new Workspace to display the hidden Photoshop toolbar
In addition to the above methods, you can also display the hidden Photoshop toolbar by creating a new Workspace. Specifically, the steps are as follows:
Step 1: On the menu bar, select Windows => select Workspace and then click New Workspace. Because it is a new workspace, you can freely choose the toolbar. Name your new Workspace.
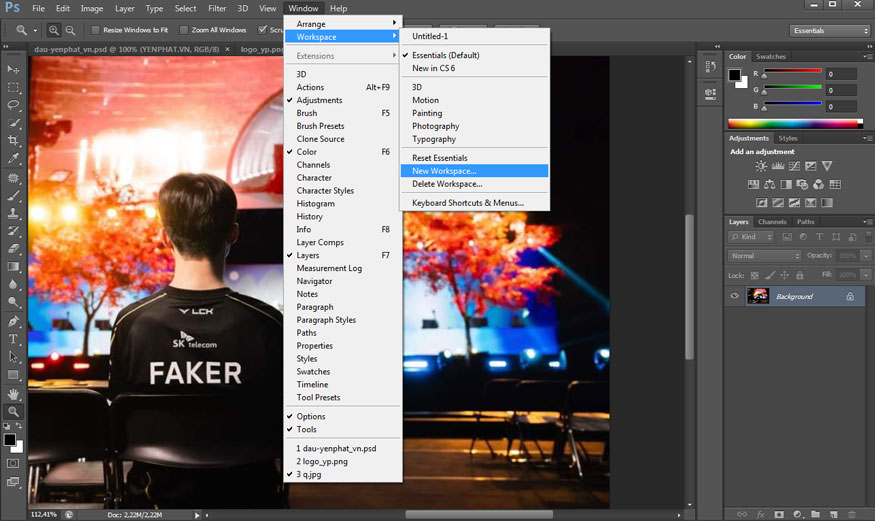
Step 2: Check Keyboard shortcuts, Menu and Toolbar. You can proceed to customize the toolbar according to your intended use.
Step 3: Finally, save the new Workspace.
Note: We can only add custom menu layouts and shortcuts for a specific set of tasks to the new workspace. Therefore, create multiple new workspaces, which contain different custom arrangements to display the hidden Photoshop toolbar.
4. Use workspace tools to show hidden Photoshop toolbars
With this method, you can follow these basic steps:
Step 1: First we need to create a new workspace. On the menu bar, select Windows, select Workspace, then select New workspace.
Step 2: In the new workspace, select Edit on the menu bar, select Toolbar. You may have to scroll down further because the Toolbar is usually at the bottom.
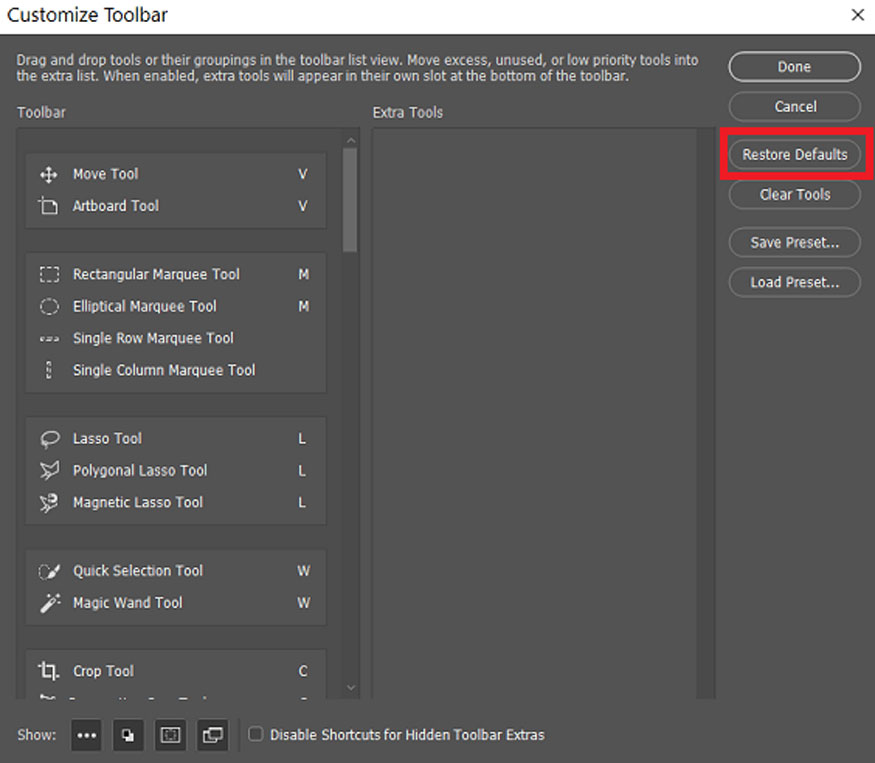
Step 3: In the Customize Toolbar window, click Restore Defaults. If you've set up a new workspace, but for some reason some tools are still missing from the toolbar. Then, follow the steps above to show the hidden Photoshop toolbar.
5. Reset the Essentials workspace to display the hidden Photoshop toolbar
In addition to the ways to fix the hidden Photoshop toolbar as above, we can also display the hidden Photoshop toolbar by resetting the Essentials workspace. You can do this by following these basic steps:
Step 1: On Photoshop's menu bar, click Window and then select Workspace.
Step 2: Then select Essentials (Default).
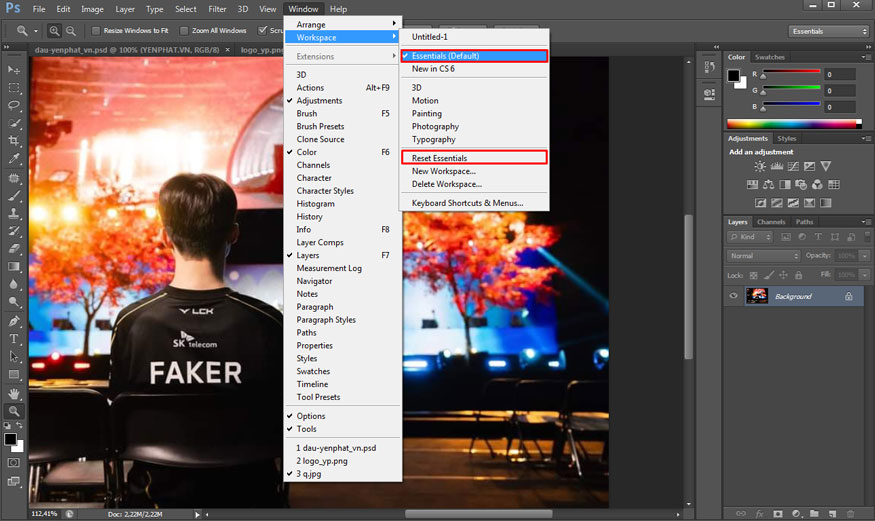
Step 3: Continue to select Window on the menu bar, select Workspace. This time click on Reset Essentials.
So, you have reset Essentials Workspace to help display the hidden Photoshop toolbar.
Above is general information about ways to display hidden Photoshop toolbars. Reopening hidden tools in Photoshop is not difficult. Hopefully, Sadesign's sharing can help the process of using this software be optimal and most convenient.


