Best Selling Products

Upgrade Genuine Office 365
49 USD

Upgrade Duolingo Super
29 USD

Adobe Photoshop Copyright - Full App
120 USD

MidJourney Account
29 USD

ChatGPT Plus Account (GPT-4)
16 USD

Adobe Premiere Pro Account
99 USD

Capcut Pro 1 Year
39 USD

Autodesk All App Account Copyright
120 USD

Windows 10 & 11 Pro Key
36 USD

Genuine Adobe Illustrator account
99 USD

Plugin Retouch4me
69 USD

Upgrade genuine Capture One account
120 USD

Copyright Adobe Lightroom Account
59 USD

Genuine Cheap Canva Pro
39 USD

Freepik Premium Account
59 USD
How to make tattoo design in Photoshop
Nội dung
If you like tattoos but don't want to get one, let's learn how to create tattoos with photoshop from Sadesign below. You can comfortably get a tattoo of all designs in different positions just like the real thing without having to hesitate about whether or not to get a real tattoo.

If you like tattoos but don't want to get one, let's learn how to create tattoos with photoshop from Sadesign below. You can comfortably get a tattoo of all designs in different positions just like the real thing without having to hesitate about whether or not to get a real tattoo.

1. How to create a tattoo design in Photoshop
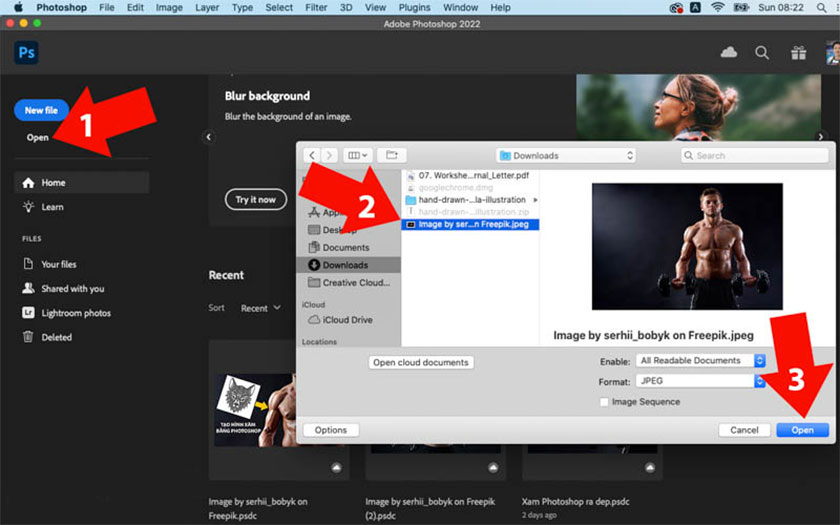
First, click Open (1) => find a folder to save the photo on your computer (2) => select the photo and click Open (3). Alternatively, you can do it another way, which is to drag and drop the image into Photoshop.
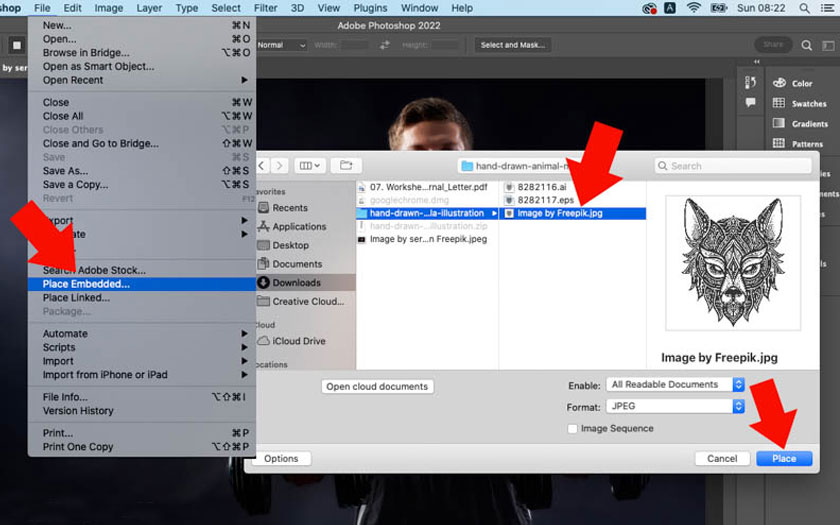
Once you have opened the photo you want to create a tattoo in Photoshop, click File => select Place Embedded => select folder => select the tattoo and click Place. This operation helps place the tattoo on the photo to be merged.
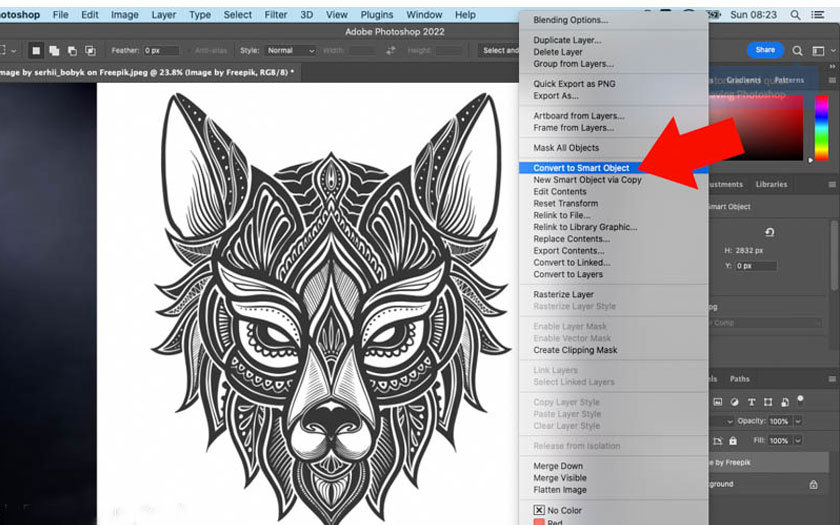
Often model photos and tattoos will use different sizes. Right-click on the tattoo layer => select Convert to Smart Object to resize the image without causing the image to break, and at the same time adjust the Filter parameters applied to the Layer.
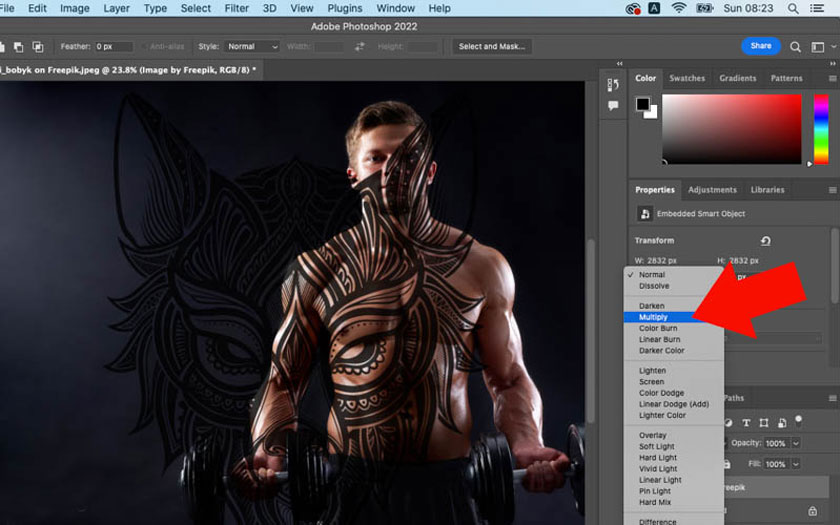
In this tutorial we use tattoos with a white background JPG image format. To remove the white background, just select the tattoo layer => click Blending Mode => select Multiply. Photoshop will immediately remove white pixels while keeping other colored pixels intact. If you use PNG image format, you can skip this step.
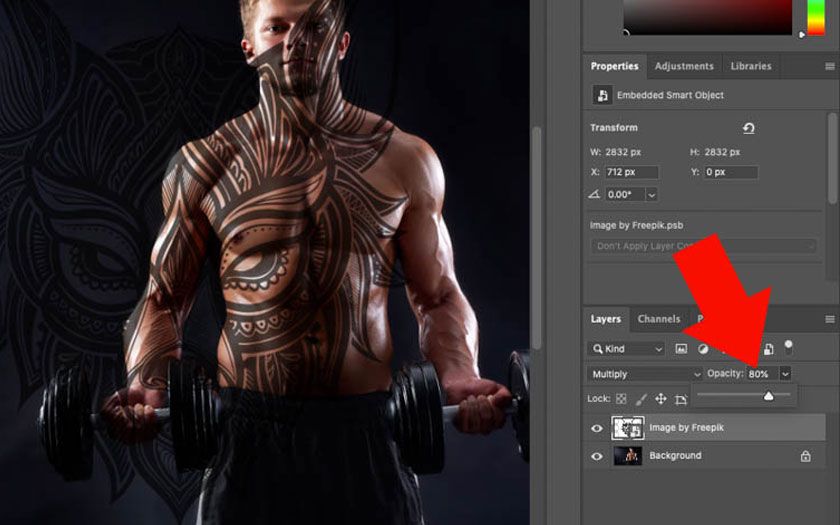
Body tattoos are ink that blends with the skin, so you can also do this in Photoshop to make the tattoo look more realistic. Click on Opacity => select a value of 80% to help the tattoo blend with the model's skin to make the tattoo more realistic.
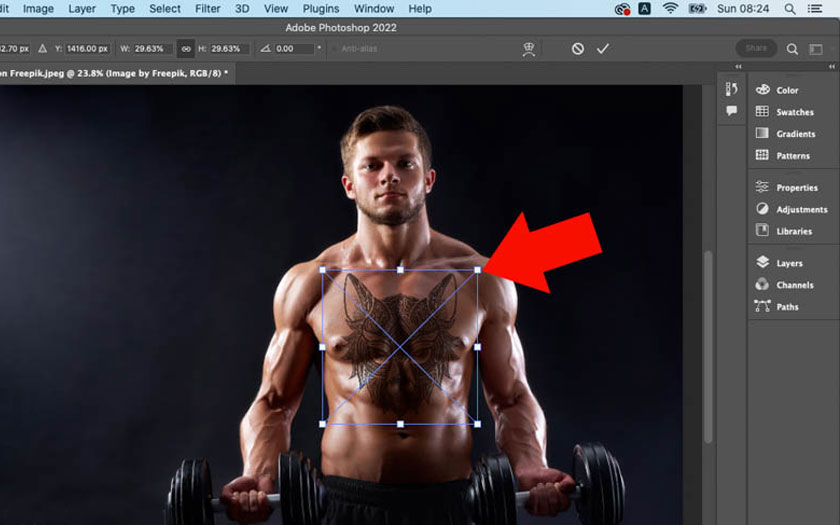
Next select the tattoo layer => select Edit => Free Transform or use the keyboard shortcut Ctrl + T. You will immediately see the blue frame and anchor points as shown. Drag the corners to resize and rotate. Next click on the center of the tattoo to move it to a position suitable for the model. Finally, select Enter to make the Free Transform frame disappear.
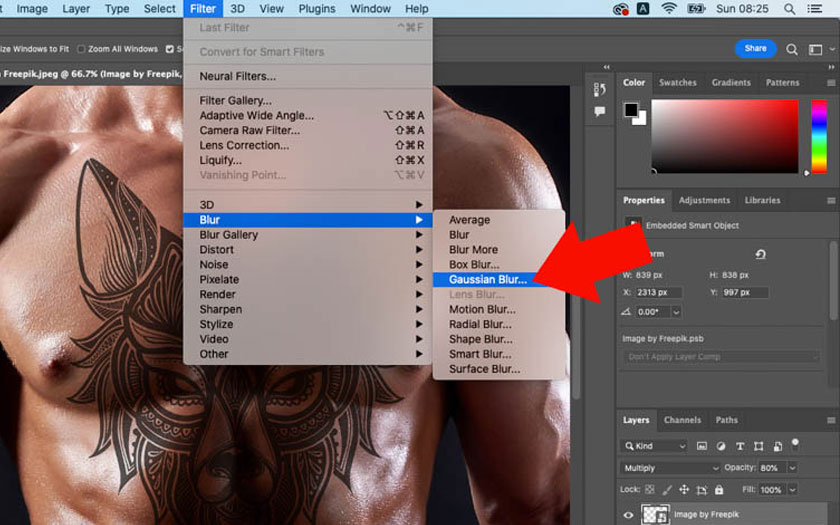
To make the tattoo more realistic, go to Filter => Blur => select Gaussian Blur to blur the tattoo, making the photo more realistic.
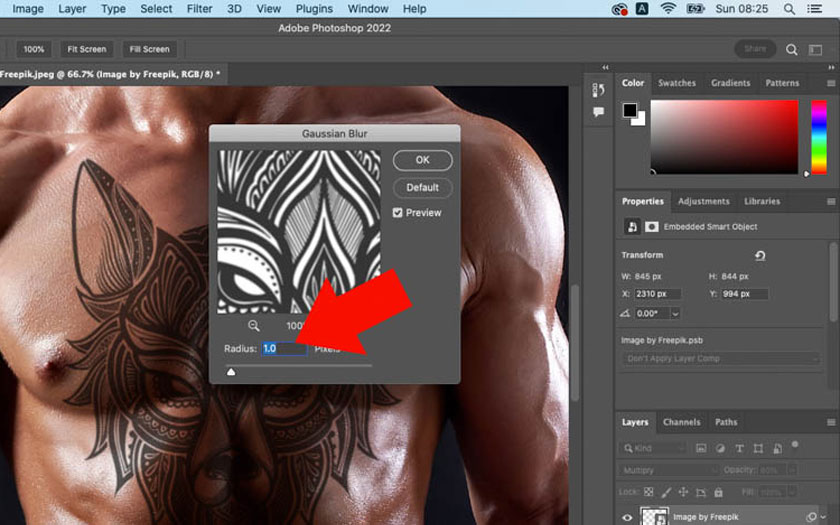
Check Preview in Gaussian Blur to make adjustments to the Radius parameter. Adjust the tattoo so that it matches the model's skin. The tattoo needs to be neither too sharp nor too blurry. Drag the Radius slider until the most suitable parameter is achieved.
As a result, we have a tattoo that looks much more realistic. However, one thing is that the tattoo is not as bright and dark as the model's skin. To fix this, right-click on the tattoo layer => select Blending Options.

Hold down the Alt key and drag the black slider to the right to control the dark area on the tattoo. Thus, the dark area has been divided into many different levels, much more beautiful than before.
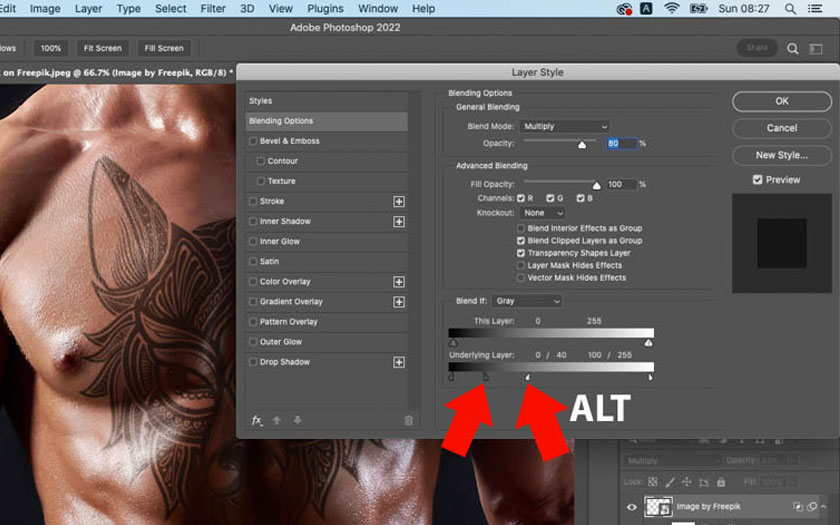
Similarly, hold down the Alt key and drag the white slider to the left to control the light area on the tattoo. This helps the brightest areas gradually transition to darker, very realistically like the model's skin. Just keep adjusting the parameters until you achieve the color you like.
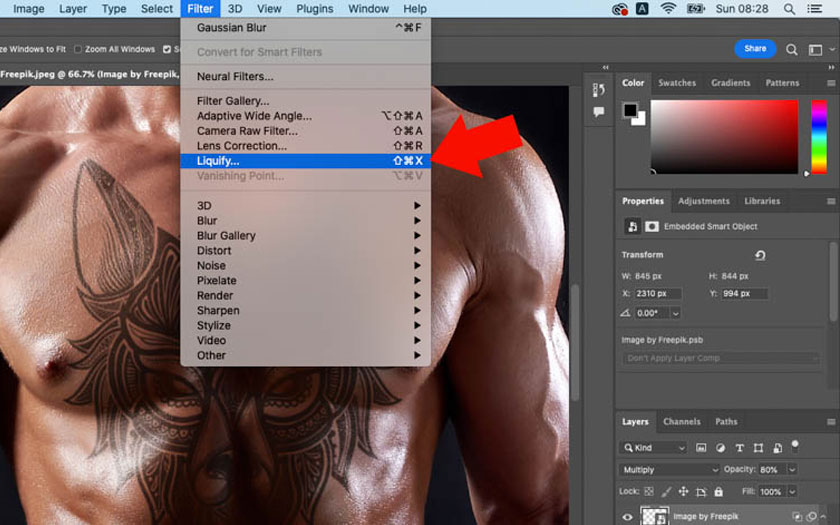
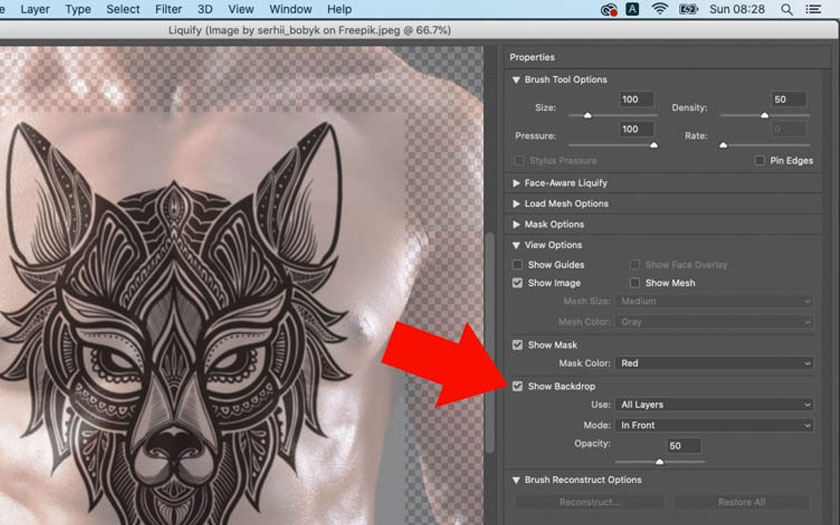
To combine a tattoo with Photoshop more realistically, click Filter => select Liquify, this is a feature that has the effect of squeezing the face and waist in Photoshop, they can be used to make more realistic tattoo adjustments.
In Liquify, check Show Backdrop to see the model image below => adjust the Opacity to suit your needs.
Click the Bloat Tool (B) => select the [ ] key to resize it to suit your needs. It can be seen that the tattoo is quite flat compared to the model's chest. Press the Bloat Tool in these areas to help adjust the bulge of the tattoo, this helps the image look even more realistic.
![select the [ ] key to resize it to suit your needs](/pictures/picfullsizes/2023/11/08/cach-tao-hinh-xam-bang-photoshop-14.jpg)
Use the Pucker Tool (S) => press the [ ] key to change the size => select concave areas on the model's body to help the tattoo concave, suitable for the model's body. Adjust the bulge and concavity to be as natural as possible. You can also combine it with the Forward Warp Tool (W) to straighten the tattoo to make it more realistic.
![press the [ ] key to change the size](/pictures/picfullsizes/2023/11/08/cach-tao-hinh-xam-bang-photoshop-15.jpg)
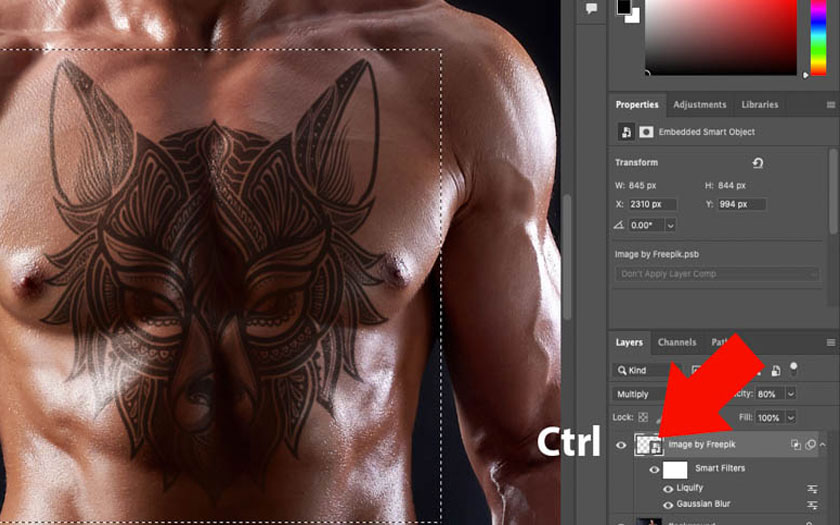
A suggestion for you is to create an additional layer above the tattoo to show the model's skin in detail. Press and hold the Ctrl key, => select the tattoo layer to let Photoshop create a selection corresponding to the tattoo size.
Keeping the selection intact, click on the Layer Background corresponding to the model. Next, click select Edit => select Copy. You can also hold down the keyboard shortcut Ctrl+C. So, we have finished copying the model's skin selection area, with the size and position corresponding to the tattoo.
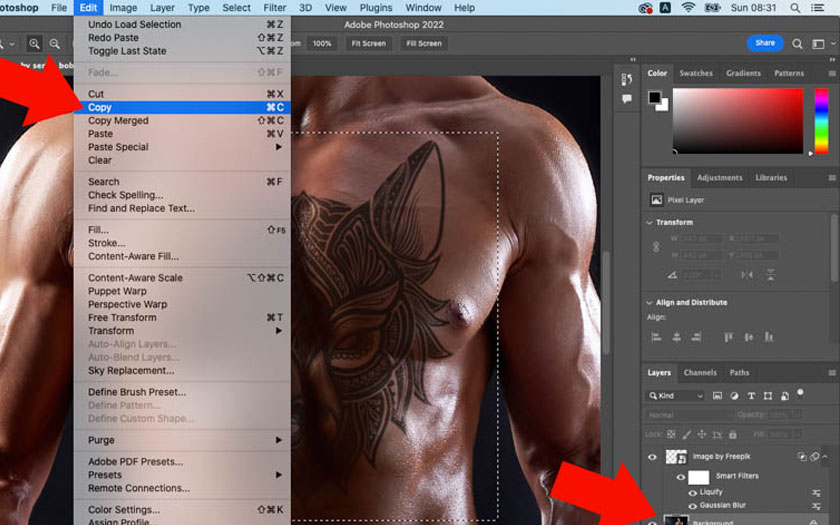
Now you will just need to click Edit => select Paste (Ctrl + V) to create a new layer, this layer contains the model's skin area, with the size and position corresponding to the tattoo.
Hold down the mouse on Layer 1 and drag it to the top as shown in the image or you can use the keyboard shortcut Ctrl+Shift+] to bring Layer 1 to the top faster.
![use the keyboard shortcut Ctrl+Shift+] to bring Layer 1 to the top faster](/pictures/picfullsizes/2023/11/08/cach-tao-hinh-xam-bang-photoshop-18.jpg)
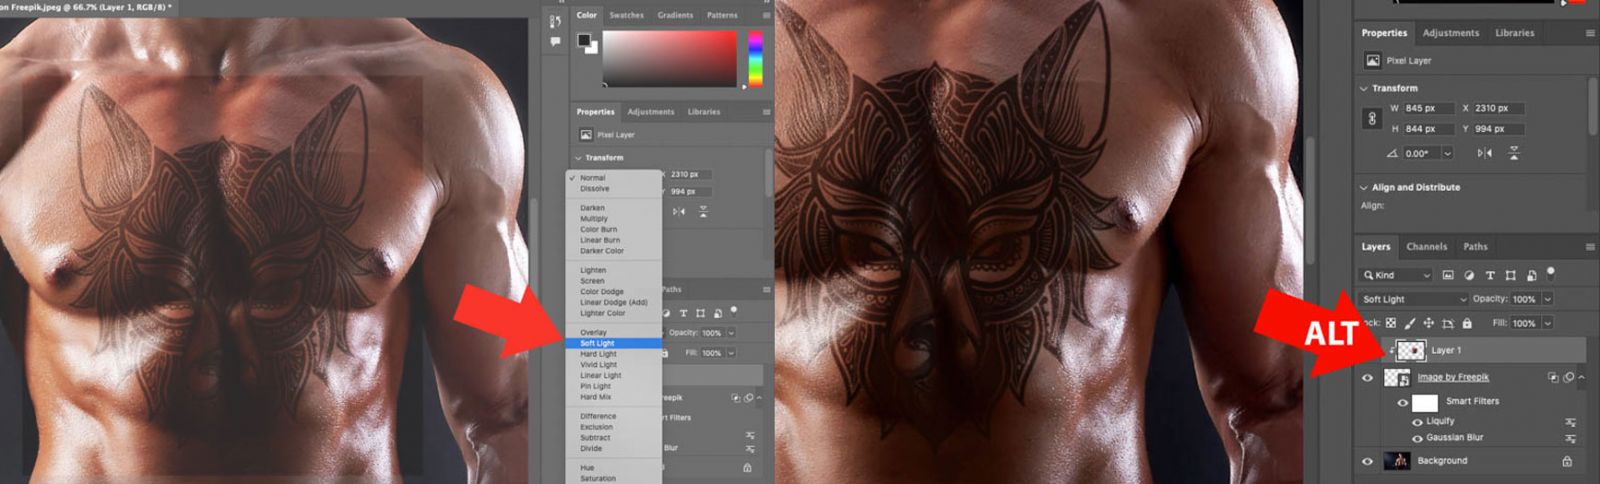
Select Layer 1 => click on Blending Mode => select Soft Light and you will see the tattoo appear again but a little darker than normal. Press and hold the Alt key => click on Layer 1 and you will see the arrow pointing downward, this indicates that this Layer only affects the Layer immediately below it.
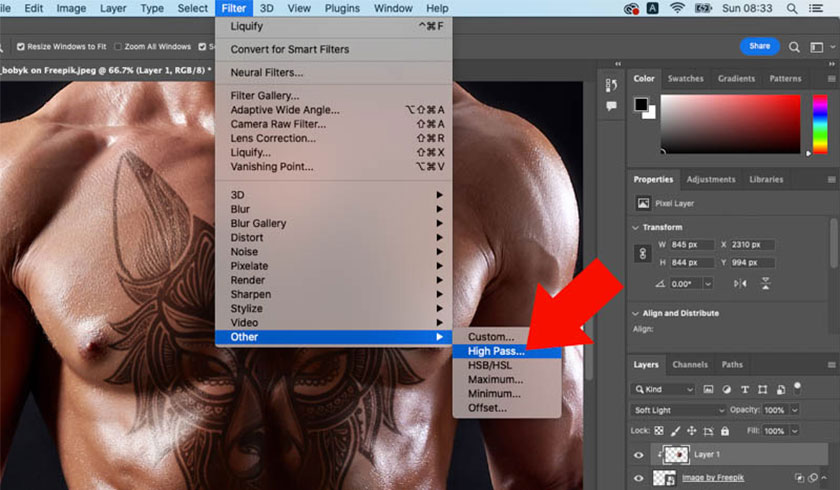
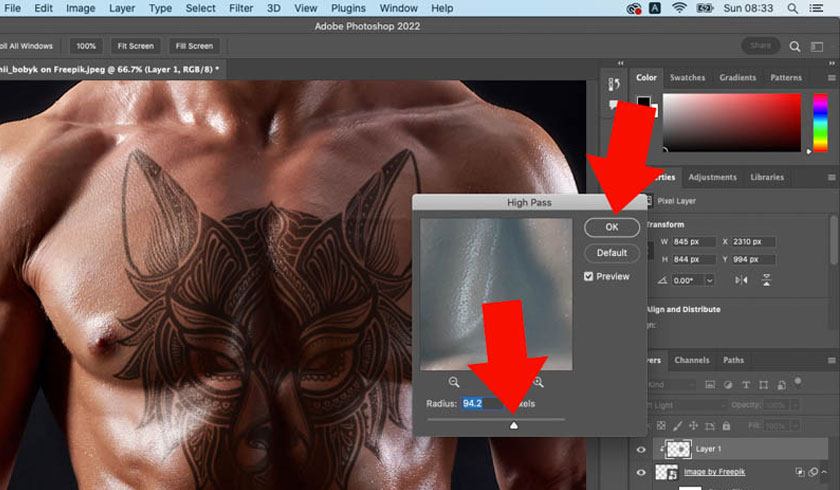
Click Filter => Other => select High Pass. Continue to check Preview to see the effects of High Pass, as well as adjust the Radius parameter. When increasing the Radius, the tattoo will have more details, more like the model's skin, helping the tattoo blend with the model's skin.
Please adjust the parameters to suit your needs because the parameters are based on your wishes and the image in use. Click OK to complete. If you feel dissatisfied, adjust it in Smart Filter.
2. Experience in making quick and beautiful tattoos with Photoshop
To be able to create tattoos quickly and easily, you need to keep in mind the following notes:
- Is it easy to create tattoos with Photoshop? How to create tattoos in photoshop is not as difficult as many people think. The process is quite simple, you just need to download the tattoo, then use the blending mode to make the tattoo more realistic.
- Where to download Photoshop tattoos? You can download free tattoos on many different platforms, you can refer to downloading tattoos on Freepik.
- Reasons why Photoshop tattoos are not realistic? You need to adjust the sharpness, contrast, and material to suit the model's skin to contribute to the realism of the model's skin.
- To get the most out of creating photos in photoshop, you should do it many times to get used to it, ensuring the next photos will be much more beautiful and faster than the first time.
The above shares have helped readers create tattoos using Photoshop quickly and most beautifully. You should adjust the parameters to suit your photo to get the best results. You can apply the same to other tattoos in locations such as the neck, body, arms,...
Wishing you success with the simplest ways to create tattoos in Photoshop that we introduce above. Don't forget to follow Sadesign to update more useful information related to photoshop!


VIP Products


Best Selling Products
Upgrade Genuine Office 365
49 USD
Upgrade Duolingo Super
29 USD
Adobe Photoshop Copyright - Full App
120 USD
MidJourney Account
29 USD
ChatGPT Plus Account (GPT-4)
16 USD
Adobe Premiere Pro Account
99 USD
Capcut Pro 1 Year
39 USD
Autodesk All App Account Copyright
120 USD
Windows 10 & 11 Pro Key
36 USD
Genuine Adobe Illustrator account
99 USD
Plugin Retouch4me
69 USD
Upgrade genuine Capture One account
120 USD
Copyright Adobe Lightroom Account
59 USD
Genuine Cheap Canva Pro
39 USD
Freepik Premium Account
59 USD