
Best Selling Products
Plugin Retouch4me
69 USD
Adobe Photoshop Copyright - Full App
120 USD

Upgrade Duolingo Super
29 USD

MidJourney Account
29 USD

Freepik Premium Account
59 USD

Adobe Premiere Pro Account
99 USD

ChatGPT Plus Account (GPT-4)
16 USD
Genuine Cheap Canva Pro
39 USD
Genuine Adobe Illustrator account
99 USD
Upgrade Genuine Office 365
49 USD
Capcut Pro 1 Year
39 USD
Windows 10 & 11 Pro Key
36 USD
Autodesk All App Account Copyright
120 USD
Upgrade genuine Capture One account
120 USD

Copyright Adobe Lightroom Account
59 USD
Editing your voice using CapCut is extremely easy and doesn''t require professional software.
Nội dung
- 1. What's so interesting about the voice editing feature on CapCut?
- 2. Instructions on how to edit your voice using CapCut on your phone.
- 2.1. Step 1: Create a new project and add the video you want to edit.
- 2.2. Step 2: Select the video segment containing the voice.
- 2.3. Step 3: Choose the appropriate voice effect
- 2.4. Step 4: Listen back and save the voice effects.
- 3. How to add voiceovers and splicing to videos using CapCut
- 3.1. Step 1: Add video to CapCut project
- 3.2. Step 2: Open the voiceover tool
- 3.3. Step 3: Proceed with voice recording
- 3.4. Step 4: Extract audio from the existing video
- 3.5. Step 5: Adjust audio and export video
- 4. Some tips to help you edit your voice on CapCut to sound better and more natural.
- 5. Convenient CapCut upgrade location at Sadesign
Voice is one of the most important factors determining the appeal of a video. Skillfully crafted dialogue can make content funnier, more lively, or convey emotions better. Instead of using complex audio editing software, you can easily transform your voice right in CapCut with a few simple steps. The application offers many unique effects, supports changing tone, voiceovers, and combining sounds to your liking. Let''s explore with Sadesign how to edit your voice using CapCut to create more interesting and engaging videos!
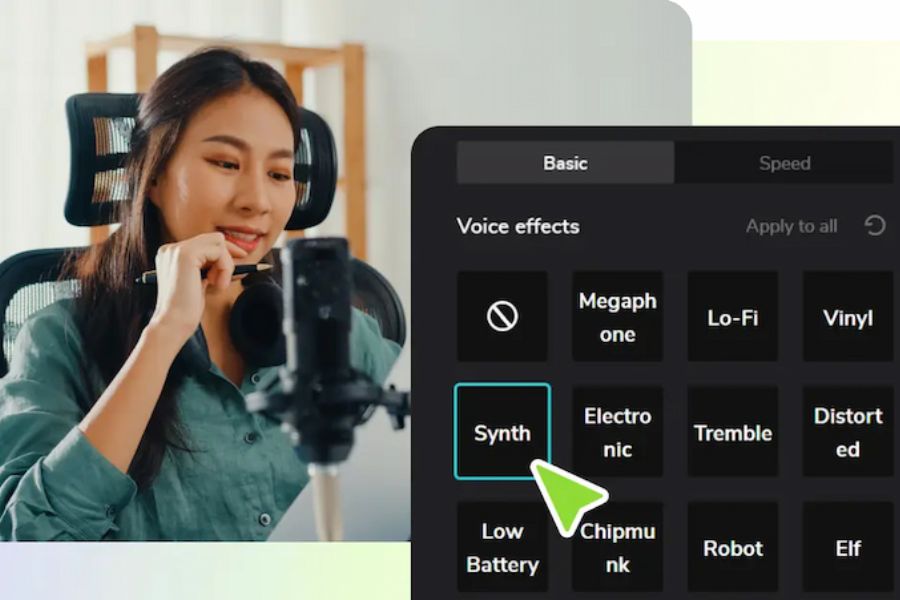
1. What's so interesting about the voice editing feature on CapCut?
CapCut is known as a familiar video editing application for many content creators thanks to its intuitive interface and diverse tools. Besides features like cutting and merging videos, adding background music, inserting text, and creating visual effects, the application also supports quite flexible audio processing. Users can adjust the voice directly during editing without needing to install additional specialized software. The appeal of this feature lies in its ability to transform the voice into many different styles. With just an initial recording, you can create fun, unique, or completely new sounds. Some notable options and benefits include:
-
Voice filters: Offer various voice transformation effects such as robot voice, baby voice, chipmunk voice, and other styles depending on the application version.
-
Live voiceover: Allows you to record audio using your phone's microphone and then add it to the video without needing a separate recording app.
-
Flexible audio editing: Supports arranging, cutting segments, adjusting volume, and combining voiceovers with background music.
-
Text-to-speech: Some versions support creating automatic voiceovers from text content, which is convenient for making introductory or instructional videos.
-
Create innovative content: Help storytelling, review, entertainment, or knowledge-sharing videos add a unique audio element.
Thanks to these tools, even video beginners can confidently create content with better audio quality.
2. Instructions on how to edit your voice using CapCut on your phone.
To change the voice in a video, you first need to prepare a video clip containing the audio you want to edit. The process is quite simple and doesn't require advanced editing experience. Below is a step-by-step guide to help you easily apply it.
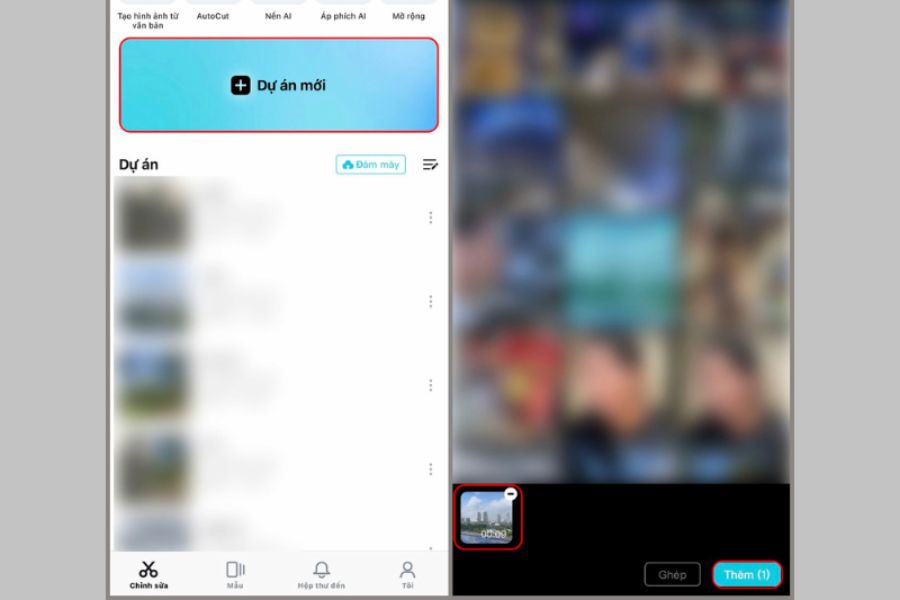
2.1. Step 1: Create a new project and add the video you want to edit.
First, open the CapCut app on your phone and log in if prompted. On the main interface, tap "New Project" to start creating your video. Next, select the video segment containing the voice you want to change from your device's photo library and tap "Add". Once complete, CapCut will take you to the editing interface with the video displayed on your timeline. You should review the content and accurately identify the dialogue segment to apply the effect to for a smoother editing process.
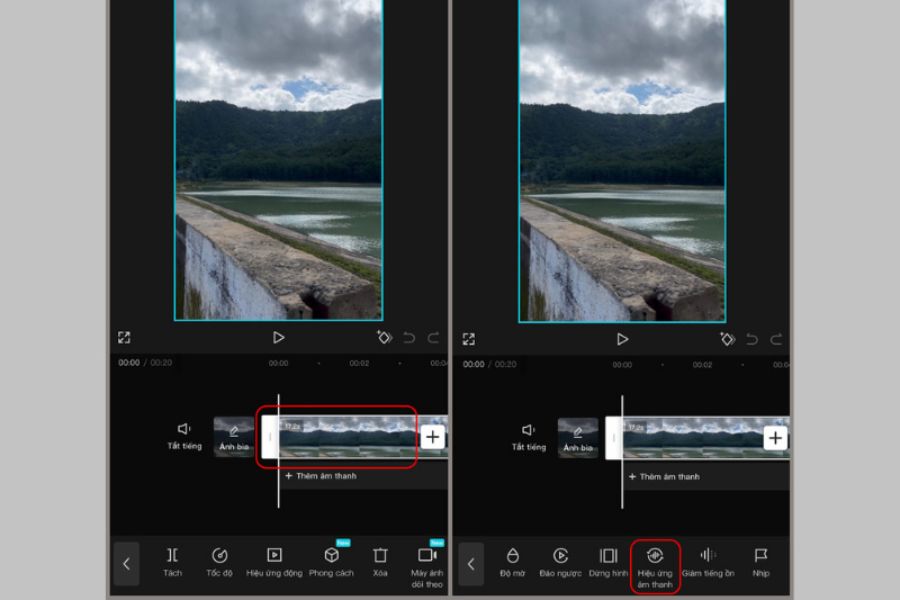
2.2. Step 2: Select the video segment containing the voice.
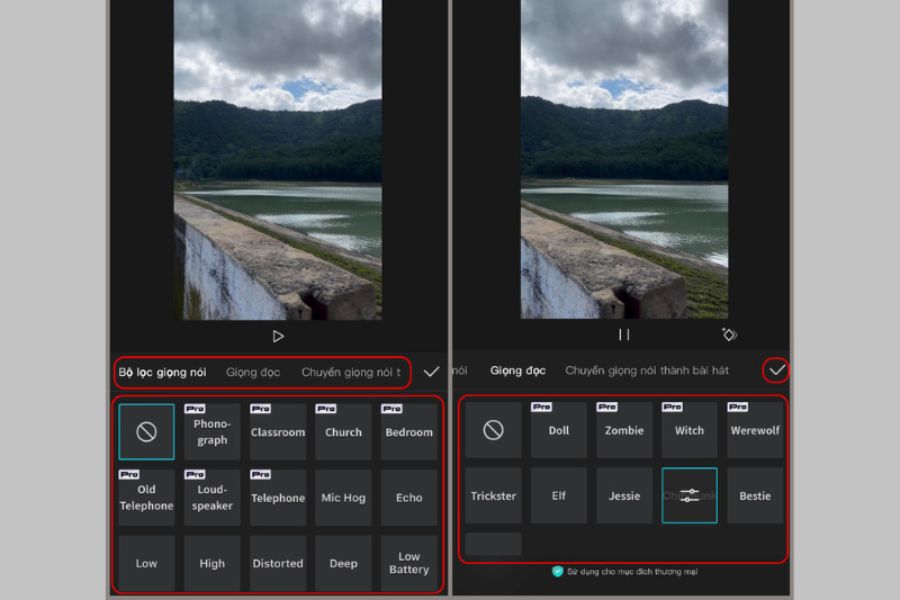
Once the video appears on your timeline, tap directly on the video to open the corresponding editing tools. Look at the toolbar at the bottom of the screen and find the "Sound Effects" or "Voice Filters" option, depending on the version of CapCut you're using. If you don't see the necessary option, you can swipe the toolbar to the sides to find it. Choosing the right video segment is crucial because the effects will be applied to the corresponding audio, giving you easier control over the content you want to change.
2.3. Step 3: Choose the appropriate voice effect
After accessing the sound effects area, CapCut will display voice transformation options for you to explore. Depending on the version, the list may include various styles such as robot, baby, squirrel, or other unique voice effects. Simply click on each effect to listen to a preview and choose the sound style that best suits your video content. For example, a robot voice can create a fun feeling, while a baby voice effect is suitable for cute and entertaining videos. Try a few options before deciding to find the most natural and pleasant sound.
2.4. Step 4: Listen back and save the voice effects.
Once you've chosen your desired effect, play back the video to check the change in your voice. If the sound isn't right, go back to the effects list and try a different option. You should also pay attention to the clarity of the dialogue, avoiding distorted or difficult-to-understand voices after the transformation. When you're satisfied with the result, tap the checkmark to confirm the edit. Finally, you can tap the Export button to save the video to your phone or share it directly to social media platforms.
3. How to add voiceovers and splicing to videos using CapCut
In addition to using pre-recorded voiceovers, CapCut also allows users to record their own voiceovers and add them to videos. This is a useful option when you want to create review videos, storytelling videos, tutorials, or knowledge sharing videos but don't want to appear directly in front of the camera. You can follow these steps:
3.1. Step 1: Add video to CapCut project
First, open CapCut on your phone and select "New Project" from the main interface. Next, find the video you want to narrate in your device's library and tap "Add" to import the content into the editor. You should choose a video with clear images and identify the sections that need narration beforehand to easily adjust the recording time. After the video is successfully added, check the timeline and arrange the video segments in the desired order before moving on to the next step.
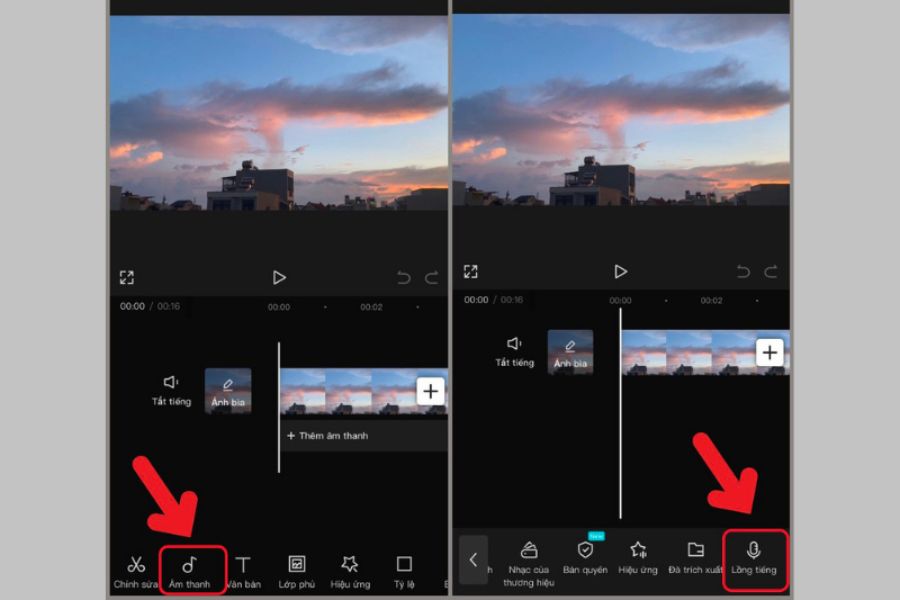
3.2. Step 2: Open the voiceover tool
In the editing interface, find the Audio option on the toolbar at the bottom of the screen. Then, select Voiceover to open CapCut's live recording feature. This tool allows you to record dialogue using your phone's microphone and place the audio in the correct position on the timeline. Before you begin, check your surroundings to minimize noise and prepare the content you want to read. A quiet space will help your voice be clearer and reduce post-production editing time.
3.3. Step 3: Proceed with voice recording
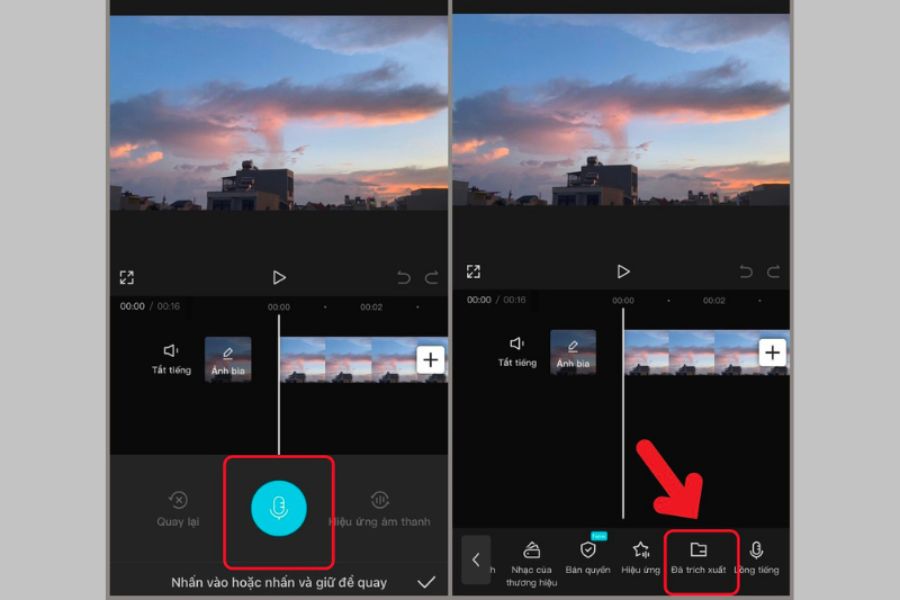
When the voiceover interface appears, press and hold the microphone icon to start recording and read the prepared script. While recording, maintain a suitable distance from the phone, speak clearly, and keep a moderate pace so viewers can easily follow along. If you make a mistake or are not satisfied with the dialogue, you can re-record to get a better version. After you're finished, press stop and listen to the recorded content. CapCut will display the audio on the timeline, making it easy to move and align with the image.
3.4. Step 4: Extract audio from the existing video
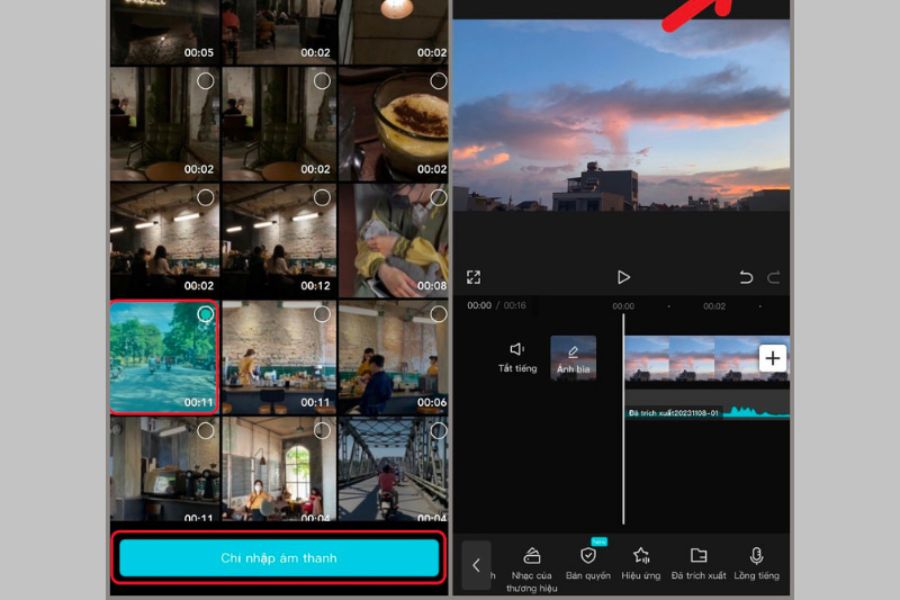
If you already have an audio or video recording containing the dialogue you want to use, you don't necessarily need to re-record from scratch. Instead, go to the Audio section and find the Extracted option. Next, select the video containing the audio you want to extract and click Import Audio Only if this option appears. CapCut will extract the audio from the original video for you to use in your current project. This method is quite convenient when you want to utilize a pre-prepared recording or combine dialogue from another video into the content you are editing.
3.5. Step 5: Adjust audio and export video
After adding the voiceover to your project, drag the audio track on the timeline to the correct position corresponding to the image. If the dialogue is longer or shorter than the video, use the trimming tool to adjust it accordingly. You can also change the voiceover volume, reduce background noise if available, and add background music at a moderate level. Once everything is complete, play back the entire video to check the synchronization between the image and sound. Finally, press Export to save the finished product to your device in the desired quality.
4. Some tips to help you edit your voice on CapCut to sound better and more natural.
Using voice effects correctly can make videos more engaging, but if the wrong choice is made, the sound can be unpleasant or make it difficult for viewers to understand the content. Therefore, in addition to mastering editing techniques, you should pay attention to some of the tips below to create higher-quality audio.
-
Choose effects according to the video's theme: Humorous videos can use robot or baby voices, while educational content should prioritize clear, easy-to-understand voiceovers.
-
Avoid overusing effects: Only modify dialogue sections that are truly necessary to prevent the sound from becoming muddled.
-
Record in a quiet place: Minimize noise from fans, traffic, or surrounding equipment to ensure your voice sounds clearer.
-
Adjust the volume appropriately: If using background music, lower the volume so that the dialogue stands out and isn't drowned out.
-
Review the video before exporting: Listen to the entire content again to detect any audio interruptions, out-of-sync moments, or discrepancies with the video.
-
Keep the dialogue natural: Use familiar expressions, a moderate speaking speed, and appropriate pauses to make it easy for the audience to understand.
These small adjustments will help your video have a more polished audio experience without needing to invest in professional equipment or editing software.
5. Convenient CapCut upgrade location at Sadesign
If you frequently create TikTok, YouTube, or advertising videos, using CapCut's advanced features can significantly save you editing time. Depending on the service package and availability, CapCut Pro may offer additional creative resources, effects, editing tools, and features to help users build more professional videos. You can consider upgrading your CapCut account at Sadesign for greater convenience. Sadesign offers affordable account upgrade solutions, a clear support process, and dedicated consultants. Some key points to consider when using Sadesign's services include:
-
The upgrade costs are reasonable, making it easy for users to choose according to their budget.
-
Receive support and advice throughout the registration and usage process.
-
The support process is convenient and suitable for those who frequently create content.
-
Other upgrade solutions that can be used for creative work and video editing may also be considered.
6. Conclusion
With its user-friendly interface and numerous convenient audio tools, CapCut makes voice editing easier than ever. In just a few steps, you can transform your voice, add unique effects, or even add your own voiceover to videos without needing professional software. Hopefully, these instructions will help you easily master CapCut's voice editing features and create more creative and engaging videos. Try experimenting with different effects to find the audio style that best suits your content!















VIP Products



Best Selling Products
Plugin Retouch4me
69 USD
Adobe Photoshop Copyright - Full App
120 USD
Upgrade Duolingo Super
29 USD
MidJourney Account
29 USD
Freepik Premium Account
59 USD
Adobe Premiere Pro Account
99 USD
ChatGPT Plus Account (GPT-4)
16 USD
Genuine Cheap Canva Pro
39 USD
Genuine Adobe Illustrator account
99 USD
Upgrade Genuine Office 365
49 USD
Capcut Pro 1 Year
39 USD
Windows 10 & 11 Pro Key
36 USD
Autodesk All App Account Copyright
120 USD
Upgrade genuine Capture One account
120 USD
Copyright Adobe Lightroom Account
59 USD