Best Selling Products

Capcut Pro 1 Year
39 USD

Freepik Premium Account
59 USD

Autodesk All App Account Copyright
120 USD

Adobe Photoshop Copyright - Full App
120 USD

Upgrade Genuine Office 365
49 USD

Copyright Adobe Lightroom Account
59 USD

Plugin Retouch4me
69 USD

Genuine Adobe Illustrator account
99 USD

Windows 10 & 11 Pro Key
36 USD

Upgrade Duolingo Super
29 USD

Upgrade genuine Capture One account
120 USD

Genuine Cheap Canva Pro
39 USD

MidJourney Account
29 USD

Adobe Premiere Pro Account
99 USD

ChatGPT Plus Account (GPT-4)
16 USD
How to create a embroidered text effects in Photoshop
Nội dung
You can absolutely create embroidered text effects with Photoshop without spending too much time or effort. If you don't know how to do it, let's learn with SaDesign.

You can absolutely create embroidered text effects with Photoshop without spending too much time or effort. If you don't know how to do it, let's learn with SaDesign.

1. Instructions for creating background that look like jeans
To create a jeans background, follow these basic steps:
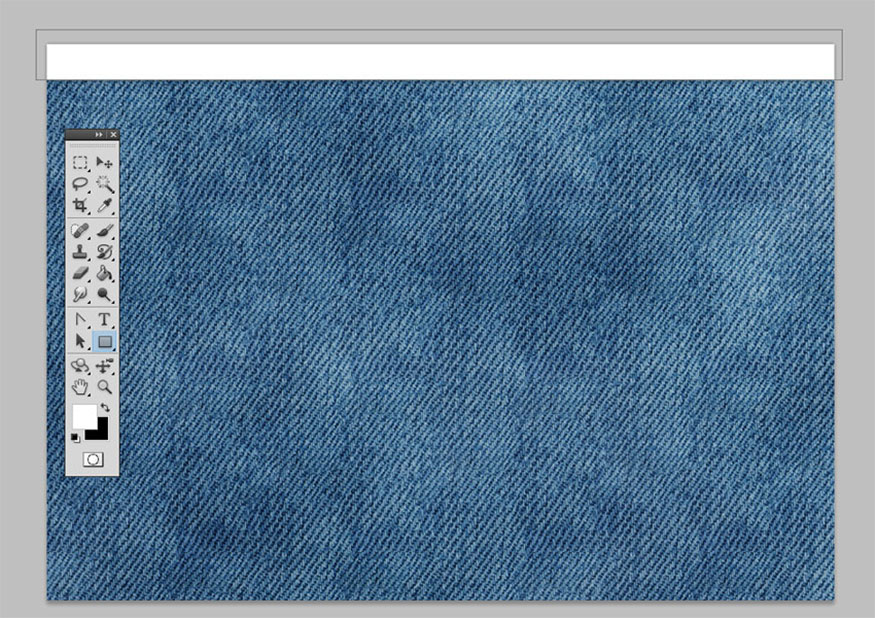
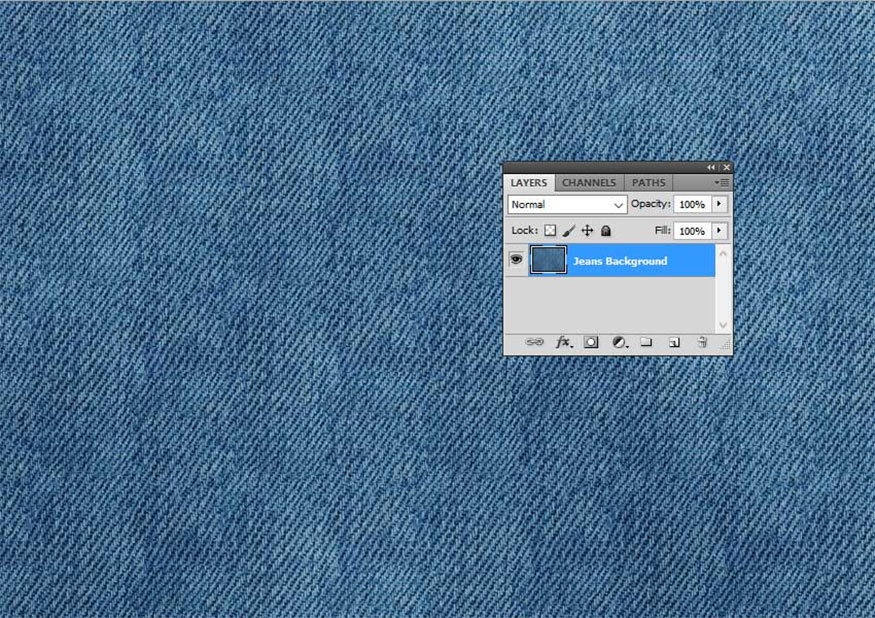
- Step 1: Create a new document with dimensions of 1100 x 600px then create a new layer named “Jeans Background”.
Copy and paste the Jeans texture above this layer. Note that you need to use large patterns (2000 x 1500 px).
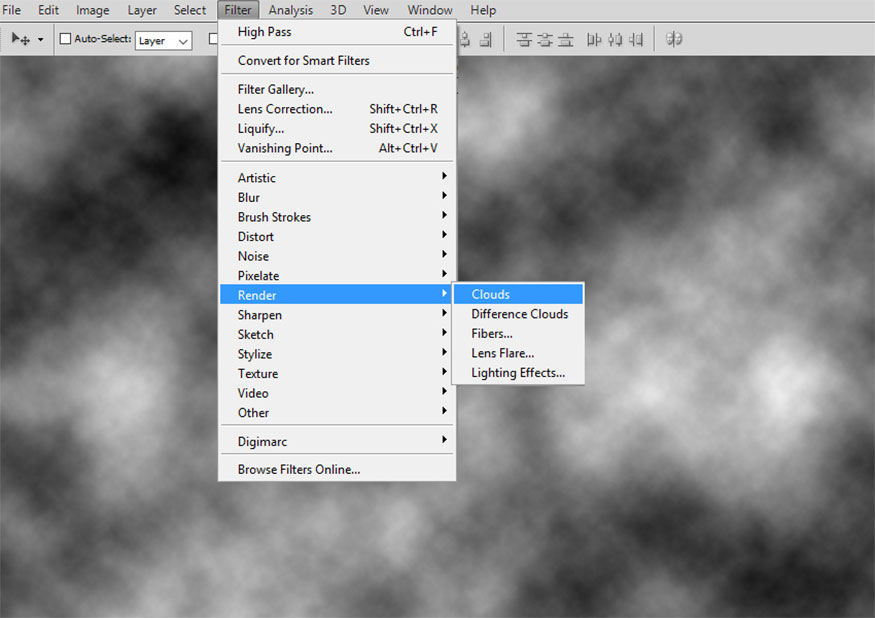
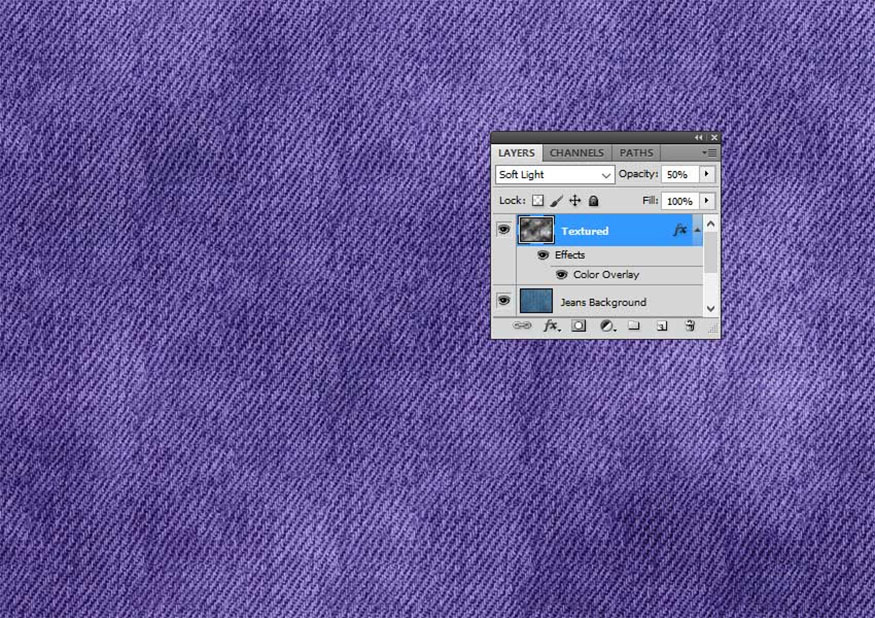
- Step 2: Create a new layer named “Textured” and fill it with white. Make sure the Foreground Color is white and the Background Color is black.
Then go to Filter => Render => Clouds.
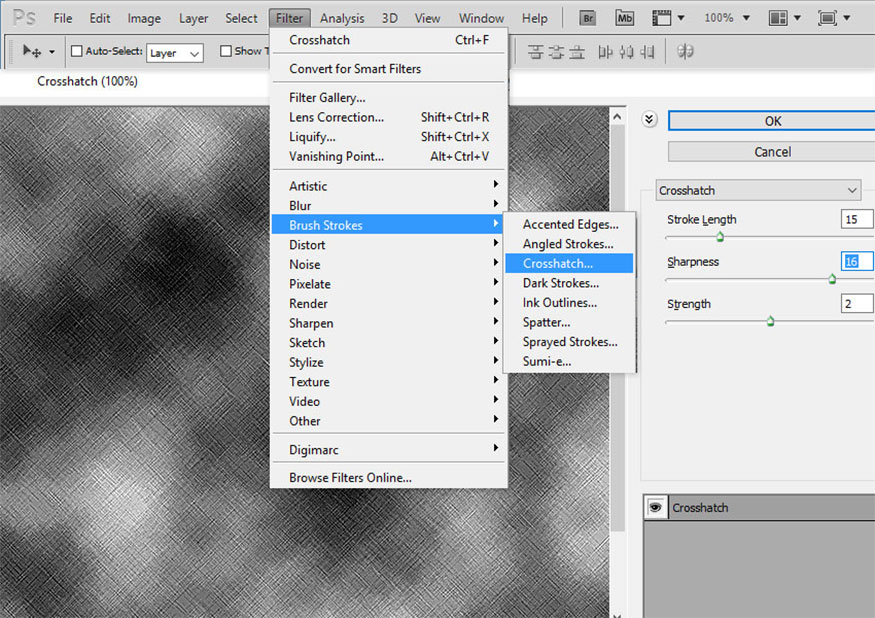
- Step 3: Filter => Brush Strokes => Crosshatch with the following settings:
-
Stroke Length: 15
-
Sharpness: 16
-
Strength: 2.
The above parameters are for reference only, you can completely change other parameters.
- Step 4: Set the Textured layer's blending mode to Soft Light and Opacity to about 50%. If you want, you can change the color of the jeans by adding a Color Overlay to the Textured layer with the Color blend mode and choosing the color you like.
2. Instructions on how to create a sewing brush
To create a stitching brush, follow the following detailed instructions:
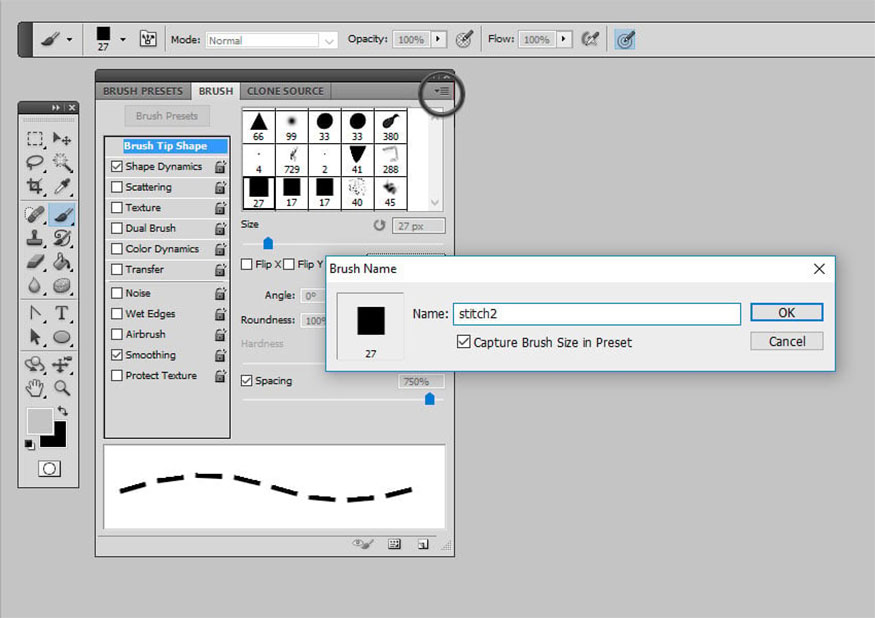
- Step 1: To perfect the background of the jeans and create a realistic embroidery effect in Photoshop, we will create a set of stitching brushes from the beginning.
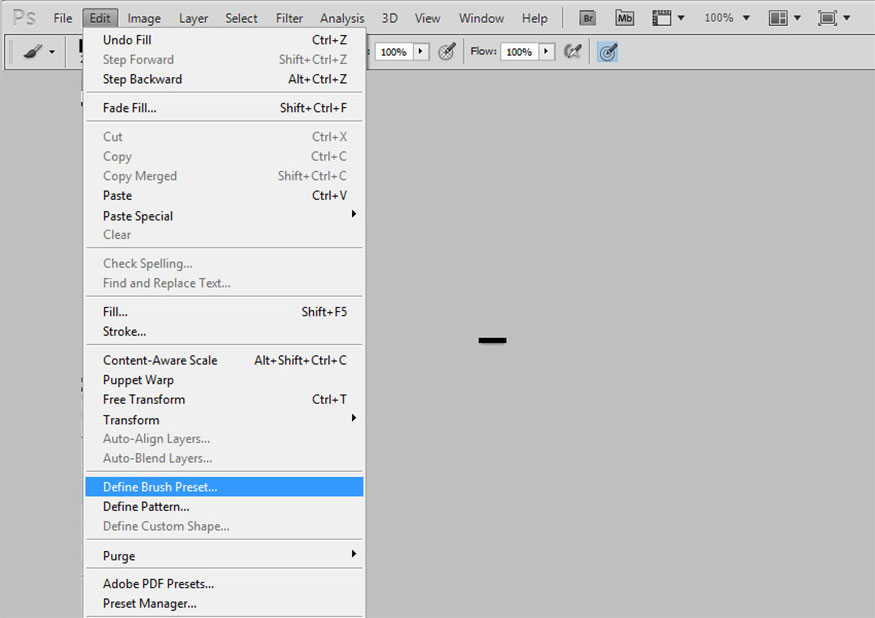
First, you need to create a new PSD file with dimensions of 27 x 5px. Then fill the canvas with black. Then set the brush preset by going to Edit => Define Brush Preset. Set the brush name to "stitch" and click OK.
You close the new PSD file without saving, then return to the original PSD file (jeans background file).
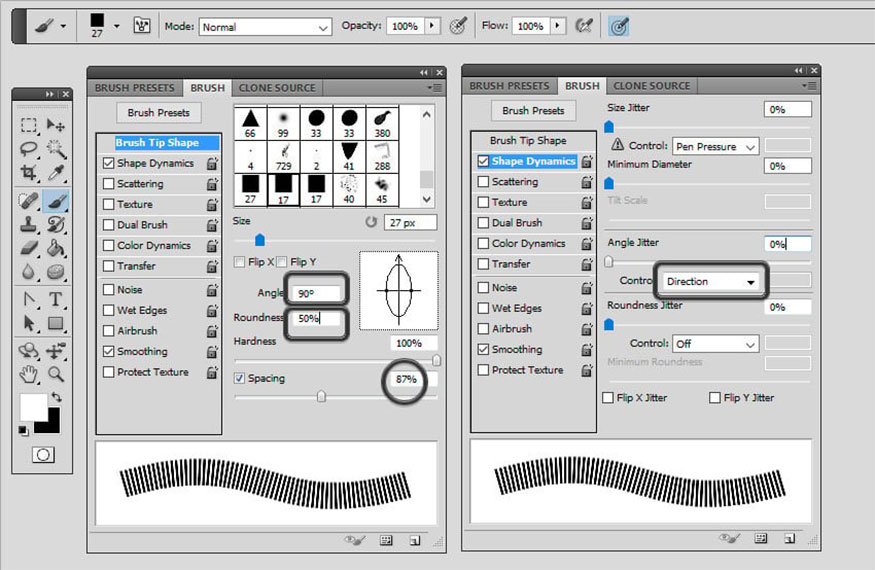
- Step 2: Modify the newly created brush to create a custom brush by selecting the Brush Tool, then selecting the "stitch" brush from the Brush Preset Picker. Change the Brush Panel and make the following settings:
-
Angle: 90
-
Roundness 50%
-
Spacing 87%
-
Angle Jitter: Direction.
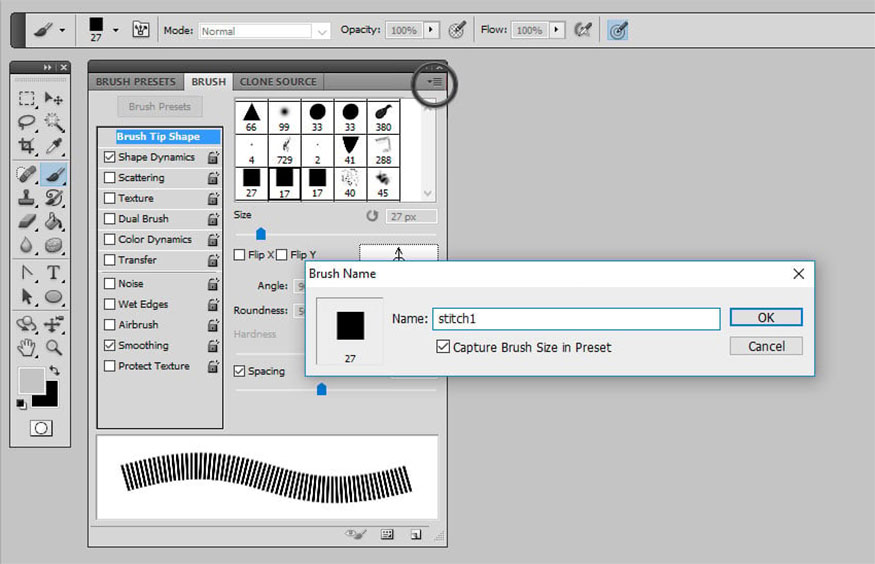
- Step 3: Click on the top right corner of the Brush Panel then select New Brush Preset, name the new brush "stitch1".
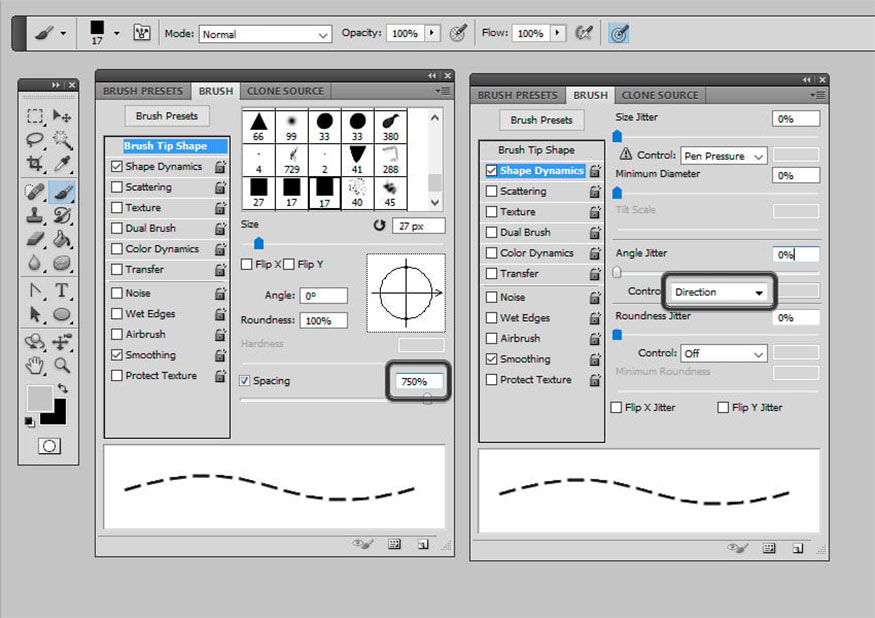
- Step 4: Create a second brush by selecting the Brush Tool, then selecting the "stitch" brush from the Brush Preset Picker. Change the Brush Panel and make the following settings:
-
Spacing: 750%
-
Angle Jitter: Direction.
- Step 5: Click on the top right corner of the Brush Panel then select New Brush Preset, name this new brush "stitch2".
3. Instructions for adding sewing details
- Step 1: We use the Rectangle Tool to draw a shape as shown in the preview image and name this layer “Jeans Border”.
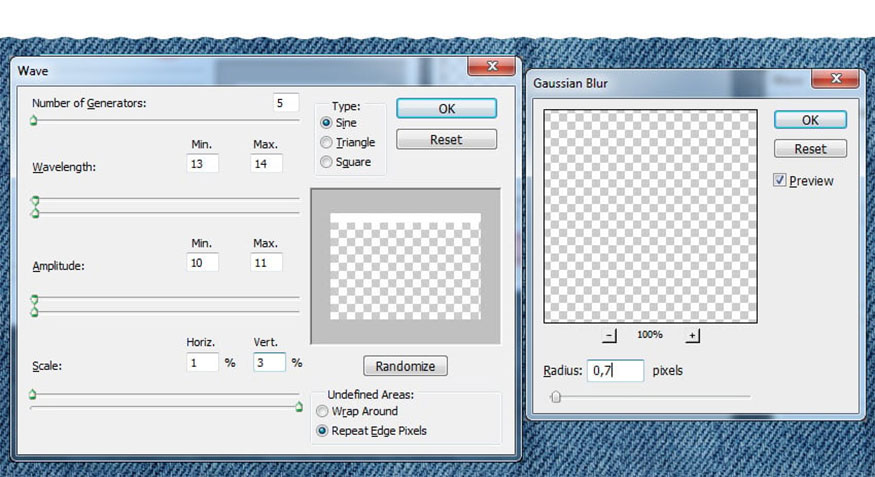
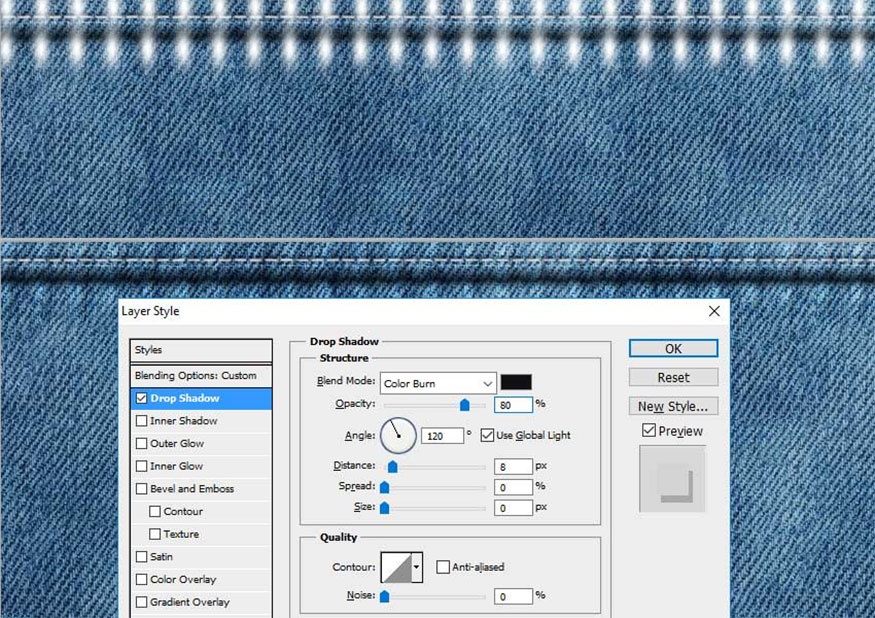
- Step 2: Go to Filter => Distort => Wave and set the parameters for Wavelength, Amplitude and Scale as shown to create a wavy border. Also, go to Filter => Blur => Gaussian Blur and set the Radius to 0.7 pixels.
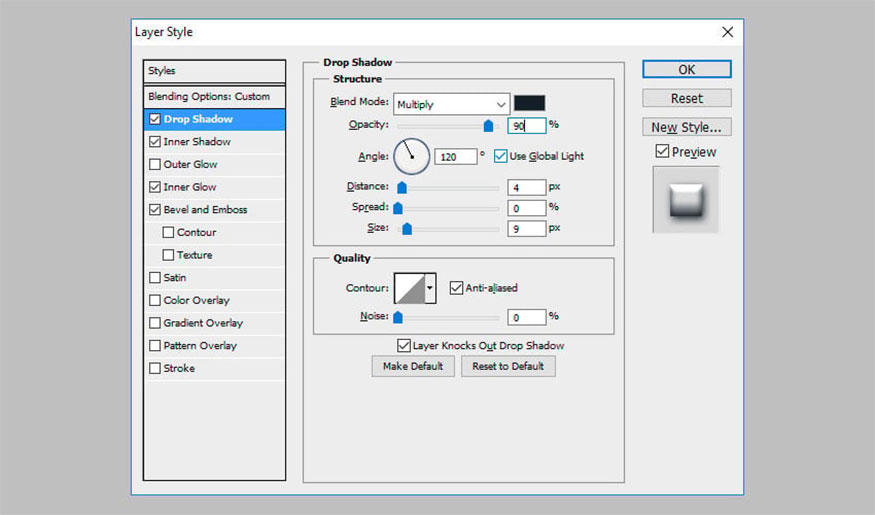
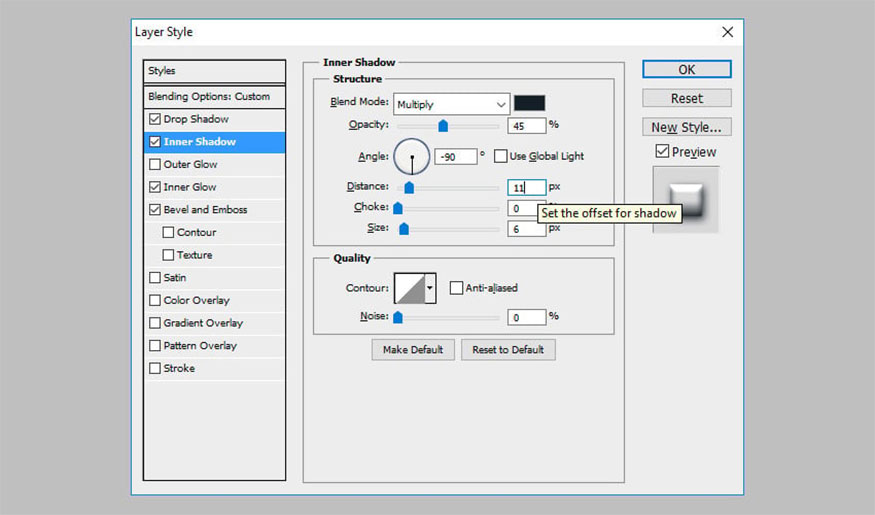
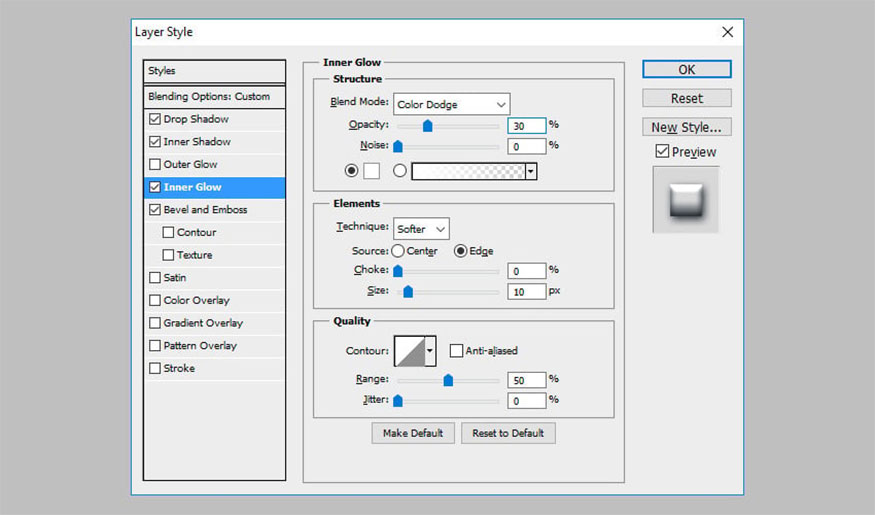
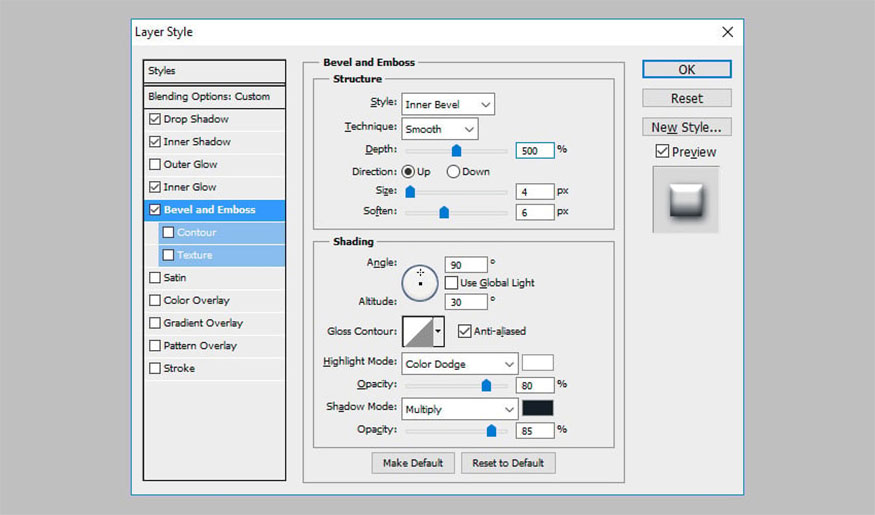
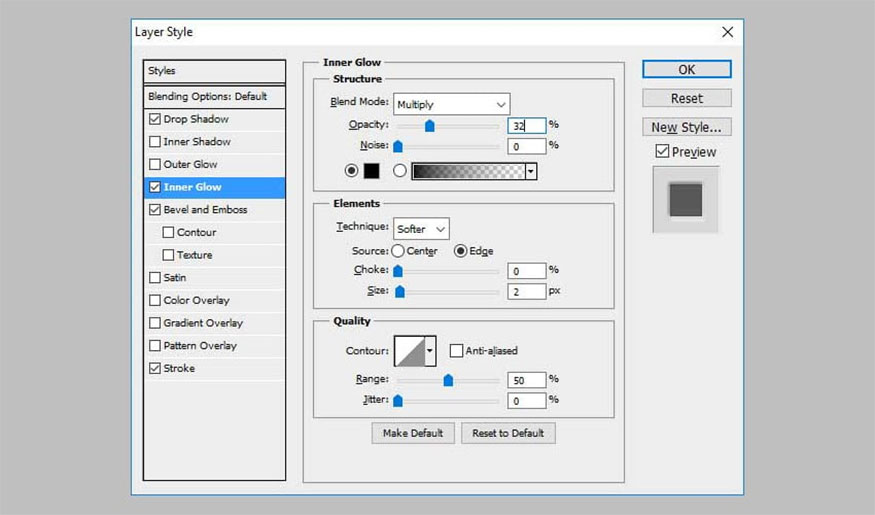
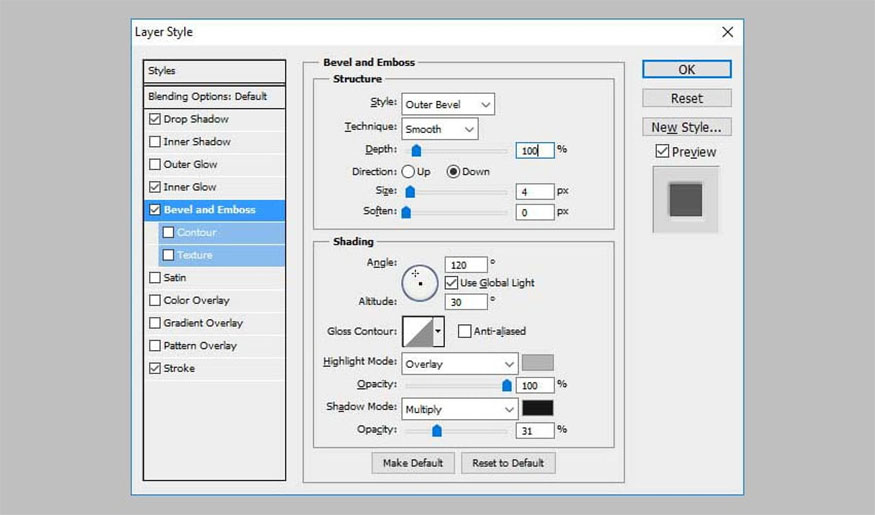
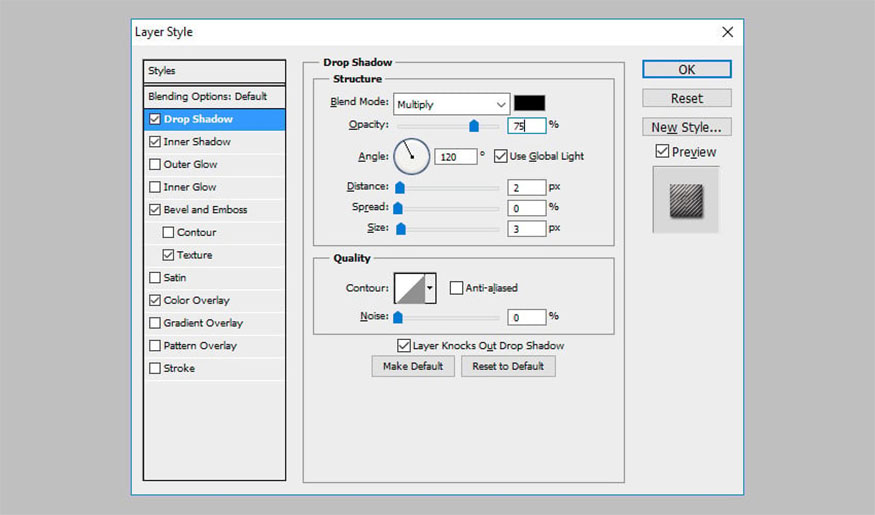
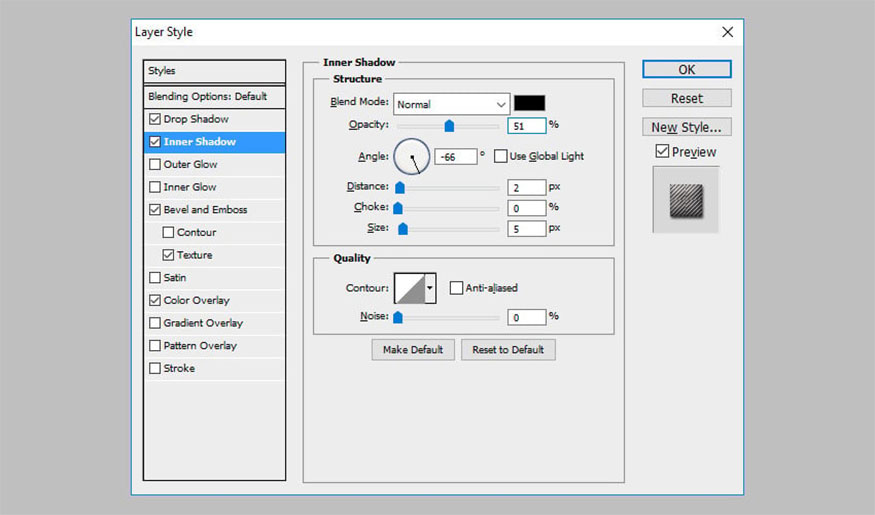
- Step 3: Add this layer style to the Jeans Border layer:
-
Drop Shadow: (color #131e26)
-
Inner Shadow: (color #131e26)
-
Inner Glow: (color #ffffff)
-
Bevel and Emboss: (colors: #ffffff and color code #131e26)

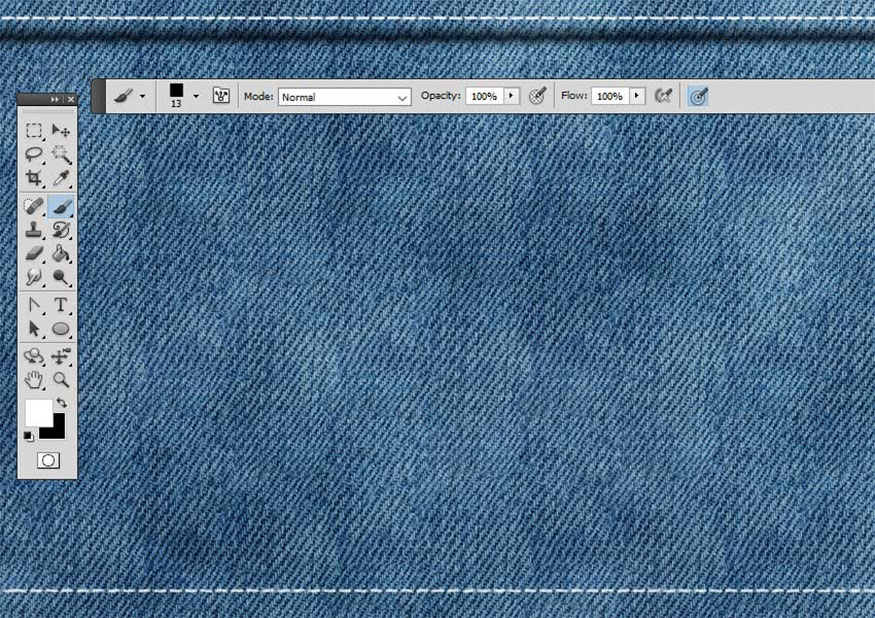
- Step 4: Create a new layer called “Stitch”, then select the Brush Tool and select the "stitch2" brush. You set the size to about 13 px and the color to #ffffff.
Hold down the Shift key to draw a straight line, then add another line at the bottom of the jeans background in the same way.
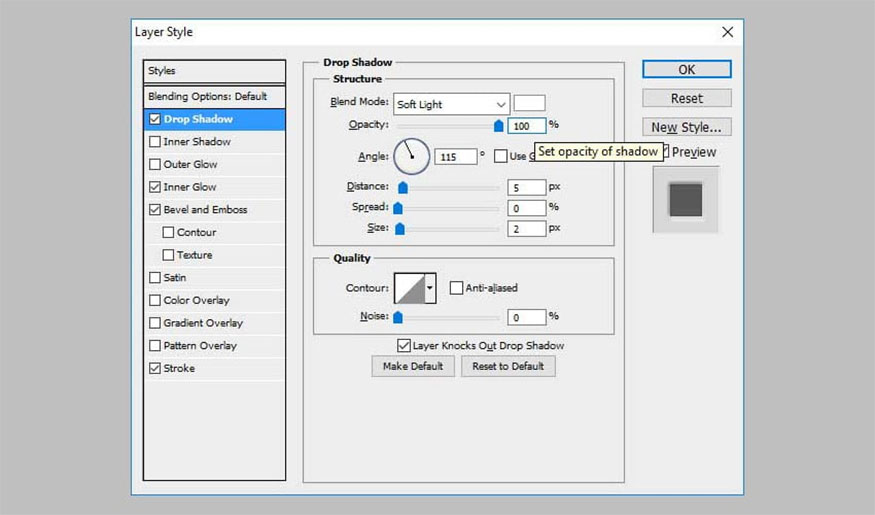
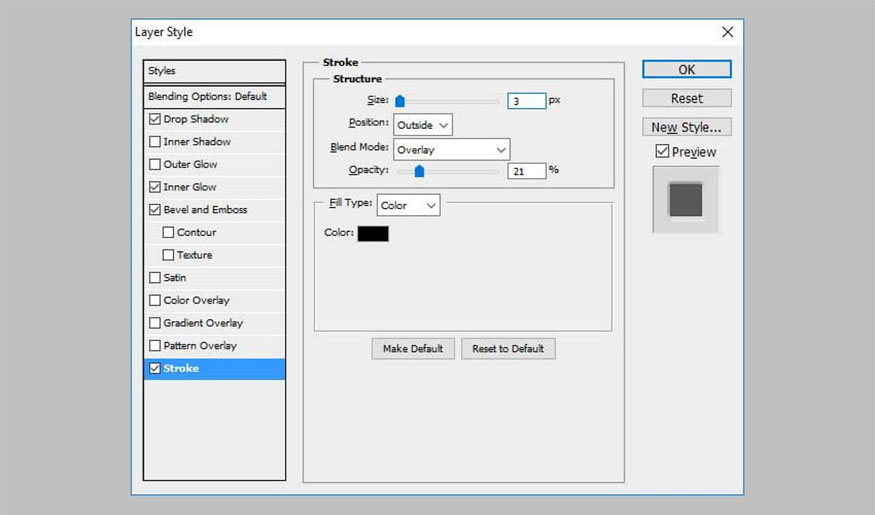
- Step 5: Select the following settings:
-
Drop Shadow: check
-
Inner Glow: check
-
Bevel and Emboss: check
-
Stroke: check
- Step 6: Go to Filter => Distort => Ripple and set Amount 30% and Size Small. And here is the result we get:

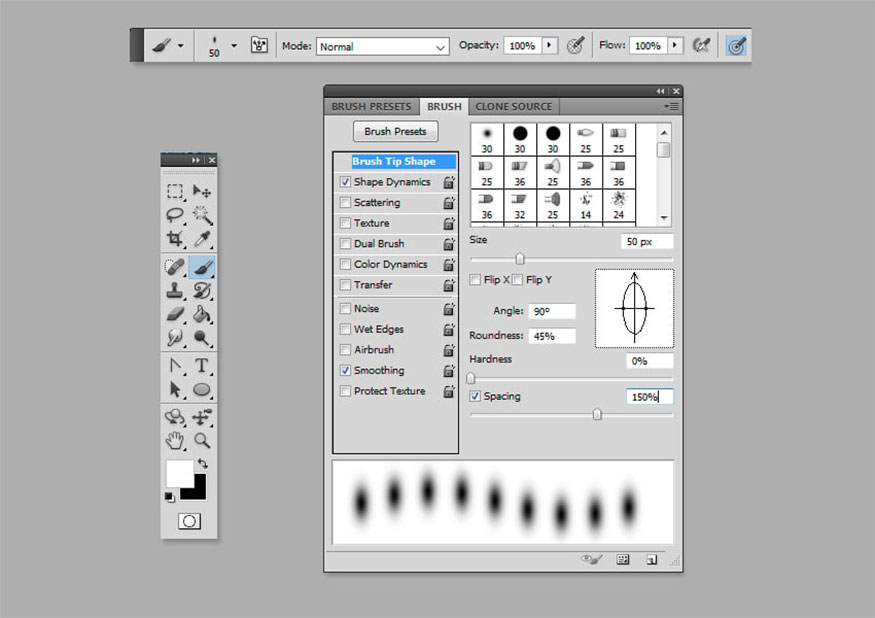
- Step 7: Create a new layer and name it “Ripple Edge”, use the Brush Tool and select Soft Round Brush.
Toggle the Brush panel to customize the brush and make the following settings:
-
Size: 50px
-
Angle: 90
-
Roundness: 45%
-
Spacing: 150%.
- Step 8: Draw two lines using this custom brush and fill it with white.
Set the blending mode of Ripple Edge layer to Overlay, Opacity 40%.
Next, add the Drop Shadow layer style (color #0f1114).
4. Instructions for creating an embroidery effect in Photoshop
Now will be the final step to complete the embroidery letter design. Specifically, the process of creating an embroidery effect in Photoshop will take place in the following steps:
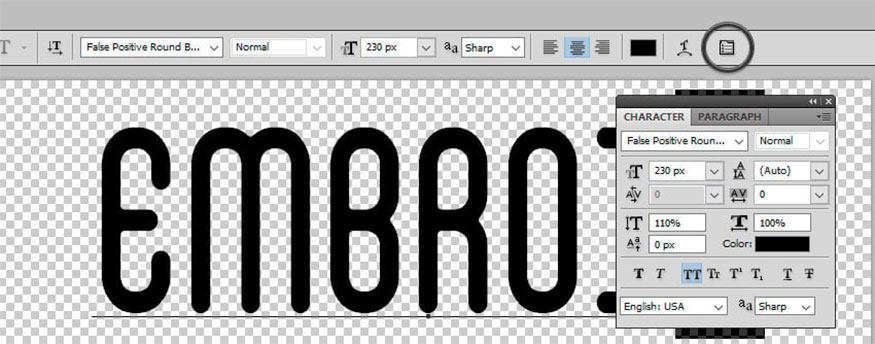
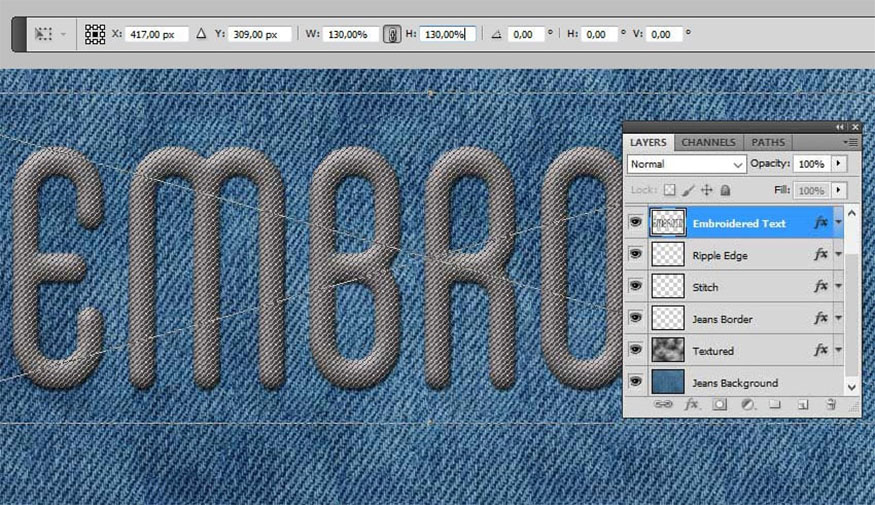
- Step 1: Create new text layers and name them “Embroidered Texture”. Enter text using False Positive font. Click the Toggle the Character and Paragraph Panels button and set the Font Size to 230 px, and the Vertically/Horizontally Scale as shown in the preview.

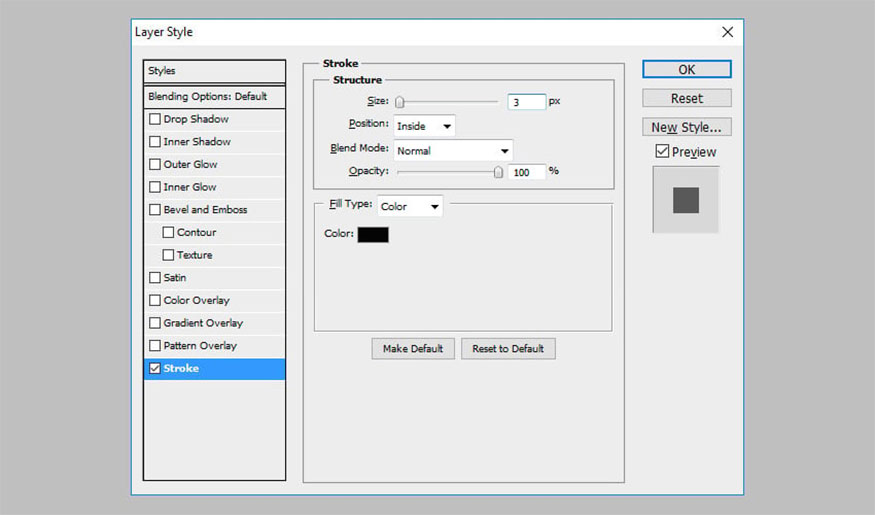
- Step 2: Add Stroke to the Embroidered Texture layer to make the text thinner. Right click on the layer and Convert to Smart Object.
- Step 3: Add Embroidered Texture layer and the following settings:
-
Drop Shadow (color code #000000)
-
Inner Shadow (color code #000000)
-
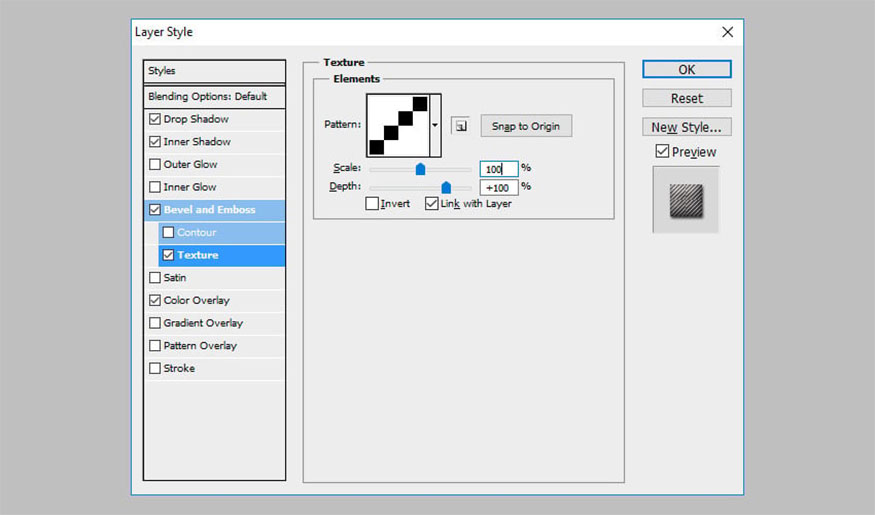
Bevel and Emboss (color #ffffff and code #000000)
-
Bevel and Emboss - Texture (Pattern "pixel-pattern-diagonal")
-
Color Overlay (color #686565)


- Step 4: Convert this layer into a smart object so that we can add another type of layer without having to create effects. Press Ctrl-T to convert the smart object while scaling it to 130% in both horizontal and vertical scale.
- Step 5: Duplicate the Embroidered Text smart objects and set them as Shadow. Move this layer below the Embroidered Texture smart object.
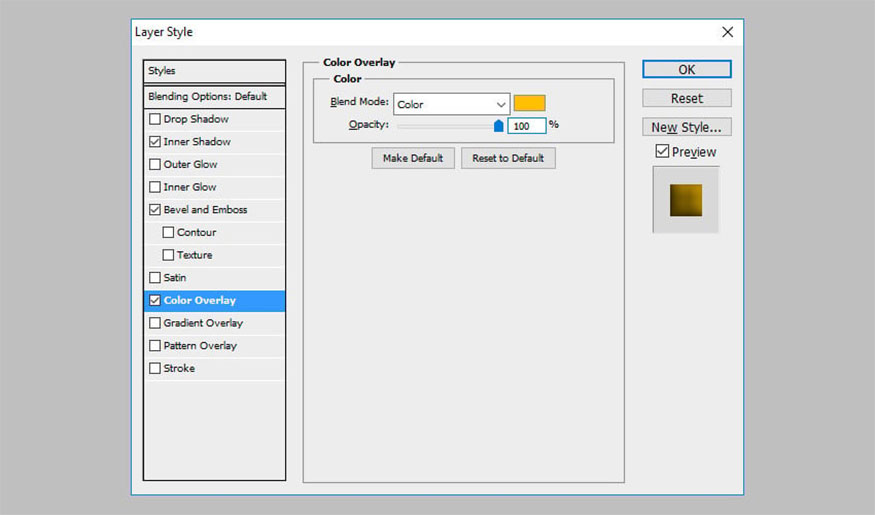
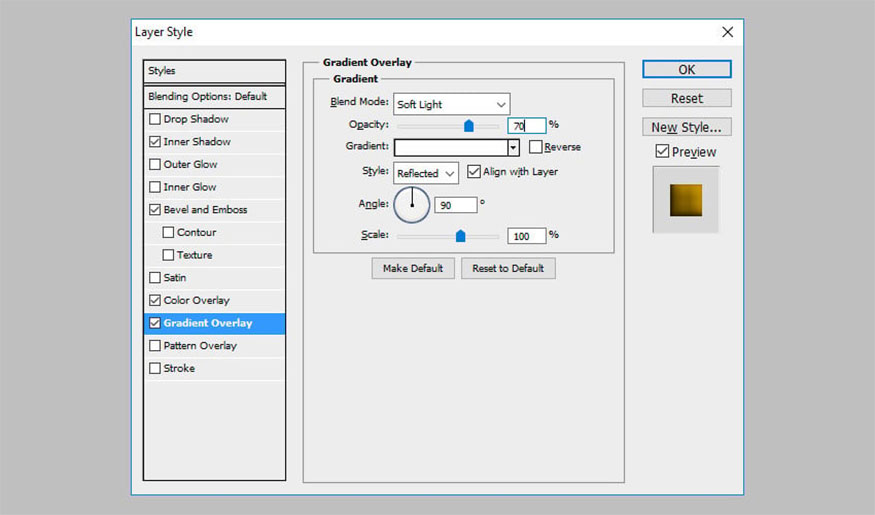
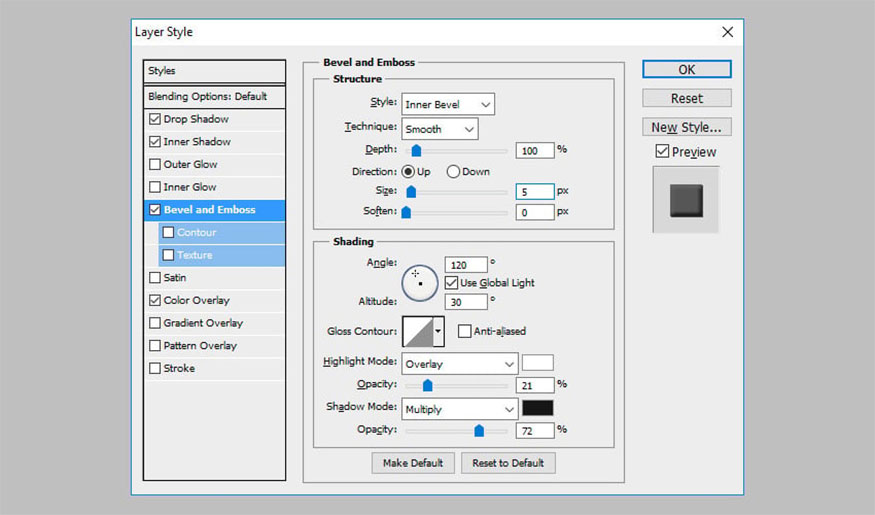
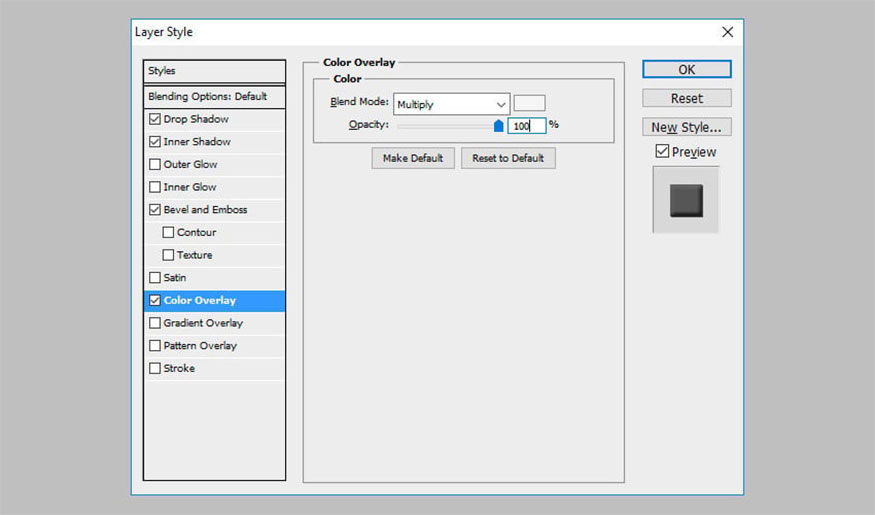
- Step 6: Add layer styles for each of these two layers. Start with the Embroidered Texture object. Add Inner Shadow (color #000000), Bevel and Emboss (color #ffffff and #000000), Color Overlay (color #ffc000), and Gradient Overlay (color #ffffff and #ffffff).
You can choose any Color Overlay you like just make sure to adjust the Gradient Overlay opacity if you want the tone darker or lighter.
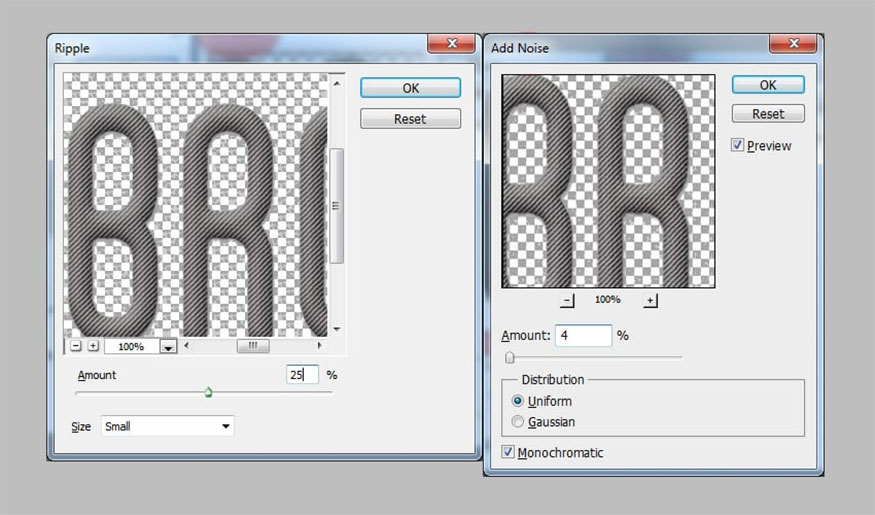
- Step 7: To make the effect more realistic, add Filter => Distort => Ripple and Filter => Distort => Noise effect.
These two effects are added as Smart Filters, so you can make edits to them at any time by double-clicking the Filter name.
- Step 8: Go to Shadow Layer and set Fill to 0%, then add layer style Bevel and Emboss (colors #ffffff and #000000).
And this is the result we got:
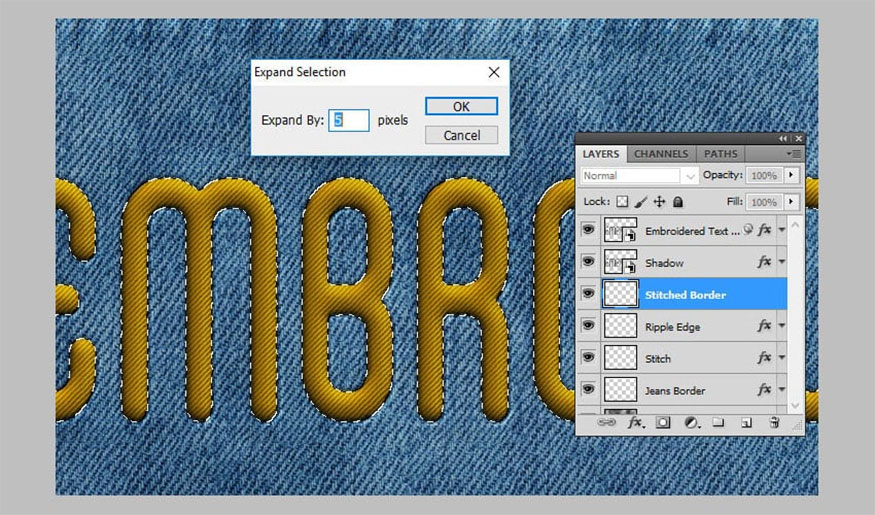
- Step 9: Create a new layer right below the Shadow layer and name it “Stitched Border”.
Hold down the Ctrl key and click the Embroidered Texture layer thumbnail to create a selection.
Go to Select => Modify => Expand and expand it by 5 pixels.

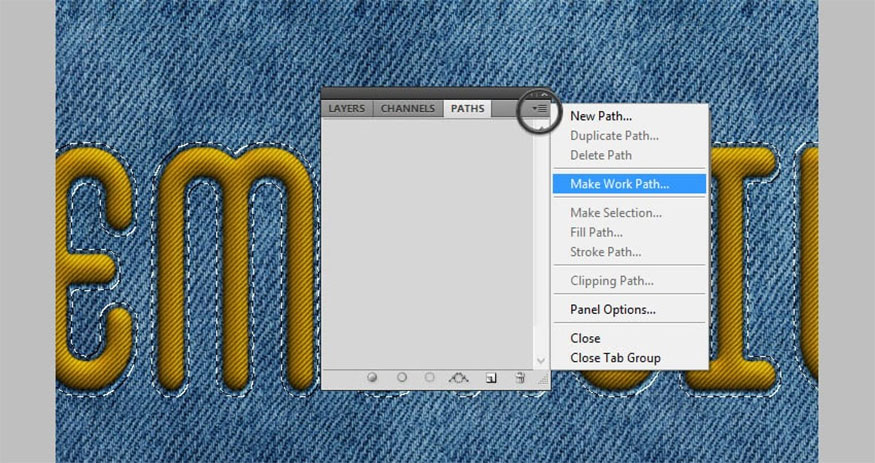
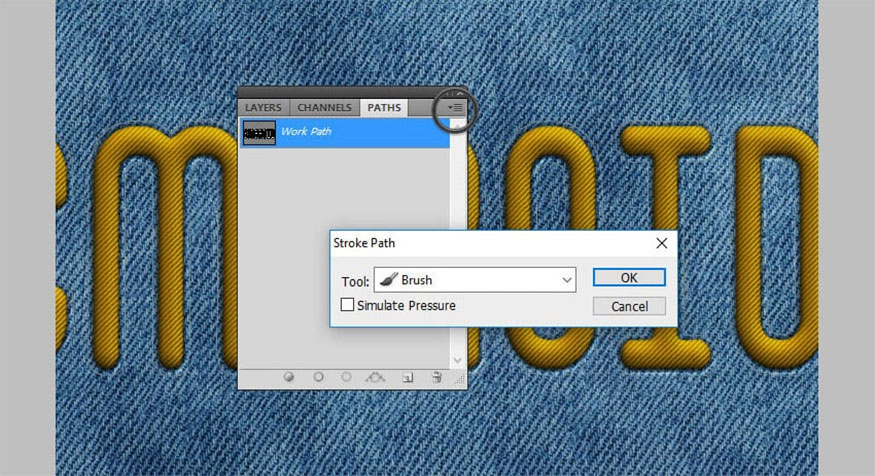
- Step 10: Go to Paths and select Make Work Path.
- Step 11: Select the Brush Tool, fill it with color #ffffff and select the "stitch1" brush. Continue on the Paths tab and select Stroke Path. Click Delete to delete the working path.
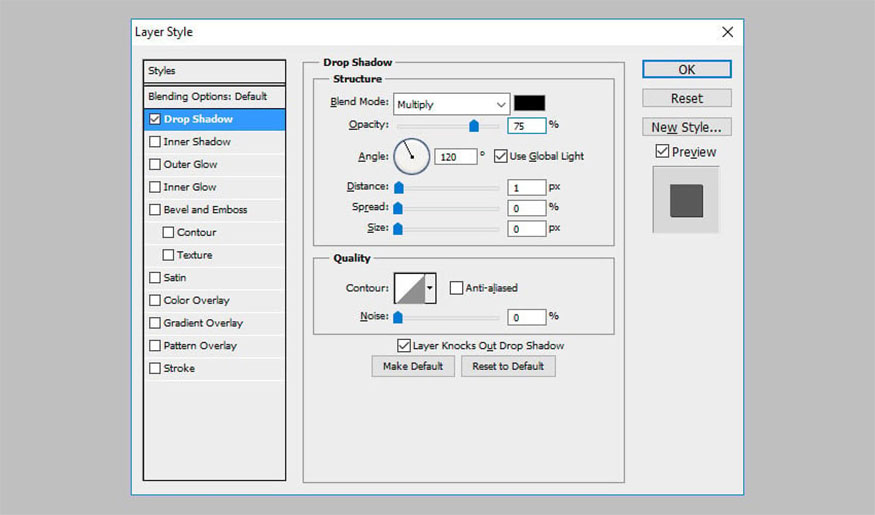
- Step 12: Add the Drop Shadow layer style (color #000000) to the Stitched Border layer. Perform a conversion of this layer into a smart object.
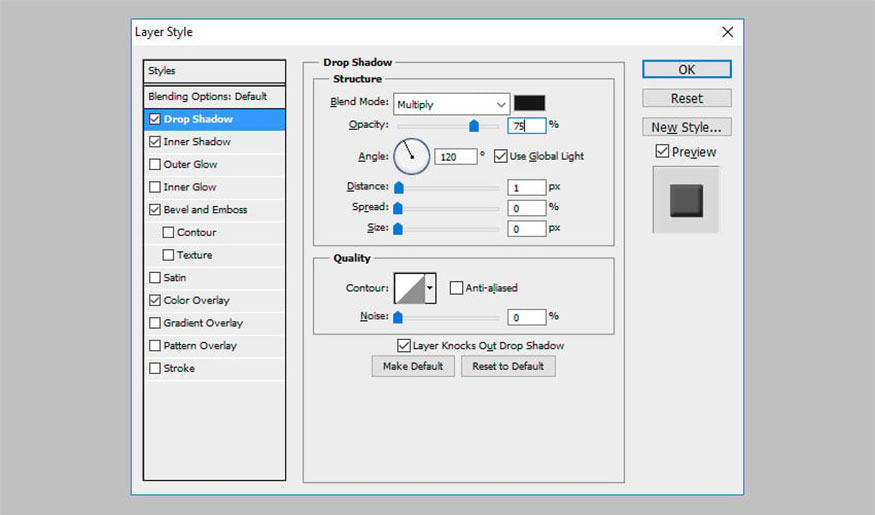
- Step 13: Finally, add a layer style to the Stitched Border smart object with the following color coding settings:
-
Drop Shadow: #161616
-
Inner Shadow: #161616
-
Bevel and Emboss: #ffffff and #161616
-
Color Overlay: #f5f5f5
You can choose any color you want for the stitching.
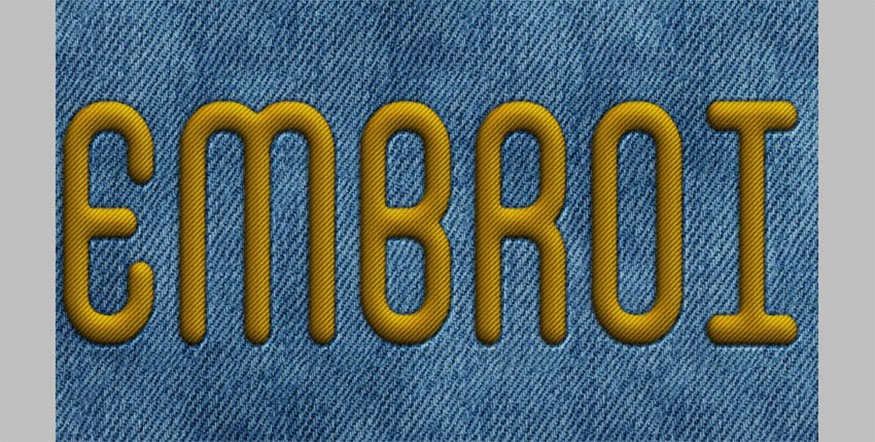
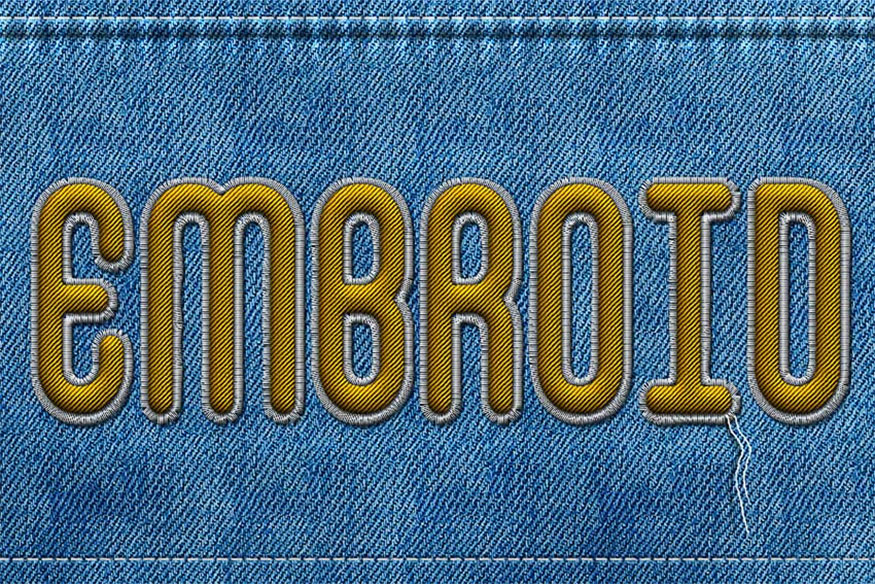
So, we have completed how to create realistic embroidered text effects in Photoshop. The final result we get will be as follows:
Hopefully, the detailed instructions we provide above will help readers successfully create realistic embroidered text effects in Photoshop. Don't forget to follow SaDesign for more interesting information about photoshop!


VIP Products


Best Selling Products
Capcut Pro 1 Year
39 USD
Freepik Premium Account
59 USD
Autodesk All App Account Copyright
120 USD
Adobe Photoshop Copyright - Full App
120 USD
Upgrade Genuine Office 365
49 USD
Copyright Adobe Lightroom Account
59 USD
Plugin Retouch4me
69 USD
Genuine Adobe Illustrator account
99 USD
Windows 10 & 11 Pro Key
36 USD
Upgrade Duolingo Super
29 USD
Upgrade genuine Capture One account
120 USD
Genuine Cheap Canva Pro
39 USD
MidJourney Account
29 USD
Adobe Premiere Pro Account
99 USD
ChatGPT Plus Account (GPT-4)
16 USD