Best Selling Products

Adobe Photoshop Copyright - Full App
120 USD

Autodesk All App Account Copyright
120 USD

Plugin Retouch4me
69 USD

Copyright Adobe Lightroom Account
59 USD

ChatGPT Plus Account (GPT-4)
16 USD

Upgrade Genuine Office 365
49 USD

Genuine Cheap Canva Pro
39 USD

Upgrade genuine Capture One account
120 USD

Capcut Pro 1 Year
39 USD

Windows 10 & 11 Pro Key
36 USD

MidJourney Account
29 USD

Freepik Premium Account
59 USD

Adobe Premiere Pro Account
99 USD

Upgrade Duolingo Super
29 USD

Genuine Adobe Illustrator account
99 USD
Create a simple matrix effect in Photoshop with SaDesign
Nội dung
- 1. How to create a matrix effect background in Photoshop.
- 2. How to quickly extract topics in Photoshop
- 3. Create a dark green layer to create a matrix effect
- 4. How to create a matrix lighting effect in Photoshop
- 5. How to create rim lighting for a matrix effect in Photoshop
- 6. How to create a matrix eye effect in Photoshop
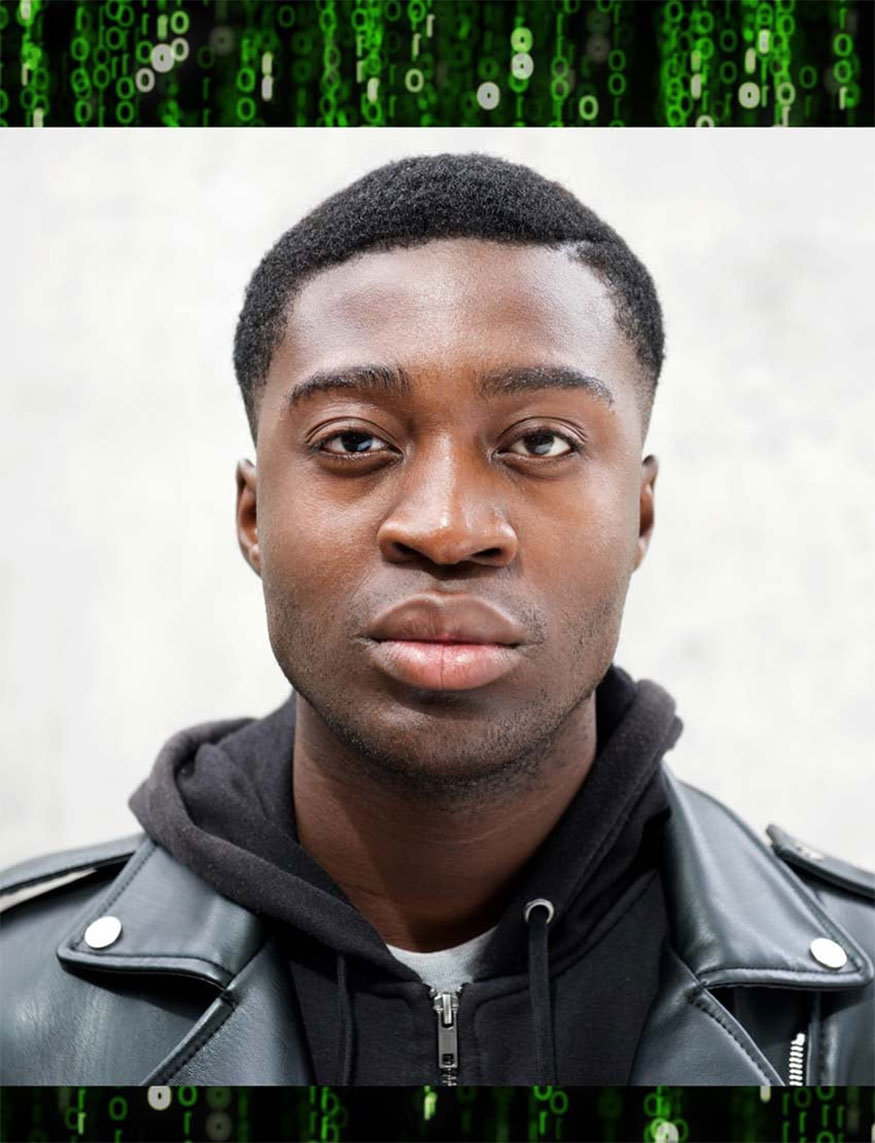
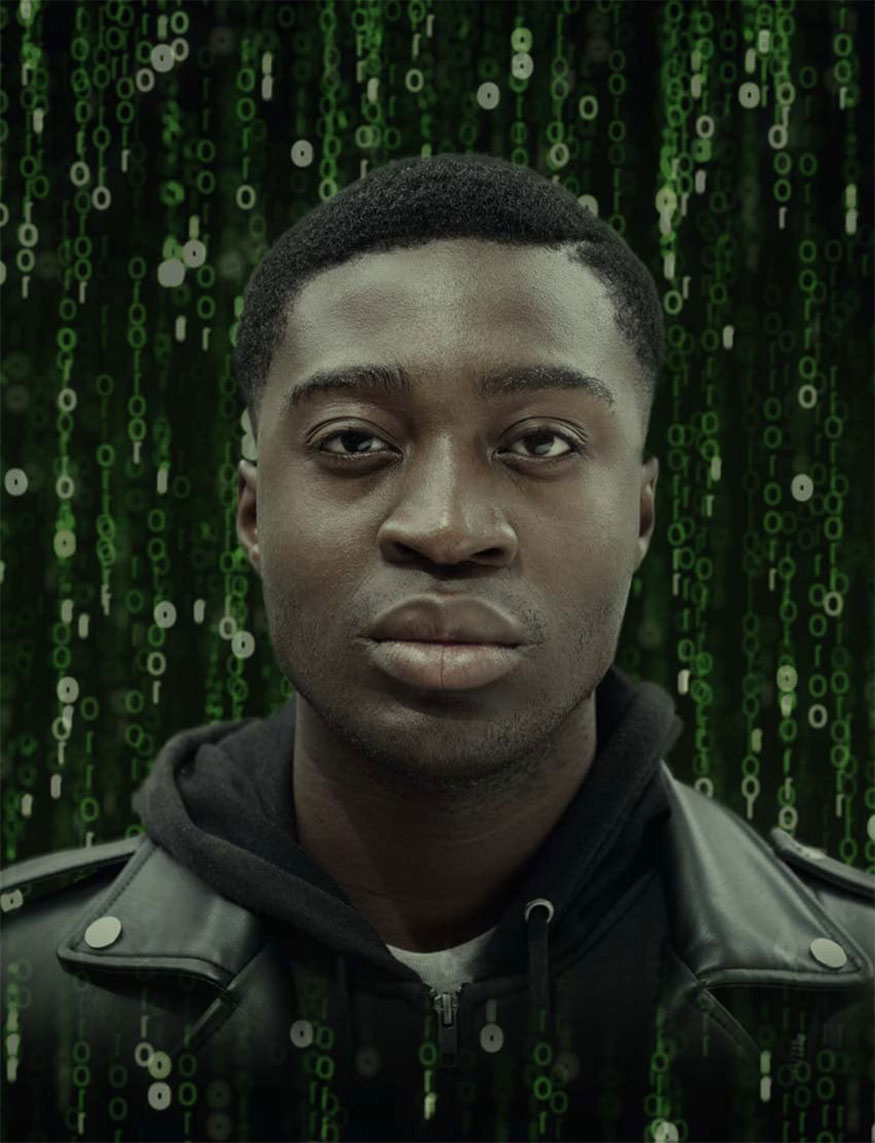
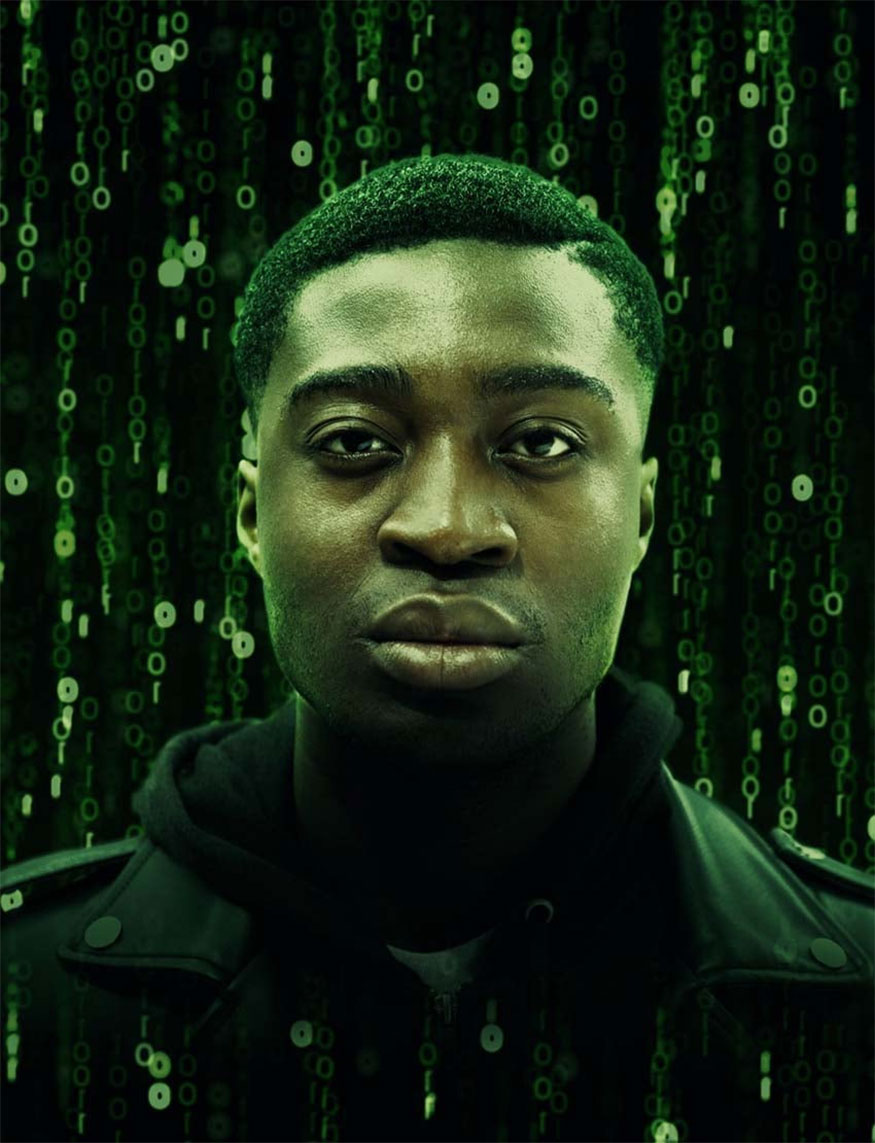
The Matrix is a great technique with the effect of green text running on a mysterious black background, helping to bring magical mystery to viewers. You can absolutely use Photoshop to create these magical matrix text lines in your design. In the following article, let's learn with SaDesign how to create matrix effects in Photoshop quickly and easily.

The Matrix is a great technique with the effect of green text running on a mysterious black background, helping to bring magical mystery to viewers. You can absolutely use Photoshop to create these magical matrix text lines in your design. In the following article, let's learn with SaDesign how to create matrix effects in Photoshop quickly and easily.

1. How to create a matrix effect background in Photoshop.
- Step 1: First of all, we need to set up the background for the matrix. Create a layer with green color code #153100 and fill the top and bottom with black.

- Step 2: Add matrix by using matrix background and overlay, you can select both numbers and characters.

Using Matrix 11 textures, drag and drop them on the canvas and scale the texture up.
- Step 3: Reduce the Opacity to about 50%, then right-click and select Convert to Smart Object.
- Step 4: Let's blur these numbers because they are used as the background of the image.

Go to Filter => Blur => Field Blur then set Blur to 34px => click OK.
- Step 5: Duplicate the Matrix 11 texture, in the Lighten section set the Opacity to 65%.
Let's move the textures around and zoom out them a bit.
- Step 6: Since the textures have been converted to smart objects, you can adjust them by double-clicking Blur Gallery.
Set Blur: 26px and Light Bokeh to 38%. Then, move the Light Range to the left, place them below Range and press OK.
- Step 7: Repeat the above step one more time by duplicating the Matrix texture, selecting Screen and setting the Opacity to 65%.
Zoom out to make them smaller than the previous textures.
- Step 8: Click Blur Gallery, reduce Blur to 14 px and remove Light Bokeh.
Next, go to Image => Adjustments => Brightness/Contrast, set Brightness to 75.
Group the layers, name the group "Background", so we have completed the matrix background.

2. How to quickly extract topics in Photoshop
- Step 1: Drag and drop the object into the canvas.
- Step 2: Select the Object Select tool and click Select Subject on the Options toolbar.
Add a Layer Mask to the subject. If the Object Select tool misses any areas, proactively do it manually to cover them.

- Step 3: Double-click the Layer Mask, set Feather to 0.9 px, then press Select and Mask.
Select Smart Radius and set the Radius to 3 px. We can now use the Refine Edge Brush along the edges of the object. If you select too many, press Alt to deselect.
Click OK if the mask is a little better.
- Step 4: Finish refining the mask by using the Smudge tool set at 25–30% to push the remaining white edges. Use this brush to blur any edges that need blurring, such as hoods and jacket shoulders.
If any spots are covered by mistake, use a white semi-hard round brush to cover them up.
- Step 5: Finally, use the large soft round Brush tool to cover the bottom of the object and remove the border of the image.

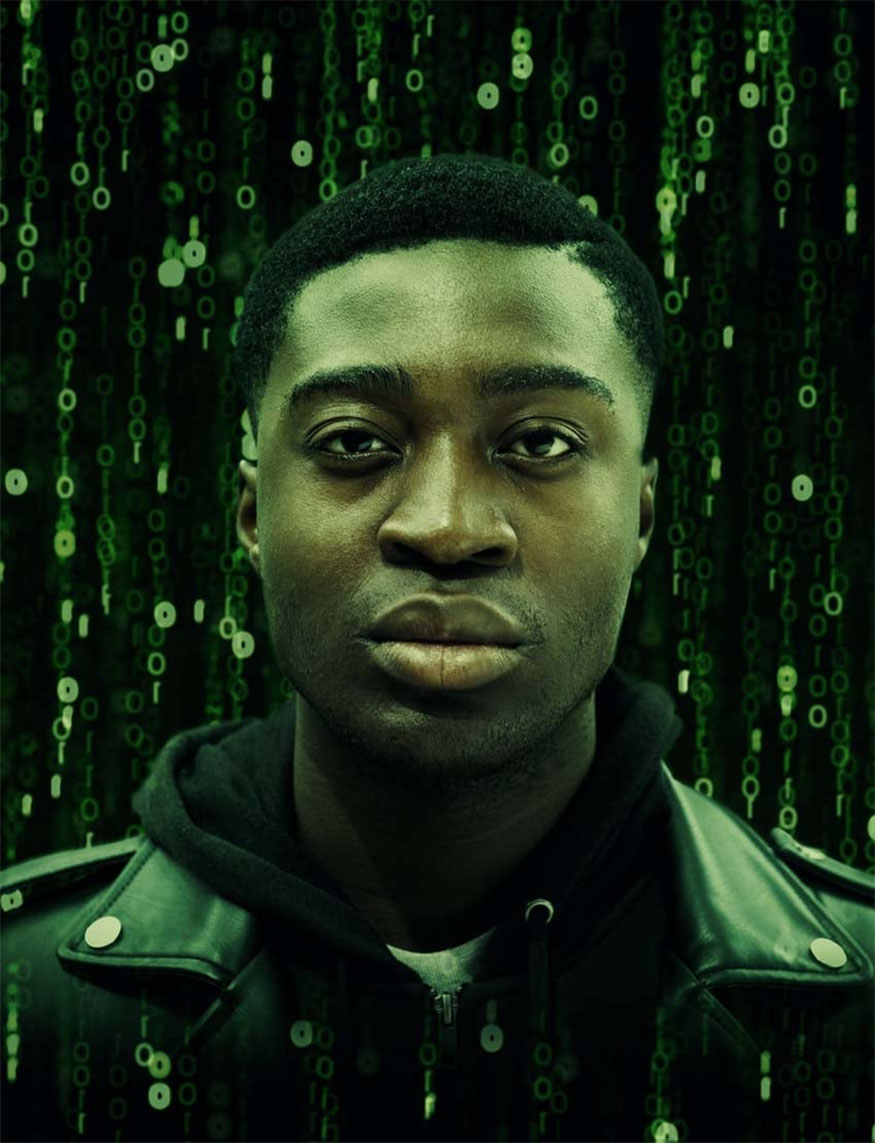
3. Create a dark green layer to create a matrix effect
- Step 1: This dark green layer will be placed on top of all other layers. First the Color Lookup adjustment layer is set to Foggy Night with an opacity of 26%.
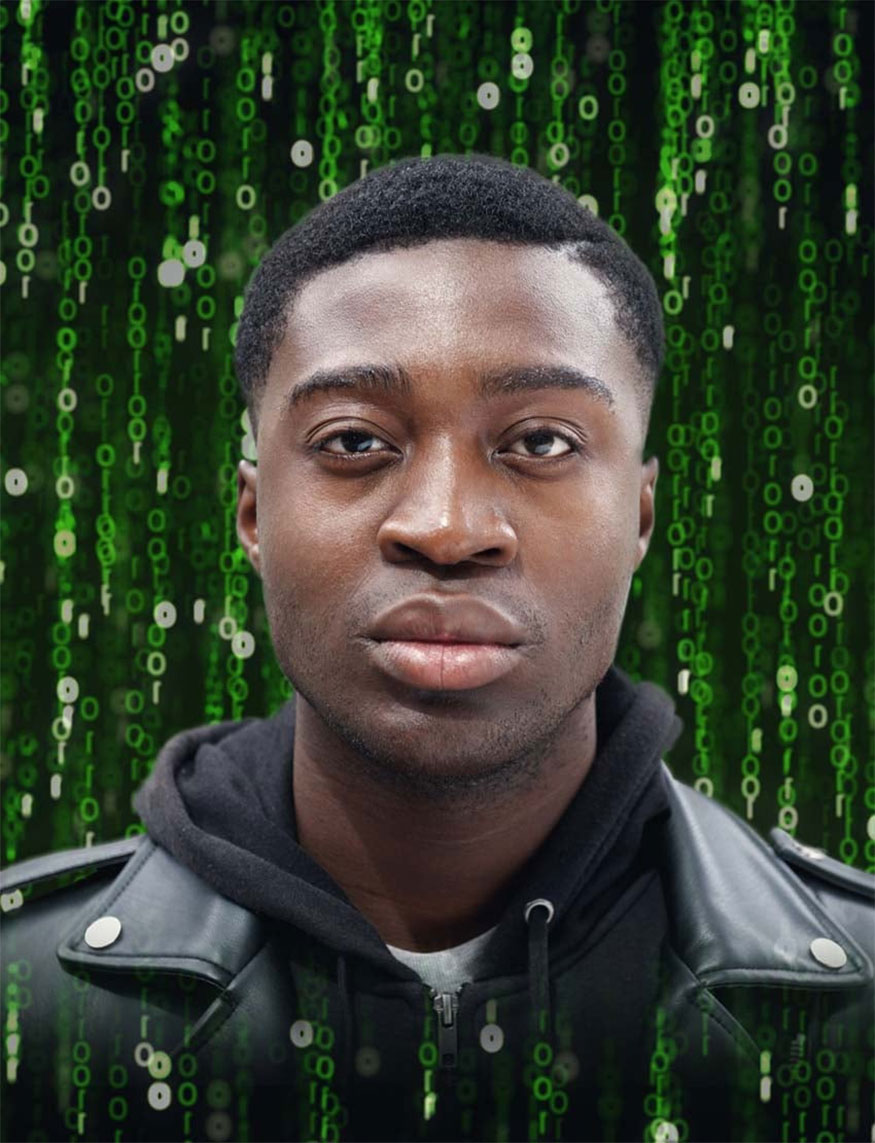
- Step 2: Secondly, set the Black to White Gradient Map layer to 42% Opacity.
- Step 3: Solid Color #234400 layer: set Multiply and Opacity 38%.
- Step 4: Color Lookup layer: set to Tension Green with Opacity 59%.
- Step 5: The final Color Lookup Layer: set to Filmstock with Opacity 84%.
- Step 6: The Selective Color layer adjusts only the Neutrals with settings of +7, -10, +3 and 0.
Use a Selective Color mask to mask the subject's face, then group everything together.
4. How to create a matrix lighting effect in Photoshop
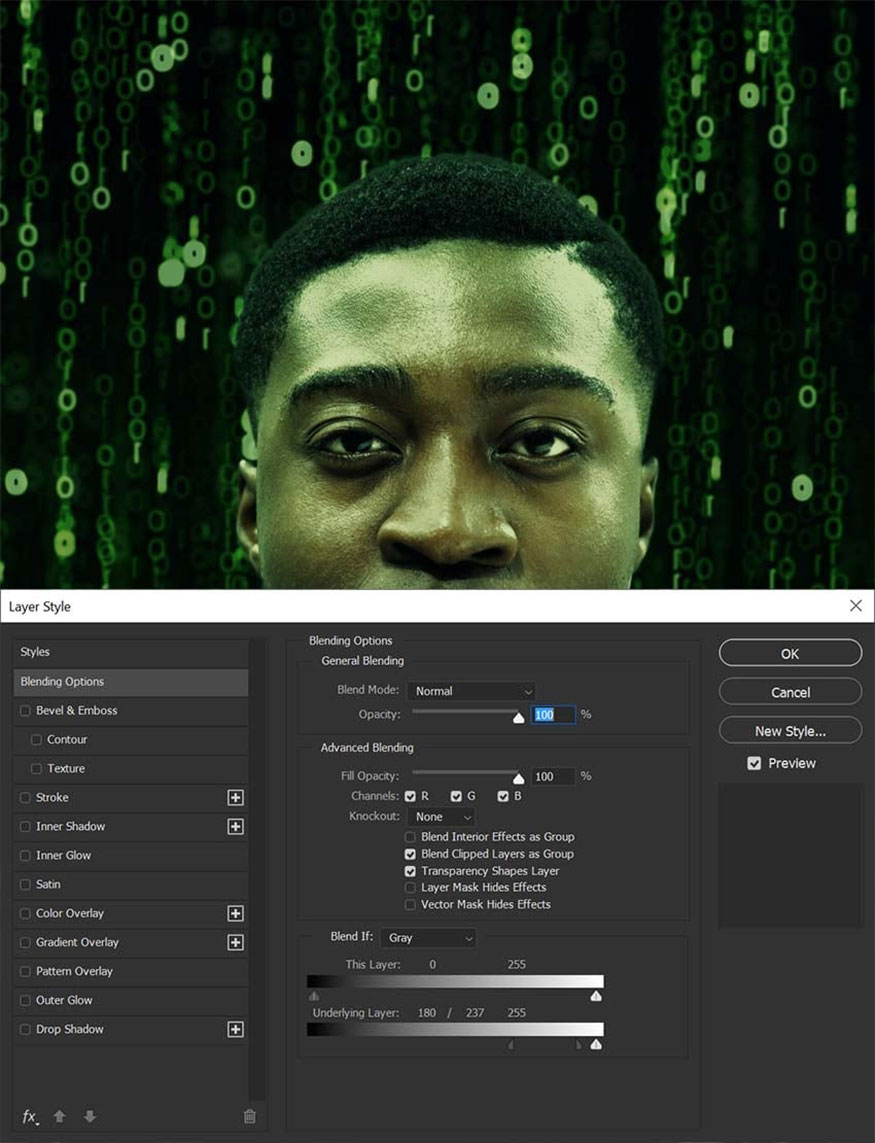
- Step 1: We need to illuminate the subject to achieve an interesting matrix lighting effect. Create and clip a Curves adjustment layer to the subject, increase the highlights, then double-click the layer to open the Layer Style panel.
We can adjust the Blend If settings, holding Alt to split the leftmost transition up, moving the right half all the way to the right and the left half to the right below “225”.
- Step 2: Now create and cut the second Curves layer into the object, placing it on top of the first layer.
We reduce the highlights to create shadows. Press Ctrl-I to invert the Layer Mask and mask the shadows in the area under the chin and on the jacket.
Keep highlights on the neck and jawline for the most part.
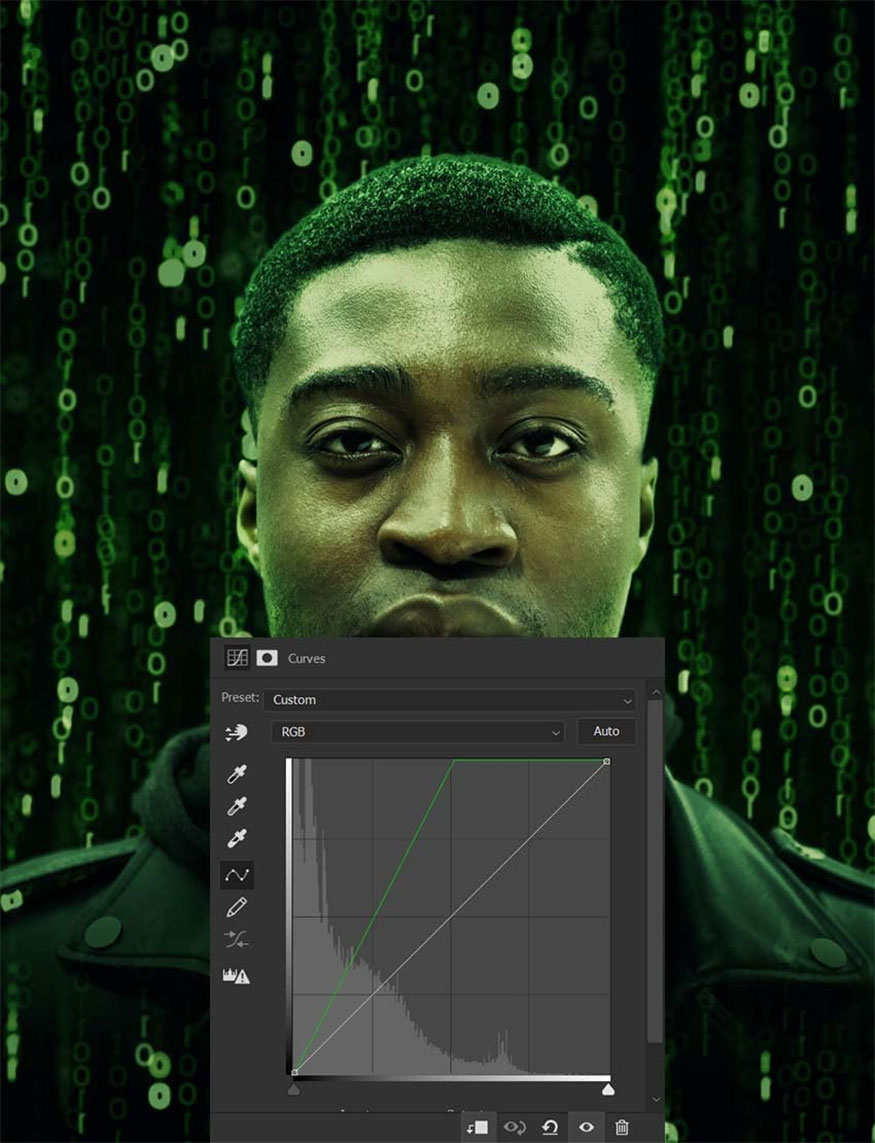
- Step 3: Create and cut the final Curves layer, change from RGB channel to Green, then again reveal those highlights about halfway.
Invert the mask, then apply the highlighting green mask to your hair, cheeks, jawline, and edges of your neck.
- Step 4: Finish the lighting by creating and clipping a new layer set to Screen into the object, placing them on top of all the other clipped layers.
Lower the Opacity to about 50%, then paint some green along the edges of the face, adding #74ff51 to any shadows.
5. How to create rim lighting for a matrix effect in Photoshop
- Step 1: Now we're going to add some glow and rim lighting to the object.
Create 2 new layers and set them to Screen, placing both layers below the object.
Use a large, fluffy and round brush with Flow 10% and set it to green color code #00dc00. Draw a little light at the back of the subject.
Reduce the Opacity of the layers if the light is too strong.
Use 2 layers instead of one for slower light gain and better opacity control.

- Step 2: Now for the border lights, we copy the themes and put them below the original. Add a Color Overlay effect and fill it with light neon green color code #a1ff63.
Push this layer up 5–10 pixels so that the green rise out of the top of the head and shoulders.
- Step 3: Right click => Apply Layer Mask => add a new Layer Mask.
Cover the entire jacket underneath, most of the shoulders, and a small portion of the hood.
Mask out any areas of the face that don't need the green edging light.
Group all these layers and all previous subject layers into a group called “Subject”.

6. How to create a matrix eye effect in Photoshop
- Step 1: Drag and drop the new Matrix 11 texture onto the canvas. Scale them down significantly and set it to Screen.
Make sure the Matrix texture is placed on the subject's iris because we want it to appear as if the numbers are reflecting in the subject's eyes.

- Step 2: Zoom in one of the eyes and use the Elliptical Marquee tool to create a selection the size of the subject's iris. Once you are satisfied with the object, add a Layer Mask.
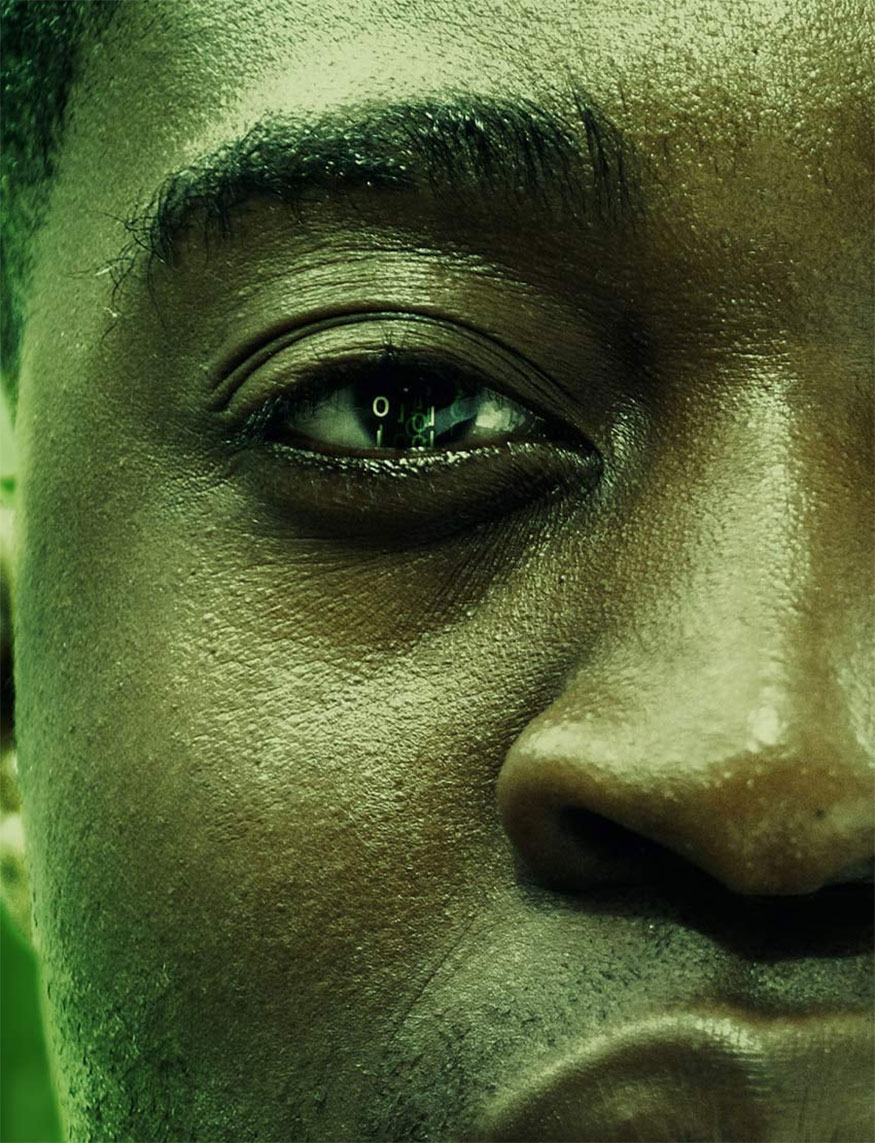
To help the numbers become brighter and more prominent, you can double the pattern.
- Step 3: Continue repeating the same steps with the second eye.

- Step 4: Copy one of the previous Matrix 11 textures from the background, bringing this layer above all the current layers except the color level group.
Set Gallery Blur to at least 35 px and Light Bokeh to at least 35%.
Adjust Light Range to increase lighting effects if needed. These settings will depend on each person's size, texture, and personal preferences.
So, we have completed how to implement the Matrix effect.

- Step 5: Add a Layer Mask to the texture and mask out any numbers that fall directly on the subject's face.

- Step 6: Group all the layers together, duplicate and merge the group then name them “Background”, then press Play and see it in action.

Above, SaDesign has guided readers on how to make the matrix effect in Photoshop in the simplest and most effective way. Wishing you success with your design!


VIP Products


Best Selling Products
Adobe Photoshop Copyright - Full App
120 USD
Autodesk All App Account Copyright
120 USD
Plugin Retouch4me
69 USD
Copyright Adobe Lightroom Account
59 USD
ChatGPT Plus Account (GPT-4)
16 USD
Upgrade Genuine Office 365
49 USD
Genuine Cheap Canva Pro
39 USD
Upgrade genuine Capture One account
120 USD
Capcut Pro 1 Year
39 USD
Windows 10 & 11 Pro Key
36 USD
MidJourney Account
29 USD
Freepik Premium Account
59 USD
Adobe Premiere Pro Account
99 USD
Upgrade Duolingo Super
29 USD
Genuine Adobe Illustrator account
99 USD