Best Selling Products

MidJourney Account
29 USD

Freepik Premium Account
59 USD

Upgrade Duolingo Super
29 USD

Windows 10 & 11 Pro Key
36 USD

Adobe Photoshop Copyright - Full App
120 USD

ChatGPT Plus Account (GPT-4)
16 USD

Autodesk All App Account Copyright
120 USD

Adobe Premiere Pro Account
99 USD

Genuine Cheap Canva Pro
39 USD

Capcut Pro 1 Year
39 USD

Plugin Retouch4me
69 USD

Copyright Adobe Lightroom Account
59 USD

Upgrade genuine Capture One account
120 USD

Upgrade Genuine Office 365
49 USD

Genuine Adobe Illustrator account
99 USD
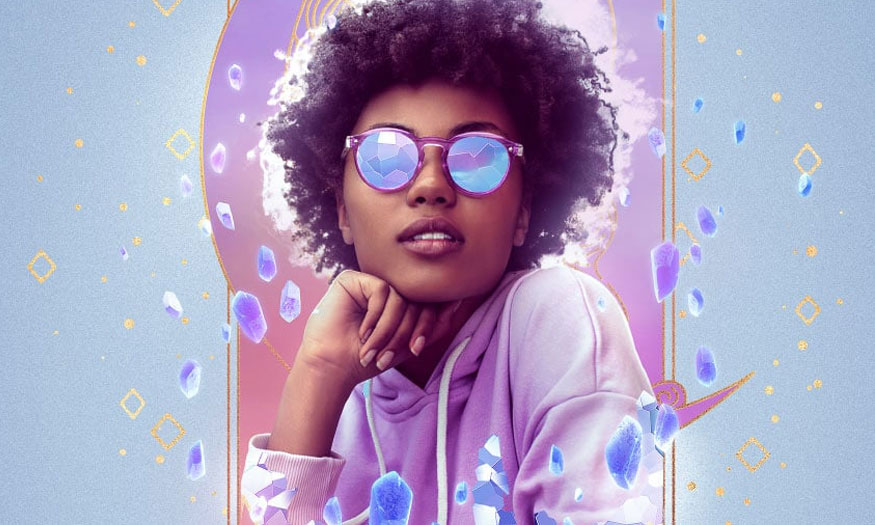
Creating Interesting watercolor effects in Photoshop with SaDesign
Creating watercolor effects in Photoshop is one of the important skills that editors should master to help images become vivid and attractive. If you are interested in how to create interesting watercolor effects in Photoshop, the following instructions that SaDesign brings will definitely be very useful!

Creating watercolor effects in Photoshop is one of the important skills that editors should master to help images become vivid and attractive. If you are interested in how to create interesting watercolor effects in Photoshop, the following instructions that SaDesign brings will definitely be very useful!

1. How to do photo editing
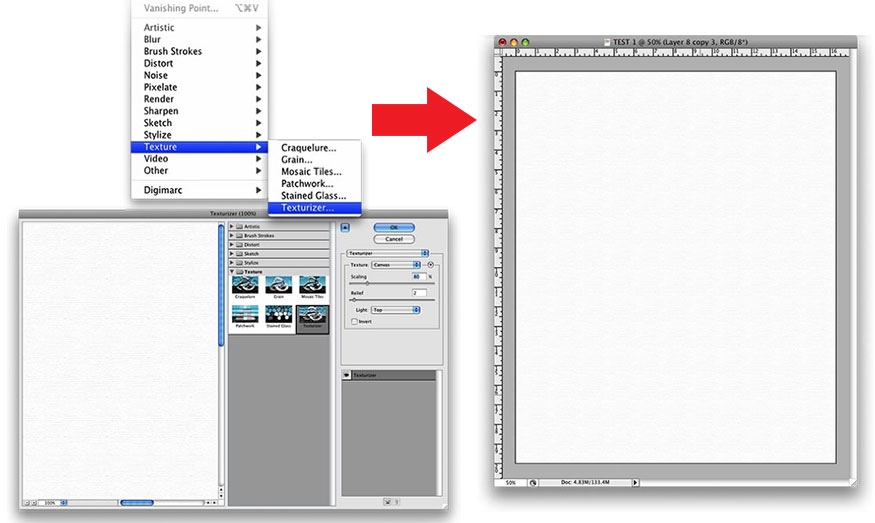
- Step 1: Create a new document and a new layer, name them "texture", then use white for coloring. Make sure the foreground is white and the background is black.
Then you go to Filter => Texture => Texturizer, you can use Canvas or Texture with a ratio of 80%.
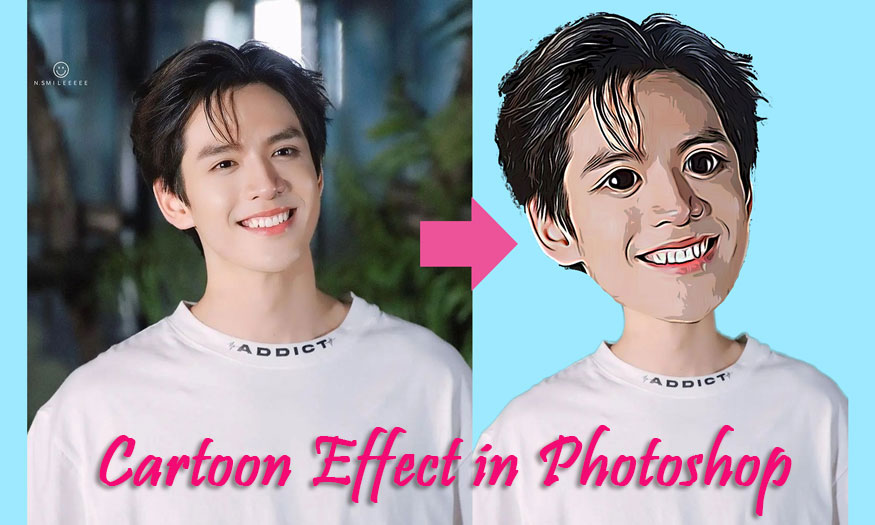
- Step 2: Add an image in your document and erase the background using the Path Tool (P) or Polygonal Lasso Tool (L).

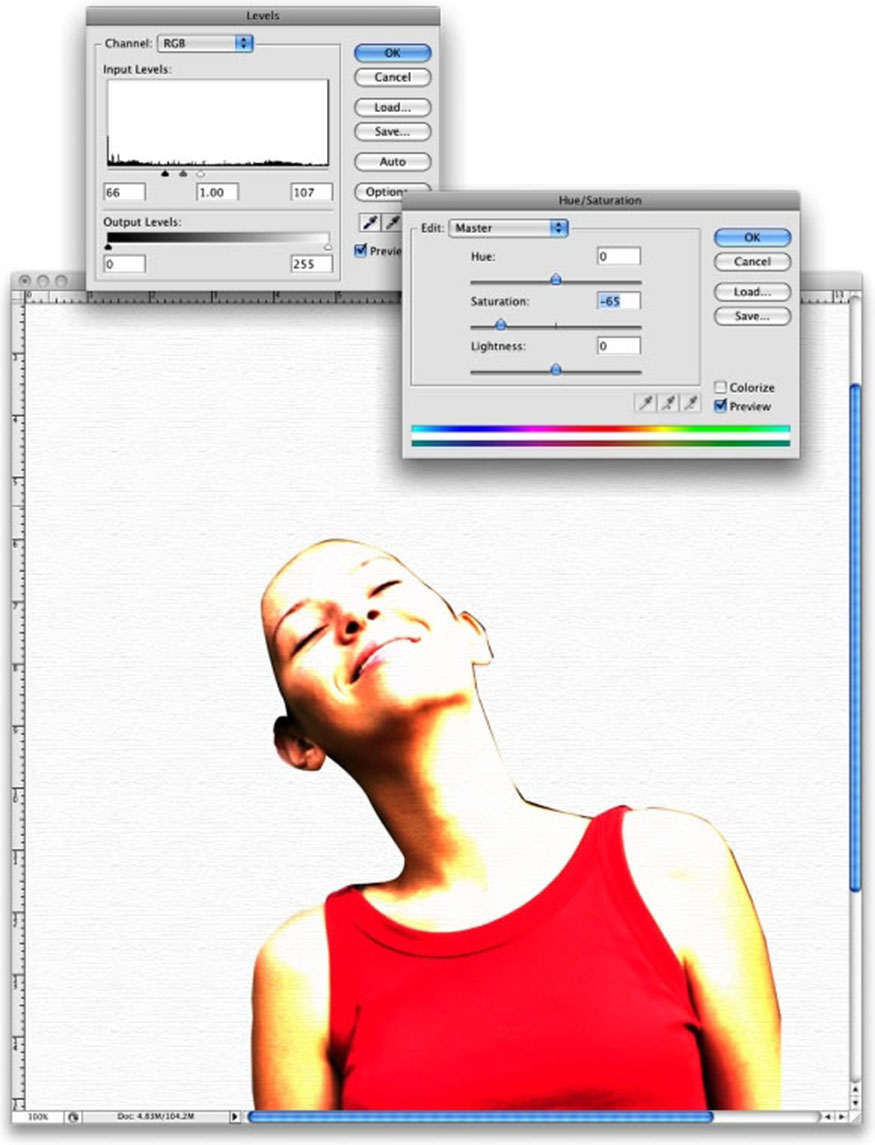
- Step 3: Select the image layer of the girl then go to Image => Adjustments => Levels. Next, go to Image => Adjustments => Hue/Saturation and change the value of Saturation to -65.
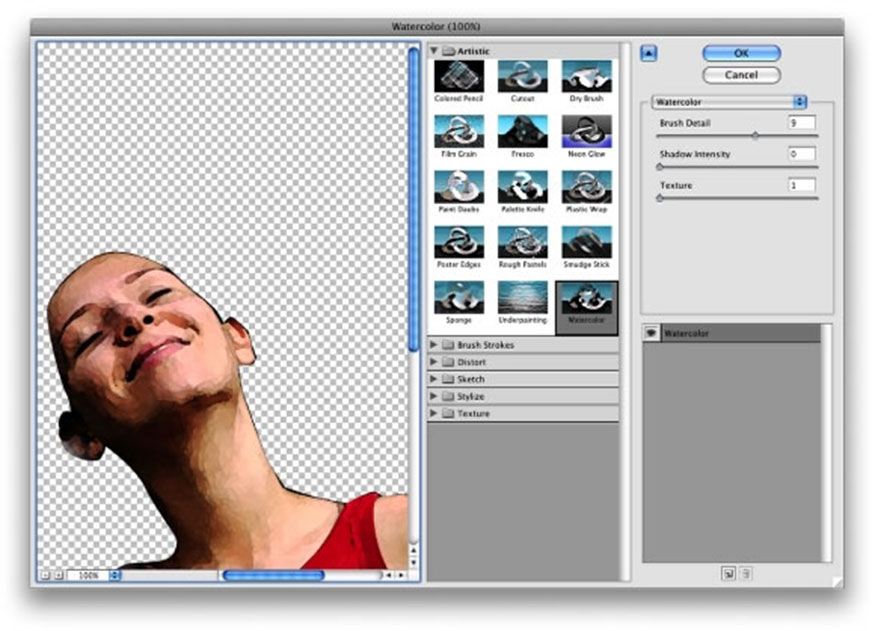
- Step 4: Click Filter => Artistic => Watercolor and make the following settings:
-
Brush Detail: 9
-
Shadow Intensity: 0
-
Texture: 1.
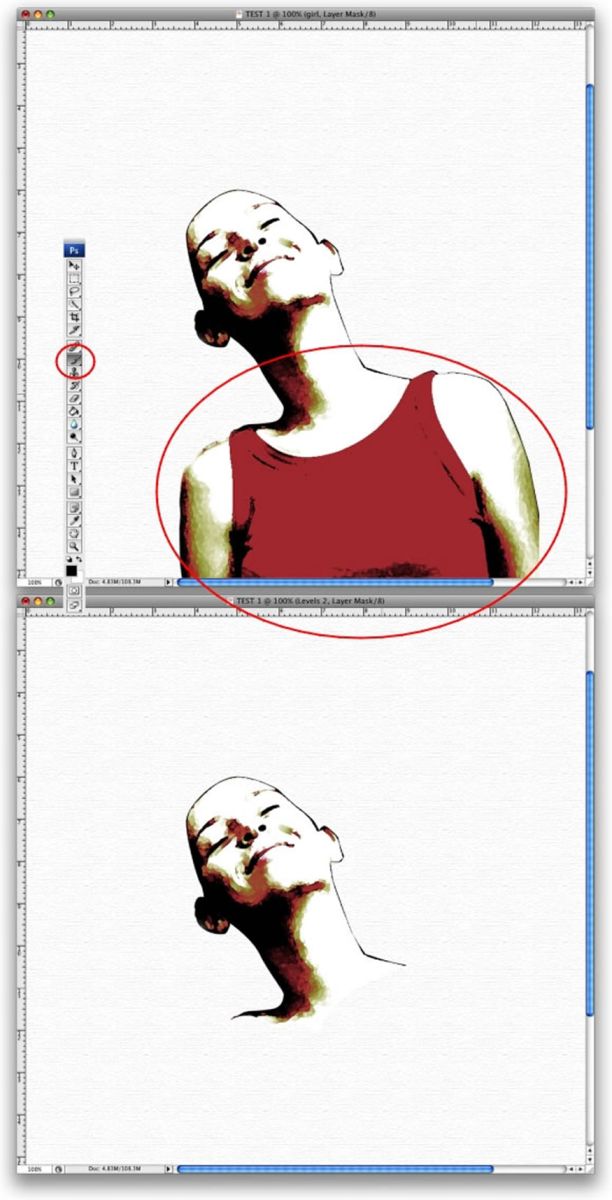
- Step 5: With the girl image layer selected, go to Layer => Layer Mask => Reveal All. Next, select the Brush Tool (B) with black color to cover the girl's body.
2. How to create a watercolor effect
To create a watercolor effect, we proceed with the following specific steps:
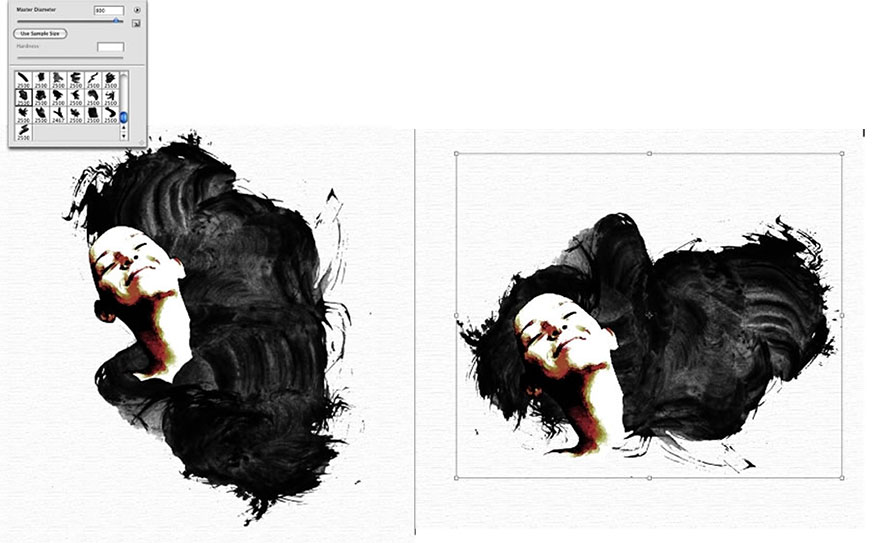
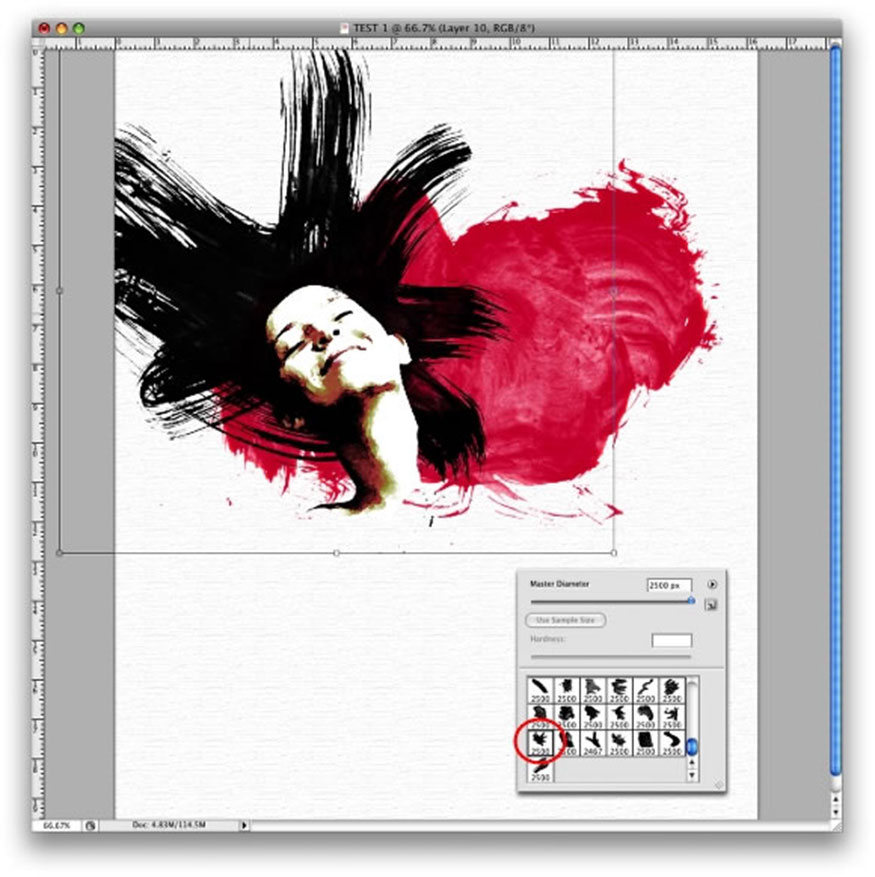
- Step 1: First you need to download Bittbox Water Brush 2, then create a new layer. Click on the Brush Tool (B) and select the 7th brush from BB Watercolor Brushes. The color choice is black, while reducing their size to ensure they fit the document. Rotate then change the layer size, use a brush to make the idea a watercolor hairstyle for the girl.
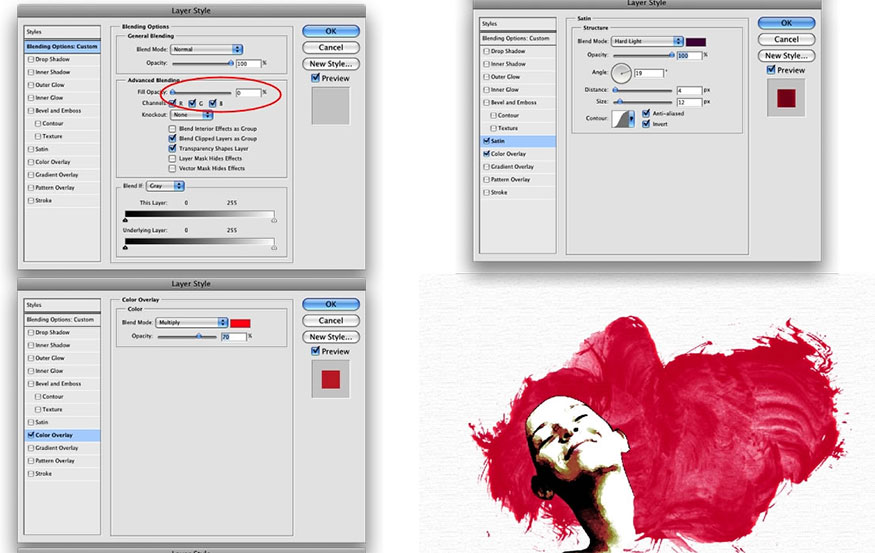
- Step 2: Go to Layer => Layer Style => Blending Options, then change the value of Fill Opacity to 0 and click on the Color Overlay option. Use the color red. In Blend Mode, click Multiply then make the following settings:
-
Opacity: 70%
-
Check Satin
-
Blend Mode: Hard Light
-
Color: Purple (#5d085c)
-
Angle: 20°
-
Distance: 4px
-
Size: 12px.
- Step 3: Continue creating a new layer, then select the brush with the Brush Tool (B). On this new layer draw some brush strokes in the middle of the screen, then change their size, rotate the shape until they become better.
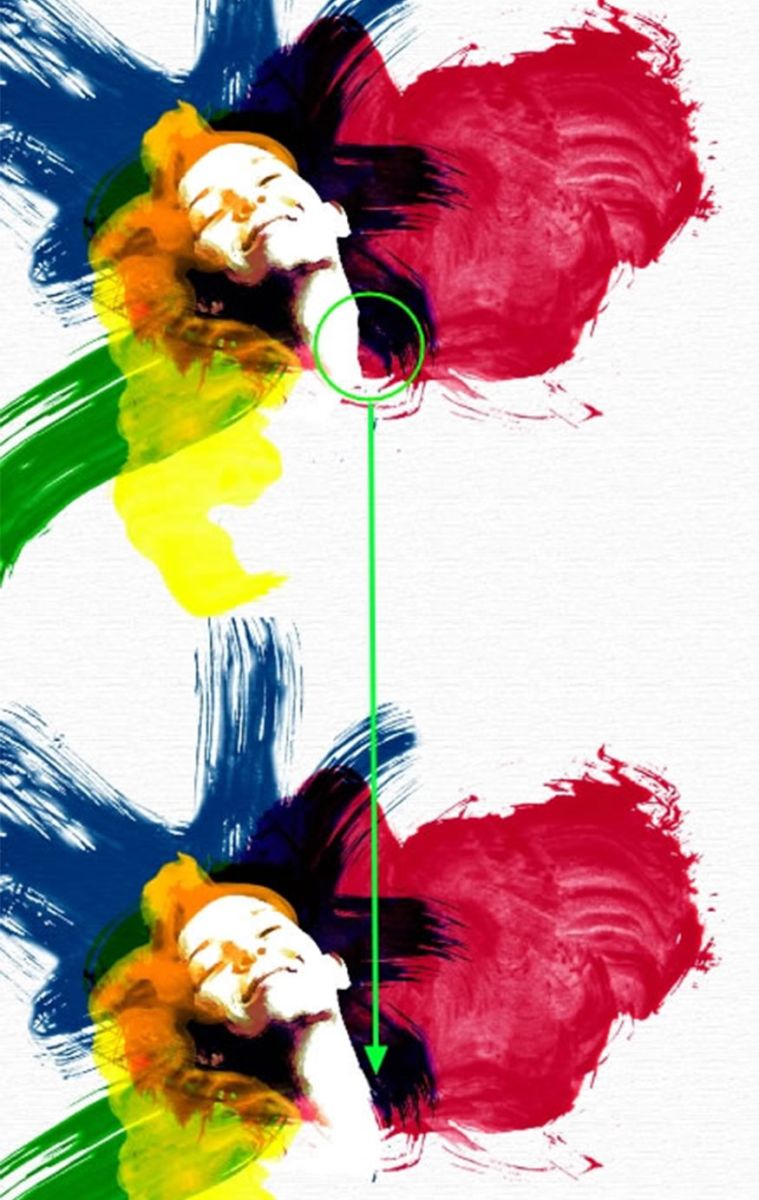
As a result, we will get a hairstyle as shown below.
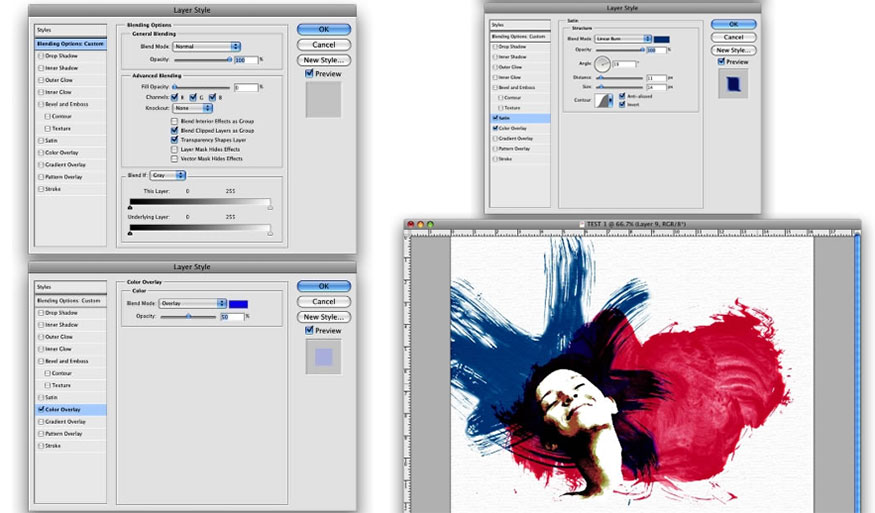
- Step 4: Go to Layer => Layer Style => Blending Options, then set the Fill Options value to 0. Next, add Color Overlay, use Overlay for Blend Mode, color is Blue (#002cec), and the Opacity value is 50%. Select Satin and make parameter settings as follows:
-
Color: Dark green (#065795)
-
Blend Mode: Linear Burn
-
Opacity: 100%
-
Angle: 19°
-
Distance: 11px
-
Size: 14px.
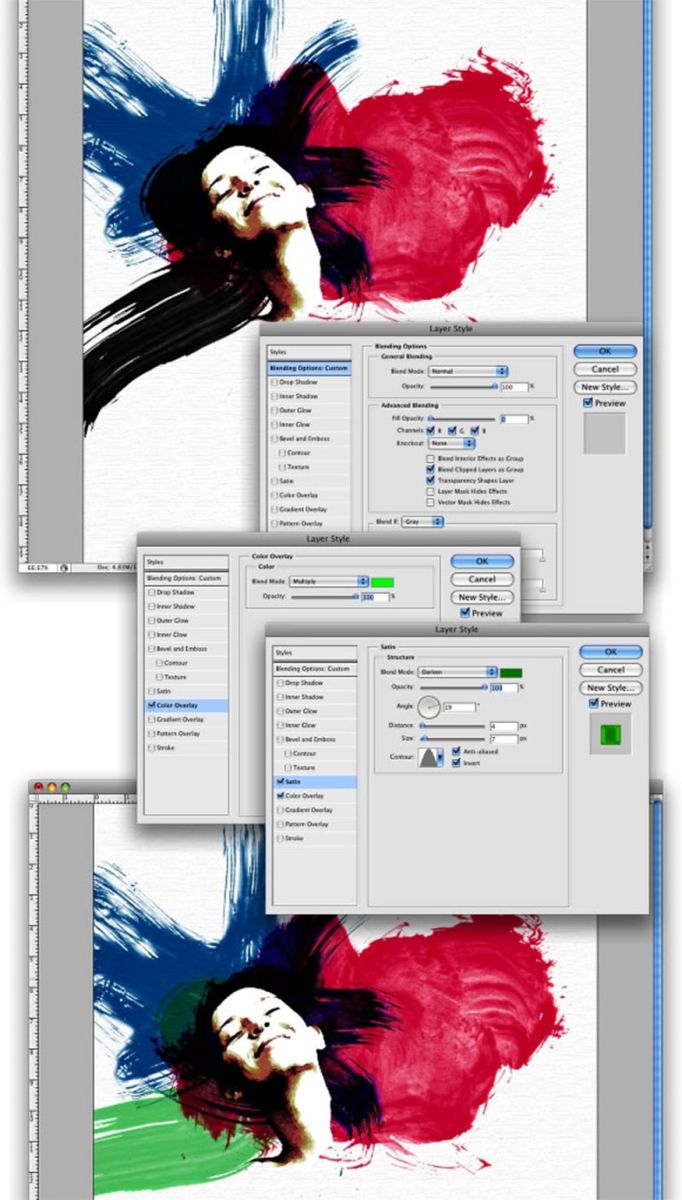
- Step 5: Create a new layer and select the Brush tool (B), from the watercolor set select another brush, click on the last line, then reduce their size and draw more hair.
Click on Layer => Layer Style => Blending Options and set the value as follows:
-
Fill Options: 0.
-
Add Color Overlay
-
Blend Mode: Multiply
-
Color: Green (#18ff00)
-
Opacity: 100%.
Select Satin and set the value as follows:
-
Darken for Blend Mode
-
Color: darker green (#0b9600)
-
Opacity: 100%
-
Angle: 19°
-
Distance: 4px
-
Size: 7px .
- Step 6: Repeat the steps as step 5 by selecting the new layer, clicking on the Brush Tool (B) to select another brush and clicking on its size to draw more hair. Resize and rotate until you get the desired result.
Go to Layer => Layer Style => Blending Options then set the following parameters:
-
Fill Options: 0
-
Add Color Overlay
-
Blend Mode: Hard Light
-
Color: yellow (#ffe400)
-
Opacity: 100%.
Select Satin and set the following parameters:
-
Color: Darker yellow (#a2a406)
-
Blend mode: Color Burn
-
Opacity:100%
-
Angle: 19°
-
Distance: 17px
-
Size: 73px.

- Step 7: Click on the layer with the girl's face => change the Blend Mode value to Screen.
3. How to add text
To add text to the design, follow these steps:
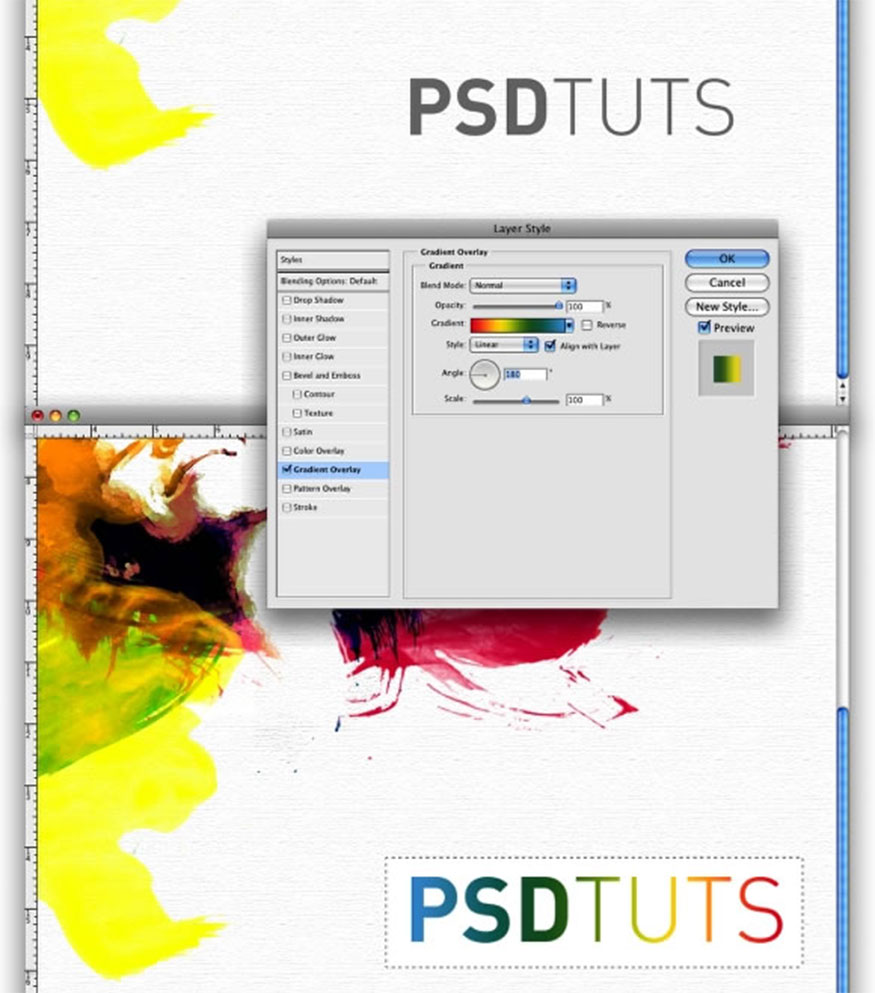
- Step 1: Enter the text into the design, after adding the text, click Layer => Layer Style => Gradient Overlay.
Select the 180° parameter for Angle and the blending mode is Normal.
Create another layer and make sure the text is on this new layer.
Click the Rectangular Marquee Tool to create a rectangular selection and fill it with white.
Merge these 2 layers to add some text effects so that the filter works well.
- Step 2: Apply some filters to the text by going to Filter => Brush Strokes => Sprayed Strokes and setting parameters as follows:
-
Stroke Length: 17
-
Spray Radius: 0
-
Stroke Direction Vertical.
Next, Filter => Artistic => Watercolor and setting parameters as follows:
-
Brush Detail: 11
-
Shadow Intensity: 0
-
Texture 1.
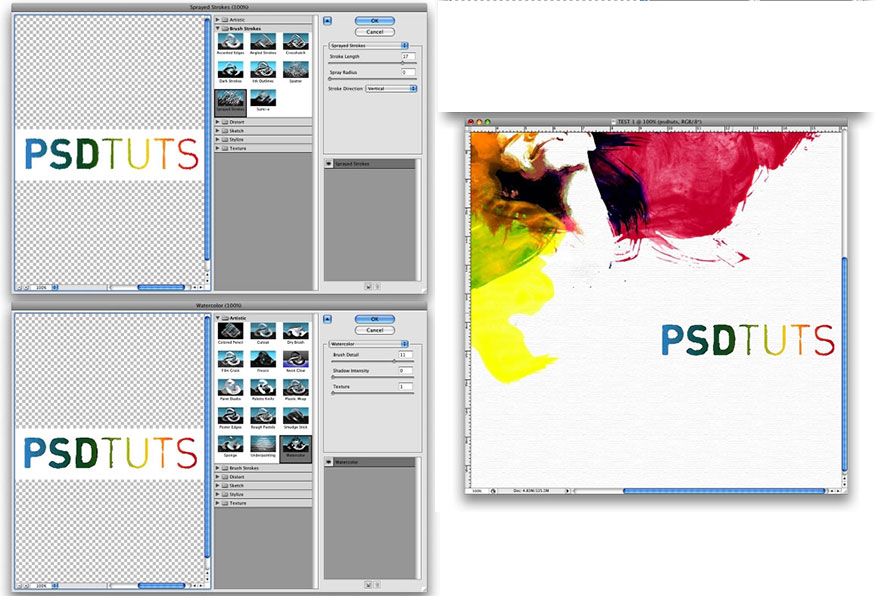
These settings help create beautiful text effects, you can experiment with different filters until you get the best results. Hopefully the ways to create interesting watercolor effects in Photoshop that SaDesign brings above will help you apply them successfully to your designs. Don't forget to follow us to continuously update the most useful information about Photoshop!


VIP Products


Best Selling Products
MidJourney Account
29 USD
Freepik Premium Account
59 USD
Upgrade Duolingo Super
29 USD
Windows 10 & 11 Pro Key
36 USD
Adobe Photoshop Copyright - Full App
120 USD
ChatGPT Plus Account (GPT-4)
16 USD
Autodesk All App Account Copyright
120 USD
Adobe Premiere Pro Account
99 USD
Genuine Cheap Canva Pro
39 USD
Capcut Pro 1 Year
39 USD
Plugin Retouch4me
69 USD
Copyright Adobe Lightroom Account
59 USD
Upgrade genuine Capture One account
120 USD
Upgrade Genuine Office 365
49 USD
Genuine Adobe Illustrator account
99 USD