Best Selling Products
Glazed Cookie Text Effect in Photoshop
Nội dung
- 1. How to create a gradient background and text layer
- 2. How to create and save a Stroke brush tip
- 3. How to create and outline a Work Path
- 4. How to style a Layer group
- 5. How to add graphic images
- 6. How to choose effects
- 7. Instructions for creating a smooth effect
- 8. How to create a textured glaze style
- 9. How to create more letters
- 10. How to create a sprinkle brush tip
- 11. How to create Sprinkles style
- 12. How to add a sprinkle effect
- 13. General adjustments
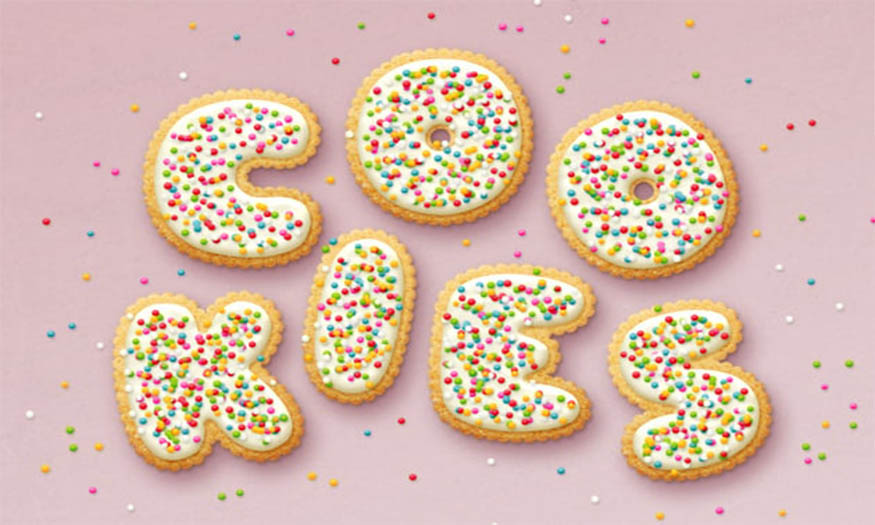
Glazed cookies look so attractive. And do you know how to create text from these lovely glazed cookies? Today's article SaDesign will share with readers how to set brushes, layer styles and adjust layers in Photoshop to create a funny, lovely and fun glazed cookie text effect.
Summary:
In this tutorial, SaDesign created the Gradient background and text layers. Then went on to create a simple cookie brush tool in Photoshop, using it to stroke the text. At the same time, styled the text and stroke layers to create the main cookie shape.
We then created and styled the glaze layers, and created a sprinkle brush to add to the top of the cookies and style them in different colors. Finally, we used a few adjustment layers to add general tweaks to the effect.
Now let's get started.
1. How to create a gradient background and text layer
Step 1
Let's start by creating a new document with dimensions of 1000 x 800px and click on the Create new fill or adjustment layer icon at the bottom of the Layers panel to add a Gradient layer.
Create a gradient fill using the colors #e8d2d6 on the left and #ddbcc0 on the right, and change the Angle to 107 .
.jpg)
Step 2
Create text in All Caps using the Sniglet font and set the Size to 250 pt.
You can create the entire word at once or if you want a more vibrant and beautiful result, create each letter on a separate layer.
And if you choose to create individual letters, make sure to put each of their layers into a group with the letter's name.
.jpg)
2. How to create and save a Stroke brush tip
Step 1
Select the Brush Tool (B) and open the Brush panel. Then choose a hard round tip and use the following settings:
Brush Head Shape
.jpg)
Shape dynamics
.jpg)
Step 2
The next step is to click on the Create New Brush icon located at the bottom right corner of the panel, change the Name to Cookie Stroke then select OK.
.jpg)
3. How to create and outline a Work Path
Step 1
Right-click on the text layer then select Create Work Path
.jpg)
Step 2
Create a new layer on top of the text layer, then name it Stroke, you need to make sure the Brush Tool is still active then press the Return key to stroke the path.
Select the Direct Selection Tool (A) and press the Return key again to get rid of the path.
.jpg)
Step 3
Place both the text and Stroke layers into a group, then name it Text and Stroke.
.jpg)
4. How to style a Layer group
Double-click on the Text and Stroke group then apply the following layer style:
Step 1
Add bevel and emboss with the following settings:
Size: 7
Select the Anti-Aliasing box
Featured Mode:
Color:#b08965
Shadow mode:
Color:#d3a35e
Opacity: 35%
.jpg)
Step 2
Select to add a border with the following settings:
Contour: Half Round
Select anti-aliasing box
.jpg)
Step 3
Add Drop Shadow then set as below:
Color:#762b3d
Opacity: 38%
Distance: 3
Size: 5
.jpg)
Step 4
Add another version of the Drop Shadow effect with the following settings:
Color:#7d3848
Opacity: 50%
Distance: 15
Size: 25
.jpg)
This action will help style the main cookie shape:
.jpg)
5. How to add graphic images
Step 1
Open the Cookies image and select the Elliptical Marquee Tool to select one of the cookies in the image. You can select just the part you want to use.
Go to Edit then select Copy to copy the selected part.
.jpg)
Step 2
Go back to the original document and go to Edit > Paste to paste the copied cookie texture.
Place the pasted layer inside the letters group above the Text and Stroke groups. Then, right-click on the cookie texture layer and select Create Clipping Mask.
Press Command-T to enter Free Transform Mode, resize and rotate the pattern until you like it.
Press Return to commit the changes.
.jpg)
6. How to choose effects
Step 1
Command-click the text layer thumbnail to create a selection.
.jpg)
Step 2
Choose Select > Modify > Contract and change the Contract By value to 5 .
.jpg)
Step 3
Create a new layer on top of the letter group then name it Glaze 01.
Fill the selection with White, and press Command-D to deselect.
.jpg)
Step 4
Duplicate the Glaze 01 layer and name the copy Glaze 02, and change the copy's Fill value to 0.
.jpg)
Step 5
Put both layers into a group then name it Glaze.
.jpg)
7. Instructions for creating a smooth effect
Double-click the Glaze 01 layer to apply the following layer settings:
Step 1
Add bevel and emboss with the following settings:
Size: 9
Softening: 9
Select the Anti-Aliasing box
Highlight Mode: Soft Light
Color:#b08965
Shadow mode:
Color:#b69c5e
Opacity: 35%
.jpg)
Step 2
Add more borders by setting:
Contour: Half Round
Select the Anti-Aliasing box.
.jpg)
Step 3
Add a Texture with the following settings:
Pattern: Cloud
Depth: 25%
.jpg)
Step 4
Add an Inner Shadow with the following settings:
Color:#d3d1c8
Opacity: 35%
Distance: 3
Size: 7
.jpg)
Step 5
Add a color overlay layer with the following settings:
Color:#f1efde
.jpg)
Step 6
Add a Drop Shadow with the following settings:
Blend Mode: Linear Recording
Color:#2c1c0b
Opacity: 15%
Distance: 3
Size: 3
.jpg)
This will give us a soft-style letter.
.jpg)
8. How to create a textured glaze style
You need to double-click on the Laze 02 layer and apply the following layer settings:
Step 1
Add bevel and emboss with the following settings:
Size: 7
Softening: 7
Uncheck the Use Global Light box
Angle: 85
Height: 26
Select the Anti-Aliasing box
Featured Mode: Vivid Light
Color:#ffffff
Shadow Mode: Linear Recording
Color:#b1997c
Opacity: 28%
.jpg)
Step 2
Add a Border with the following settings:
Contour: Half Round
Select the Anti-Aliasing box.
.jpg)
Step 3
Add a Texture with the following settings:
Pattern: Satin
Depth: 26%
.jpg)
This will help create a more textured glaze layer.
.jpg)
9. How to create more letters
Repeat the same steps to create any additional letters you need.
Use Free Transform Mode to rotate the letters and position them the way you want.
You don't have to reapply all layer styles to each layer. Instead, you can right-click the styled layer, select Copy Layer Style, right-click the new layer you want to apply the same layer style to, and select Paste Layer Style.
Once you're done, put all the letter groups into another group and name it Text.
.jpg)
10. How to create a sprinkle brush tip
Now let's create another realistic cookie brush in Photoshop. Select the Brush Tool and open the Brush panel.
Select a hard round tip and use the following settings:
Brush Tip Shape
.jpg)
Shape Dynamics
.jpg)
Scattering
.jpg)
11. How to create Sprinkles style
Step 1
Create a new layer on top of the text group and then place it in a group called Sprinkles.
.jpg)
Continue double-clicking on the new layer then apply the following layer styles:
Step 2
Add Bevel and Emboss with the following settings:
Size: 6
Uncheck the Use Global Light box
Angle: 98
Height: 53
Select the Anti-Aliasing box
Featured Mode: Vivid Light
Opacity: 5%
Shadow mode: Color recording
.jpg)
Step 3
Add Contour with the following settings:
Contour: Round steps
Select the Anti-aliasing box.
Range: 59%
.jpg)
Step 4
Add a Color Overlay with the following settings:
Color:#f88dc7
This is where you can choose the color of the sprinkles on the styled layer, so you can choose any color you like.
.jpg)
Step 5
Add a Drop Shadow with the following settings:
Color:#2a2826
Opacity: 20%
Distance: 2
Size: 3
.jpg)
12. How to add a sprinkle effect
Step 1
Rename the styled layer to the color you chose for the color overlay layer effect and copy its layer style.
Click and drag lightly across the letters to add sprinkles. You can change the tip of the cookie brush in Photoshop with the Spacing and Scattering values as needed to create the effect you like.
.jpg)
Step 2
Create new layers, name each layer with the color you want and paste the layer style into it.
All you need to do to change the color of the sprinkles is double click on the sprinkle layer then select a new color value for the color overlay layer effect.
.jpg)
Step 3
You can add as many sprinkle layers and colors as you like to fill in the text.
.jpg)
13. General adjustments
Step 1
Once you're done adding sprinkles, put the Text and Sprinkles group into another new group and name it Cookies.
.jpg)
Step 2
Add a Levels adjustment layer and clip it to the Cookies group.
Then change the Highlights value to 6, the Gamma to 0.90, and the Shadow to 248.
.jpg)
Step 3
Add a Vibrance adjustment layer and clip it to the Cookies group and change the Vibrance value to 20.
.jpg)
Step 4
Add a Brightness/Contrast adjustment layer and clip it to the Cookies group, and change the Contrast value to 15.
.jpg)
Step 5
Place the Cement texture image on top of the gradient fill layer, resize it to fit the document, and rename its layer to the texture overlay layer.
Change the Text Overlay layer's Blend Mode to Linear Burn and its Opacity to 50%.
.jpg)
Above are the details on how to create a glazed cookie text effect in Photoshop that SaDesign wants to share with readers. Hopefully, this article will help readers create impressive texts from cute, funny and lovely cookies.


