Best Selling Products

Autodesk All App Account Copyright
120 USD

Upgrade Duolingo Super
29 USD

Freepik Premium Account
59 USD

Copyright Adobe Lightroom Account
59 USD

Upgrade Genuine Office 365
49 USD

Genuine Cheap Canva Pro
39 USD

Genuine Adobe Illustrator account
99 USD

Upgrade genuine Capture One account
120 USD

Plugin Retouch4me
69 USD

Capcut Pro 1 Year
39 USD

Windows 10 & 11 Pro Key
36 USD

ChatGPT Plus Account (GPT-4)
16 USD

MidJourney Account
29 USD

Adobe Photoshop Copyright - Full App
120 USD

Adobe Premiere Pro Account
99 USD
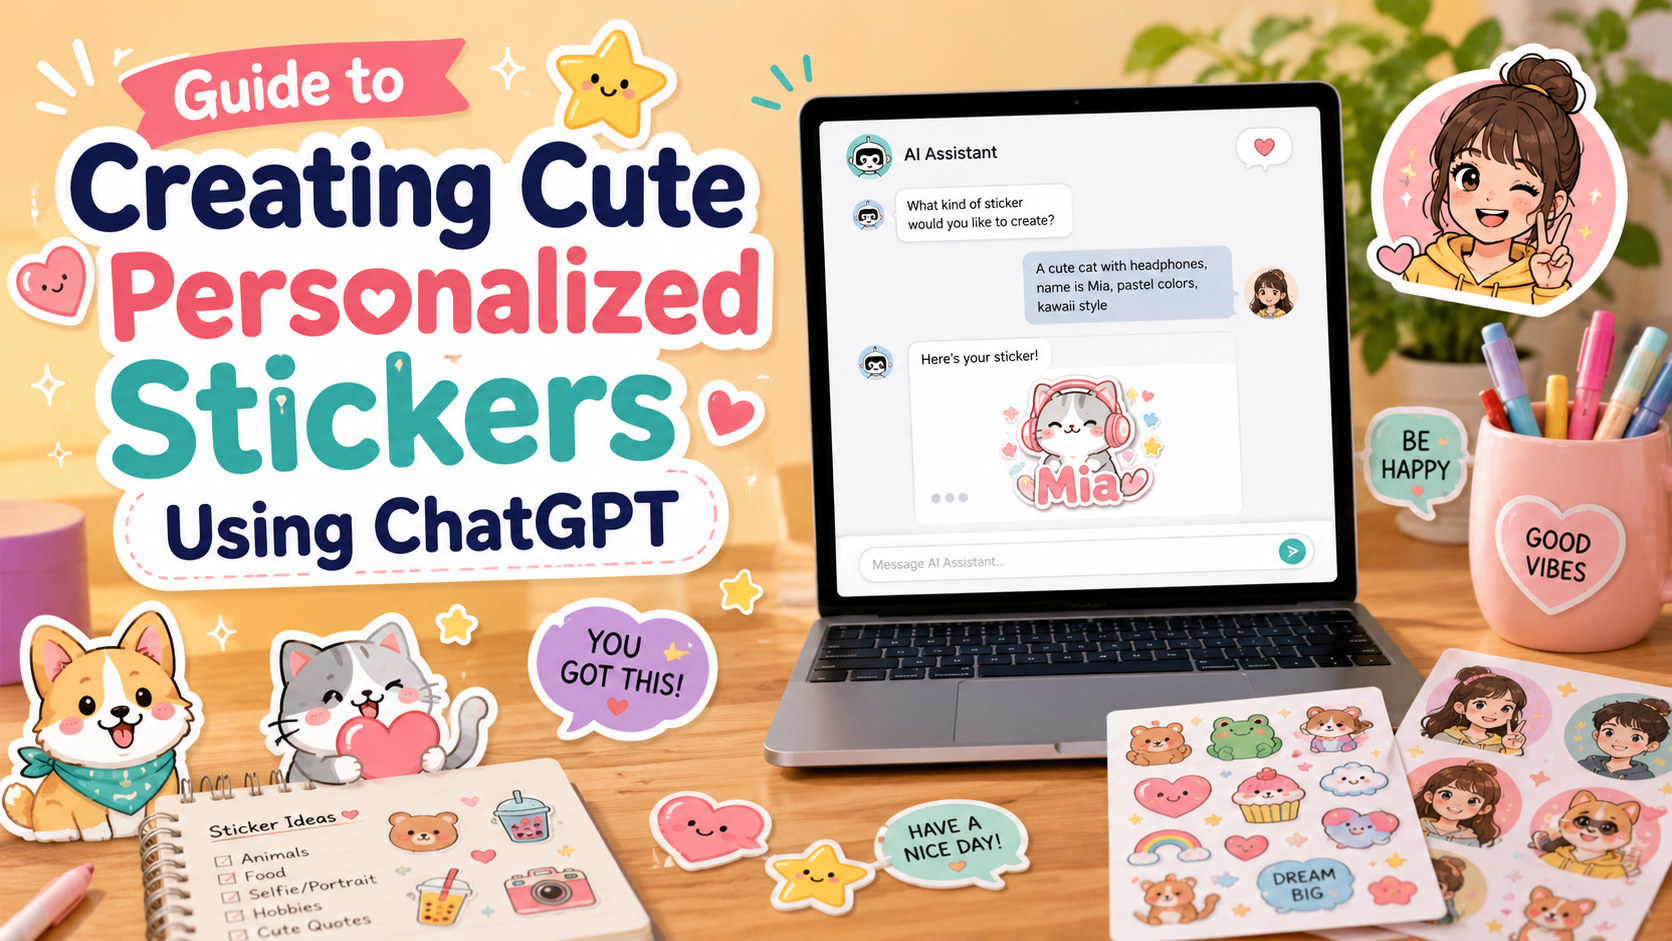
Guide to Creating Cute Personal Stickers Using ChatGPT
Nội dung
- 1. What are personal stickers?
- 2. Benefits of using personal stickers
- 3. Preparation for creating personal stickers
- 4. Guide on how to create personal stickers using ChatGPT
- 4.1 Step 1: Access an AI tool that supports images
- 4.2 Step 2: Prepare and upload a portrait photo
- 4.3 Step 3: Enter a description (prompt) for AI
- 4.4 Step 4: Wait for the system to process
- 4.5 Step 5: Download the image
- 5. Upload stickers to the Messenger app
- 5.1 Step 1: Separate each sticker into an individual image
- 5.2 Step 2: Add images to Messenger
- 6. Tips for creating cute and unique personal stickers
- 7. Suggested prompts for creating cute stickers
- 7.1 Suggested Vietnamese prompts
- 7.2 Suggested English prompts
- 8. Conclusion
Creating personal stickers is becoming an interesting trend loved by many young people. With just a portrait photo and the ChatGPT tool, you can easily own a set of adorable chibi stickers with a strong personal mark. These stickers not only make conversations more lively but also express your personality and personal style in a creative way. The article below will guide you step by step on how to create personal stickers using ChatGPT, from preparing images to designing funny icons, helping you quickly have a unique sticker set to share through messages and social networks. Let’s explore it with Appvip right away!
1. What are personal stickers?
Personal stickers are digital stickers designed based on each person’s own images, expressions or style. Unlike common stickers already available in messaging apps, personal stickers carry an exclusive mark, helping you express your personality and personal style in a visual and lively way. This is a form of creativity that is becoming increasingly popular, especially among young people, those who love uniqueness and want to create a personal mark in every conversation.
Popular types of personal stickers today include:
Cute chibi: This is a type of sticker drawn in a small and adorable style, often emphasizing outstanding facial features such as big eyes, rosy cheeks and a bright smile. This type of sticker is very suitable for expressing cuteness and cheerfulness in daily conversations.
Expression stickers: Focus on emotions, helping you convey states such as happiness, sadness, anger, surprise or disappointment in a lively way. These stickers make conversations more vivid and realistic.
Funny and humorous stickers: Often combine fun accessories, amusing actions or cheerful details, helping users express humor, creativity and make an impression on friends or followers.
2. Benefits of using personal stickers
Increase fun in messaging: A unique personal sticker set will make conversations more lively and attractive, avoiding the boring feeling of only sending text or regular emojis.
Express your own personality: Stickers are a way for you to freely create, producing images that correctly reflect yourself, your style and interests. Each sticker is a personal “mark,” helping you stand out among friends and the online community.
Use across multiple platforms: Not limited to chat, personal stickers can appear on social networks, blogs, personal profiles or online posts, becoming a unique highlight, contributing to building a digital personal brand.
Thus, personal stickers are not only an entertainment tool but also a way for you to express yourself, interact creatively with everyone and affirm your own personality in the digital world.
3. Preparation for creating personal stickers
Before starting to create personal stickers using ChatGPT, careful preparation will help you save time and have a final product that is high quality, beautiful and true to your idea.
Things you need:
High-quality portrait photo: This is the most important factor in creating stickers. A clear image, good lighting and a full face will help the sticker be recognizable, detailed and lively. A beautiful photo will determine the success of the final sticker.
ChatGPT tool: ChatGPT will be an AI “assistant” that helps you write prompts, guide ideas and suggest how to turn a photo into a sticker in the style you want. This tool is extremely useful when you do not have design experience but can still create quality stickers.
Image editing apps or software support (optional): Apps such as Canva, Photoshop, PicsArt or specialized sticker-making applications will help you add borders, colors, details or special expressions, making the sticker more complete and professional.
Notes when choosing photos:
Clear background, full face: A simple background helps AI easily recognize the face, avoiding unnecessary details that make the sticker messy. At the same time, a full and clear face helps the sticker retain your outstanding features.
Good lighting: A well-lit photo helps colors and expressions appear more realistic, creating bright and lively stickers.
Avoid blurry photos or too many messy details: Blurry images or overly complex backgrounds will make the final sticker less sharp, difficult to edit, and may lose important facial features.
Careful preparation from this step will make the process of creating personal stickers faster, more effective and bring a satisfying final product. A quality photo combined with ChatGPT will open up the opportunity to create unique, funny and extremely “cute” stickers for use in every conversation.
4. Guide on how to create personal stickers using ChatGPT
Recently, on social networking platforms, a very interesting trend has been spreading among young people: creating personalized stickers using ChatGPT. With just a simple portrait photo, you can easily turn your image into adorable chibi stickers. This process does not require professional design skills, you only need to describe your idea and let AI do the rest.
ChatGPT’s AI system will automatically analyze details from the photo such as the face, hairstyle, hair color, clothing and expression, then create a series of unique stickers. Each sticker is unique, carrying a strong personal mark, helping you express your own personality and make conversations or social media posts stand out.
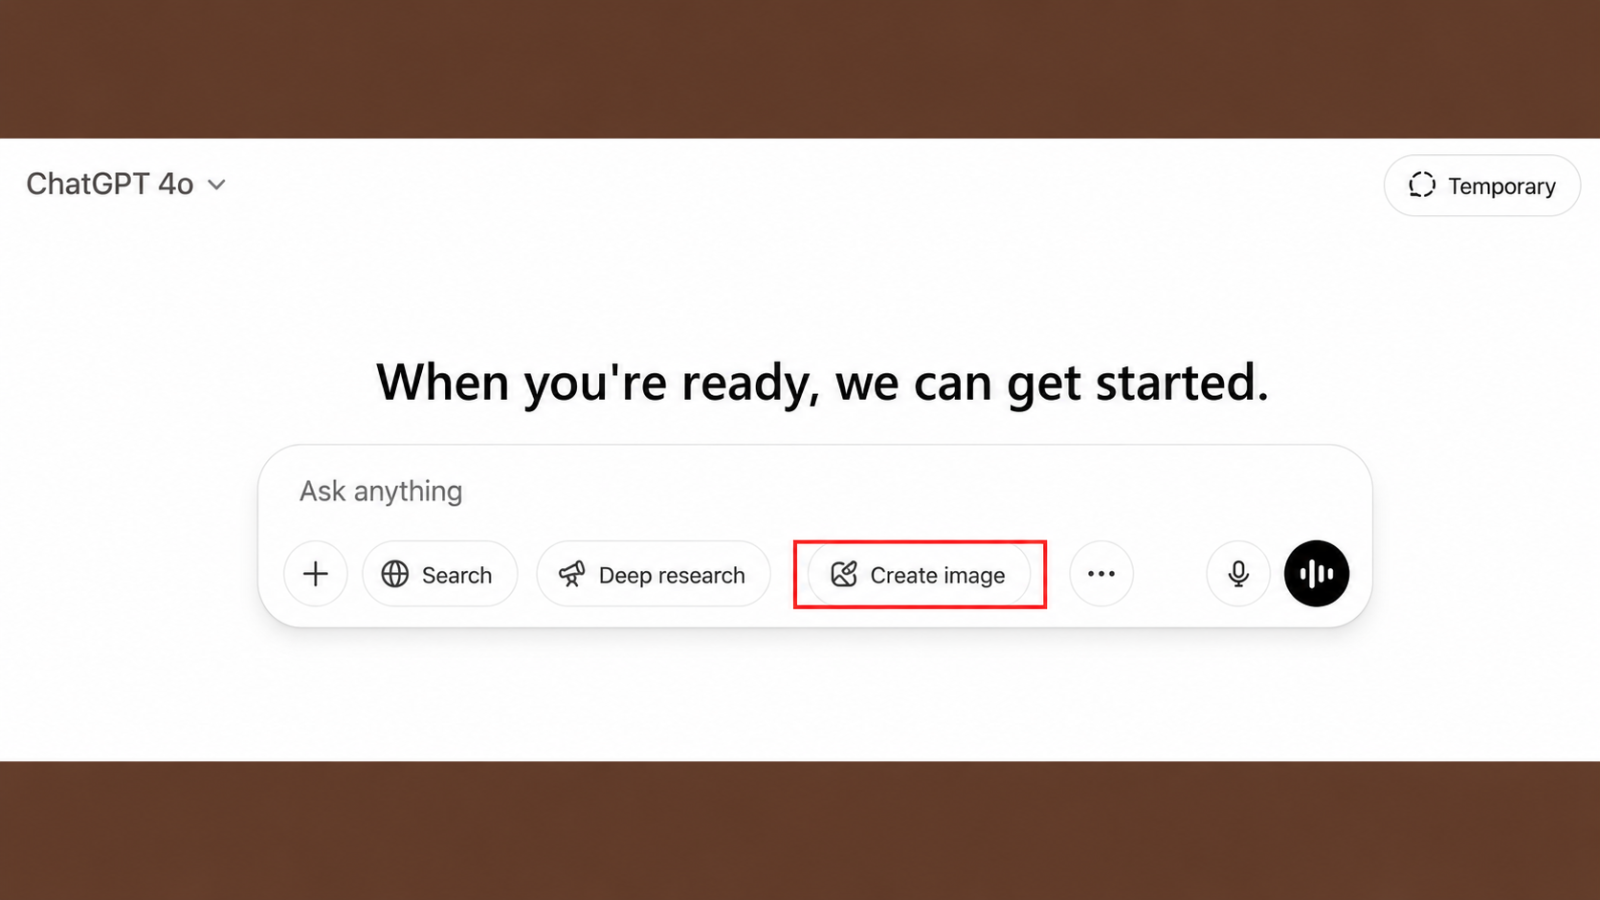
4.1 Step 1: Access an AI tool that supports images
First, you need to access an AI platform with image processing functions, such as ChatGPT at the address https://chatgpt.com. Make sure you are using a version that supports uploading and analyzing images, because some older or free versions may not have this feature yet.
After logging in, choose the image creation feature or Image Generation on the ChatGPT interface. This will be where you upload the photo and enter the description, so AI can create stickers according to your wishes. Choosing the right tool and version will help the sticker creation process run quickly and smoothly.
4.2 Step 2: Prepare and upload a portrait photo
The image you choose is an important factor that determines the quality of the final sticker. Choose a clear photo with good lighting, where the face, hair and outfit can be seen clearly. The clearer and simpler the photo, the sharper and cuter the sticker created will be.
After choosing a satisfactory photo, upload it to the AI tool opened in step 1. ChatGPT will use this photo as material to create personalized stickers, thereby ensuring the stickers reflect your appearance and style correctly.
4.3 Step 3: Enter a description (prompt) for AI
To help AI understand what kind of sticker you want, enter a detailed description (prompt) into the chat box. For example:
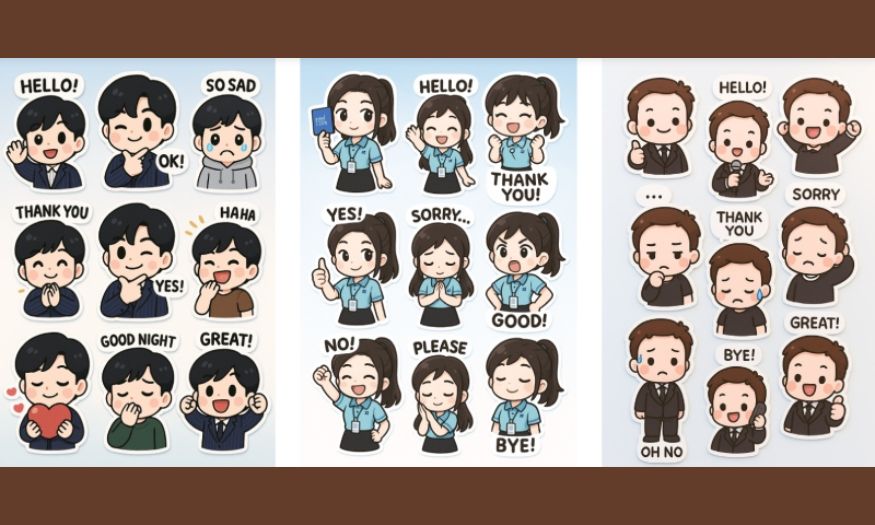
“Create a 3D kawaii on a 10:16 canvas featuring nine chibi-style stickers in various outfits, poses, and expressions. Use the attached image for reference. Each sticker has a white border and includes a speech bubble with regularly used phrases like [ADD ANY DIALOGUE YOU WANT]. Set on a soft white-to-pastel blue gradient background for a fun, positive vibe, perfect for [NAME OF THE SOCIAL NETWORK YOU WANT TO USE] use.”
You can customize the prompt by changing the dialogue or background to suit the style and purpose of using the stickers. A detailed prompt will help AI create stickers that are lively, cute and more accurate.

4.4 Step 4: Wait for the system to process
After uploading the photo and entering the prompt, you need to patiently wait a few minutes for AI to analyze and create the image. This process includes recognizing the face, converting it into chibi style, adding borders and expressions as requested.
While waiting, you can prepare additional ideas such as adding dialogue, accessories or backgrounds for the stickers. Make sure not to turn off the browser or close the tab, because this may interrupt the processing process.
.jpg)
4.5 Step 5: Download the image
When AI finishes creating the stickers, you can preview the sticker set that has been generated. If you feel satisfied, click the Download button to save the stickers to your personal device.
This sticker set is now ready to use in conversations, share on social networks or even use to decorate your personal profile. Saving high-quality stickers will help you reuse them many times without having to recreate them from the beginning.
.jpg)
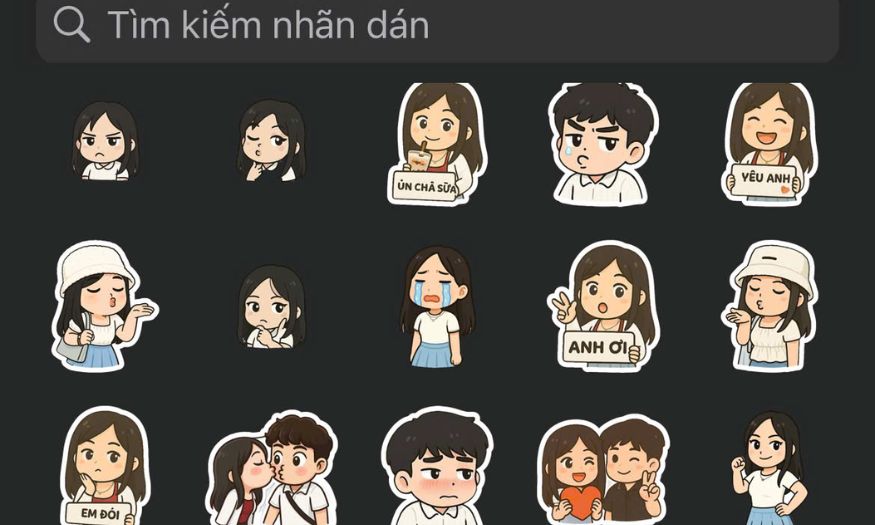
5. Upload stickers to the Messenger app
After completing the creation of personal stickers using AI, the next step is to add them to the Messenger app for use in conversations with friends and relatives. This will help you express your own personality, making messages more lively and fun. You can completely create your own exclusive sticker set that does not duplicate anyone else’s.
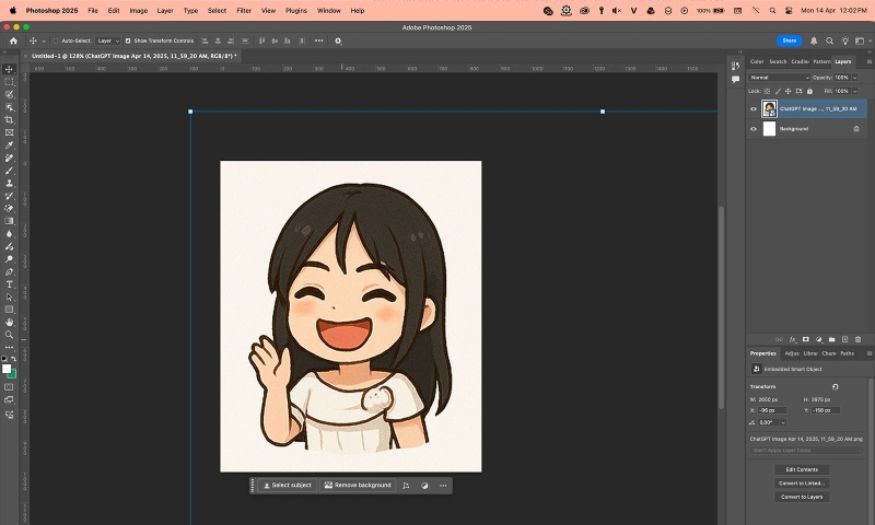
5.1 Step 1: Separate each sticker into an individual image
To add stickers to Messenger, first you need to separate each sticker into individual image files. You can use image editing software such as Adobe Photoshop, Canva, PicsArt or any similar tool to do this. This process includes cutting each sticker from the overall sticker set, ensuring each one is a complete sticker.
After separating them, save each sticker in PNG format (transparent background) or JPG format (colored background) as you like. PNG format is often preferred because it preserves transparency, helping stickers display beautifully on Messenger’s chat background. Once the stickers have been separated and saved individually, you will easily add them to your personal collection in the app.
5.2 Step 2: Add images to Messenger
Next, transfer all separated sticker files to your phone. You can use a cable, Google Drive, Dropbox or other sharing tools to ensure the images are fully uploaded and retain high quality.
Open the Messenger app and choose any conversation. Tap the sticker icon, then select the “+” or “Add” sign in the upper corner to create a new sticker collection. Next, add each sticker image one by one to your personal collection. During this process, you can also edit effects, add borders or adjust the size if desired, then tap “OK” to complete. Your personal sticker set is now ready to use in every conversation.
6. Tips for creating cute and unique personal stickers
To make personal stickers truly cute and outstanding, adding personalized details is something that cannot be ignored. You can add characteristic accessories such as glasses, hats, bunny ears or favorite items so the sticker reflects your style correctly. These small details will create a close, lively feeling and help the sticker become more unique compared to the common stickers already available.
In addition, try creating rich expressions for the stickers. Not only smiling, sad or angry, you can add humorous, surprised expressions, or even cute actions such as waving, dancing or winking. When stickers carry many emotions, your conversation will become more interesting, lively and much more personalized.
Choosing bright and harmonious colors is also an important secret to making stickers look eye-catching. Gentle pastel colors or bright color tones will make stickers cute and suitable for many different chat backgrounds. At the same time, you should keep the style consistent across the entire sticker set, from colors and borders to small details, so the sticker set looks more professional and attractive.
Another tip is to make use of dialogue and fun icons on the stickers. Adding short, cute sayings or small emotion icons will make the stickers more vivid and able to “communicate” with other users. These dialogues should match the personality and purpose of using the stickers, helping the conversation become more lively and interesting.
7. Suggested prompts for creating cute stickers
7.1 Suggested Vietnamese prompts
Create a 3D kawaii sticker set on a 10:16 frame, including nine chibi stickers with various outfits, poses and expressions. Use the attached reference image. Each sticker has a white border and speech bubbles with sayings such as: “Hello!”, “So cute!”, “Let’s play!”, “Hihi”, “So full of life!”. The background is a gentle white-to-pastel pink gradient, creating a cheerful and positive feeling, suitable for Facebook.
Design a personal chibi 3D style sticker set on a 10:16 canvas, each sticker carrying a different cute expression and adorable outfit. Add a white border and bubble text with sayings: “Hello!”, “I’m so happy!”, “Let’s be together!”, “Hahaha”, “So adorable!”. The background is a pastel blue gradient, creating a fun atmosphere, suitable for Instagram.
Create a 3D sticker set consisting of 9 small chibi characters, each character with a different pose and outfit, pastel colors. Stickers have white borders and speech bubbles with dialogues: “Hi everyone!”, “I’m so hungry!”, “Let’s take a photo!”, “Yay!”, “I like you!”. The background is a soft pastel purple gradient, creating a cute feeling, suitable for TikTok.
Design 9 chibi stickers in 3D style, each sticker with a different expression and cute outfit. White border with bubble text: “Good morning!”, “So delicious!”, “Let’s study!”, “Hehe”, “I’m happy!”. The background is a light pastel orange gradient, creating a cheerful and positive feeling, suitable for Messenger.
Create a 3D chibi sticker set consisting of 9 characters, diverse expressions and cute outfits. Each sticker has a white border and speech bubble: “Hello!”, “I want ice cream!”, “Let’s hang out!”, “Haha”, “So full of life!”. The background is a pastel green gradient, creating a bright atmosphere, suitable for Zalo.
7.2 Suggested English prompts
Create a 3D kawaii set on a 10:16 canvas, featuring nine chibi-style stickers in various outfits, poses, and expressions. Use the attached image for reference. Each sticker has a white border and includes a speech bubble with phrases like: “Hello!”, “So cute!”, “Let’s play!”, “Hehe”, “Feeling happy!”. Set on a soft pink-to-white gradient background for a fun, positive vibe, perfect for Facebook use.
Design a personal 3D chibi sticker set on a 10:16 canvas, each sticker showing a different cute expression and outfit. Include a white border and bubble text with: “Hi there!”, “I’m so happy!”, “Join me!”, “Hahaha”, “Adorable!”. Background is pastel blue gradient, cheerful and fun, perfect for Instagram.
Create a 9-piece 3D chibi sticker set, each character with unique poses and outfits, pastel colors. Each sticker has a white border and speech bubble saying: “Hey everyone!”, “I’m hungry!”, “Let’s take a photo!”, “Yay!”, “I like you!”. Background is soft purple pastel gradient, cute and friendly, ideal for TikTok.
Design 9 chibi 3D stickers, each with different expressions and cute clothes. White borders and bubble text: “Good morning!”, “Yummy!”, “Let’s study!”, “Hehe”, “I’m happy!”. Background is pastel orange gradient for a cheerful, positive vibe, perfect for Messenger.
Create a 3D chibi sticker set of nine characters, with diverse expressions and outfits. Each sticker has a white border and speech bubble: “Hello!”, “I want ice cream!”, “Let’s go out!”, “Haha”, “Feeling awesome!”. Set on a pastel green gradient background, bright and cheerful, perfect for WhatsApp.
8. Conclusion
With the simple steps above, you can completely create an exclusive sticker set carrying your own image and personality by yourself. Not only for messaging, these stickers can also become an interesting highlight on social networks, making your conversations more lively and fun. The way to create personal stickers using ChatGPT not only helps you express yourself but also opens up a new and creative way of interaction in the digital world, where every idea can become reality in just a few minutes.


VIP Products


Best Selling Products
Autodesk All App Account Copyright
120 USD
Upgrade Duolingo Super
29 USD
Freepik Premium Account
59 USD
Copyright Adobe Lightroom Account
59 USD
Upgrade Genuine Office 365
49 USD
Genuine Cheap Canva Pro
39 USD
Genuine Adobe Illustrator account
99 USD
Upgrade genuine Capture One account
120 USD
Plugin Retouch4me
69 USD
Capcut Pro 1 Year
39 USD
Windows 10 & 11 Pro Key
36 USD
ChatGPT Plus Account (GPT-4)
16 USD
MidJourney Account
29 USD
Adobe Photoshop Copyright - Full App
120 USD
Adobe Premiere Pro Account
99 USD